AWS for M&E Blog
Processing user-generated content using AWS Lambda and FFmpeg
In this post, we introduce a workflow to process media files stored in Amazon Simple Storage Service (Amazon S3) using AWS Lambda that doesn’t require copying files to Lambda’s local storage. Lambda is equipped with temporary storage space of 512 MB, which is often not sufficient for media processing. At the same time, Lambda can be configured to mount an Amazon Elastic File System (Amazon EFS). This approach, however, involves re-architecting the storage workflow (Amazon S3 and/or Amazon EFS), setting up and managing other services like Amazon Virtual Private Cloud (Amazon VPC), and may incur additional cost.
Instead of copying media files locally for processing, we put together a workflow to use Lambda’s memory space. Lambda functions can be configured with up to 10240 MB of memory, which makes the workflow well suited for processing user-generated content (UGC). UGC is any content created by individuals and is usually characterized by small or capped file sizes. For workloads dealing with larger media files beyond Lambda’s memory capacity, mounting an Amazon EFS file system should still be considered.
The workflow presented here can be used for a number of UGC processing use cases such as:
- changing the media file format or container (re-packaging / re-wrapping)
- clipping media files
- converting audio-only files to audio/video (A/V) by inserting a video stream of a slate, black frames, or even a waveform
- converting variable frame rate (VFR) audio to constant frame rate (CFR) audio, which is the use case we demonstrate in this post
Depending on the recording device, UGC is sometimes captured with VFR audio (with smartphones, for instance). VFR audio may often lead to audio sync issues in media workloads. In this post, we build a demo that processes UGC and converts audio from VFR to CFR. The Lambda function we use can be used as a pre-processing stage for larger workloads. We use FFmpeg to process the audio stream, but the same concept may work with other media processing tools as well.
A foundational knowledge of Lambda, Amazon S3, AWS Identity and Access Management (IAM), FFmpeg, Boto3, and Python scripting language is recommended to build this workflow.
Overview of the code
First is the FFmpeg command we run in the Lambda function, where the output is not copied to a local file but instead sent to the standard output (stdout). The FFmpeg command used to convert audio VFR to CFR is similar to the following:
Parameters explanation:
- “<source-file>” is a presigned URL to the Amazon S3 object. For this demo, we are only considering mp4 files as sources.
- “-f mpegts” represents the format of the output.
- “-c:v copy” is telling FFmpeg to copy the video “as is” from input to output. Basically, we are only processing the audio in this demo.
- “-af aresample=async=1:first_pts=0” is the Resampler audio filter with “async=1” option that converts audio to CFR. The “first_pts=0” option is used to pad the audio stream to start at the beginning in sync with the video. UGC could be captured by certain devices with audio starting behind the video.
- The “-” at the end of the command sends the FFmpeg output to stdout.
We use the “mpegts” output format because FFmpeg requires a seekable output format when writing to stdout – or generally speaking, to a pipe. Note that a pipe (in Unix-like systems) is a buffer created in memory that acts as communication channel to connect multiple processes or programs. A relevant discussion about this topic can be found on Stack Overflow here.
Running the preceding command using Python “subprocess”, the FFmpeg output is captured by the subprocess stdout, which is defined as a pipe (subprocess.PIPE).
The FFmpeg output held in subprocess stdout (p1.stdout) will then be passed to Boto3 Amazon S3 client as the “Body” parameter of put_object() method:
Set up the workflow
Note: Choose an AWS Region where all services are available to build the workflow.
1. Amazon S3 and IAM configuration
Using the Amazon S3 console, create two buckets: one for media source files (ugc-source-bucket) and the other for destination files (ugc-destination-bucket).
In the IAM console, create a role for Lambda (lambda-ugc-role) that grants access to read from the Amazon S3 source bucket and write to the Amazon S3 destination bucket. Lambda also needs access to Amazon CloudWatch Logs for troubleshooting purposes. The following is an example of a Lambda policy with the minimum permissions required for this demo:
Note: Update the Amazon S3 bucket names based on your own chosen bucket names.
2. Create the Lambda FFmpeg layer
Before we start, make sure you are familiar with the terms of FFmpeg license and legal considerations as listed here. In addition, the FFmpeg static build used in this demo is licensed under GPLv3 as mentioned here.
First, we must create a zip package for the Lambda layer that contains the FFmpeg binary. Here is a summary of the steps required to create the FFmpeg package and the Lambda layer. To create the package, you can use an EC2 instance running the same Amazon Machine Image (AMI) used by Lambda (as listed here):
- In your working directory, download and unpack the latest static release build of FFmpeg for Linux amd64 from https://johnvansickle.com/ffmpeg/. Instructions are provided in the FAQ of the page and are in the following section for convenience.
- The FFmpeg binary is located in the folder “ffmpeg-4.3.1-amd64-static” (because version 4.3.1 is the latest release available at the time of this post)
- Create a ZIP package for the Lambda layer as follows:
- Upload the resulting ffmpeg.zip package to Amazon S3, then create a new Layer in the Lambda console pointing to the package as we did in the following image. For this demo, we only need the “Python 3.8” runtime, however you can optionally add other Compatible runtimes from the drop-down list to the Layer configuration.
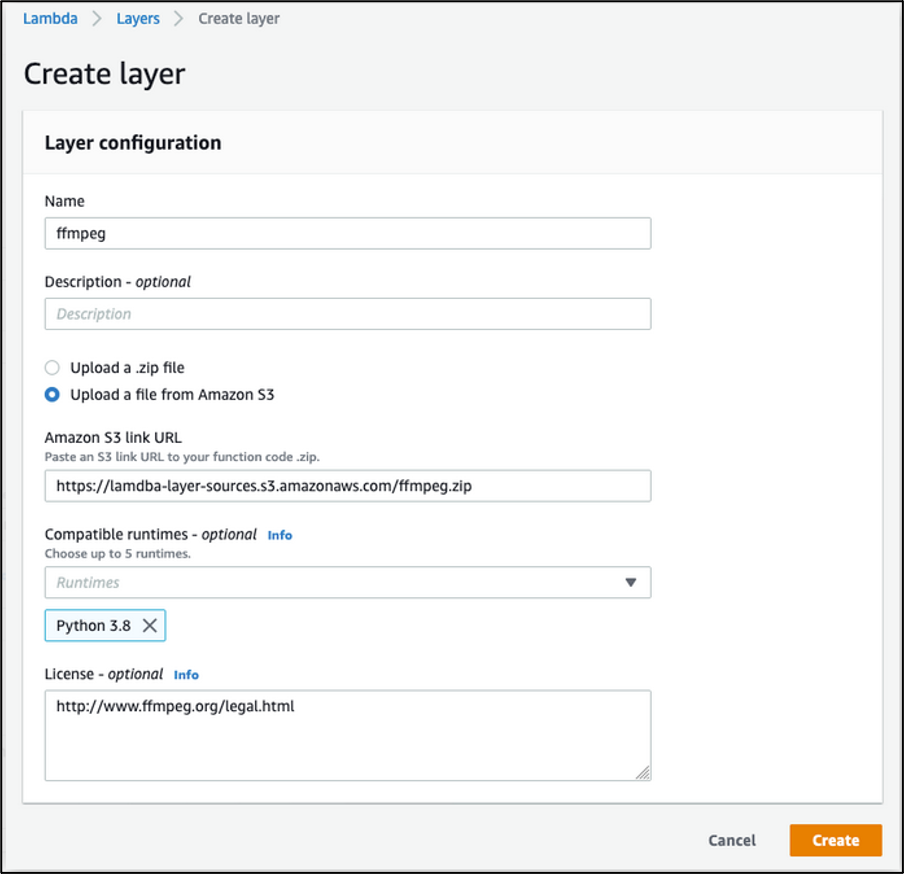
Creating a Layer for FFmpeg in Lambda console: input a Name for the Layer and an optional Description. Select Upload a file from Amazon S3 then input the Amazon S3 link URL to the ffmpeg.zip package. From Compatible runtimes drop-down, select “Python 3.8”. You can optionally input information about License, then choose “Create”
3. Create the Lambda function
You can now create a new Lambda function in the console: choose the Author from Scratch option, fill in the Basic information, and choose Create function.
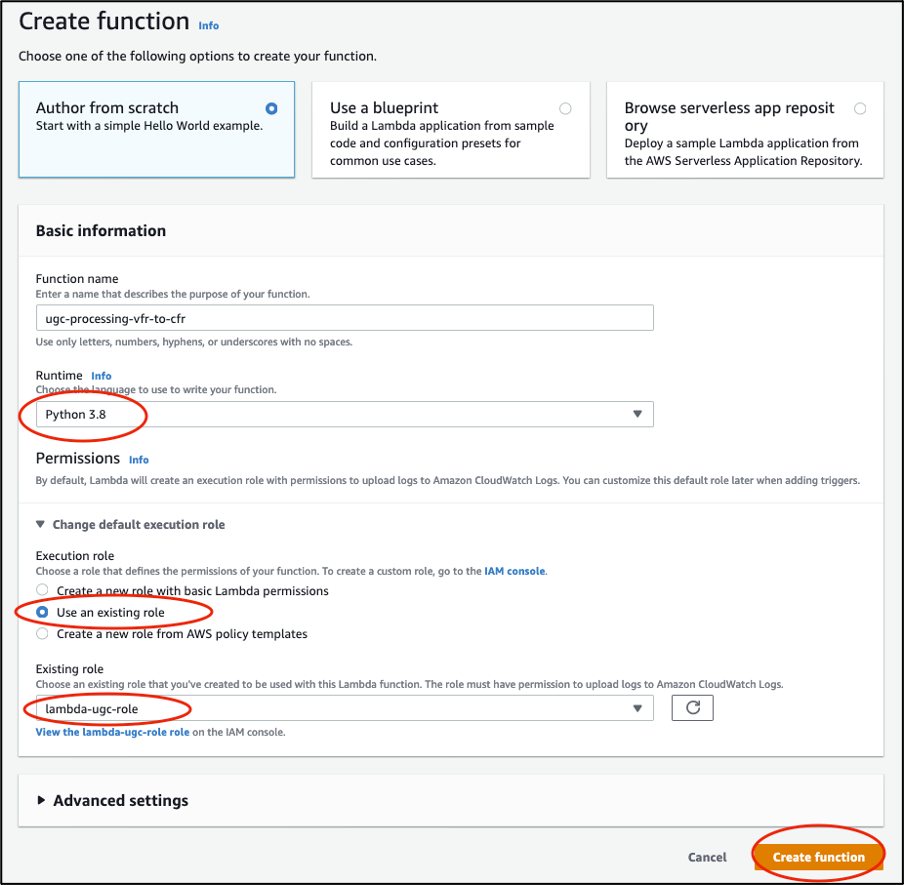
Authoring a Lambda function from scratch in Lambda console: choose Author from scratch. Input the Function name and select “Python 3.8” under Runtime. For Permissions, choose Use an existing role and choose the role we created in first step, then choose create function
Once the Lambda function is created, choose Layers and then Add a layer. Choose Custom layers. Select “ffmpeg” from the drop-down list under Custom layers and the Version, then select Add.
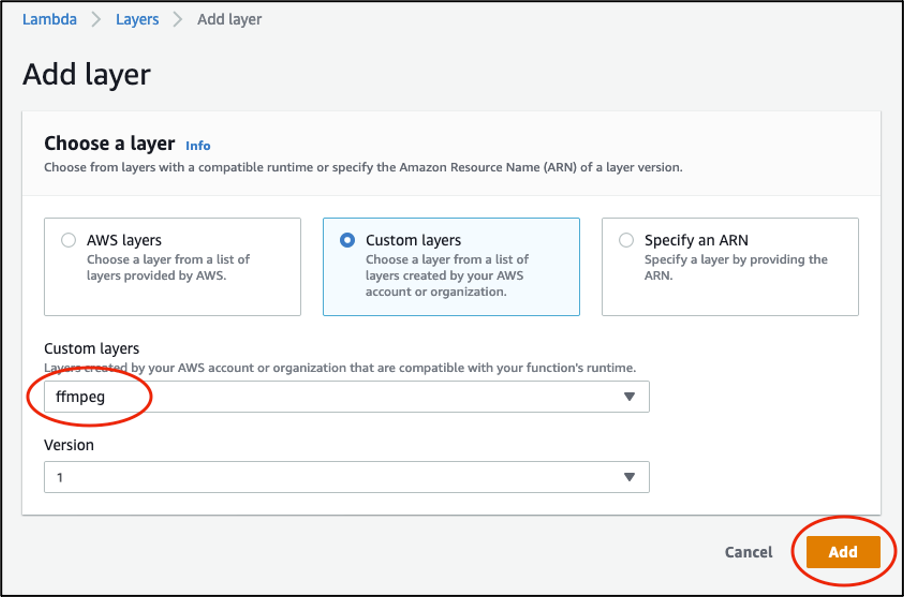
Adding FFmpeg layer to the Lambda function in the console: select Custom layers. Select “ffmpeg” from the drop-down list under Custom layers and the Version, then choose Add.
Then add your Amazon S3 source bucket as a trigger by choosing + Add trigger and select S3 aws storage. Enter the “.mp4” suffix to limit Lambda invocations to mp4 files only. Read the Recursive invocation section, and acknowledge by checking the box, then choose Add.
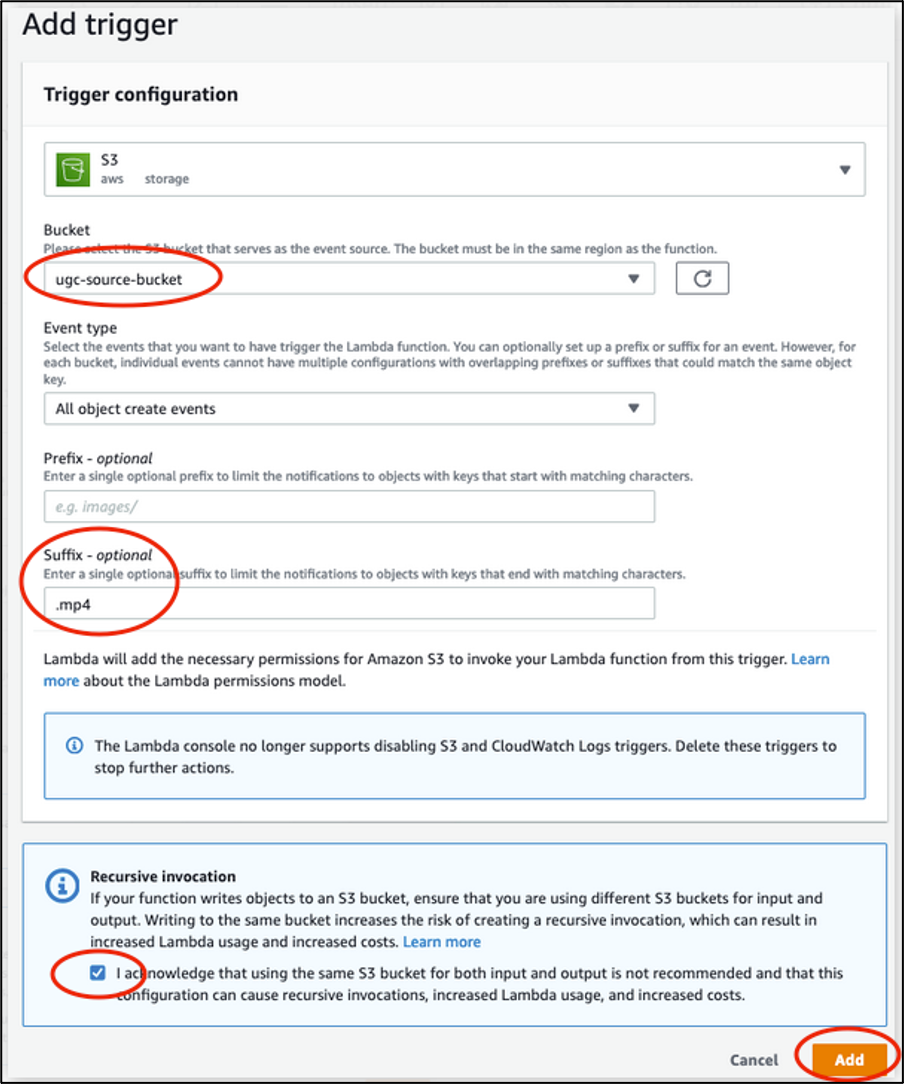
Adding an Amazon S3 trigger from the source bucket to the Lambda function in the console: under Bucket, select the source bucket. Select “All object create events” for Event type. Input “.mp4” as Suffix. Read the Recursive invocation section, and acknowledge by checking the box, then choose Add.
Next, edit the Basic settings of the Lambda function to increase the Memory and Timeout values. Select 2240 MB memory and 1-min timeout for this demo. These values might differ for other processing types. We discuss the Memory needs for this demo in the “Testing and Results” section that follows.
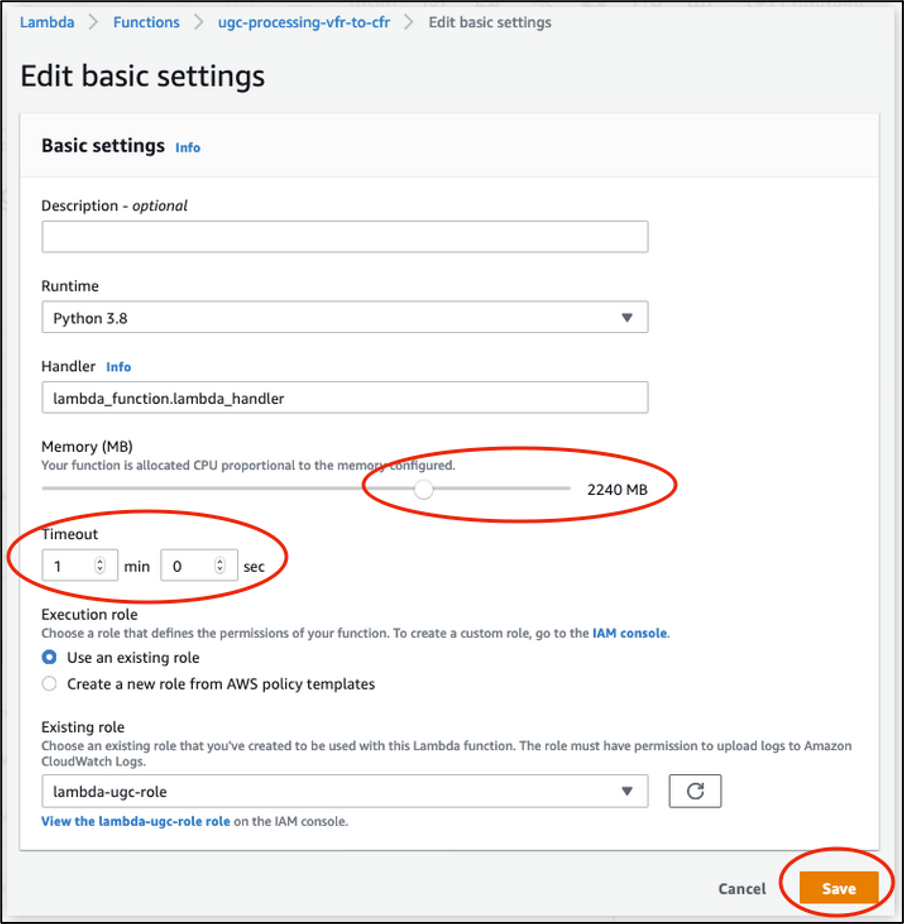
Editing basic settings of the Lambda function to increase Memory and Timeout values: move the slider to set Memory size to 2240 MB and input “1 min 0 sec” for Timeout, then choose Save.
Finally, copy the following Python script to the Function code.
Testing and results
The workflow is now ready for processing. You can test it by uploading an mp4 source file to Amazon S3 ‘ugc-source-bucket’. The FFmpeg output is then stored in ‘ugc-destination-bucket’. The Lambda invocation logs can be found in the Amazon CloudWatch service console; choose Log groups from the left side pane, and then choose the Log group of the function, which has the following name pattern “/aws/lambda/<function-name>”.

Identifying the Log group of Lambda function in CloudWatch console using the pattern “/aws/lambda/”
Each invocation of the Lambda function adds logs to a Log stream inside the Log group of the function. You can review invocation logs and stats of the invocation in the Log stream to troubleshoot any errors, or if you added additional debug messages to the code. For instance:
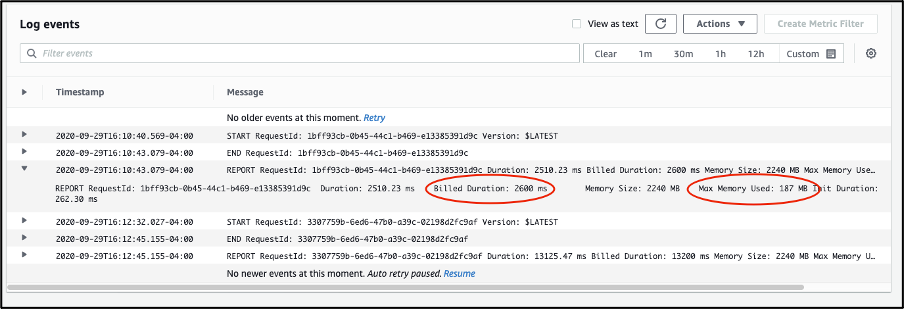
Example of Lambda function invocation logs in CloudWatch console: you can find in the Log stream code errors and debug messages. For each invocation, you can read the Billed Duration and Max Memory Used values.
We tested three source files of varying sizes using the workflow and captured the following results:

As expected, the maximum memory used by Lambda increases linearly with the size of the source file. The relationship between the two can be approximated to 2x source file size in addition to 120-140 MB of processing overhead. This is because both the source and output files have about same sizes, as we only processed the audio in this demo.
We estimate the current memory configuration of 2240 MB to work with sources up to or slightly larger than 1 GB in size. The Lambda maximum memory allocation size of 10240 MB is expected to allow processing source files up to around 4GB in size, considerably larger than the 512 MB available under Lambda’s /tmp directory. Note that these observations are only relevant to processing audio in mp4 files. For other content or processing types, make sure you test sufficiently to estimate your own Lambda memory requirements.
Cleaning up
To avoid incurring future charges, delete the resources and more specifically the Amazon S3 objects and CloudWatch invocation Log group used for these tests.
Conclusion
In this post, we introduced a workflow to process UGC on AWS Lambda using FFmpeg and that works around the 512 MB limitation of Lambda’s local temporary storage. We presented a demo to process VFR audio and convert it to CFR audio. We also discussed Lambda memory requirements for the workflow.
For additional details around UGC handling and processing, in addition to enabling Video on Demand (VOD) workflows on AWS, we recommend the following resources:
- 2020 Resolution: Add User-Generated Content to Your Applications (https://aws.amazon.com/blogs/media/2020-resolution-add-user-generated-content-to-your-applications/)
- Using Amazon EFS for AWS Lambda in your serverless applications (https://aws.amazon.com/blogs/compute/using-amazon-efs-for-aws-lambda-in-your-serverless-applications/)
- Video on Demand on AWS (https://aws.amazon.com/solutions/implementations/video-on-demand-on-aws/?did=sl_card&trk=sl_card)
- AWS Lambda quotas (https://docs.aws.amazon.com/lambda/latest/dg/gettingstarted-limits.html)
- Create mp4 file from raw h264 using a pipe instead of files (https://stackoverflow.com/questions/55698581/create-mp4-file-from-raw-h264-using-a-pipe-instead-of-files)