AWS Robotics Blog
Run any high-fidelity simulation in AWS RoboMaker with GPU and container support
This blog references AWS RoboMaker Integrated Development Environment (IDE), a feature that has been deprecated. To follow along with this blog post, use the AWS Cloud9 IDE. See our updated blog on how to Build and simulate robotics applications in AWS Cloud9.
Introduction

High-fidelity simulations have more polygons rendered per object, which gives objects more detail, more texture, and improved lighting and shadows, making the simulation more realistic. Robotics developers can test and train perception models more accurately in simulations that closely mimic the real world vs. simulations that are less realistic. High-fidelity simulation also makes it possible to generate realistic synthetic images for training machine learning models, reducing the need to capture images from the real world and speeding up model development. To support high fidelity simulation, AWS RoboMaker now supports GPU-based simulation jobs designed for compute intensive workflows, such has high-fidelity simulation. GPU-based simulation also supports faster frames-per-second, more responsive interactivity with the simulation, and improved sensing performance for cameras and laser scanners. These capabilities further reduce the gap between simulation and the real world. Previously, AWS RoboMaker simulation jobs ran only on Central Processor Units (CPU), now you can choose to add a GPU for your simulation job.
Additionally, AWS RoboMaker now provides flexibility to use the robot software and simulator of your choice, making it possible to use simulators such as CARLA, Ignition, Drake or Nvidia Isaac Sim, with high -fidelity rendering engines such as Unity or Unreal Engine to run simulations in AWS RoboMaker. Developers can build an Open Container Initiative (OCI) compliant container using Docker or a similar build tool, with their choice of simulator and rendering engine, upload it to Amazon Elastic Container Repository (ECR), and use it as their simulation application. Now, developers can use the robot software and simulator that aligns to their use case. Developers can still use ROS in their robot applications, including older version such as ROS Kinetic, removing the need to upgrade their systems, or newer versions such as ROS2 Galactic, or they can run custom robot applications without using ROS.
To summarize, AWS RoboMaker has released features which provide:
- GPU based compute – Enable developers to run simulations using a GPU for high-fidelity simulations, vision processing and machine learning.
- Choice of simulator – Enable developers to use any simulator to run simulations in containers stored in Amazon Elastic Container Repository (ECR)
- Flexibility of robot software – Enable developers to run custom robot applications or run custom ROS versions such as older ROS distributions, also in containers stored in ECR
Next, we walk through the process of building, uploading and running a container with a high-fidelity simulation in AWS RoboMaker.
Tutorial
This tutorial has three parts explained in detail
- Part 1 – Build a sample container
- Part 2 – Upload the container to Amazon Elastic Container Registry (ECR)
- Part 3 – Start an AWS RoboMaker simulation with the container and GPU
Prerequisites
An AWS account with permissions for AWS RoboMaker and Amazon ECR access.
Part 1 – Build a sample container
The container we are going to build and run is based on the CARLA open source autonomous driving simulator, which uses the Unreal Engine 4 for high-fidelity graphics.
1.1 – Create a development environment
To get started with this tutorial, we’re going to create an AWS RoboMaker integrated development environment (IDE). From the AWS RoboMaker menu, select Development Environments then Create environment.

Name your environment carla-env, choose Foxy (Latest) as your ROS distribution and m4.xlarge as the instance type, then click Create.

After a few seconds, you should see the development environment appear.

1.2 – Build the container image
In the lower window pane of the development environment, use a bash terminal to create a new folder called “carla-examples”.
In upper window pane of the development environment, create a new file and copy the following contents into that file:
Save the file as Dockerfile to the carla-examples folder and build the container image.
Part 2 – Upload the container to Amazon Elastic Container Registry (ECR)
2.1 – Create a repository in ECR to store the container image
In the bash terminal, use the AWS Command Line Interface (CLI) to create a repository in ECR for our container image.
The command will return a JSON structure that includes the “repositoryUri” value. Use that value to log in to ECR.
You should receive the response Login Succeeded.
2.2 – Upload the container image to ECR
Tag the image with the same <repositoryUri> as before.
Upload (push) the image to ECR
Part 3 – Start an AWS RoboMaker simulation with the container and GPU
For the final part of this tutorial, open a tab to the AWS RoboMaker console.
On the left side menu, choose Simulation jobs, then click Create simulation job.
On the Configure simulation page, select General as the Robot software suite. This is a new feature that enables custom containers.
Choose Create new role and “robomaker-simulation” as your IAM role name.
For Compute types, choose CPU and GPU to add a GPU to your RoboMaker simulation. Select Next to continue.

On the Specify robot application screen, choose None for robot application, then Next to continue.

Next, on the Specify simulation application screen, select Create new application.
Name the application “carla-examples-sim” and select Simulation runtime as the Simulation software suite.

Select Provide a Provide container image for an environment. Then select Browse ECR to locate the container repository you created earlier, and choose the latest version.
For the launch command, use “./CarlaUE4.sh -opengl” and check the box next to Run with streaming session.

Add two terminals (xterms) to the simulation session, so that we can interact with it. To add the xterms, select Customize tools, then Add tool.

In the Add tool window, set Tool name to “xterm” and Command to “/usr/bin/xterm”.
In the Exit behavior list select Restart and in the Output Settings select Enable UI streaming. Then select the Add tool button to continue.

Repeat the Add tool steps above to add a 2nd terminal called “xterm2”, with “/usr/bin/xterm” and the rest of the options the same as the first terminal.

Scroll to the bottom of the screen and choose Next.
Finally, on the next screen review that all the fields look correct, and choose Create. This will launch your simulation job.

It will take a few minutes to start the job. After the job is created, view the simulation by clicking on the Simulation application Connect button.

The CARLA UE4 application will appear in a new browser window.

Navigate the camera view around the simulation using the keyboard; ‘w’ moves forward, ‘s’ moves back, ‘a’ moves left, and ‘d’ moves right.
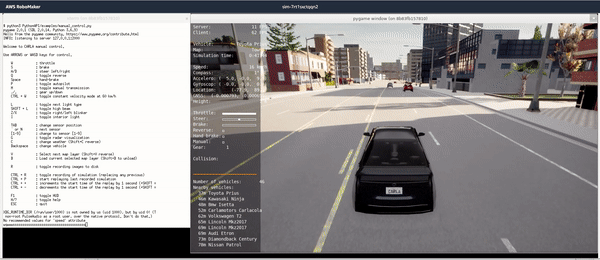
The city simulation starts out empty, to add vehicles and pedestrians to it, open the xterm application by clicking Connect.
In the xterm window, run the spawn_npc.py script. The option ‘-n 50’ is the number of vehicles to spawn, 50.
There should now be 50 vehicles and some pedestrians moving in the simulation.

Now that we have vehicles moving, we’ll add a vehicle to the simulation that we can control and drive around the city.
Open the second terminal ‘xterm2’ by clicking Connect.
Within the terminal, start the manual_control.py script to spawn a vehicle in the simulation that you control.
A new window will appear with a vehicle ready to drive. Drag and resize the windows to place them side by side.To control the car using the keyboard; accelerate with ‘w’, turn left with ‘a’, turn right with ‘d’, and brake with ‘s’.

In an autonomous driving scenario, instead of driving the car manually, you can add a robot application as a second container to control the car. In this way you can test your autonomous driving application.
This concludes the tutorial, which explained how to run the CARLA autonomous driving simulator in AWS RoboMaker, add vehicles to the city, and drive a car in the simulation.
Conclusion
In this blog, we introduced AWS RoboMaker features that make it possible to use any robot simulator and robot software to run high fidelity GPU based simulation jobs. We then walked step-by-step through a tutorial showing how to run a CARLA autonomous driving simulator in AWS RoboMaker using these new features. To learn more about these features contact us. (robomaker-bd@amazon.com)