To keep pace with innovation on Amazon Web Services (AWS), many customer-application teams experiment with publicly available software packages that may have known vulnerabilities that can expose your environments to different threats. In this blog post, we discuss an operation that reduces the risk of downloading new packages from public repositories.
There are three common implementations when working with public repositories:
- Using a public repository directly.
- Using a hybrid repository that contains internal packages and a proxy to a public repository that acts as an extension.
- Using an isolated, internal repository.
Using a hybrid repository or a public repository directly can result in downloading vulnerable software packages, but an internal repository gives you full control over the software packages. Manual software composition analysis (SCA) procedures, however, may slow down the development speed. Hence we use an automated pipeline that can initiate a download-scan-upload procedure.
Overview
The following steps automate a vulnerability scan of a new public package:
- Capture events when adding new packages into the application’s
requirements.txt file.
- Process the changes, and verify that the package does not exist in the current AWS CodeCommit repository.
- AWS CodeBuild downloads the package, scans it, and uploads to the internal repository.
- If the package (or package dependencies) contains any vulnerabilities, the build fails and generates a detailed report.
Figure 1 shows the architecture and flow of automation.
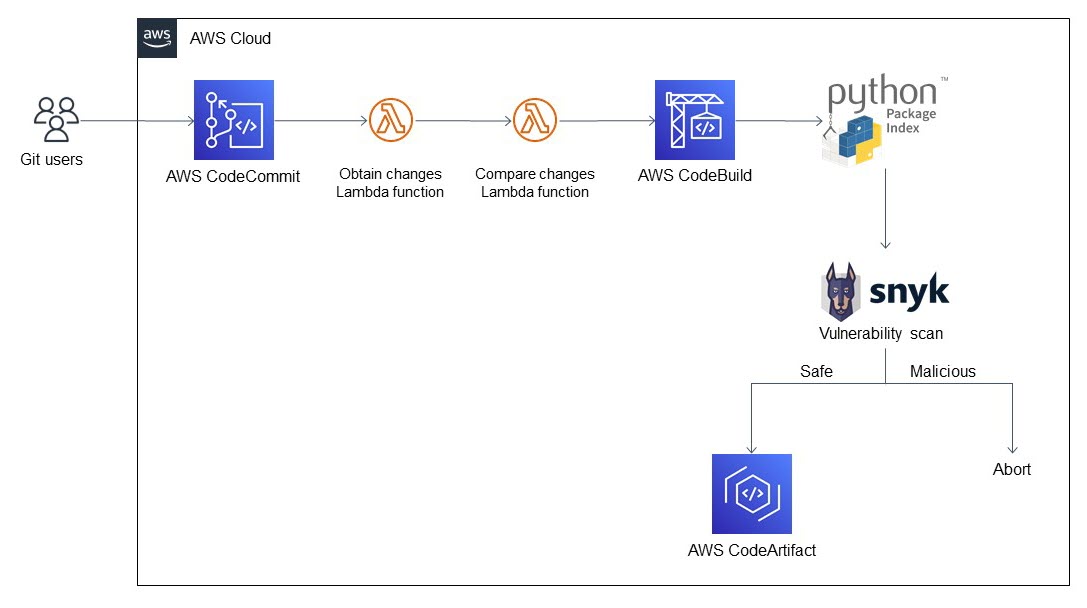
Figure 1. Architecture diagram for software-composition analysis
Architecture flow
- A new or updated package is added to the requirements file (for example, in Python, it is
requirements.txt)
- After you commit and push your changes to the AWS CodeCommit repository, a trigger invokes the obtain-changes Lambda function. The function contains Python code that extracts only the changes, which avoids the overhead of working through the dependency list.
- The obtain-changes Lambda function triggers the compare-changes Lambda function, which compares your changes to the existing repository.
- If the package already exists, there are no further actions.
- Otherwise the compare-changes Lambda function invokes an AWS CodeBuild project.
- AWS CodeBuild takes the added or changed packages and downloads them from the public repository (in this case, Python uses
pypi.org) into a sandbox container.
- Snyk scans the packages for known vulnerabilities.
- If the scan succeeds, it is uploaded to AWS CodeArtifact and ready for use.
- If the scan fails, a detailed report is generated for further investigation.
Prerequisites
Before getting started, ensure that you have the following:
- An AWS account. Use a Region that supports AWS CodeCommit, AWS CodeBuild, and AWS CodePipeline. For more information, see AWS Regional Services.
- A basic understanding of the following AWS Services:
- AWS CodeBuild
- AWS CodeCommit
- AWS CodeArtifact
- AWS Lambda
- AWS Systems Manager Parameter Store
- A Snyk account (note that Snyk is third-party software).
- A basic understanding of Python.
- A basic understanding of Git.
- A basic understanding of CDK environments.
Walkthrough
Code overview
The Python code in this post was written using the AWS CDK. To view the code, see the associated GitHub repository. If you’re unfamiliar with AWS CDK, see Getting started with AWS CDK.
For the deployment, use an AWS CDK construct in the code base iac/iac/constructs/ci.py and the AWS CDK stack iac/iac/stacks/stack.py. The construct requires the following parameters:
- Parameter Store name of the Snyk organization ID.
- Parameter Store name for the Snyk authentication token.
- (Optional) Parameter for the AWS CodeCommit repository name.
For more information about authenticating Snyk, see Authenticate the CLI with your account. Set up your organization ID and authentication token before deploying the stack—because these are confidential and sensitive, deploy them as a separate stack or manual process. In this solution, the parameters are stored as a SecureString parameter type and encrypted using AWS Key Management Service (AWS KMS). For more information, see AWS KMS keys concepts.
In the Snyk console, create the organization ID and authentication token. To add these parameters, navigate to the Settings page, and choose General, as shown in figure 2.

Figure 2. Snyk settings
Navigate to the AWS Systems Manager Parameter Store, choose the Overview tab, and retrieve the parameter names, as shown in figure 3.

Figure 3. Parameter names for SnykAuth
SCA scanning
AWS CodeBuild uses Snyk to trigger an SCA scan (we use the open-source versions of Snyk). Because this solution is modular, you can integrate your own SCA tool. If there are any vulnerabilities, the build fails and uploads the output to Amazon Simple Storage Service (Amazon S3). If there are no vulnerabilities, it proceeds to the next stage.
Deploying
Clone the CDK code from the GitHub repository:
git clone https://github.com/aws-samples/software-composition-analysis
Navigate to the iac directory of the cloned repository, and run the following command:
cdk deploy
--parameters CodeCommitName=<name-of-codecommit-repo> \
--parameters SnykOrgId=<value> \
--parameters SnykAuthToken=<value>
Note: The parameters are optional. If they are unspecified, default values are used. The values of SnykOrgId and SnykAuthToken parameters are the names of AWS Systems Manager Agent (SSM Agent) parameters that contain the details in an encrypted string.
The previous command adds a new AWS CloudFormation template, which creates an AWS CodeCommit git repository to hold the source code, a CodeBuild server, a CodeArtifact repository to hold the scanned packages, and two Lambda functions.
Run the scan
In this solution, the AWS CodeCommit repository is initially empty. Create a requirements.txt file, and populate it with packages and versions:
django==2.2.0
flask==2.0.1
Commit your changes to any branch. By default, the solution is triggered by changes to any branch. For more information, see Connect to an AWS CodeCommit repository. If you want to limit the pipeline for certain git branches, modify the following line accordingly:
self.codecommit_repo.notify(arn=self.calc_changes_lambda.function_arn,
name="lambda-trigger",
branches=<YOUR BRANCH(s))
For more information, see the API reference. An output of the previous example would fail and generate the following output:
[Container] 2021/08/12 12:46:10 Entering phase POST_BUILD
--snipped for readability--
Snyk found vulnerabilities, Aborting
[Container] 2021/08/12 12:46:10 Command did not exit successfully
[Container] 2021/08/12 12:46:10 Phase complete: POST_BUILD State: FAILED
This happens because Django version 2.2.0 has known vulnerabilities. To fix this, choose the latest version of Django.
Note: At the time of writing, version 3.2.7 contained no known vulnerabilities.
django==3.2.7
flask==2.0.1
When you push your changes to AWS CodeCommit, the solution passes successfully.
Review the components
The first lambda function, trigger-changed-lambda, runs immediately and obtains the added or modified packages and versions. The code starts by inspecting the event details.
commit_hash = event['Records'][0]['codecommit']['references'][0]['commit']
repo_name = event['Records'][0]['eventSourceARN'].split(':')[-1]
branch_name = os.path.basename(str(event['Records'][0]['codecommit']['references'][0]['ref']))
Next, extract all of the branch changes. By default, this happens for all branches, as previously described, but you can limit it to specific branches.
response = codecommit.get_differences(repositoryName=repository_name,
                                      afterCommitSpecifier=last_commit_id,
                                      **extra_kwargs)
Finally, for each change, extract the file contents both before and after the change:
...
after_changes = set(codecommit.get_blob(repositoryName=repo_name, blobId=after_blob)['content'].decode().split())
...
before_changes = set(codecommit.get_blob(repositoryName=repo_name, blobId=before_blob)['content'].decode().split())
added_modified_packages = list(after_changes - before_changes)
This function passes the details to the second Lambda function, reqfile_to_artifact, with the following information:
return {
    'changed_packages': added_modified_packages,
    'commit_id': commit_hash
}
The reqfile_to_artifact Lambda function verifies that the modified packages are already stored in the internal artifact repository. This speeds up the process and avoids triggering a scan for existing packages.
...
response = ca_client.list_package_versions(
            domain=domain,
            domainOwner=domain_owner,
            repository=repository,
            format=lang_format,
            package=new_package,
            **kwargs
        )
...
for package, version in with_ver_reqlist.items():
    if package in missing_packages_from_repo:
        new_packages.append(f"{package}=={version}")
    elif with_ver_reqlist[package] in get_package_version(package):
        print(package, " same version already exists")
    else:
        print(f"{package}=={version}", "added (ver) to missing")
        new_packages.append(f"{package}=={version}")
It then creates a new requirements.txt file with only the changed packages and uploads it to Amazon S3 for further processing by AWS CodeBuild.
if new_packages:
   # Generate new requirements file with the changed packages
    file_name = f"requirements-{commit_hash}.txt"
    local_file_path = os.path.join("/tmp", file_name)
    with open(local_file_path, "w") as f:
        for item in new_packages:
            f.write(f"{item}\n")

   # Upload new file to S3
    upload_file(
        local_file_path, bucket, object_name=f"requirements_files/{file_name}"
    )

   # Initiate AWS CodeBuild project that will download the file and scan it.
    trigger_cb(file_name, commit_hash, project_name)
else:
    print("Nothing has been changed")
The following is the AWS CodeBuild buildspec.yaml:
---
version: '0.2'
env:
  parameter-store:
    SNYK_TOKEN: SnykAuth
    SNYK_ORG: SnykPSOrg
phases:
  install:
    commands:
    # Installing Snyk https://snyk.io/
    - echo 'Installing Snyk'
    - npm install -g snyk
  pre_build:
    commands:
    # Authorizing to Snyk using the predefined token
    - echo Authorizing Snyk
    - snyk config set api=${SNYK_TOKEN}
    # Downloading the requirements file, with the missing packages
    - aws s3 cp s3://cdk-stack-cdkciconstructartifactsbucket9d74b28d-61ufvwdffpxw/requirements_files/${REQ_FILENAME}
      .
  build:
    commands:
    # Installing the missing packages
    - echo Installing requiremnets
    - pip3 install -r ${REQ_FILENAME}
    # Scanning the packages using Snyk
    - echo Executing Snyk scan
    - snyk test --file=${REQ_FILENAME} --org=${SNYK_ORG} --package-manager=pip > results_output
  post_build:
    commands:
    # Alert and generate a report if any vulnerabilities are found
    - if [[ $CODEBUILD_BUILD_SUCCEEDING == 0 ]]; then
      echo '@@@@@@@@ Snyk found vulnerabilities, Aborting @@@@@@@';
      exit 255;
      fi
    - pip3 install twine
    - mkdir downloaded_pakacges
    - pip3 download -r ${REQ_FILENAME} -d downloaded_pakacges
    - aws codeartifact login --tool twine --domain dummy-domain --domain-owner 448328614092 --repository dummy-repo
    # Uploading the missing, scanned packages to Code Artifact
    - twine upload --repository codeartifact downloaded_pakacges/*
artifacts:
  files:
  - results_output
  name: results_output-$(date +%Y-%m-%d)
The AWS CodeBuild project contains the following subtasks:
- Installs and configures the Snyk CLI with your organization ID and token.
- Downloads the
requirements.txt file from Amazon S3 and installs its content into a sandbox.
- Runs a Snyk scan.
- If no vulnerabilities are found, CodeBuild uploads packages to the internal artifact repository.
- Otherwise, the build fails and uploads results to Amazon S3.
For the source code, see the associated GitHub repository.
Cleanup
To avoid accruing further costs for the deployed resources, run cdk destroy to remove them. The output of a successful deletion should look like the following:
Are you sure you want to delete: cdk-stack (y/n)? y
cdk-stack: destroying...
....
DELETION OF RESOURCES
....

 ✅  cdk-stack: destroyed
Conclusion
In this blog post, we showed you how to integrate SCA scanning with continuous integration and continuous delivery (CI/CD) procedures. The procedure is automated and transparent to developer teams, and your third-party software packages can be added to your internal repository after running the necessary security checks.
Download the sample code so that you can deploy this solution and get started on your own software-composition analysis. You can also modify and integrate the solution with different languages and package repositories. To increase the visibility of your scanning tool, we recommend Using Amazon CloudWatch metrics.
To submit feedback for this post, use the comments section.
About the authors
 Danny Gitelman
Danny is a DevOps architect at AWS. He helps customers understand, design, and implement scalable solutions. His passion is to impact the cultural perception of thought by adopting DevOps concepts that withstand operational and growth challenges along the way. In his free time, he’s probably playing VR games or cooking something tasty.

Daniel Begimher
Daniel is a senior security consultant who works with customers to help protect their cloud resources and data. He works with customers to mitigate and improve security by working backwards, getting to know the customer, and spotting potential vulnerabilities. Outside of work, you may find him playing with a new gadget, enjoying a video game, or traveling to explore new places and flavors.