AWS Database Blog
Replicate your data from Amazon Aurora MySQL to Amazon ElastiCache for Redis using AWS DMS
Caching enables the best user experience for real-time applications. You can build applications that provide sub-millisecond response times by storing the most frequently requested data in an in-memory cache like Redis.
On August 30, 2021, we announced the support for migrating your data from supported sources to Redis, Amazon ElastiCache for Redis, and Amazon MemoryDB for Redis as target databases using AWS Database Migration Service (AWS DMS). In this post, we talk about use cases and best practices when migrating data to an ElastiCache for Redis cluster.
Use case
Redis is an open-source, in-memory database that serves data to applications with minimal latency and high throughput. The two most popular caching strategies are write-through and write-around. In write-through, the application writes to the cache first and then to the backing data store. This is good for applications that frequently read directly after writing at the cost of a slightly higher write latency. In the write-around strategy, the application writes directly to the backing data store. This is good for data that may not be read frequently or at all, at the cost of cache misses for recently written data. Whatever strategy you select, there are associated application changes to support the caching layer.
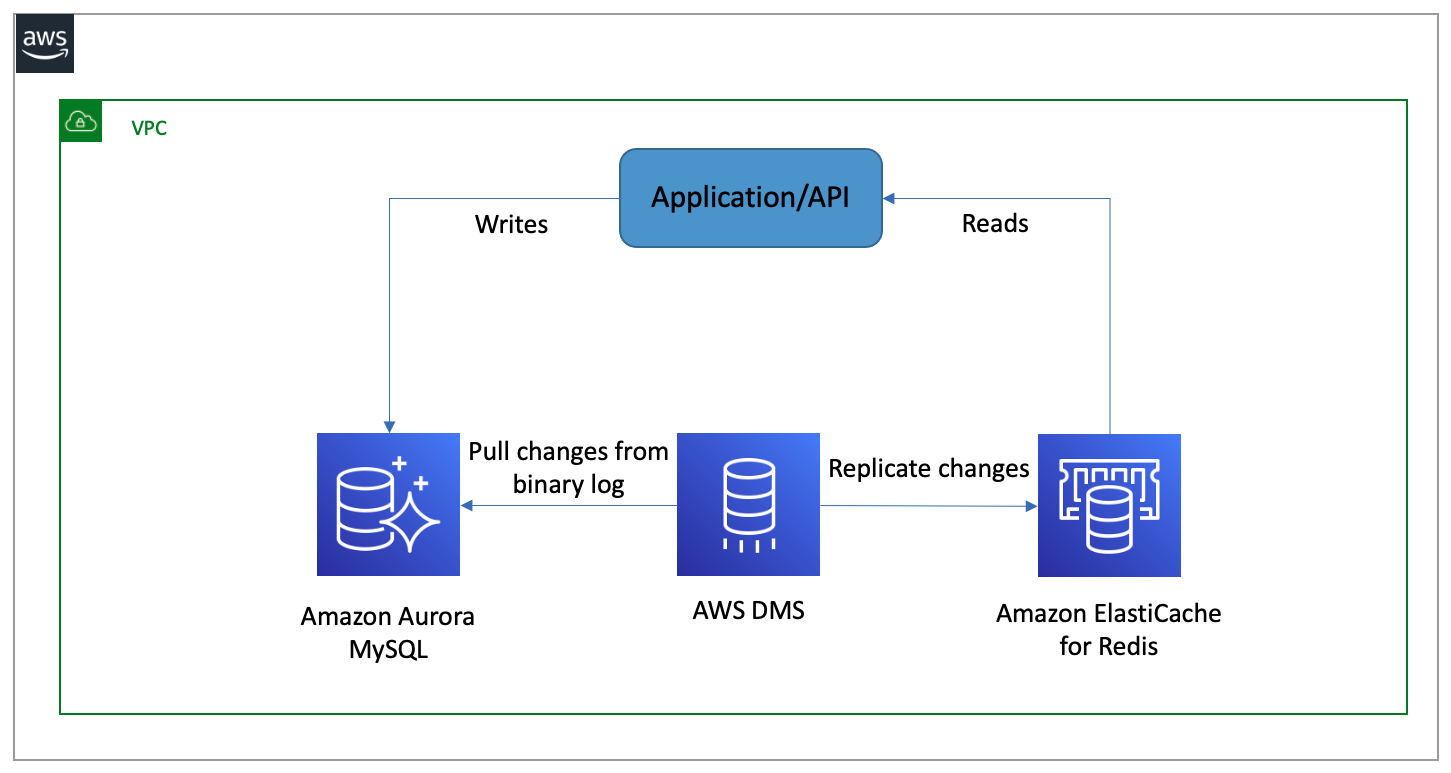
In a traditional scenario, your application writes all the transactional and real-time data required to both the database and a caching layer, such as Redis. This requires every transaction application in your enterprise to use a library or logic to populate the Redis cache to serve reads by consumer applications.
With AWS DMS support for Redis as a target, you can introduce a caching layer into your architecture with minimal code changes. You can use AWS DMS to support a write-around approach, where your application continues to write to your primary data store and AWS DMS keeps the cache updated. You can also use AWS DMS to pre-warm a new cache, or new datasets as they come online, which improves the overall application performance.
The following diagram illustrates this architecture.
Let’s talk about a specific example of maintaining a shopping catalog for an e-commerce website. Over time, the catalog may change and expand, and you want an easy way to give users a consistent, low-latency experience with your application by directing reads to a caching layer. As you onboard new data into your primary data store, AWS DMS can replicate the data to your caching layer to provide that experience. In the following example, we walk through the steps to set this up.
The cluster needs to be sized appropriately to handle the replication stream from the production database. Consider setting an eviction strategy in the event that your cache memory becomes full.
Solution overview
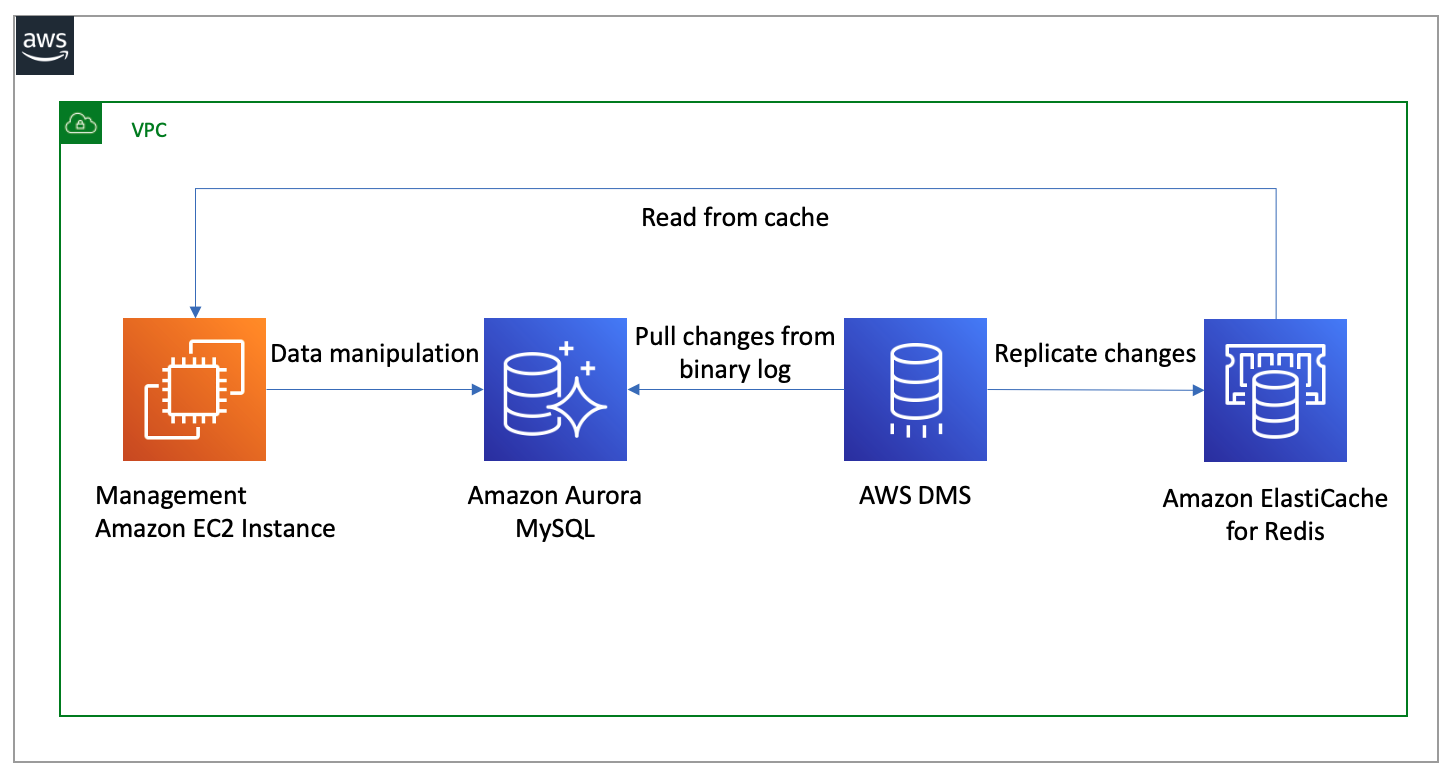
The AWS CloudFormation template featured in the next section deploys the following resources:
- A management Amazon Elastic Compute Cloud (Amazon EC2) instance to log into the database to make data changes, and connect to the cache to observe the data being replicated.
- An Amazon Aurora MySQL-Compatible Edition database, which you use to insert sample data
- An AWS DMS replication instance to perform your data migration
- An ElastiCache for Redis cluster, which receives changes made to your source database
The following diagram illustrates the solution workflow.
Prerequisites
To deploy this solution, the following is required:
- An AWS account with sufficient privileges to launch the resources necessary for this solution
- The AWS Command Line Interface (AWS CLI) set up and ready to run commands to interact with your AWS resources
The resources deployed are not eligible for the Free Tier, but if you choose the smallest instance sizes available, you should incur costs less than $1.00, assuming that you clean up the stack in an hour.
Deploy the solution
To deploy the solution, complete the following steps:
- Launch the CloudFormation stack.

- For DBInstanceClass, enter the desired compute and memory capacity of the Aurora MySQL database.
- For InstanceType, choose the EC2 instance type.
- For RedisCacheNodeType, choose the desired compute and memory capacity of the ElastiCache for Redis cluster.
- Enter non-overlapping CIDR ranges for the VPC and subnets, or use the defaults as long as it doesn’t conflict with your existing VPC CIDRs.
- Choose Next.

- Acknowledge the statement before creating the stack.

Provisioning takes approximately 15–20 minutes to complete. When the stack status shows Create Complete, you can choose the Outputs tab to review the results.
Next, we log into the management EC2 instance via AWS Systems Manager Session Manager.
- On the Amazon EC2 console, on the Instances page, select the instance
MySQLRedisBastionand choose Connect.
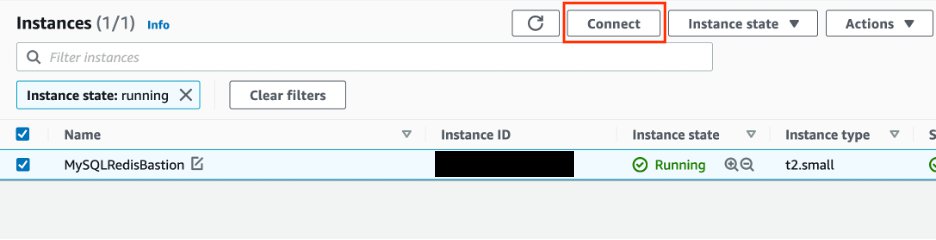
- On the Session Manager tab, choose Connect.

An in-browser terminal launches in a new window or tab. Next, we prepare the Aurora MySQL database for replication.
- Retrieve the required values to use in the following code:
- The
RDSEndpointvalue from the CloudFormation stack Outputs tab - The AWS Secrets Manager password from the Secrets Manager console (the
SecretsArnvalue is on the CloudFormation stack Outputs tab).
- The
We’re now ready to start the AWS DMS task.
- On the AWS DMS console, on the Database migration tasks page, select the
replicate-productstask. - On the Actions menu, choose Restart/Resume.
- Wait until the task status shows as
Available.

- In your Session Manager terminal window, re-establish connectivity to Aurora MySQL and insert a few sample records to the products table using the following command:
Verify data replication
To verify data replication via the AWS DMS console, navigate to your database migration task and choose the Table statistics tab. Check that the inserted records show under the Inserts column, and that it matches the number of records you inserted in the previous step.

Finally, we connect to ElastiCache for Redis to verify data replication. In your Sessions Manager terminal window, establish connection to the ElastiCache for Redis cluster and retrieve the values for one of the keys as shown in the following code:
This is the expected output. Because Redis is a key-value data store, the Redis key naming convention of schema-name.table-name.primary-key is used when your source is a relational database. The value is stored as a hash data structure with key-value pairs corresponding to each column name and value.

Clean up
To avoid incurring ongoing charges, open the AWS CloudFormation console and delete the MySQLRedis stack. This deletes the resources you created.
Conclusion
In this post, we showed you how to add a caching layer to your architecture. You implemented an end-to-end AWS DMS replication between your relational database and an ElastiCache for Redis cluster, and observed how AWS DMS can benefit your applications through increased performance and minimal overhead. Share your feedback with us in the comments section.
About the Authors
 Kishore Dhamodaran is a Senior Cloud Consultant with Amazon Web Services Professional Services. Kishore helps customers with their cloud enterprise strategy and migration journey, leveraging his years of industry and cloud experience.
 Ryan Shevchik is a Data & Analytics Specialist Solutions Architect with Amazon Web Services.
 Mohit Mehta is a leader in the AWS Professional Services Organization with expertise in AI/ML and big data technologies. Prior to joining AWS, Mohit worked as a digital transformation executive at a Fortune 100 financial services organization. Mohit holds an M.S in Computer Science, all AWS certifications, an MBA from College of William and Mary, and a GMP from Michigan Ross School of Business.