Containers
Progressive Delivery using AWS App Mesh and Flagger
NOTICE: October 04, 2024 – This post no longer reflects the best guidance for configuring a service mesh with Amazon EKS and its examples no longer work as shown. Please refer to newer content on Amazon VPC Lattice.
——–
In this blog, we will cover how to implement progressive delivery using AWS App Mesh and Flagger. Progressive delivery helps customers release features quickly, decrease deployment risk, and increase deployment safety. Customers already using CI/CD pipelines and following Agile and DevOps practices will greatly benefit by implementing progressive delivery. Customers currently use various tools like Jenkins, GitLab, CircleCI, or TeamCity to implement continuous integration and continuous delivery. A lot of emphasis is put on continuous delivery where customers have a strong CI/CD mechanism in place to ensure code can be deployed quickly and safely after automated tests pass. A lot of customers are currently transitioning their delivery model from continuous delivery to continuous deployment. Continuous deployment is the next step of continuous delivery, where customers can deploy every change to production automatically after it passes automated tests. Progressive delivery is the advanced form of continuous delivery.
Before we build the demo environment, we will cover the concepts on progressive delivery, canary deployment strategy, automated canary analysis, AWS App Mesh, and Flagger at a high level.
Progressive Delivery
Progressive delivery is a modern practice for organizations to gradually roll out new features, ship code faster, and reduce the risk of introducing bugs and continuously improve user or customer experience. Two core tenets of progressive delivery are release progression (adjusting the number of users exposed to new features) and delegation (delegating the control of a feature to the owner responsible for the outcome). Automation, user segmentation, traffic management, and observability are the building blocks of progressive delivery. Customers don’t have to rush and continuously push new code to a production environment. Instead, they can focus on release progression via targeted rollouts, canary deployments, ring deployments, or percentage rollouts. With progressive delivery, you can implement CI/CD practices safely. The main goal of progressive delivery is to reduce the risks of continuous delivery without sacrificing speed. Progressive delivery focuses on delivering new features to customers faster.
Canary Deployment Strategy
Canary is a deployment strategy where a new application version is released to a small subset of users alongside the stable running version. This new version is then evaluated against the current deployment, which is the baseline to ensure the new deployment is operating well. You do this to mitigate risks before deploying the new version to all of your users. You can limit the impact of breaking application changes, and a very small percent of users are impacted if you have any bugs in the new release. You can test your changes with real users and compare different versions in parallel. It’s safe, fast, and cheaper to implement. Canary offers zero downtime with faster rollbacks. The drawback with the canary strategy is that rollouts can be slow, since each release needs to be monitored for a certain timeframe. Without automation, it can also be very time consuming and prone to error.
Automated Canary Analysis (aka Metrics-Based Canary)
Many customers rely on manual analysis and gating to promote releases to production. Manual judgements are error-prone and time-consuming. Errors in releases often have significant business disruptions. We need an automated way of promoting canary releases to production.
Automated canary analysis consists of two stages.
- First stage focuses on retrieving key metrics from the baseline and canary. These metrics are stored in a time-series database (in our case, Prometheus). A set of tags or annotations identify whether the data belongs to a baseline or a canary.
- Second stage focuses on comparing the metrics collected and renders a decision to pass or fail the canary. After all the metrics are classified, a final score is calculated to show how the canary is performing when compared to the baseline.
Flagger can use this to determine if the canary should be deployed and promoted or aborted and rolled back.
Flagger
Flagger is a progressive delivery operator that automates the promotion of canary deployments. Flagger implements a control loop that gradually shifts traffic to the canary while measuring key performance indicators like HTTP requests success rate, requests average duration, and pods health. Based on the KPI analysis, a canary is promoted or aborted, and the analysis is pushed to a communication channel.
Flagger uses ingress controllers (NGINX, Traefik, and Contour) and service meshes (Istio, Gloo, App Mesh, Linkerd, OSM, and Alibaba Service Mesh) for flexible traffic routing. It relies on Prometheus metrics to analyze an application’s behavior during a controlled rollout. Flagger measures the application performance and runs tests on metrics and conformance. It allows you to safely deploy your applications and reduce the risk of application downtime by controlling and automating canary releases with Prometheus metrics. You can also set error threshold metrics to determine when to promote and when to abort and roll back a deployment.
Flagger lets you define key performance indicators and thresholds. The decision to shift the traffic, pause the shift, or abort or promote a canary is based on:
- Deployment health status
- Request success rate percentage (Envoy metric)
- Request latency average value (Envoy metric)
- Custom metric checks (Prometheus queries)
- Webhooks (integration testing, load testing, and so on)
Flagger can run automated application analysis, promotion, and rollback for the following deployment strategies:
- Canary (Progressive traffic shifting)
- A/B Testing (HTTP headers and cookies traffic routing)
- Blue/Green (traffic switch or mirroring)
In this blog, we focus on automated canary analysis using App Mesh for the traffic routing.
AWS App Mesh
AWS App Mesh is a service mesh that provides application-level networking to make it easy for your services to communicate with each other across multiple types of compute infrastructure. It allows you to transparently add capabilities like security, traffic management, and observability without any code instrumentation. App Mesh gives end-to-end visibility and high availability for your applications. App Mesh uses envoy proxy as a sidecar proxy.

Flagger with AWS App Mesh and Amazon EKS
In this diagram, we cover different constructs to implement progressive delivering. An Amazon EKS cluster should be ready before you install App Mesh. App Mesh integration with EKS is via Kubernetes custom resources. Flagger automates the creation of the App Mesh objects for us.
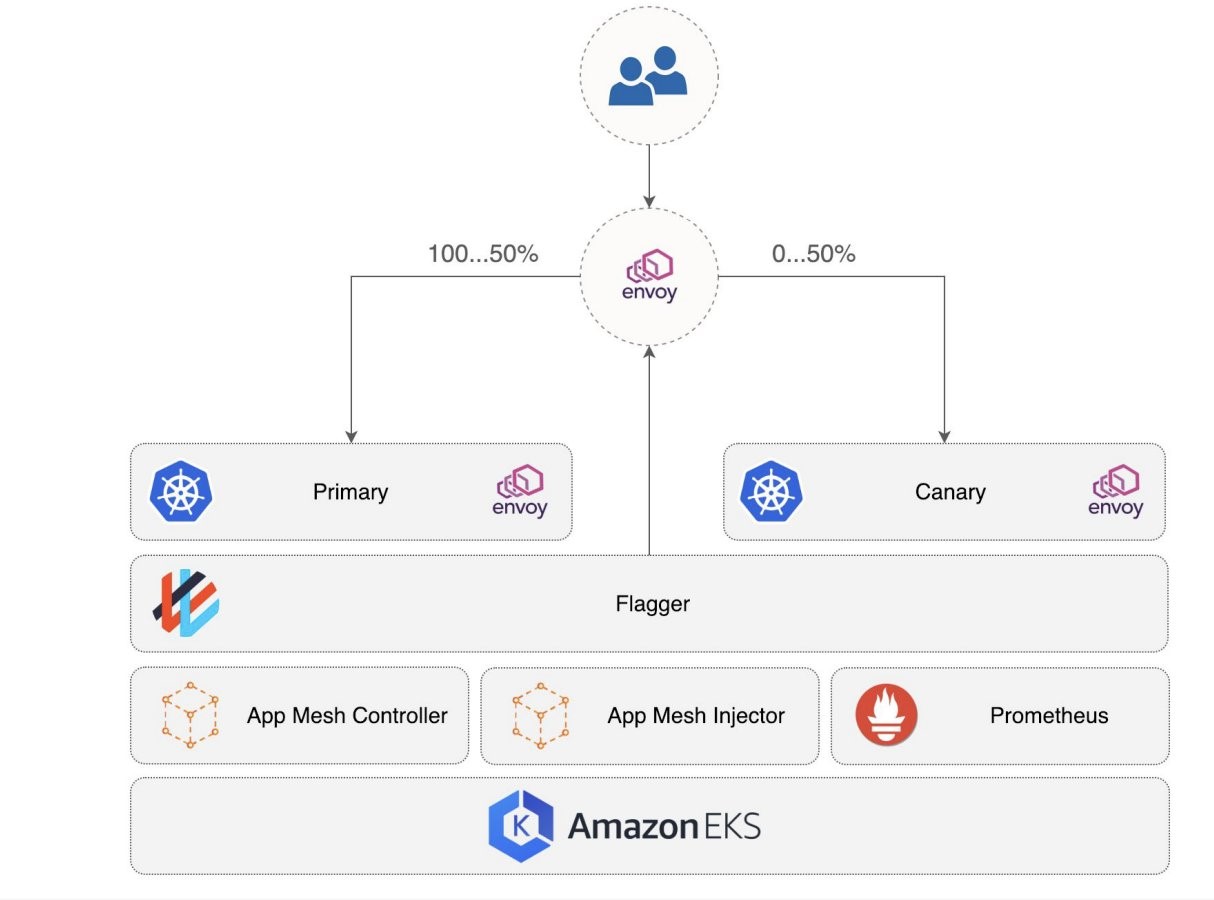
Diagram Constructs
- Mesh is a logical boundary for the network traffic between the services.
- Virtual node defines a logical pointer to a Kubernetes workload.
- Virtual router handles traffic for one or more virtual services within a mesh.
- Routes are associated with a virtual router as it directs traffic that matches a service name prefix to one or more virtual nodes.
- Virtual service defines the routing rules for each workload inside the mesh. It is an abstraction of a real service that is either provided by a virtual node directly or by a virtual router.
- Envoy is the sidecar container that configures application pods to use app mesh traffic rules setup for virtual routers and virtual nodes.
- App Mesh injector is an admission controller that injects sidecar proxies (envoy) and assigns Kubernetes pods to the App Mesh virtual nodes.
- App Mesh controller is a CRD controller that keeps the Kubernetes custom resources (mesh, virtual node, and virtual service) in sync with the App Mesh control plane.
- Prometheus is responsible for scraping and storing envoy metrics.
- Amazon EKS is a managed container service to run and scale Kubernetes applications in the cloud or on-premises.
When implementing canary setup, we have to create a lot of Kubernetes objects (canary deployment, canary service, primary deployment, and primary service) and App Mesh objects (canary virtual node, primary virtual node, HTTP routes, virtual router, and virtual service). With Flagger, you end up writing less YAML. Flagger will automate the canary setup by creating Kubernetes and App Mesh objects.
Prerequisites
- An existing EKS cluster configured with an IAM OIDC provider to support IAM Roles for Service Accounts (IRSA)
- See Creating an Amazon EKS Cluster. Kubernetes version 1.20 used in this example.
- See IAM roles for service accounts.
- AWS CLI
- eksctl
- Helm
- kubectl
Implementing Progressive delivery using EKS, App Mesh, and Flagger
Install App Mesh Controller (v1.4.0)
Step 1. Add the eks-charts repository to Helm.
Step 2. Download the IAM policy JSON file and create an IAM policy called AppMeshk8s.
Step 3. Create a ServiceAccount for the App Mesh Controller that has the required IAM permissions. Replace <CLUSTERNAME> with the name of your EKS Cluster.
Step 4. Install the App Mesh CRDs.
Step 5. Install the App Mesh Controller for Kubernetes.
Replace <REGION> with the AWS Region of your EKS Cluster. (We have deployed v1.4.0 version of App Mesh Controller.)
To validate the App Mesh Controller install, run the following command:
The output should show a pod, deployment, service, and replica set running:

Step 6. Install Metrics Server using the latest manifests.
Step 7. Install Prometheus in the appmesh-system namespace.
Step 8. Install Flagger in the appmesh-system namespace using Helm.
Add the flagger chart repository to Helm.
To validate Flagger install, run the following command:
The output should show a Flagger pod running:
![]()
Automated Canary Deployments
Flagger takes a Kubernetes deployment and creates a series of objects (deployments, ClusterIP services, App Mesh virtual nodes, and virtual services). All you need to create is a mesh resource.
Flagger is creating Kubernetes and App Mesh objects as documented previously under the Flagger section.
Step 1. Create a mesh.
A mesh is a logical boundary for the network traffic between the services.
Sidecar injection is not happening at the mesh level, and it always happens at the namespace level. Namespaces with this label (appmesh.k8s.aws/sidecarInjectorWbhook: enabled) will be part of the mesh.
Step 2. Create a new namespace called eks-blog with App Mesh sidecar injection enabled.
Sidecar injection will happen at the namespace level.
Step 3. Create a Kubernetes Deployment object.

The output should show a deployment in not ready state.
Step 4. Deploy a canary object.
A canary resource can target a Kubernetes Deployment or DaemonSet. The canary custom resource defines the release process of an application.
To check the status of the canary object, run this command:
The output should show the canary being initialized:

Step 5. To expose the webapp application outside the mesh, create an App Mesh gateway.
Install appmesh-gateway by running this command:
Step 6. Create a gateway route that points to the webapp virtual service.
To access the webapp on a public endpoint run these commands:

Outcome: v1 version of the application is deployed successfully and is accessible on a public endpoint.
Automated Canary Promotion
A canary deployment is triggered if you update the Deployment Pod specification. Updates that you can do as of today are listed below:
- container image
- command
- ports
- environment variables
- ConfigMaps and Secrets mounted as volumes or mapped to environment variables
Step 7. In this blog, we will trigger a canary deployment by updating the container image.


To view the v2 version of the webapp, refresh the URL.

v2 version got promoted from canary to primary after passing all the checks.
Automatic Rollback
If your application has high latency or you see HTTP 500 errors, Flagger will automatically roll back to the previous version of your application. Automatic rollback is triggered if the number of failed checks reaches the canary analysis threshold. Flagger ensures the traffic is routed back to the primary, and the canary is scaled to zero. The rollout will be marked as failed.
Conclusion
In this blog post, we demonstrated how you can leverage AWS App Mesh and Flagger to implement progressive delivery (automated metrics-based canary deployment). It is not mandatory to use a service mesh to implement progressive delivery. We recommend using a service mesh for security, traffic management, observability, and service-to-service communication use cases. If you don’t have a use case that requires a service mesh, then you can use an ingress controller for progressive delivery.
To learn more about AWS App Mesh and Flagger:
- Check out the AWS App Mesh official documentation
- Learn more about the AWS App Mesh capabilities in the AWS App Mesh workshop
- Learn about Flagger: Introduction – Flagger