AWS HPC Blog
Using Spot Instances with AWS ParallelCluster and Amazon FSx for Lustre
Processing large amounts of complex data often requires leveraging a mix of different Amazon Elastic Compute Cloud (Amazon EC2) instance types. This is because some parts of a workflow benefit from a higher number of CPUs, and other parts benefit from a higher amount of memory. These types of computations also benefit from shared, high performance, scalable storage like Amazon FSx for Lustre. Right-sizing your compute fleet and storage to the computation needs is a way to control costs. Another way to save costs is to use Amazon EC2 Spot Instances, which can help to reduce EC2 costs up to 90% compared to On-Demand Instance pricing.
This post will guide you in the creation of a fault tolerance cluster allowing the automatic re-queue of the jobs in case of a Spot interruption. In addition, Spot Instances can decrease the cost of your jobs by up to 90% over On-Demand Instances. We will explain how to configure AWS ParallelCluster to run a Slurm cluster that is able to manage Spot Instance interruptions, automatically unmount the Amazon FSx for Lustre filesystem, and re-submit the interrupted jobs back into the queue so they run on new nodes of the cluster.
A Spot Instance is an instance that uses spare EC2 capacity that is available for less than the On-Demand Instance price. The hourly price for a Spot Instance is called a Spot price. The Spot price of each instance type in each Availability Zone is set by Amazon EC2, and is adjusted gradually based on long-term supply and demand. Additionally, Amazon EC2 can interrupt your instance when Amazon EC2 needs to fulfil demand for non-Spot Instance requests. When this event happens, Amazon EC2 provides an interruption notice, which gives the instance a two-minute warning before Amazon EC2 interrupts it.Amazon FSx for Lustre maintains a distributed and coherent state across both client and server instances, and delegates temporary access permissions to clients while they are actively-doing I/O and caching file system data. When a Spot Instance is reclaimed, the FSx for Lustre servers wait for the client’s reply for few minutes before evicting them. As the number of Spot Instances are reclaimed and shut down, the performance of the other-running FSx for Lustre clients can suffer.
To avoid the situation where a FSx for Lustre server is waiting multiple minutes for the terminated clients to reply to the server request, you can unmount the FSx for Lustre client before the Spot Instance shuts down. The documentation for FSx for Lustre covers how to work with Amazon EC2 Spot Instances and provides an example bash script.
With an HPC cluster running multiple instances, the unmount procedure must be managed at scale. Once a Spot Instance is reclaimed by Amazon EC2, the scheduler must shut down the whole job impacted and then your job must be re-submitted.
This functionality allows specific categories of jobs to be interrupted and resumed anytime. Some examples are Monte Carlo simulations, and checkpoint-able applications. Monte Carlo simulations are a type of computational algorithms that predicts a set of outcomes based on repeated random sampling. This class of algorithm can be restarted anytime without specific requirements. Checkpoint-able applications are another type of jobs that can save the status of the simulation and restart from the saved state.
Description of the solution
The following section will guide you in the deployment of an AWS ParallelCluster environment with two subnets. The network configurations section of the AWS ParallelCluster documentation contains additional information.
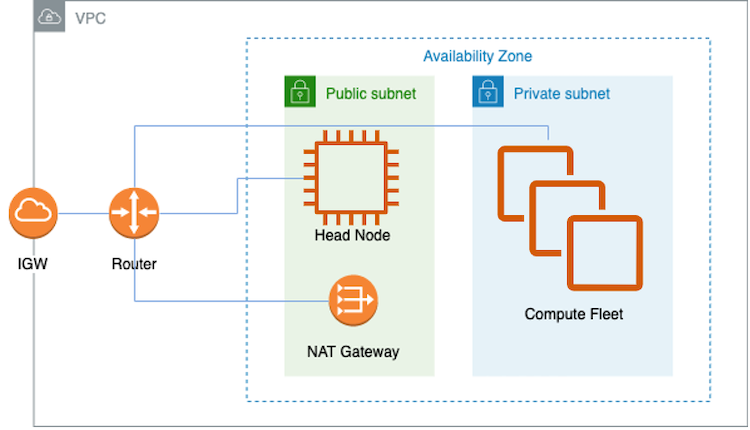
Figure 1 – AWS ParallelCluster network configuration
Download the custom files from git
As the deployment of the solution requires some additional configuration, the next paragraph explains how to download the provided custom files in your local environment.
- Clone the git repository on your local drive and upload the spot-daemon.sh and post-action.sh scripts into a dedicated Amazon S3 bucket. From AWS CLI you can use:
aws s3 cp spot-daemon.sh s3://<YOUR BUCKET NAME>/
aws s3 cp post-action.sh s3://<YOUR BUCKET NAME>/
After copying the required files, you can start to install and configure the AWS ParallelCluster command line. This solution uses a Python virtual environment to avoid requirement version conflicts with other pip packages.
- To install AWS ParallelCluster into a Python virtual environment, you must define a configuration file, and create the first configuration:
- Create a virtual environment and name it:
$ python3 -m virtualenv ~/apc-ve - Once created, activate the virtual environment:
$ source ~/apc-ve/bin/activate (apc-ve) user@myhost:~$ - Install the latest version of AWS ParallelCluster:
(apc-ve)~$ python3 -m pip install --upgrade "aws-parallelcluster" - For further details refer to install AWS ParallelCluster in a virtual environment.
- Create a virtual environment and name it:
- Create your first configuration using the wizard:
(apc-ve)$ pcluster configure --region <YOUR AWS REGION> --config cluster-config.yaml
The wizard will ask you some questions to create the network stack, based on your choices.
In addition, the preceding AWS ParallelCluster command will create the cluster-config.yaml file, that will be used to create the cluster in the next step. This generated file must be updated with a few changes according to the requirements of the solution.
Customize the AWS ParallelCluster configuration file
Make a backup copy of this generated file, and replace it with the provided cluster-config.yaml file, on which you have to change the placeholders accordingly based on the copied file:
<YOUR AWS REGION>– replace this placeholder with your AWS Region.<YOUR HEADNODE INSTANCE TYPE>– replace this placeholder with the EC2 instance type for the head node.<PUBLIC SUBNET ID>– replace this placeholder with the public subnet id created after execution of pcluster configure<YOUR KEYNAME>– replace this placeholder with your key pair.<YOUR BUCKET NAME>– replace this placeholder in the HeadNode CustomActions, HeadNode Iam, Scheduling SlurmQueues CustomActions, Scheduling SlurmQueues Iam<PRIVATE SUBNET ID>– replace this placeholder with the private subnet id created after execution of pcluster configure<YOUR COMPUTE INSTANCE NAME/LABEL>– replace this placeholder with the name for the compute environment for the Slurm queue.<YOUR COMPUTE INSTANCE TYPE>– replace this placeholder with the EC2 instance type to use in this Slurm compute resource.
Changes of cluster configuration file
The following section will explain the relevant changes of cluster configuration file:
- In the “HeadNode” section, the Custom Action script is executed after the configuration stage of the head node. The post-action.sh reconfigures Slurm in order to add the “RequeueExit” setting on
/opt/slurm/etc/slurm.confSlurm configuration file and restart the Slurm control daemon to make this change active. The requeue action will be performed in case the job exits with an exit code equal to 200.HeadNode: CustomActions: OnNodeConfigured: Script: s3://<YOUR BUCKET NAME>/post-action.sh - In the “Scheduling” section, the custom action starts after the configuration stage of the compute node. The spot-daemon.sh script periodically checks, using a curl statement to the instance metadata, for a Spot Instance interruption action. When the Spot Instance interruption action is detected, the script performs the needed actions to shut down the processes that are using the FSx for Lustre filesystem, and then proceeds to unmount it correctly. As final step, the script runs the graceful shutdown of the node. The “CapacityType” is configured as
SPOT, in order to request Spot Instances.Scheduling: Scheduler: slurm SlurmQueues: - Name: queue1 CapacityType: SPOT CustomActions: OnNodeConfigured: Script: s3://<YOUR BUCKET NAME>/spot-daemon.sh - In the “SharedStorage” section is defined the mount point and storage type of the FSx for Lustre filesystem.
SharedStorage:
  - MountDir: /fsx
    Name: fsx
    StorageType: FsxLustre
    FsxLustreSettings:
      DeploymentType: SCRATCH_2
      StorageCapacity: 1200
To specify the default AWS Region for your cluster, export the following environment variable in your terminal:
export AWS_DEFAULT_REGION=<YOUR AWS REGION>We can now create the cluster by running the following pcluster create-cluster command:
pcluster create-cluster --cluster-configuration cluster-config.yaml --cluster-name <YOUR_CLUSTER_NAME>The cluster creation will create the resources specified in the configuration file.
You can monitor the creation of the cluster with the pcluster list-clusters command:
pcluster list-clusters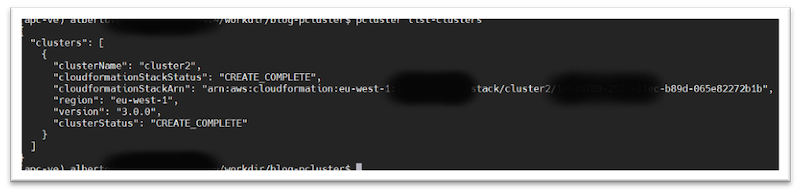
Figure 2 – AWS ParallelCluster list-clusters output
Connect to the head node
Once the cluster is at CREATE_COMPLETE state, you can connect to the head node following the steps below:
- Load your private key certificate:
eval $(ssh-agent -s) ssh-add <YOUR KEYPAIR CERT> - Connect via the“pcluster ssh” command:
pcluster ssh --cluster-name <YOUR CLUSTER NAME>
When you are connected to the terminal on the head node cluster, you can proceed to the creation of your job script file, using a template like the one below:
#!/bin/bash
trap "exit 200" TERM
<YOUR CODE HERE...>
The trap line is used to intercept the TERM signal sent by the spot-daemon.sh script when the Spot Instance interruption action is detected. The 200 exit code is used to catch the Spot interruption condition, instead of any other exit code deriving from the application.
You can now submit the job to the scheduler:
sbatch <YOUR_SCRIPT_NAME>A new Spot Instance compute node is created and then the job is dispatched to the compute node.

Figure 3 – Slurm sinfo command output

Figure 4 – Slurm squeue command output
A quick note about connecting to the instance: In the previous instructions we used the default method for ParallelCluster to connect to the head node, namely SSH. Alternatively, you could connect to the cluster Head Node using AWS Systems Manager Session Manager, which has a few management and security benefits over SSH.
Triggering an Spot interruption event with AWS Fault Injection Simulator
When a Spot Instance is reclaimed by Amazon EC2, the following actions are performed:
- The Spot Instance interruption action URL is created in the instance metadata.
- The
spot-deamon.shscript detects the Spot interruption action and sends aTERMsignal to your job script accessing the FSx for Lustre filesystem. - Meanwhile, the job traps the
TERMsignal and shuts down with exit code 200. - The
spot-daemon.shproceeds to unmount gracefully the FSx for Lustre filesystem and shuts down the compute node. - The job is automatically requeued and shown as a pending job until a new Spot Instance is created.
You can trigger the interruption of an Amazon EC2 Spot Instance using AWS Fault Injection Simulator (FIS). With a few clicks in the console, you can set up an experiment that triggers interruptions on your Spot Instances.
To use AWS FIS, you must create an IAM role that grants AWS FIS the permissions required so that AWS FIS can run experiments on your behalf.
The following policy grants AWS FIS permission required to use the AWS FIS actions for Amazon EC2.
{
    "Version": "2012-10-17",
    "Statement": [
        {
            "Sid": "AllowFISExperimentRoleEC2ReadOnly",
            "Effect": "Allow",
            "Action": [
                "ec2:DescribeInstances"
            ],
            "Resource": "*"
        },
        {
            "Sid": "AllowFISExperimentRoleEC2Actions",
            "Effect": "Allow",
            "Action": [
                "ec2:RebootInstances",
                "ec2:StopInstances",
                "ec2:StartInstances",
                "ec2:TerminateInstances"
            ],
            "Resource": "arn:aws:ec2:*:*:instance/*"
        },
        {
            "Sid": "AllowFISExperimentRoleSpotInstanceActions",
            "Effect": "Allow",
            "Action": [
                "ec2:SendSpotInstanceInterruptions"
            ],
            "Resource": "arn:aws:ec2:*:*:instance/*"
        }
    ]
}
The IAM role must have a trust relationship that allows the AWS FIS service to assume the role.
{
    "Version": "2012-10-17",
    "Statement": [
        {
            "Effect": "Allow",
            "Principal": {
                "Service": [
                  "fis.amazonaws.com"
                ]
            },
            "Action": "sts:AssumeRole",
            "Condition": {}
        }
    ]
}
Create and start a AWS FIS experiment in the console
To create an experiment template using the console
- Open the AWS FIS console at https://console.aws.amazon.com/fis/
- In the navigation pane, choose Experiment templates
- Choose Create experiment template
- Enter a description for the template
- For IAM role, select an IAM role created in the previous step
- For Actions, specify the set of actions for the template. Choose Add action and complete the following:
- For Name, enter a name for the action
- For Action type, select aws:ec2:send-spot-instance-interruptions
- For Target, select a target that you defined in the Targets If you have not defined a target for this action yet, AWS FIS creates a new target for you.
- For durationBeforeInterruption, enter the duration after which the Spot Instances are interrupted.
- Choose Save.
- For Targets, define the target resources on which to carry out the actions. Choose Edit to edit the target that AWS FIS created for your [step 6]. For each target, do the following:
- For Name, enter a name for the target.
- For Resource type, select aws:ec2:spot-instance.
- For Target method, select Resource IDs and specify the instance id of the running compute node.
- Choose Save.
- Choose Create experiment template.
After you have created an experiment template, you can start experiments.
To start an experiment using the console:
- In the navigation pane, choose Experiment templates
- Select the experiment template, and choose Actions, Start experiment
- Choose Start experiment. When prompted, enter start and choose Start experiment
After the experiment has been shut down, the compute instance will be shut down and the job re-queued.

Figure 5 – Slurm job re-queued

Figure 6 – Slurm job running
Clean up
When you have finished your computation, the cluster can be shut down using the pcluster delete-cluster command:
pcluster delete-cluster --cluster-name <YOUR_CLUSTER_NAME>Conclusion
In this blog post, we show you how to configure AWS ParallelCluster to handle Spot Instance interruption. We covered how to maintain a consistent and a performant Amazon FSx for Lustre file system. The coherency of read and write operations are enforced through the FSx for Lustre distributed lock manager. If application threads running on multiple nodes were trying to read and write the same part of a file at the same time, they would both see consistent results. The procedure to unmount correctly the Amazon FSx for Lustre file system allows to maintain a distributed and coherent state across both client and server instances.
In addition, we also discussed how to automatically re-submit jobs that were affected when a Spot Instance is reclaimed. If the running job’s application supports check-pointing, you have the possibility to alter the procedure to automatically restart the job from the last-saved checkpoint.
As last point, the described architecture increases the fault tolerance allowing the automatic re-queue of the Jobs and, using Spot instances, the EC2 cost for your Jobs can be up to 90% lower than On-Demand instances.
To learn more, read about how to use AWS ParallelCluster and Amazon FSx for Lustre.