AWS Database Blog
PostgreSQL bi-directional replication using pglogical
July 2023: This post was reviewed for accuracy.
PostgreSQL supports block-based (physical) replication as well as the row-based (logical) replication. Physical replication is traditionally used to create read-only replicas of a primary instance, and utilized in both self-managed and managed deployments of PostgreSQL. Uses for physical read replicas can include high availability, disaster recovery, and scaling out the reader nodes. Although there is flexibility in the use cases for physical replicas, consider that all data in the database must be replicated from the write instance to its readers. In contrast, logical replication allows you to choose a subset of the data to replicate. Additionally, when using logical replication, there is no requirement for the secondary nodes to be read-only. You can configure logical replication to get data for some tables and at the same time, the application can directly write to the same or different tables in the database.
The publisher- and subscriber-based logical replication feature was introduced into core PostgreSQL starting with version 10, but prior to that, PostgreSQL started supporting the logical decoding feature from version 9.4. Much of the logical replication capability in core PostgreSQL was based on the work done for the open-source PostgreSQL logical replication extension called pglogical. This pglogical extension is still available and provides some additional capabilities that aren’t available in native PostgreSQL. The pglogical extension became available for Amazon Relational Database for PostgreSQL starting from versions 9.6.10+, 10.5 +, and 11+. Amazon Aurora PostgreSQL-compatible Edition enabled this extension with versions 10.13+ and 11.8+.
Although pglogical is typically used for the implementation of unidirectional replication, it provides the capability for bi-directional replication as well. In this post, we talk about how to use the pglogical extension for logical replication, and how it can enable bi-directional replication between PostgreSQL instances.
Bi-directional replication requirement
Using bi-directional replication increases the complexity of maintaining the database infrastructure. Therefore, it’s important to understand the additional management overhead. You should be sure that physical replication can’t meet your requirements. For example, using physical replicas to create read-only nodes can help meet most high availability and disaster recovery use cases. If the overall load on a primary instance is causing resource utilization issues on a single node cluster, splitting read and write transactions at the application level may help alleviate those issues without the need for implementing (and maintaining) logical replication.
Common use cases for bi-directional replication include the requirement to create a global high availability infrastructure with low read/write latency requirement for end-users. This allows for keeping read/write nodes closer to customers in the geos where they’re located, but also allows for this geo-specific data to be replicated logically back to other instances across the globe. In this use case, you can set up multiple application stacks in different AWS Regions, and keep independent regional database clusters in sync via bi-direction replication. This architecture can be helpful if you require read/write instances in each Region, but want the ability to query across your entire dataset without added application complexity. The following diagram shows an example architecture spanning two Regions, using logical replication.

In this architecture, the client application is routed to the Region closest to them. You can achieve this routing using Amazon Route 53, which is a highly available and scalable cloud DNS service. Route 53 provides the capability to route the traffic based on the geographic location of your users. For more information about geographic location-based routing, check out Geolocation routing.
A similar functionality is available in Amazon Aurora Global Database, though this Aurora PostgreSQL feature only allows for creating global read-only clusters in other Regions. For more details, read Cross-Region disaster recovery using Amazon Aurora Global Database for Amazon Aurora PostgreSQL.
Bi-directional capability
The two key features provided by pglogical that enable bi-directional replication are loop-back prevention and conflict resolution. Loop-back prevention allows you to configure the nodes so that they only publish changes that originate on the node. As a result, all changes received from the remote nodes are never sent back to their origin, preventing a loop-back scenario.
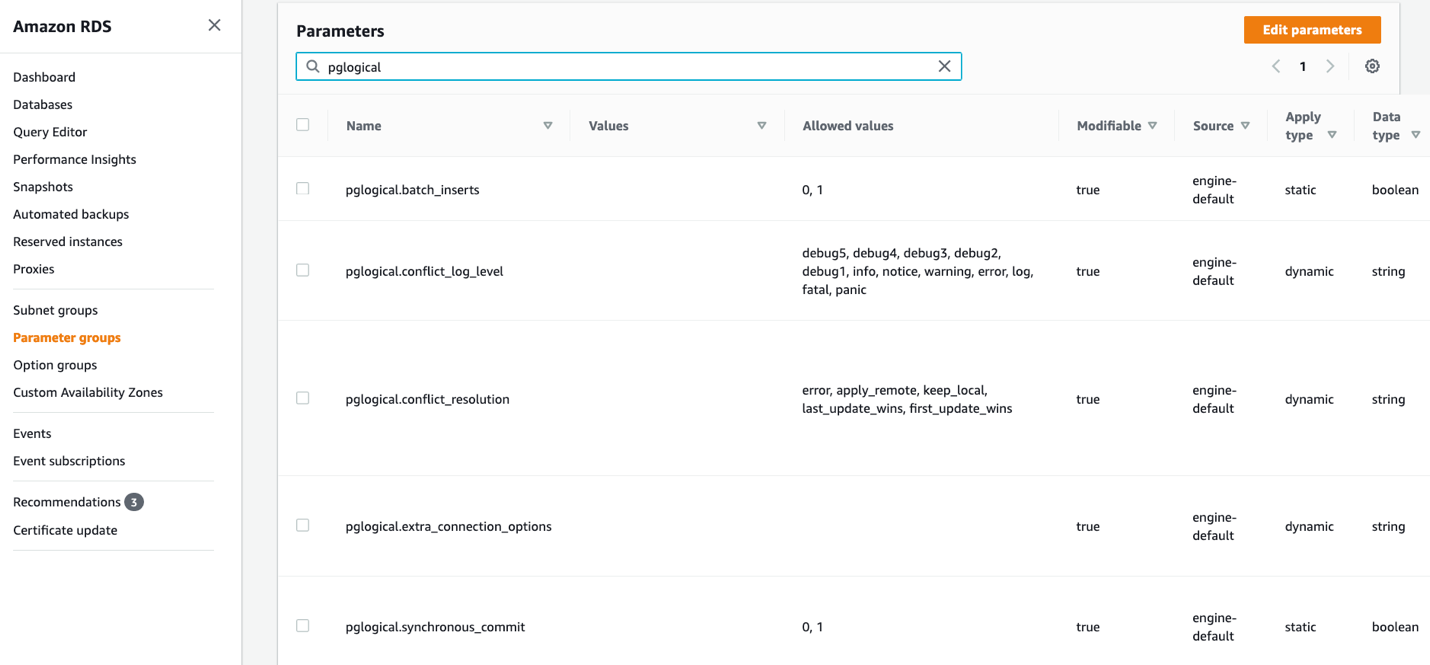
The pglogical extension performs conflict resolution based on the value set for the parameter pglogical.conflict_resolution. This parameter supports five values: error, apply_remote, keep_local, last_update_wins, and first_update_wins. When the error option is set, the replication stops on conflict. The apply_remote and keep_local options direct the pglogical extension that the change received from the remote or the local server is kept in case of a conflict. The last two options, last_update_wins and first_update_wins, use the actual commit timestamp of the transaction to determine which change is used in case of a conflict. These commit timestamp-based conflict resolution options require enabling the commit timestamp tracking in PostgreSQL by setting the additional parameter track_commit_timestamp. It’s important to note that enabling timestamp tracking can result in a measurable impact on database performance. Validating database performance with this feature enabled should be considered vital, especially in production environments. For more information on the different types of conflict resolution modes available for pglogical, check out Conflicts. For this post, the test setup has been configured with the last_update_wins option.
In Aurora, the conflict resolution and related pglogical settings can be located in cluster-level parameter groups.
Prerequisites
You can enable and use pglogical on the supported versions of Aurora PostgreSQL, Amazon RDS for PostgreSQL, and self-managed PostgreSQL. Perform the following steps to configure the pglogical extension for Amazon RDS for PostgreSQL and Aurora PostgreSQL:
- Edit the parameter group associated with your instance.
- Enable logical replication by setting the
rds.logical_replicationparameter to 1. - Add
pglogicalto theshared_preload_librariesparameter. - Save the parameter group changes and restart the cluster.
- Create a user on both servers. In our test, we used the test user name
pguser:
The preceding steps make sure that the password is securely set and is not logged in the database logs.
- Next, grant the role
rds_superuserto this newly created user so that it can be used for the pglogical setup:
As mentioned in the previous section, for the test results shared in this post, we enabled the commit timestamp tracking support using the parameter track_commit_timestamp and set the conflict resolution parameter pglogical.conflict_resolution to last_update_wins.
For more information about parameter groups and the steps to create a custom parameter group for your instance, check out Working with DB parameter groups.
For self-managed PostgreSQL installations, you can configure the pglogical extension using the instructions provided in the post Migrating PostgreSQL from on-premises or Amazon EC2 to Amazon RDS using logical replication.
Test environment
To test the steps shared in this post, we use two RDS for PostgreSQL instances. The first cluster, referred to as Cluster #1, is version 12.8. The second cluster, referred to as Cluster #2, is version 13.4. Both the instances use pglogical version 2.4.0.
Set up unidirectional logical replication
In this section, we set up unidirectional replication from Cluster #1 to Cluster #2. After you complete the prerequisites mentioned earlier, create a test table for your workflows. You need to create this table on both PostgreSQL instances:
Set up Cluster #1
On Cluster #1, add some sample rows in the test table as follows:
Next, you create the pglogical extension:
With the pglogical extension in place, the next step is to create a node using the pglogical function create_node. The first parameter of this function is any name that you assign to this node; the second parameter is the nodes connection string. This connection string should be reachable by other nodes that connect to this node to fetch data. See the following code:
Note that the password is being passed to this function and, depending on your logging configuration, the statement with the clear text password can be stored in the PostgreSQL log file. One option to avoid this can be to run this command in a begin/commit block and unset the logging settings log_statement and log_min_duration_statement in the transaction before calling the create_node function.
For more information about PostgreSQL connection strings options, visit Connection Strings.
The next step is to identify a set of tables that are used for replication. For this, pglogical provides the concept of replication sets. Replication sets allow you to control which tables in the database are replicated and which actions on those tables are replicated. You can create any named replication set using the create_replication_set function, or you can use the ‘default’ replication set. The ‘default’ replication set replicates all actions (INSERT, UPDATE, DELETE) on the tables added to this set. You can use the function replication_set_add_table to add a named table or use the function replication_set_add_all_tables to add all tables from a given schema. The following command adds all the tables from the schema ‘public’ to the ‘default’ replication set:
For more information about working with replication sets, see Replication sets.
Set up Cluster #2
On Cluster #2, check the content of the test table to make sure it’s empty:
Next, create the pglogical extension:
With the pglogical extension in place, the next step is to create a node on Cluster #2 using the pglogical function create_node, similar to how you did on Cluster #1:
The next step is to create the subscription to start the replication of data from Cluster #1 using the function create_subscription. This function is provided any name that you want to use for this subscription, the connection string of the source node, and also the name of the replication sets to replicate. In our example, we used the ‘default’ replication set, so it’s used in the parameter. The argument synchronize_data tells pglogical whether to copy all existing data from the source or not. In our test, this is set to true because we want five test rows to be copied in addition to any future changes. The parameter forward_origins is important for bi-directional replication setup. It controls what changes are forwarded to other nodes. An empty array tells pglogical not to forward any changes that didn’t originate on the provider node. The following code creates a subscription on Cluster 2:
Check the content of the test table on Cluster #2:
This confirms that the logical replication has been set up and data is now flowing from Cluster #1 to Cluster #2. Because we set synchronize_data to true, the five rows that were already present in the test table in Cluster #1 were first copied over.
Test unidirectional replication
Now that we have configured replication from Cluster #1 to Cluster #2, we can test that the changes (inserts, updates, and deletes) made on Cluster #1 are replicated to Cluster #2.
Start with testing out insert and update combinations. In this test, a new row is added and immediately updated on Cluster #1. The following code is the output of Cluster #1:
Now when you check Cluster #2, it shows that both INSERT and UPDATE changes were replicated:
Now, let’s delete the row we created on Cluster #1 and confirm that it’s removed from Cluster #2 as well:
Check the current state of the test table on Cluster #2. It shows that the DELETE change was successfully replicated:
These tests show that all INSERT, UPDATE, and DELETE actions were successfully replicated from Cluster #1 to Cluster #2.
Test conflicts in unidirectional replication
Because the table on Cluster #2 is also open for direct writes, this can result in conflicts if the same row is changed on both nodes. In case of this conflict, pglogical uses the conflict resolution method that has been configured. In this test environment, the last_update_wins option has been set, which means that the version of the data with the latest commit timestamp is kept.
For example, the conflict can happen in the following use case. First, we insert a row on Cluster #2 with id set to 100:
Now we insert a row with id set to 100 on Cluster #1:
If you go back and check the rows on Cluster #2, you can see that the row directly inserted on Cluster #2 has been overwritten by the row from Cluster #1:
This occurred because the commit timestamp of the insert on Cluster #1 was newer than the commit timestamp of the insert on Cluster #2.
Additional steps to set up bi-directional logical replication
The steps shared in the previous sections allow you to create unidirectional replication from Cluster #1 to Cluster #2. Now we run additional commands to enable the flow of changes in the reverse direction.
Set up Cluster #2
Set up a replication set just as you did on Cluster #1:
Set up Cluster #1
Create a subscription on Cluster #1 so that it starts fetching the changes from Cluster #2:
In the preceding command, the argument synchronize_data has been set to false, unlike before. This is because we don’t want to copy any existing data from Cluster #2 to Cluster #1, because we know both tables already contain the same data.
With this command, the bidirectional replication setup is complete, and now any change on one server is replicated to the other.
Test bi-directional replication
Let’s start by adding a row on both clusters to confirm that bi-directional replication is happening.
Insert a row on Cluster #1 as follows:
Now check the table status on Cluster #2 and add a row there as follows:
Now go back to Cluster #1 to confirm the new row is present:
This confirms that the changes are now flowing in both directions. You can perform additional tests with updates and deletes to test this behavior further.
Monitor logical replication lag
Monitoring logical replication lag is the responsibility of the user. Logical replication lag increases can be caused by large amounts of data being changed on the replication node.
You can check the replication lag status in terms of the number of bytes on each of the servers by running the following query:
The following is output of this command from Cluster #1, which shows the status of replication happening from Cluster #1 to Cluster #2:
For more details about the pg_stat_replication view, refer to the PostgreSQL documentation.
Test pglogical bi-directional replication for production usage
In addition to the basic testing we’ve shown, you should perform more thorough testing before deploying in production so that you understand what to expect during various database cluster and data-level maintenance operations. These tests can include stopping and starting the database instance, database failover, minor version upgrade, monitoring and alerting of logical replication lag, schema changes (adding columns or tables to existing replication sets), reloading specific tables, data validation, conflict resolution testing, and performance testing.
Although Aurora PostgreSQL and Amazon RDS for PostgreSQL offer the capabilities to easily perform major and minor version upgrades, instance failovers, and autoscaling, knowing how your application and database clusters behave while using pglogical with your workloads is an important consideration to understand.
Schema changes
When deploying schema changes while replicating between clusters using pglogical, it’s important to note that Data Definition Language (DDL) changes aren’t automatically replicated between replicating nodes. While you may choose to run DDL changes on all replicating clusters individually, you can also use the pglogical function replicate_ddl_command to run the schema changes locally and replicate to the other node.
For example, to add a new column named comments to the test table, you can run the following command on any of the hosts so that the same change is applied to both clusters:
This works seamlessly for unidirectional replication, but for bi-directional replication there is a risk of breaking the replication. This can happen because if transactions are in transit from one node to another, and at the same time the other node initiates the schema change, the in-transit data changes can’t write to the changed schema, and therefore the replication can break. The safe way to make schema changes to tables being changed on both nodes is to temporarily pause the write traffic.
Limitations
When using pglogical, there are some considerations to keep in mind when designing or converting workloads for usage with pglogical. We provide a brief description of those here, but we encourage you to review the complete list of limitations and restrictions.
To replicate the updates and deletes on tables, pglogical requires a primary key or other valid replica identity such as a unique constraint. Without this unique identifier, pglogical can’t identify the updates and deletes. Additionally, foreign key constraints aren’t enforced during the replication process, so any successful operation on the publisher is assumed to be acceptable for the subscriber as well. Considering that foreign key constraints help maintain the referential integrity of data between child and parent tables, it’s important to understanding this limitation and ensure that your workload can’t cause any integrity violations.
Another important aspect to understand is the handling of sequences. Although pglogical provides a mechanism to sync up the sequence numbers, this doesn’t happen in real time. A better strategy is to have independent sequences on both nodes. For example, you may consider using only odd numbers on one node and only even numbers on the other node. This makes sure that there is no conflict of the sequence numbers.
Summary
In this post, we provided steps to set up PostgreSQL bi-directional replication using pglogical. Using bi-directional replication involves extra work and adds complexity to your database infrastructure, therefore we recommend making sure that you actually require bi-directional replication for your use case. If you can meet your requirements using a read replica, you should consider using that instead of bi-directional replication.
If you have questions or suggestions, please leave them in the comment section below.
About the Authors
 Yaser Raja is a Principal Consultant with Professional Services team at Amazon Web Services. He works with customers to build scalable, highly available and secure solutions in AWS cloud. His focus area is homogenous and heterogeneous migrations of on-premise databases to AWS RDS and Aurora PostgreSQL.
 Peter Celentano is a Specialist Solutions Architect with Amazon Web Services, focusing on managed PostgreSQL. He works with AWS customers to design scalable, secure, performant, and robust database architectures on the cloud.