Containers
Using a CI/CD Pipeline to Inject an Envoy Proxy Sidecar Container into an Amazon ECS Task
AWS App Mesh is a service mesh that provides application-level networking to make it easy for your services to communicate with each other across multiple types of compute infrastructure. App Mesh includes support for Amazon Elastic Container Service (Amazon ECS) and Amazon Elastic Kubernetes Service (Amazon EKS), requiring the open-source Envoy proxy to be run as a sidecar alongside the main application container in each ECS task or EKS pod.
For Amazon EKS, App Mesh provides a controller which leverages Kubernetes webhooks to automatically inject sidecars into pods. However, this capability is not available for Amazon ECS, and a different approach is therefore required in this case.
This blog post demonstrates how the Envoy proxy sidecar can be injected into an ECS task as part of a CI/CD pipeline for deploying ECS services in App Mesh. The benefits of this approach are:
- application developers do not need to be concerned with writing complex task definitions,
- automation results in fewer errors, and
- platform teams can use the pipeline to enforce any conventions and policies that they have adopted in relation to meshed services, such as where logs are stored.
To demonstrate the concept, this post shows how you can set up service pipelines for two meshed microservices that collectively implement a simple hello application.
Note: It is assumed that the reader is familiar with key AWS App Mesh concepts, such as virtual services, virtual routers, virtual gateways, and virtual nodes. For an explanation of these terms, please refer to the documentation.
Example application architecture
The example hello application consists of two services:
hello-web is a front-end service that receives HTTP GET requests on the resource path /hello/<name>. Upon receiving a request, it retrieves some data from the hello-backend service, using the resource path /data. It then combines this data with the passed <name> parameter to construct an HTML response.
hello-backend is a service offering a REST API that responds to HTTP GET requests on the resource path /data. It returns a JSON object comprising a greeting string and a message string.
Figure 1 shows the hello application deployed in an ECS environment without AWS App Mesh.

Figure 1: Demo application running in ECS with no mesh.
Here, the hello-web service is exposed via an Application Load Balancer (ALB) which acts as the ingress, and the hello-backend service is discoverable using the DNS name hello-backend.demo.local. The solid black arrows denote the flow of HTTP request traffic, which moves from left to right.
Figure 2 shows the same application, but this time deployed in an ECS environment with AWS App Mesh.

Figure 2: Meshed demo application.
In this architecture, additional resources are deployed in the ECS cluster itself, as well as in the App Mesh control plane. These are respectively depicted in the lower and upper halves of the architecture diagram. The dashed purple lines represent various associations between mesh components.
The ALB ingress is replaced with an NLB and an Envoy proxy service. App Mesh requires the use of Envoy to enable the ingress to be managed as a virtual gateway in the control plane. As application layer routing is now handled by Envoy, the ALB is no longer required. The NLB allows the ingress to scale horizontally and with low latency to the Envoy containers.
The hello-web and hello-backend services include an Envoy proxy running as sidecar containers in their tasks, enabling them to be managed as virtual nodes in the App Mesh control plane. All traffic in and out of service containers is routed via Envoy proxy sidecars.
The ECS service name is extended to include a version identifier that can be used to distinguish different versions of the service. In this example, the commitId generated by Git is used as a version identifier. This makes it possible to have multiple versions of the same service running concurrently and maximizes flexibility in the choice of deployment and testing strategies. However, neither the ingress service nor the hello-web service needs to be aware of these commitIds for their respective upstream services. Instead, they reference a service name that is associated with a virtual service in the mesh, and the mesh then looks after routing to the correct version of the ECS service.
In the App Mesh control plane, the ingress Envoy proxy is associated with a virtual gateway, and each of the application services is associated with a virtual service, a virtual router, and at least one virtual node. The virtual gateway, virtual services, and virtual routers are version-agnostic, but each virtual node is associated with a specific version of a service and includes the same version identifier (commitId) as the service.
The ingress virtual gateway is configured to route all requests that contain a resource path starting with /hello-service to the virtual service named hello-web.demo.local. Additionally, the resource path is rewritten such that requests to /hello-service/hello/<name> are forwarded with the resource path /hello/<name>.
The virtual service hello-web.demo.local is configured with the backend hello-backend.demo.local. This mesh construct is used to explicitly allow outbound traffic from the hello-web service to the hello-backend service.
The virtual routers for hello-web.demo.local and hello-backend.demo.local determine how incoming traffic to these services is routed. In the diagram, each virtual router is associated with a single virtual node, which is in turn associated with a specific version of the ECS service. It is also possible for a virtual service to be associated with multiple virtual nodes (and corresponding service versions), with the virtual router determining how traffic should be distributed amongst them. For example, to enable canary testing, the router can be configured to direct 10 percent of traffic to a new version while using the old version for the remaining 90 percent.
Service pipeline architecture
Having explained the application architecture, this section focuses on the pipelines that are used to build and deploy the ECS services and App Mesh virtual nodes for hello-web and hello-backend—including the injection of the Envoy sidecar. The service pipeline architecture is shown in Figure 3.
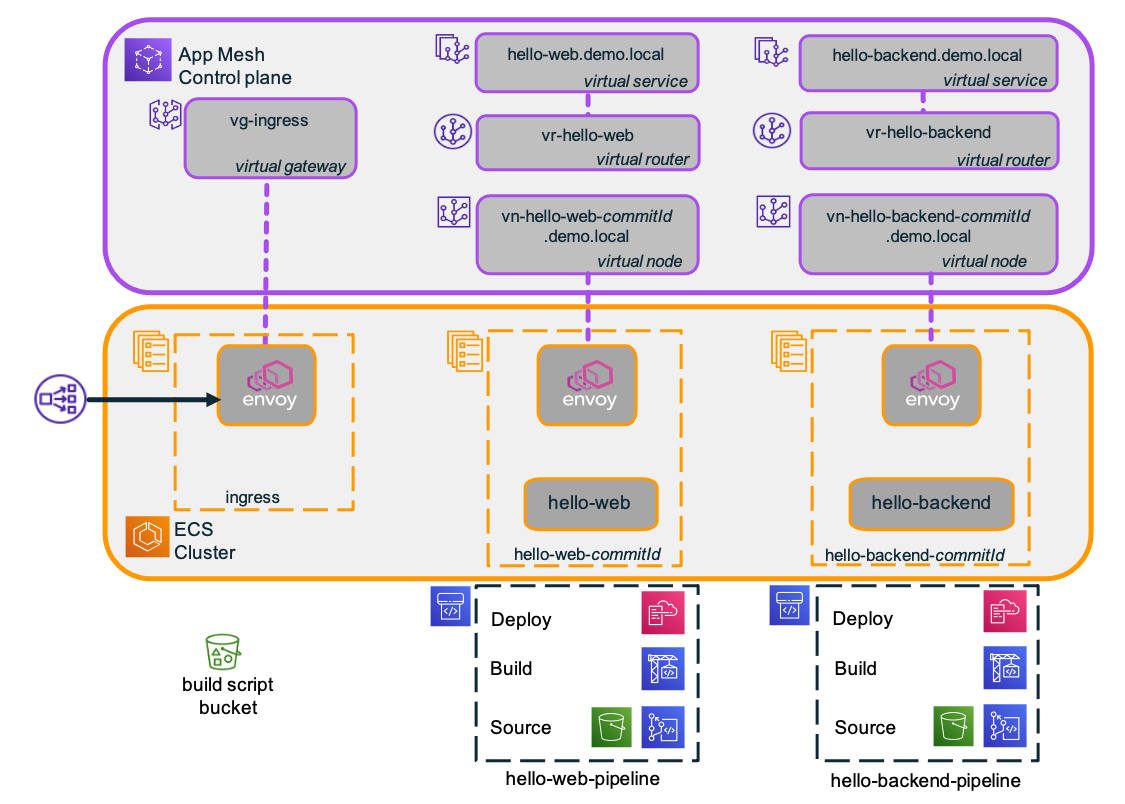
Figure 3: Service pipeline architecture.
Each service has an associated pipeline that comprises a Source stage, a Build stage, and a Deploy stage. Using these service pipelines, you can push service configurations to create and deploy ECS services and their associated App Mesh virtual nodes. You can subsequently configure the virtual routers to route traffic to the deployed services.
Note: In this demo, mesh routing is configured manually. Routing configuration can also be automated as part of the pipeline, but this is outside the scope of this post.
Each service pipeline is generated from a common, parameterized AWS CloudFormation template. Figure 4 illustrates the service pipeline structure.

Figure 4: Service pipeline structure.
The pipeline Source stage has two source actions: a shared S3 “BuildScript” bucket that is used to host CDK build script files and a “ServiceConfig” repo to store the service configuration (which is assumed to be in a manifest.yaml file).
The Source stage is triggered automatically whenever a change is pushed to the “ServiceConfig” repo. It also retrieves the CDK build script file and makes it available for the Build stage to use.
The Build stage uses AWS CodeBuild to execute the CDK build script. This processes the manifest.yaml file and builds a CloudFormation template, which is then passed on to the Deploy stage.
The Deploy stage builds a new stack for each new version of the service. Once deployed, mesh routing can be configured to use the new version of the service using a suitable strategy, such as canary deployment. Once a particular version of a service is no longer needed, its stack can be deleted.
Note: For simplicity, the approach used in this post assumes that a new stack is built for each new service version. A more elaborate pipeline might also allow existing stacks to be updated in place, particularly if the changes are of a nonfunctional nature.
Source stage
The demo assumes the use of separate Git repositories for application code and service configuration. This makes it easier to decouple changes to service deployments from changes to application code.
The demo uses a separate service configuration repo for each of the two microservices hello-web and hello-backend. Each repo contains a single manifest.yaml file that specifies a number of service configuration parameters. For example, the manifest file for the hello-web service is reproduced below:
The Task section specifies the name to use for the ECS task definition family and the CPU and memory resources required for the task.
The AppContainer section specifies the container image to use, the port on which the application runs, the endpoint to use for checking the container’s health, and the command to be executed when starting the container. In this case, the command starts the Node.js server that is contained within the hello-web container image and passes the URI of the endpoint for the backend service.
Finally, the (optional) VirtualNode section specifies any backend configuration that may be required for the virtual node associated with this service—which in this case aligns with the backend endpoint specified in the container command.
You may observe that the manifest file is not a complete specification of the parameters required to launch an ECS service. Additional parameters (such as scaling parameters, where to store logs, or whether to use AWS Fargate or EC2, etc.) are defined by the service pipeline, effectively giving control over these parameters to the pipeline template owner.
Build and Deploy stages
The Build stage uses an AWS CodeBuild project to execute the CDK build script. The project makes available a number of environment variables for the CDK script to use, such as details of the VPC, ECS cluster, service discovery namespace, and log group to use. The build spec copies the manifest.yaml artifact from the ServiceConfig action into the CDK build script directory and then invokes cdk synth to build the stack template, as shown below:
The CDK build script itself proceeds as follows:
- Validate required environment variables.
- Read, parse, and validate the manifest.yaml.
- Create a virtual node for the new version of the service.
- Create a Fargate task definition for the new version of the service, including container definitions for both the application container and the Envoy proxy sidecar container.
- Create an ECS service for the new version of the service.
- Output a CloudFormation template.
The Deploy stage then applies the resulting CloudFormation template to create a stack for the new version of the service. The commitId from the CodeCommit source is embedded in the stack name.
Demo walkthrough
The steps required to build and run the demo application are as follows:
- Create a mesh environment, including a VPC, ECS cluster, and App Mesh with a public-facing ingress.
- For each of the two microservices, create a virtual service, virtual router, and service pipeline.
- Configure and deploy the services using the service pipelines.
- Configure mesh routing to use the deployed services.
- Test application.
Once the application is running, the following steps can be used to demonstrate the introduction of a new service version using a canary deployment strategy:
- Make a change to the hello-backend service configuration and push to deploy the new version.
- Adjust service routing for hello-backend to enable canary testing (10 percent to new, 90 percent to old) and retest.
- Move all traffic to the new version and retest.
- Delete service stack for the old version.
The application code repo can be cloned from https://github.com/aws-samples/ecs-pipeline-inject-envoy-sidecar. Detailed instructions are provided in the Walkthrough section of the README.md file.
To avoid any unexpected charges, don’t forget to clean up resources once you have finished experimenting with the demo application! See the Clean up section of the README.md file.
Limitation of scope, and fit with wider CI/CD automation
The scope of this post is limited to illustrating how a service configuration repository, with an accompanying service pipeline, can be used to automate deployment of a meshed service. This would typically form part of a broader CI/CD solution that also covers:
- building the application container(s) and pushing it to a registry,
- updating service configuration files and triggering the service pipeline,
- updating mesh routing to implement deployment and rollback strategies,
- support for multiple environments and promoting a service configuration from one environment to another.
The remainder of this section highlights some additional considerations for building out a complete CI/CD solution around this approach.
Referencing container images
As per CI/CD best practice, the AppContainer.Image property in the manifest.yaml file references a specific image tag, deliberately avoiding the use of the latest tag. This image tag could be updated automatically as part of the CI/CD pipeline. For example, a push of a new image to ECR could trigger an update of manifest.yaml to reference the new image, in turn triggering the service pipeline to build a stack for the new service version.
Separation of responsibilities: Platform vs. Service
The demo uses a manifest.yaml file to specify a number of service configuration parameters, with additional parameters supplied by the pipeline itself. This arrangement enables the separation of responsibilities for platform configuration versus service configuration.
Under this arrangement, the team responsible for the platform creates one or more service pipeline templates (with associated service configuration templates) that define service deployment patterns that they are able to support. Service teams then create service pipelines using these templates and use them to deploy services to the platform.
The platform team can use pipeline templates to enforce adherence to their conventions and policies. For example, the service pipeline used in the demo implements a particular log-naming convention, forces the use of Fargate with a scaling policy, and mandates that all services must be meshed and have an Envoy proxy sidecar running in the task. This concept can be extended to other aspects of task configuration, including other sidecar containers that may be required.
Through the service configuration template, the platform team effectively determines what service parameters are controllable by the service teams. Typically, these include parameters that affect the (functional) behavior of the application—such as the container image to use and the command line parameters to pass to the application container.
Conclusion
This post demonstrates how you can use a pipeline to inject an Envoy proxy sidecar container into your ECS tasks so that they can be used with AWS App Mesh. By using a pipeline to build the required task and service definition files, developers can focus on building service logic with minimal effort required on service configuration. The pipeline can also be used to enforce any deployment conventions and policies as may be required by a platform team.