AWS Architecture Blog
Deploying Sample UI Forms using React, Formik, and AWS CDK
Companies in many industries use UI forms to collect customer data for account registrations, online shopping, and surveys. It can be tedious to create form fields. Proper use of input validation can help users easily find and fix mistakes. Best practice is that users should not see a form filled with “this field is required” or “your email is invalid” errors until they have first attempted to complete the form.
Forms can be difficult to write, maintain, and test. They often have to be repeated in multiple areas on even the most basic interactive web application. Fortunately, third-party libraries provide front-end developers with tools to manage these complexities.
This blog post will describe an example solution for implementing simple forms for a user interface using the JavaScript libraries React and Formik. We will also use AWS resources to host the application. The blog will describe how the application is provisioned using the AWS Cloud Development Kit (CDK).
Our sample form and code
Our solution demonstrates a straightforward way for a front-end or full stack developer to rapidly create forms. We will show how a popular React form library, Formik, abstracts input field state management and reduces the amount of written code.
Our sample form will collect the user’s information (name, email, and date of birth) and store the data to a private Amazon S3 bucket for later retrieval using a presigned URL. The sample code gives developers a structure with which to build on and experiment. The code provides example integration with AWS services to host a React form application.
Figure 1 demonstrates how the user’s information flows through various AWS services and finally gets uploaded to private Amazon S3 bucket.
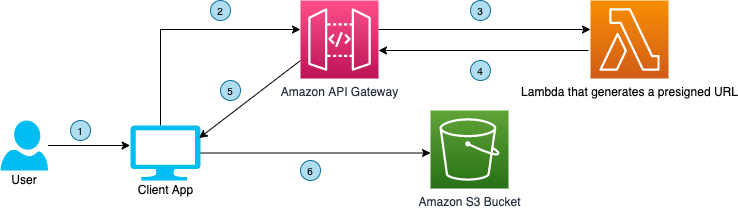
Figure 1. User interface communicating with API Gateway to upload a file to a S3 bucket using a presigned URL
- Click the Upload button. The user visits the webpage, fills the form, and clicks the ‘Upload Data’ button
- HTTP request to Amazon API Gateway. The front end makes an HTTP request to the API Gateway
- Forward HTTP request. The API Gateway forwards the HTTP request to the Lambda function that generates a presigned URL for uploading data to a S3 bucket
- Presigned URL. The presigned URL for uploading data to a S3 bucket is returned by the Lambda function to the API Gateway as HTTP response.
- Forward HTTP response. The API Gateway forwards the presigned URL to the client application
- Upload data to Amazon S3. The client application uses the presigned URL to upload the form data to a S3 bucket
The code also demonstrates the flow of data when a download request is made by the user. The download process is shown in Figure 2.
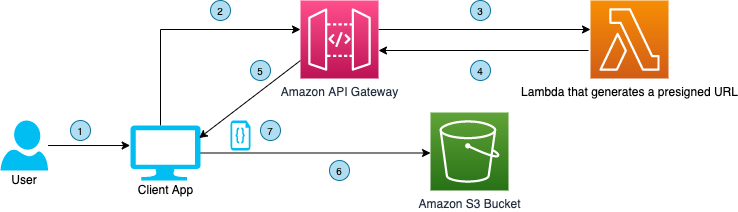
Figure 2. User interface communicating with API Gateway to download a file from a S3 bucket using presigned URL
- Click Download button. The user clicks the ‘Download Data’ button
- HTTP request to API Gateway. The front end makes an HTTP request to the API Gateway
- Forward HTTP request. The API Gateway forwards the HTTP request to the Lambda function that generates a presigned URL for downloading data from a S3 bucket
- Presigned URL. The presigned URL for downloading data from a S3 bucket is returned by the Lambda function to the API Gateway as HTTP response.
- Forward HTTP response. The API Gateway forwards the presigned URL to the client application
- Upload data to Amazon S3. The client application uses the presigned URL to download the form data to S3 bucket
- File downloads. The file downloads to user’s computer
Here are the four steps to demonstrate this solution:
- Provisioning the infrastructure (backend). The infrastructure will consist of:
- An AWS Lambda function, which will generate a presigned URL when requested by the UI and respond with the URL for uploading/downloading data
- An API Gateway, which will handle the requests and responses from UI and Lambda
- Two separate S3 buckets, which will host the static UI forms and store the uploaded data (different buckets for each).
- Deploying the front end. We will use sample React/Formik code on S3.
- Testing. Once our code is deployed, we will test the form by uploading a file though the UI, and then retrieve that file.
- Clean up. Finally, we will clean up the S3 bucket.
Prerequisites
For this walkthrough, you should have the following prerequisites:
- An AWS account
- Confirm you have followed the guide for working with CDK / CDK Toolkit Installed
- Configure the AWS CLI
- Git Installed
- Node and npm installed – You can check the version of node by running `node -v` and the version of npm by running `npm -v`
Deploying the backend and front end
Clone code
The sample code for this application is available on GitHub. Clone the repo to follow along in a terminal.
git clone https://github.com/aws-samples/react-formik-on-aws
Install dependencies
Change the directory to the folder the clone created and install dependencies for the API.
cd formik-presigned-s3/ npm install
After installing the dependencies for the API, let’s install the dependencies in the UI.
cd ui/formik-s3-react-app
 npm install
Bundling
Let’s bundle our Lambda function that currently exists in the index.js file inside the resources/lambda directory. This will create our Lambda function inside a directory that our stack can read from, to create the handler.
npx esbuild resources/lambda/index.js –bundle –platform=node –target=node12 –external:aws-sdk –outfile=dist/lambda/build/index.js
Let’s go into more detail about the function of the Lambda handler. As seen in Figure 3, the handler is using three helper functions that are written in the file (isExisted, fetchUploadUrl, fetchViewUrl). It creates a presigned URL for uploads/downloads of data, confirms that the URL was created, and fetches the URL. Lines 68–74 are calling the helper functions based on the API request needed.

Figure 3. Lambda’s handler function for GET request type
Build the React app
#Make sure you are in the ui/formik-s3-react-app directory
 npm run build
This command will create your index.html file and its dependencies, which will be the source of your UI site. When we deploy our stack, we will inspect the CDK code. The Lambda bundler and the React app build step work together to source the directory and create the S3 bucket that will eventually host the React application.
Note: If you are deploying AWS CDK apps into an AWS environment, you must provision these resources for a specific location and account. In this case you must run the following command:
cdk bootstrap aws://<aws_account_number>/<aws_region>
This is the error that you will see if you do not bootstrap:
This stack uses assets, so the toolkit stack must be deployed to the environment (Run "cdk bootstrap aws://aws_account_number/aws_region")
Let’s deploy!
Before we run the deploy command, let’s understand what exactly we are deploying and the advantages of the CDK.
Note: We won’t go into depth on how the AWS CDK works, but we will demonstrate implementation of the code for our infrastructure and website hosting.
Our configuration code for deploying our CDK is found in the root directory in a file called cdk.json. It’s important that we can configure certain properties. This is where we map to our bin file that creates our CDK app. As you can see in Figure 4, the app key points to bin/formic-s3.ts.
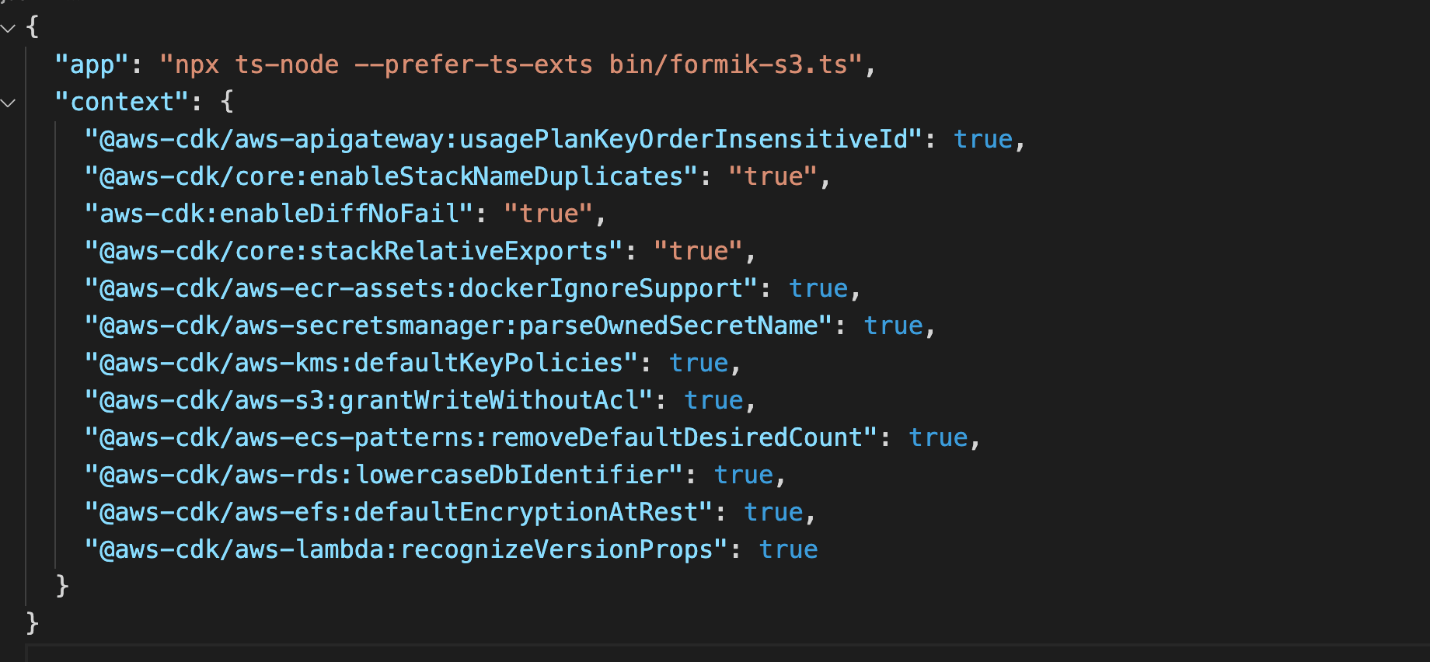
Figure 4. Contents of cdk.json file
Now let’s look at the CDK stack code, shown in Figure 5. This can be found in the lib directory of the root file and it is called formik-s3-stack.ts.
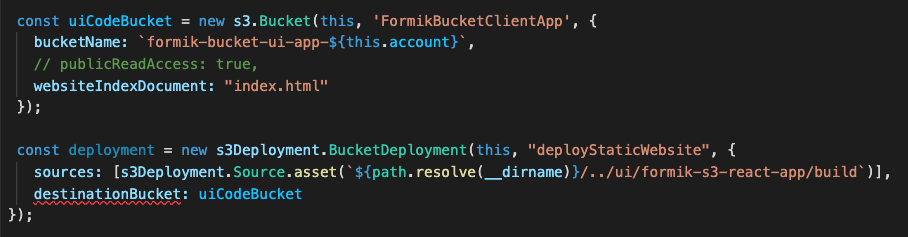
Figure 5. CDK stack code that creates a new S3 bucket for hosting the React webpage
This is the part of the code that creates our S3 bucket for hosting our React UI. The first few lines create the bucket name and point to the file that will be seen by the world (index.html). The deployment function has a source that will be searching for the path in your local directory where the build files were created. This will source the directory and then create it in an S3 bucket in the cloud.
Notice how our publicReadAccess is commented out. This is because it is not best practice to leave your bucket exposed publicly. For this blog, we will host this simple form site and allow public access. However, a CDN such as Amazon CloudFront should be used for distribution of traffic to keep your S3 bucket secure.
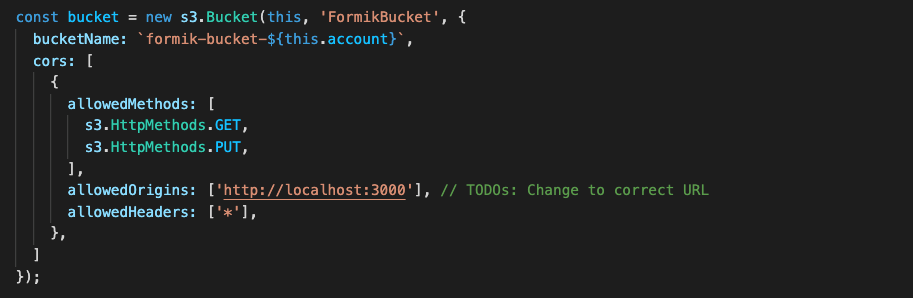
Figure 6. CDK stack code that creates a new S3 bucket for uploading and downloading data using S3 presigned URL
Figure 6 shows the second S3 bucket that will be used for our Formik data.
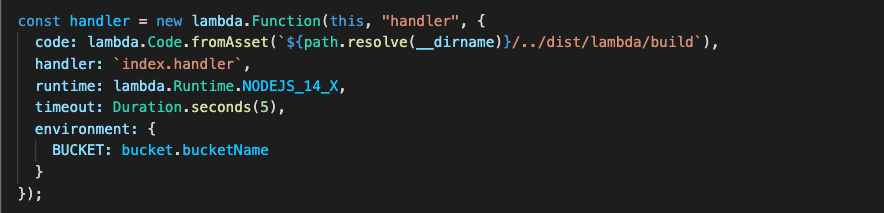
Figure 7. CDK code stack used to create the Lambda function
Figure 7 shows how to create your Lambda function, which also will be reading from the ‘bundling’ step.
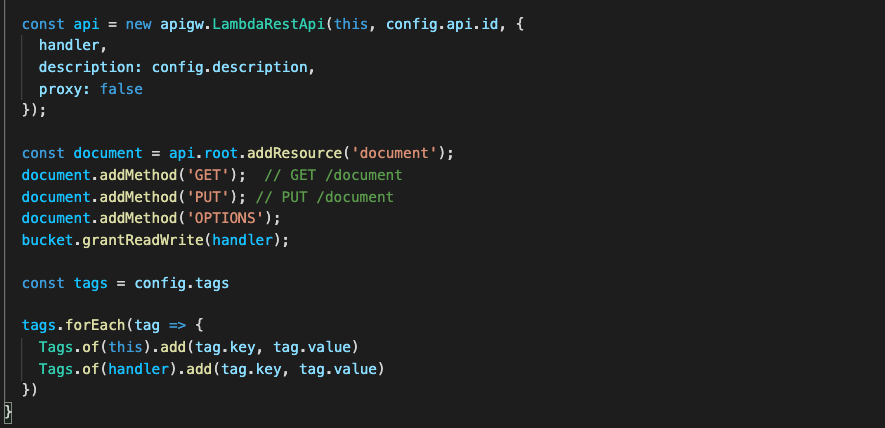
Figure 8. CDK code stack used to create API Gateway
Figure 8 shows how to create your API Gateway resources. Notice the ‘OPTIONS’ document is used here. This is because our front-end request URLs are not from the same origin as our APIs. Including the ‘OPTIONS’ document enables our browser to succeed in its preflight request and avoid any CORS issues.
Now that we understand our CDK, let’s finally DEPLOY!
npx cdk deploy
You will receive the output in the terminal that will be the storage API endpoint. You can also view this in CloudFormation under the Output tab for the stack the CDK spun up (FormikS3Stack). You should also see your S3 URL to view your React app.
What is React’s form?
Once you have your URL, you should see the form, shown in Figure 9.
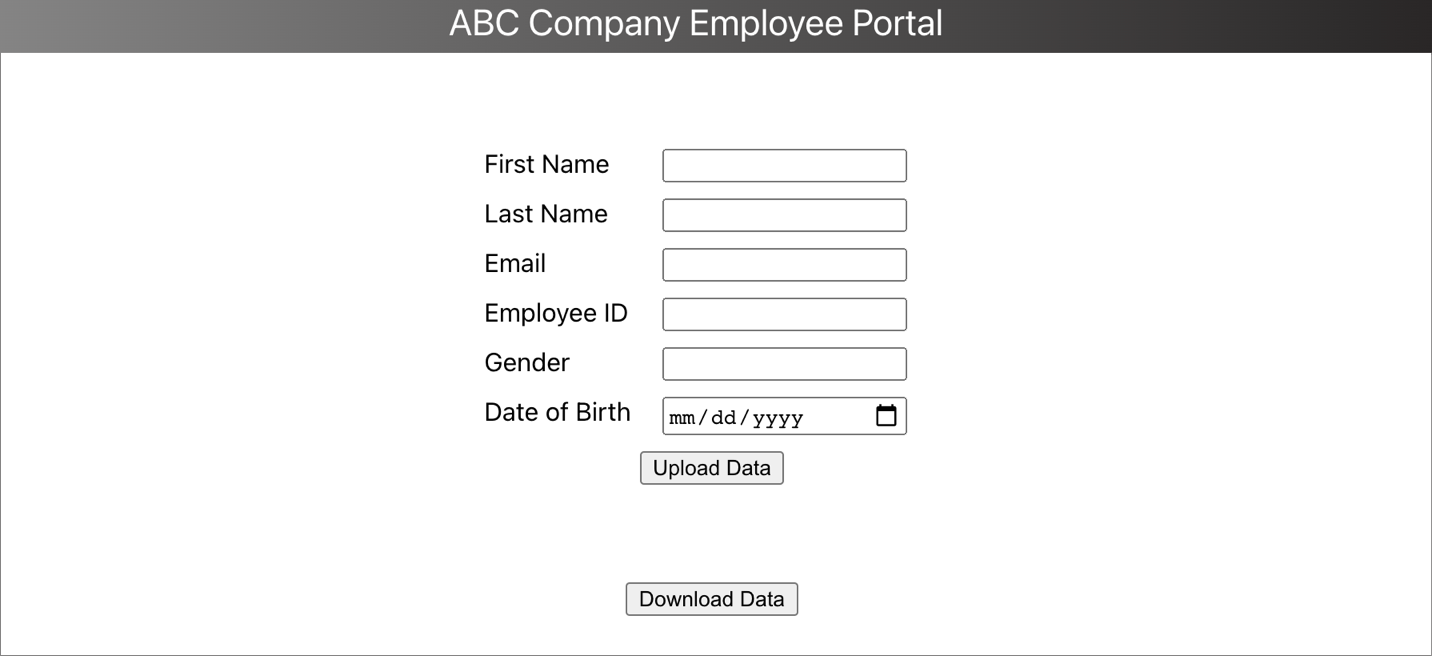
Figure 9. Portal form designed using Formik in ReactJS
Why is Formik so special?
Let’s preface this with how our forms had to be created using the old method, shown in Figure 10.
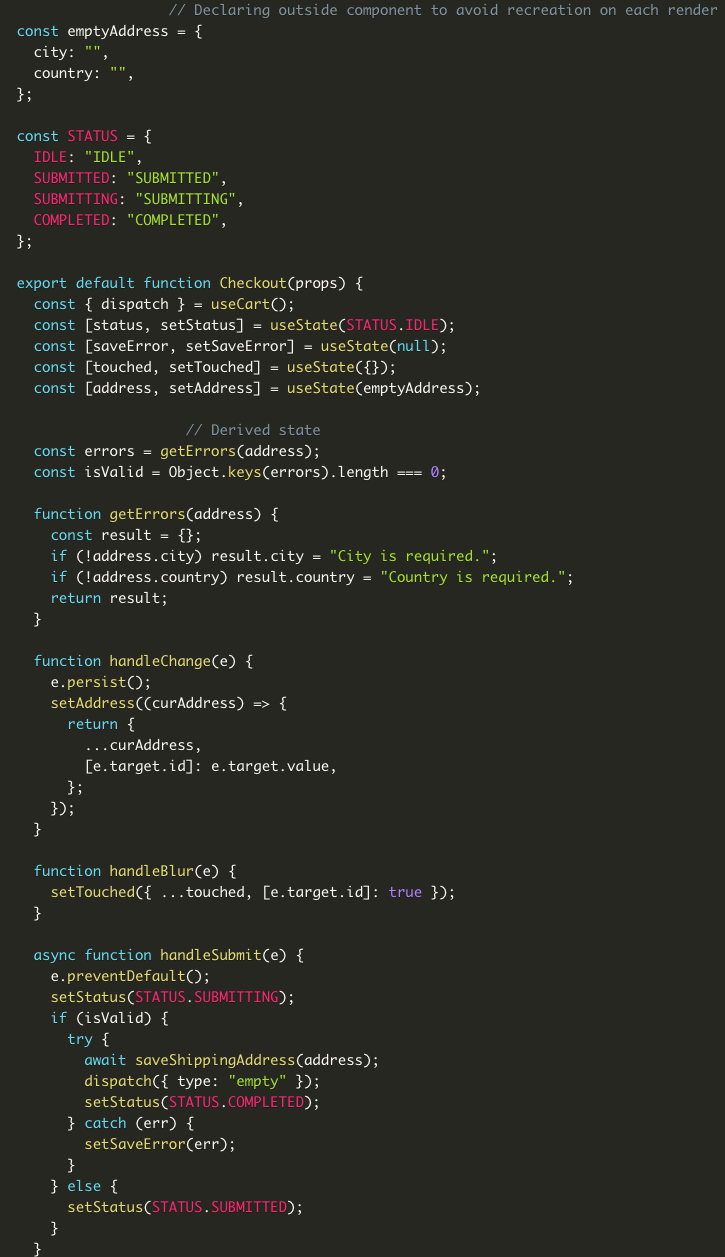
Figure 10. This is from https://www.bitnative.com/2020/08/19/formik-vs-plain-react-for-forms-worth-it/ showing a form without Formik
Figure 11 shows our code:
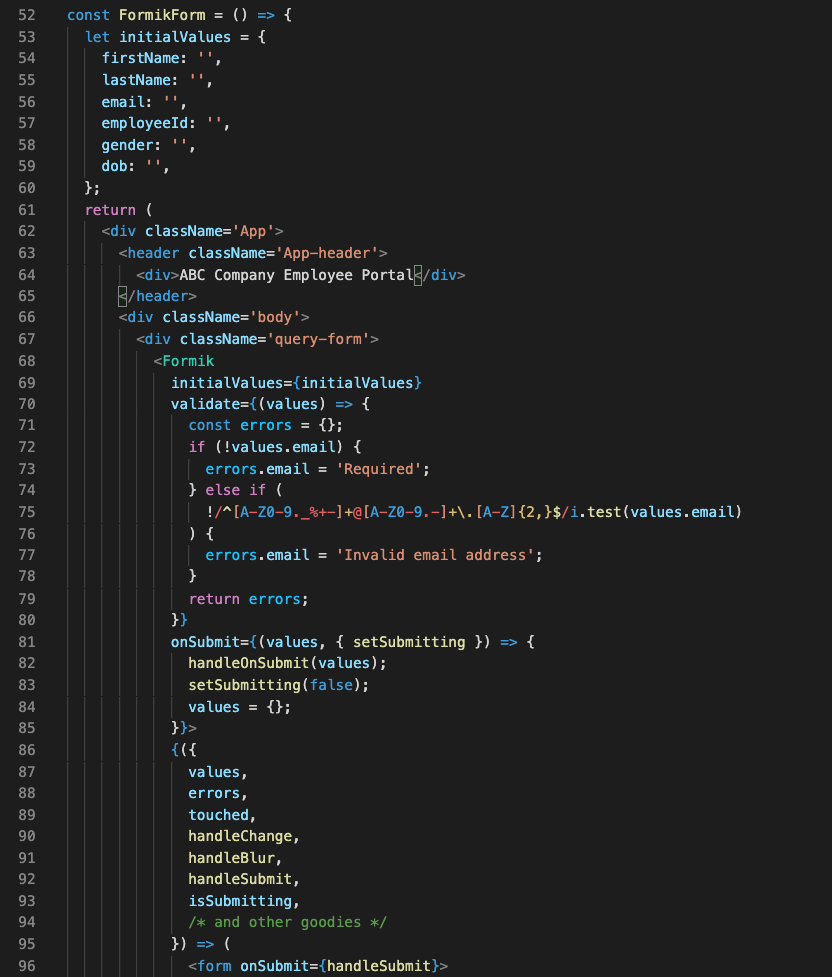
Figure 11. React code with the UI components
One of the first things you can notice when comparing both methods, is the location of your initial values. Formik handles the state of your fields. Without it, we would need to manage this with React’s state object if we were using class components, or with hooks inside functional components. With Formik, we don’t have to handle these tasks.
Another benefit of using Formik is its handling of input validation, errors, and handler functions that we can use to manage our UI (lines 70–79 and 87–93.) Formik reduces the need to write extra lines of code to handle validation and errors, managing states, and creating event handler logic.
Read this blog post that compares both methods of creating forms.
Making our API calls from the UI
Our Formik form is simple to implement, but one more step remains. We need to handle uploading the information, and then downloading it.
With all our resources created and our form done, we put it all together by creating our API requests, shown in Figure 12.
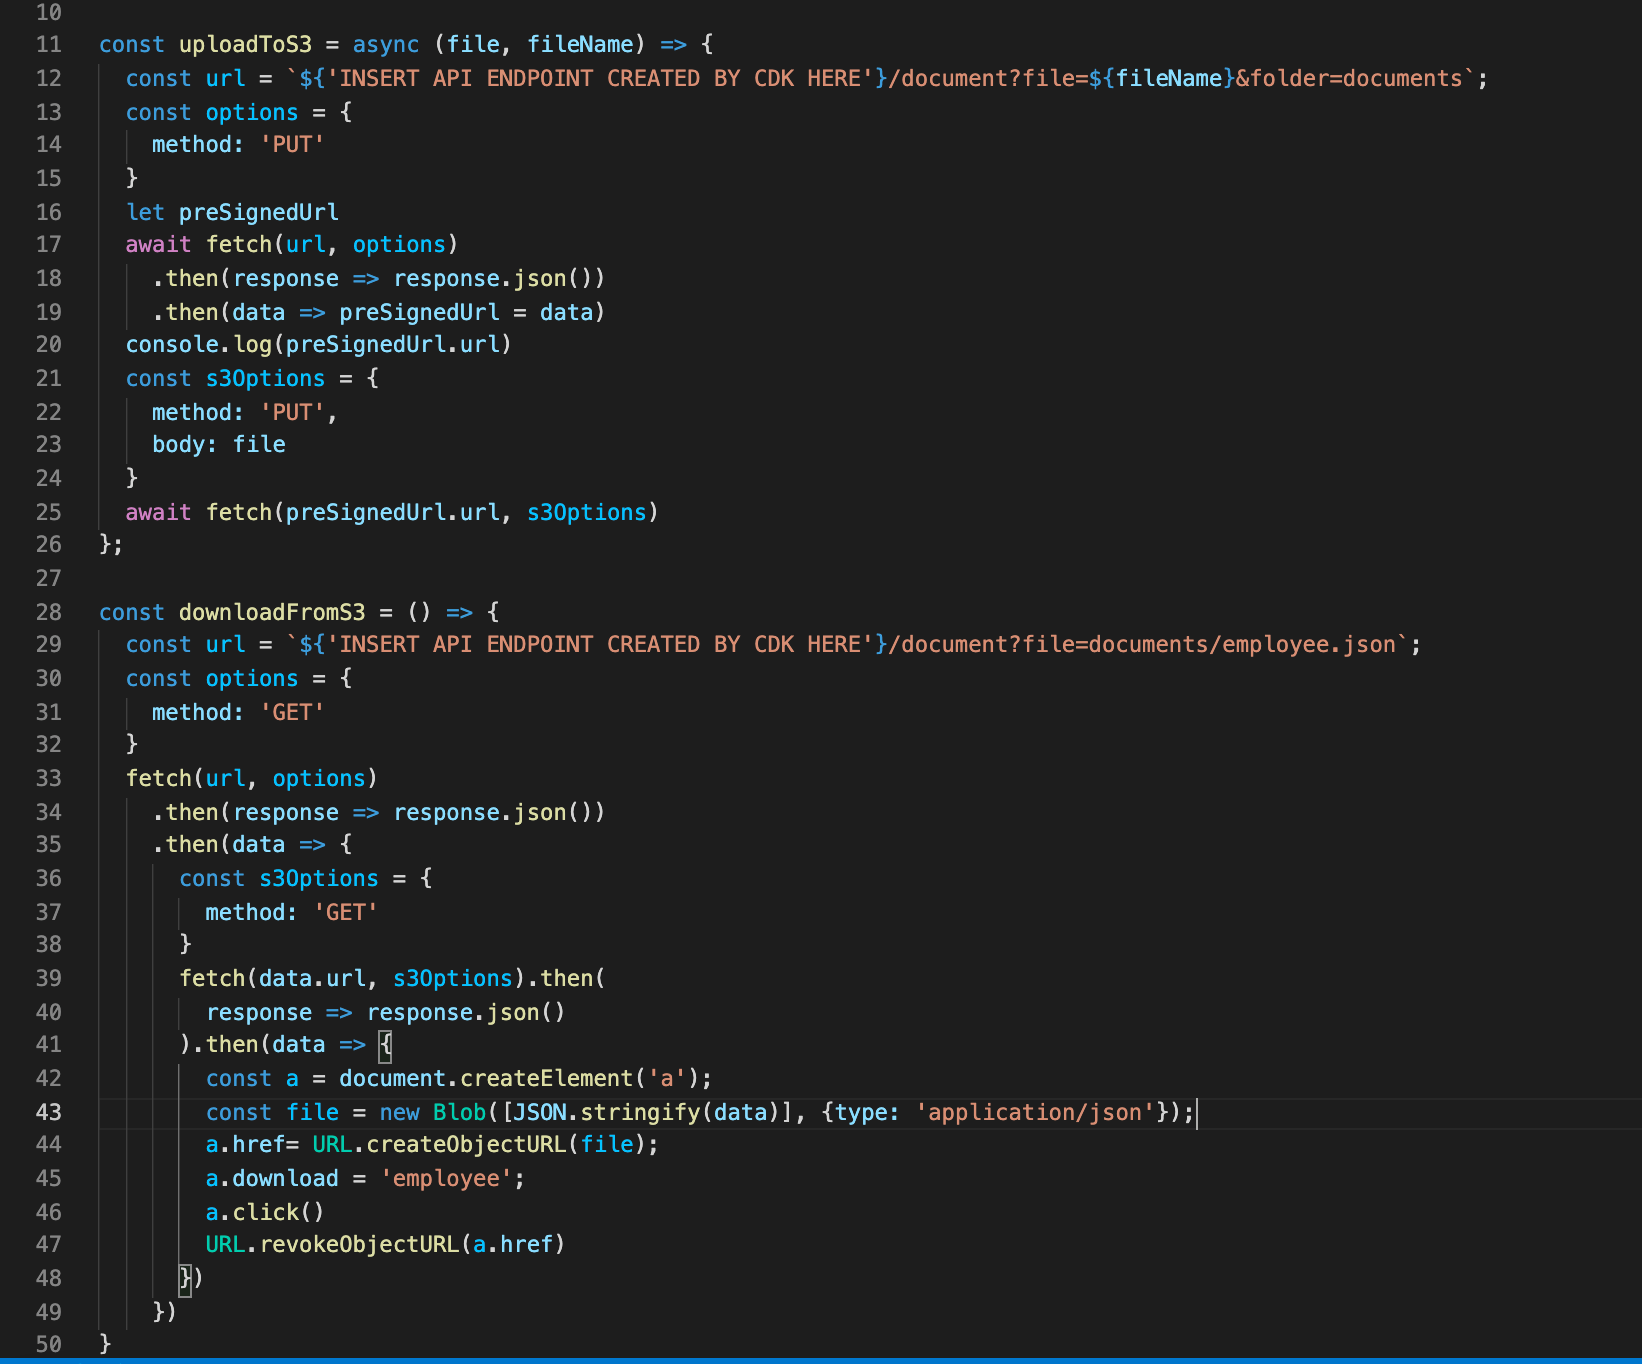
Figure 12. Code to upload to S3 bucket and download from S3 bucket
Due to the efficiency of AWS and Formik, we can upload and download with fewer than 50 lines of code.
Lines 11–26 is where we call our API Gateway URL that our CDK created for us. With this API, when the user first clicks the upload button, the request hits the endpoint to create the presigned URL. It waits for its creation and in lines 21–25 we PUT our data into our S3 bucket.
Lastly, we are able to hit that same presigned URL to download our information we uploaded into a JSON file.
Cleaning up
To avoid incurring future charges, delete the resources. Let’s run:
npx cdk destroy
You can confirm the removal by going into CloudFormation and confirming the resources were deleted.
Conclusion
In this blog post, we learned how we can create a simple server for our form submissions. We spun it up easily with the CDK toolkit and provisioned our resources. We hosted our UI and created a sample form using Formik, which handles state and reduces the amount of code we must write. We then hit the endpoints given to us by the deployment and tested the app by uploading and downloading our form data. Traditional form data management requires a separate function for handling data and errors in forms. This is a cleaner and more efficient way to handle form data.
For further reading: