AWS Storage Blog
Using AWS DataSync to move data from Hadoop to Amazon S3
You want to leverage cloud scalability, increase cost efficiency by paying only for utilized storage, decouple big data storage from processing, and increase capabilities for data analytics and machine learning using AWS. But how do you move your Hadoop cluster? To accelerate this transition, AWS DataSync recently launched support for moving data between Hadoop Distributed File Systems (HDFS) and AWS Storage services.
With this launch, AWS customers can migrate files and folders from HDFS on their Hadoop clusters to AWS Storage, populate their data lakes on Amazon Simple Storage Service (S3), move data into Amazon EMR, archive data directly to any Amazon S3 storage class, or transfer data between their clusters and AWS for further analysis and processing.
AWS DataSync agents run external to Hadoop clusters so customers can accelerate their data migrations and simplify data transfers between their cluster and AWS without consuming compute and memory resources on their cluster or impacting their business processes.
AWS DataSync is an online data migration service that gives customers a simple way to automate and accelerate copying data over the internet or with AWS Direct Connect. AWS DataSync is feature rich with built-in scheduling, monitoring, encryption, and end-to-end data integrity validation. DataSync simplifies and automates the process of copying data to and from AWS, all with pay-as-you-go pricing.
In addition to support for HDFS, AWS DataSync also supports copying data between Network File System (NFS) shares, Server Message Block (SMB) shares, self-managed object storage, AWS Snowcone, Amazon S3 buckets, Amazon Elastic File System (EFS) file systems, Amazon FSx for Windows File Server file systems, and Amazon FSx for Lustre file systems.
In this blog post, we walk you through the capabilities of HDFS support provided by AWS DataSync and give an example of using AWS DataSync to copy data from a Hadoop cluster to Amazon S3.
AWS DataSync support for HDFS
As an online data migration service, AWS DataSync helps customers move data between a variety of data storage systems. To use AWS DataSync, you create locations and specify a configuration for connecting to your storage. With the launch of support for moving data to and from Hadoop clusters, AWS DataSync now provides a new HDFS location type.
AWS DataSync uses an agent to connect to your self-managed storage systems. An agent is a virtual machine that you deploy in your VMware, Hyper-V, or KVM environment. For self-managed Hadoop clusters running on AWS, you can also deploy an agent as an Amazon Elastic Compute Cloud (Amazon EC2) instance. When connecting to your Hadoop cluster, the AWS DataSync agent acts as an HDFS client, communicating with the primary NameNode in your cluster, and then copying file data to or from the DataNodes.
How to use AWS DataSync to copy from HDFS to Amazon S3
To use AWS DataSync to copy data from your Hadoop cluster to Amazon S3, you do the following:
- Deploy and activate an AWS DataSync agent virtual machine
- Gather configuration data from your Hadoop cluster
- Validate network connectivity
- Create an AWS DataSync task
- Run the task to copy data to your Amazon S3 bucket
Deploy agent
There are multiple options for deploying your AWS DataSync agent. Depending on where your underlying Hadoop infrastructure resides, we encourage you to use the latest user guide agent documentation to take an informed decision.
For best performance, the AWS DataSync agent should be deployed near to your Hadoop cluster to minimize network latency between the agent and your cluster.
Once you have deployed your agent, the next step is to choose an AWS DataSync service endpoint and activate your agent in your AWS account and region. The endpoint will determine the network connectivity you need to enable between your agent and AWS. For more information, refer to the latest user guide network documentation.
Getting required configurations, files, and credentials
AWS DataSync supports both simple authentication and Kerberos authentication. Configure DataSync to use the authentication method used by your Hadoop cluster. In this section, we walk through the information you will need to collect, depending upon your cluster’s authentication method.
Simple Authentication
Simple authentication provides a username for authentication. When configuring AWS DataSync, you should choose a user with permissions for the files and folder(s) you want to migrate.
If your Hadoop cluster uses transparent data encryption (TDE) you want to capture the uniform resource identifier (URI) of the TDE server, which can be found in your hdfs-site.xml file, under dfs.encryption.key.provider.uri.
Kerberos Authentication
To configure DataSync for Kerberos authentication, you will need a keytab file and a Kerberos configuration file. The keytab file holds user credentials and should correspond to a principle with permissions to the files and folder(s) you want to migrate. Both the keytab file and the Kerberos configuration file can be generated or copied from a node in your Hadoop cluster.
To generate a keytab file and to get the Kerberos configuration file for your cluster, use the following steps:
- Connect by using Secure Shell (SSH) to a node on your Hadoop cluster.
- Run:
$ addent -password -p <user name> -k 1 -e <supported_encryption_type>. - Run:
$ wkt /tmp/keytabs/<user_name>.keytabfor writing thekeytabto a preferred location on your cluster node. - Exit the
ktutilcommand. - Download the
keytabfile to your local machine. - Download the file
/etc/krb5.confto your local machine.
When using Kerberos authentication, you also need to get the appropriate values for the Quality of Protection (QOP) settings. These settings specify the Remote Procedure Call (RPC) and data transfer privacy settings configured on your cluster.
To retrieve the required values, you must first validate the namenode metadata service port (IPC port) set on the core-site.xml under the fs.defaultFS or fs.default.name properties, depending upon your Hadoop distribution.
$ grep -A 2 -B 1 -i fs.default core-site.xml
<property>
<name>fs.defaultFS</name>
<value>hdfs://ip-xx-xx-xx-xx.ec2.internal:8020</value>
</property>
You must also validate the datanode port setting under the dfs.datanode.address property.
$ grep -A 2 -B 1 -i dfs.datanode.address hdfs-site.xml
<property>
<name>dfs.datanode.address</name>
<value>xxx.xxx.xxx.xxx:1004</value>
</property>
Next, validate the Remote procedure Call Protection (RPC Protection) configured on the HDFS cluster, this setting corresponds to your hadoop.rpc.protection in the core-site.xml file on your cluster.
$ grep -A 2 -B 2 hadoop.rpc.protection core-site.xml
<property>
<name>hadoop.rpc.protection</name>
<value>authentication</value>
</property>
Finally, you must validate the Data Transfer Protection setting on your cluster. This setting corresponds to the value specified on the dfs.data.transfer.protection setting in the hdfs-site.xml file.
$ grep -A 2 -B 2 dfs.data.transfer.protection hdfs-site.xml
<property>
<name>dfs.data.transfer.protection</name>
<value>authentication</value>
</property>
The values for both RPC and data transfer protection will be one of the following and must only contain a single value:
- Authentication
- Integrity
- Privacy
- Disabled
Note that TDE is not supported by AWS DataSync when using Kerberos authentication.
Validate network connectivity
In addition to connectivity between your agent and AWS, you will also need to open network ports between the AWS DataSync agent and your Hadoop cluster. The following connectivity should be validated before running DataSync tasks:
- Between the DataSync agent and the primary NameNode in your Hadoop cluster
- Between the DataSync agent and all DataNodes in your Hadoop cluster
- If you are using Kerberos authentication:
- Between the DataSync agent and the Kerberos Key Distribution Center (KDC)
- If you are using Transparent Data Encryption (TDE):
- Between the DataSync agent and the Key Management Server (KMS)
The exact ports and IP addresses for each of the above are specific to your Hadoop cluster. You can find these values in your Hadoop cluster configuration files, as noted in the previous section. The DataSync documentation also provides guidance on the ports to be opened.
You can validate connectivity between your DataSync agent and the systems noted above by using the local console on the DataSync agent.
Start by logging in to the local console on your agent and selecting option 3, Test Connectivity to Self-Managed Storage, from the menu:

Figure 1: DataSync agent local console
Then select option 4: HDFS. Enter the IPv4 or hostname and the TCP port of the system to validate network connectivity. Repeat these steps for each system you want to test.

Figure 2: Sample connectivity test for HDFS services
A successful sample output appears as follows:
        IPv4 or HDFS server name: 10.1.2.3

        TCP Ports [8020]: 1004
        Connectivity Test Results
        > 10.1.2.3:1004
         [ PASSED ]
A failed sample output appears as follows:
        IPv4 or HDFS server name: 10.1.2.3

        TCP Ports [8020]: 1004
        Connectivity Test Results
        > 10.1.2.3:1004
         [ FAILED: Ncat: Version 7.50 ( https://nmap.org/ncat )
Ncat: No route to host. ]
Creating a task
AWS DataSync uses tasks to copy data from a source location to a destination location. In our example, the source location will be HDFS and the destination location will be Amazon S3. To get started with a task, you first create your source and destination locations, and then create your task.
Create the HDFS source location
- On the AWS DataSync console select Locations and then click on Create location.
- For Location type select Hadoop Distributed File System (HDFS).
- Select the Agent deployed and activated according to the steps above.
- For NameNode configuration, use the value for
dfs.namenode.rpc-addressas found inhdfs-site.xml. - Specify the folder that you plan to migrate from HDFS to Amazon S3. This should be a path to a folder in HDFS. AWS DataSync will attempt to copy all files and folders in this path to Amazon S3.
- (Optional) If using this location for writing back to HDFS and willing to modify default values for HDFS block size and replication, you can use Additional settings.
Configuration details are illustrated in Figure 3.

Figure 3: Sample configuration for a HDFS location
If using Simple authentication, configure the name of the user and the Key Management Server (if using Transparent Data Encryption), as illustrated in Figure 4.
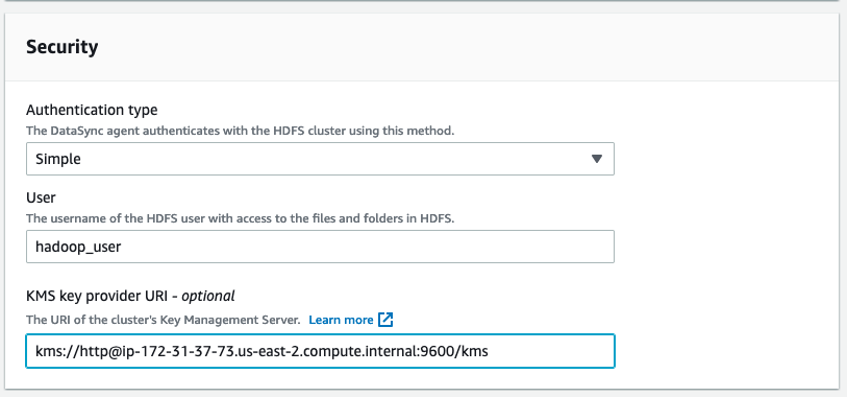
Figure 4: Sample security configuration for Simple Authentication type
If using Kerberos authentication, configure the Keytab file, the Kerberos Principal to use in the keytab file, and the krb5.conf file. Additionally, use the retrieved RPC protection configurations retrieved from dfs.data.transfer.protection and hadoop.rpc.protection, as noted earlier. The protection values selected must match the values configured on your cluster. These security settings are shown in Figure 5.
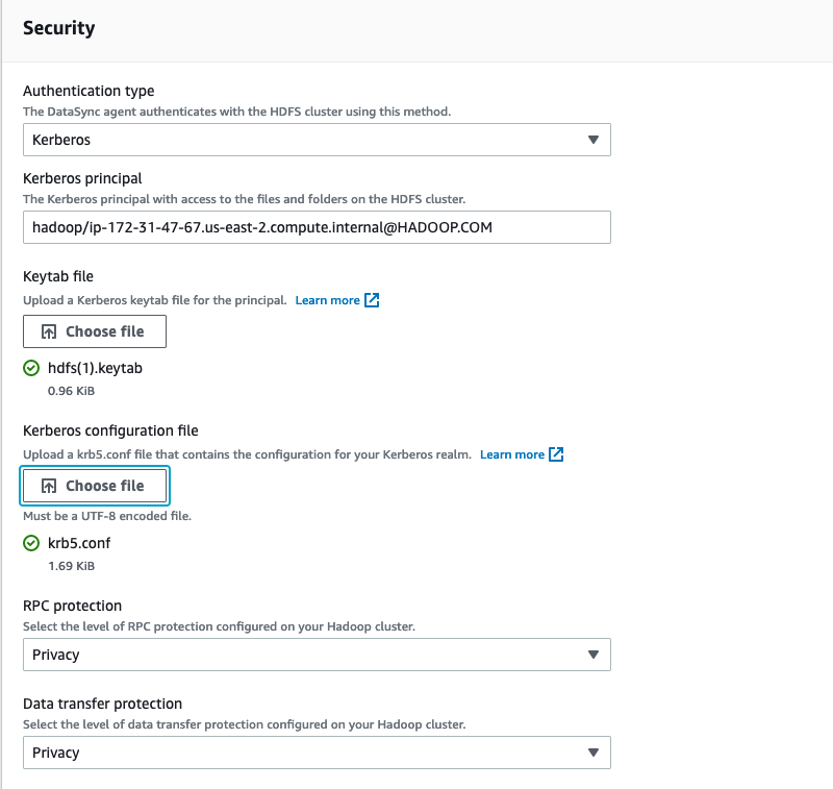
Figure 5: Sample security configuration for Kerberos Authentication type
Create destination location (Amazon S3)
Create an Amazon S3 location on AWS DataSync, selecting your preferred destination bucket and considering the storage classes documentation for selecting the right target storage class. An example location configuration is found in Figure 4.

Figure 6: Sample configuration for a S3 location
Create task
With the locations created, you can now proceed to create a task. You can create a task in the AWS DataSync console by selecting Tasks and then selecting Create task. Use the HDFS location you just created as the source and the Amazon S3 location as the destination, as illustrated in Figure 7.
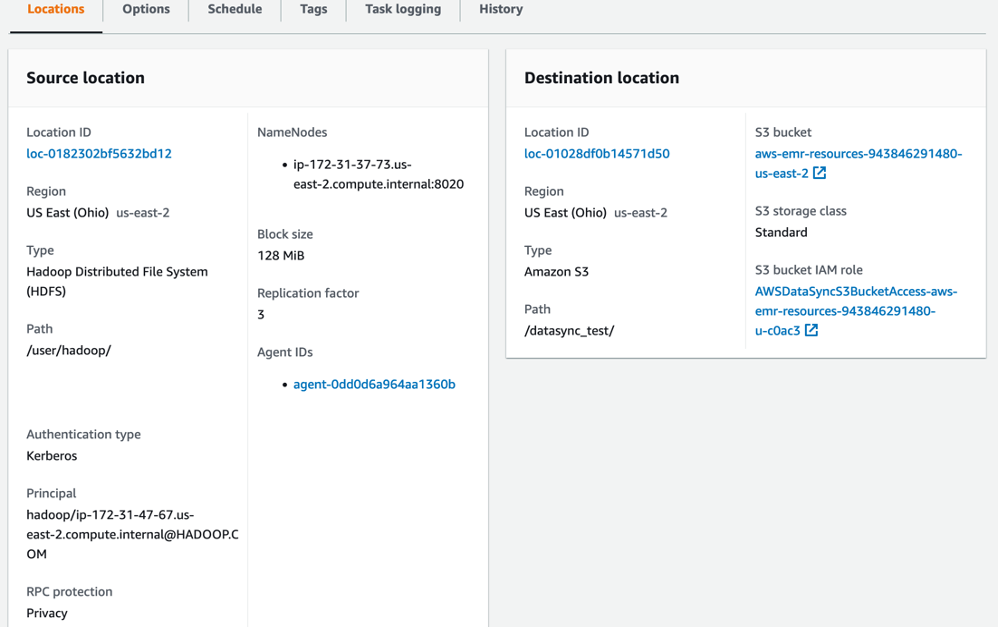
Figure 7: Sample task configuration for the HDFS source and S3 destination
After configuring the source and destination for the task, provide additional task configurations like data verification options, ownership and permissions-related options, file metadata options, and file management options. For HDFS data migrations we provide some recommendations below, however, please refer to this task configuration documentation to make your informed decisions.
For larger HDFS migrations, we recommend a dedicated networking communication channel. However, if the networking channel is shared with other workloads, you may consider limiting the amount of bandwidth consumed by the task to decrease the impact on those workloads. It is possible to change the bandwidth consumed by AWS DataSync using the parameter Set bandwidth limits (in MiB/s).
For ongoing tasks that need to mirror data between HDFS and Amazon S3, we recommend setting the overwrite files to enabled and keep the deleted files option to disabled. With these settings, modifications to files at the source will be applied to the files at the destination, and the files deleted at the source will be deleted at the destination. This will ensure that your destination is an exact copy of your source.
To verify the data transferred, know that the Verify data method can heavily impact your task running times, we recommend using the Verify only the data transferred method and implement additional downstream processes to check data quality along with metadata.
Monitor task execution
Once the task has been created, the next step is to execute it. We recommend running a limited test before running the full task. You can do this by selecting Start with overriding options.
Under the Data transfer configuration section (Figure 8), choose Specific files and folders and configure a file or folder to be transferred. See the User Guide for more information on using filters.
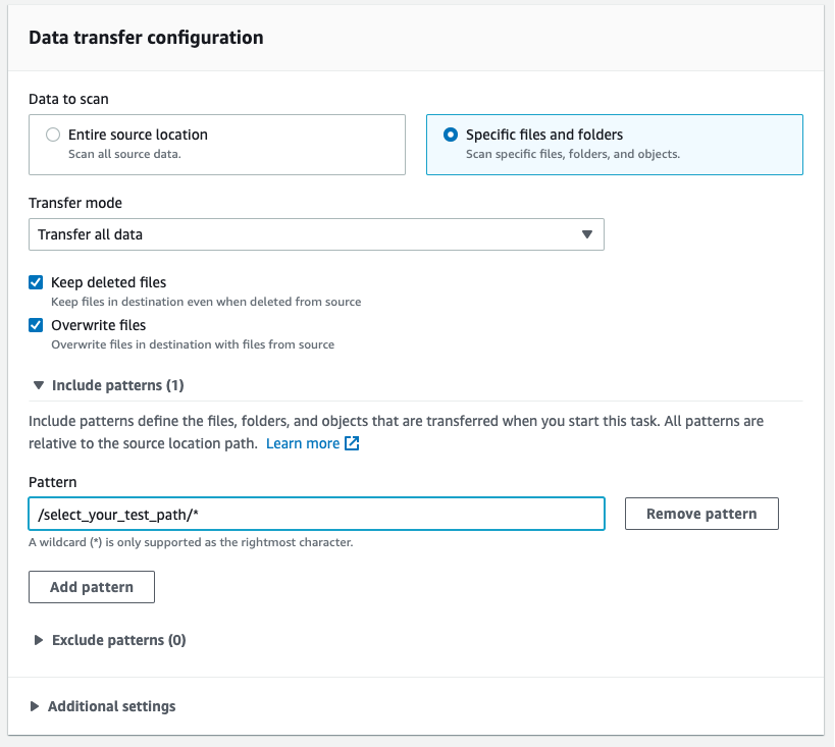
Figure 8: Sample destination location configuration for HDFS to S3 migration
Once the task is done you can review the status and the details about the files transferred, the task performance, and the task duration as depicted in Figure 9. Detailed performance metric values are described in the user guide for monitoring AWS DataSync.

Figure 9: Task performance metrics
What can you do with your data in Amazon S3?
With your data in Amazon S3, you can start to use Apache Spark on Amazon EMR or AWS Glue Jobs to read data from Amazon S3, perform data transformations or data aggregations, and apply Machine Learning Models with Amazon EMR, AWS Glue, or Amazon SageMaker. To run queries on Amazon Athena, it is necessary to have tables in your Glue Catalog. To infer and create tables from data in Amazon S3, you can use AWS Glue Crawler and you can run data exploration queries using Amazon Athena.
Conclusion
In this blog, we’ve shown you how you can use AWS DataSync to quickly and securely copy data from your Hadoop cluster to an Amazon S3 bucket. You learned how to setup and configure AWS DataSync and how to gather required configuration information from your Hadoop cluster. Once your data is in Amazon S3, you can then use the rich analytics, machine learning, and data processing capabilities that AWS provides.
Many customers are embracing the benefits of the scalability, cost-efficiency, and increased capabilities of AWS Services. Give the procedure outlined in this post a try, and remember to consult the AWS DataSync User Guide to get the best result for your situation.