AWS Open Source Blog
Building a multi-tenant Kubeflow environment on Amazon EKS using Amazon Cognito and ADFS
NOTE: Since this blog post was written, much about Kubeflow has changed. While we are leaving it up for historical reference, more accurate information about Kubeflow on AWS can be found here.
The Kubeflow project is dedicated to making deployments of machine learning (ML) workflows on Kubernetes simple, portable, and scalable. The project’s goal is not to recreate other services, but to provide a straightforward way to deploy best-of-breed open source systems for ML to diverse infrastructures. Many of our enterprise customers need to integrate Kubeflow with their existing authentication mechanism, such as Active Directory Federation Services (ADFS), to achieve isolation of notebooks, experiments, and more, between various users and user groups.
In this blog post, we explore how to deploy Kubeflow on Amazon Elastic Kubernetes Service (Amazon EKS) and how to achieve multi-user isolation using Amazon Cognito and ADFS. To get an overview of Kubeflow multi-tenancy, please refer to the Kubeflow documentation.
This is a level 300 post and assumes you are familiar with using and configuring AWS services such as Amazon Cognito and AWS Lambda.
Solution Overview
Use Case
Many large companies have a need for multi-tenancy environments for their tools. Kubeflow by default supports multi-tenancy, but only with local users and no namespace segregation.
This solution aims to solve this use case, allowing Kubeflow to integrate with Cognito and Microsoft ADFS as an identity provider and create the preconditions for multi-tenancy and user/group segmentation. And companies will be able to leverage all the benefits Kubeflow brings with integration with their local authentication system, workload isolation, and user segmentation.
The code for this solution can be found in GitHub.
Prerequisites
To get started building a multi-tenant Kubeflow environment solution, you’ll need access to the following:
- An AWS account
- Amazon Certificate Manager (ACM) certificate and a valid domain
- Knowledge about Amazon Cognito, Identity providers and Federation and Kubernetes/Amazon EKS
- eksctl
- Minimal knowledge in other AWS services like Amazon Route 53, and AWS Lambda
- Kubeflow basic administration knowledge
- ADFS Claims configured to support the Amazon Cognito Configuration
- Terraform v1.1.5
Purposed Architecture
There are a number of key components to this solution. The first is the identity management piece, configuring Amazon Cognito and an identity provider. Following that, we need to create namespaces and user groups for Kubeflow—not something natively supported by Kubeflow today. To address this, we will deploy a Lambda function that will be used to automatically create those namespaces. The third step is to configure and deploy Kubeflow on Amazon EKS. And finally, we will be configuring the authentication callbacks, so Kubeflow knows where to redirect login requests.
This is what the complete architecture looks like:
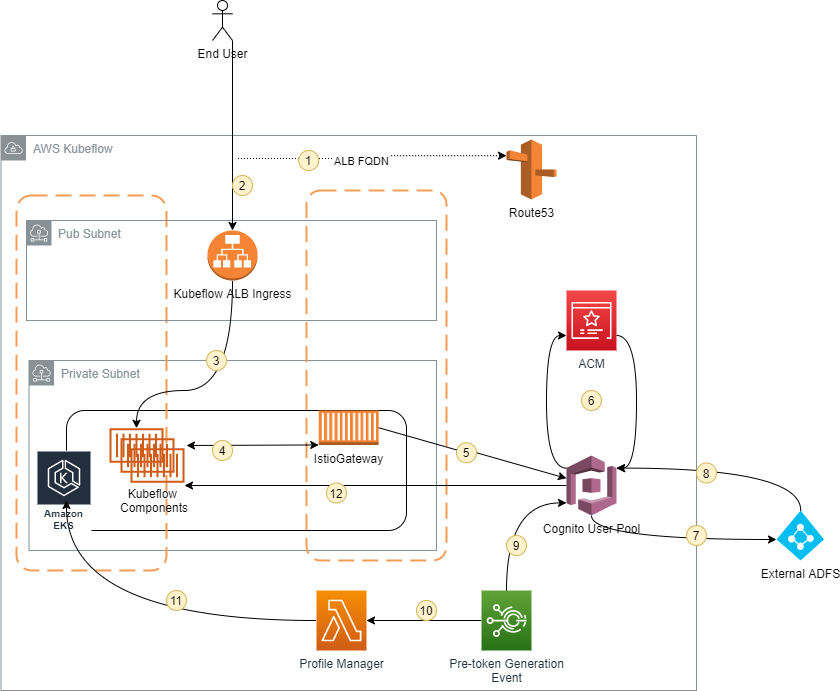
The above diagram describes the typical user workflow, logging in ADFS, and getting redirected to Kubeflow in their respective namespace.
- User opens the custom URL for the Kubeflow ALB
- Route 53 resolves the FQDN to the ALB
- ALB redirects the request to the Kubeflow containers running on EKS
- IstioGateway intercepts the request
- IstioGateway redirects the request to Amazon Cognito
- Amazon Cognito App client is configured with a custom Domain and valid certificate from Amazon Certificate Manager
- Amazon Cognito redirects the request to the configured identify provider (IdP) (ADFS in this example)
- User logs in and ADFS redirects to Amazon Cognito with the SAML assertion
- Amazon Cognito has the Pre-Token generation event configured to trigger the Lambda function
- “Profile Manager” Lambda function is triggered with the groups that the user belongs in the AD as part of the event
- The Lambda function, based on the groups received on the event will connect to the Amazon EKS and generate the necessary role and serviceRoleBindings
- Amazon Cognito redirect back to the Kubeflow UI
Implementation
To deploy Kubeflow on Amazon EKS please follow the below steps (A full explanation of each step can be found in the following section.):
- We need to create to own a valid domain and create the necessary certificates to be used in later steps by the Amazon Cognito Domain URL and the ALB for Kubeflow (Step One – AWS ACM)
- As part of the integration, Kubeflow doesn’t support the automatic creation of namespaces and user groups. To enable this functionality, we will create a new Lambda function (we called it Profile Manager) that will be triggered as part of the login flow by Amazon Cognito. The steps and code to support this implementation can be found below (Step Two – Namespace Automation)
- Once the Microsoft ADFS is configured, we can now proceed to configure Amazon Cognito as the Identity Provider for Kubeflow. The workflow details and configuration to achieve this can be found in the Amazon Cognito IdP Integration section. (Step Three – Amazon Cognito IdP Integration Flow)
- After the IdP is set up, we can proceed with the creation of the Amazon EKS Cluster. (Step Four – Amazon EKS Cluster Creation)
- After the Cluster is created and the nodes are in service. we can proceed with the Kubeflow installation. (Step Five – Kubeflow Integration)
- As a last step, and as we create the LoadBalancer with the Kubeflow deployed, we need to get the URL of the LoadBalancer, create the DNS record in Amazon Route 53 (we assume the certificate for this alias exists and is valid), and configure the Callback URL in Amazon Cognito. This lets the Login workflow know where to redirect (Kubeflow Entrypoint) after the authentication is successful. (Step Six – Configure CallBack on Amazon Cognito)
- As all the steps are now complete, we can log in to Kubeflow using the DNS entry created in the previous step. (Step Seven – Log in to Kubeflow)
Step One – AWS ACM (Certificate Manager)
Generate a certificate in AWS ACM and then validate it with Route 53 using the steps below:
NOTE: Certificates must be created in the US-EAST-1 Region, otherwise they will not be visible for Amazon Cognito.
- Make sure you own a domain and it’s registered in Route 53 (we have provided a sample domain below).
- Go to the AWS Certificate Manager console and select Request a Certificate in the left pane.
- Add the following domains to the certificate:
- <mydomain>
- kubeflow.<mydomain>
- Needed for the ALB in a later step
- auth.<mydomain>
- Needed by Cognito to validate the sub-domain afterwards
- cognito.auth.<mydomain>
- Needed for the Custom Domain in Amazon Cognito

- Press “Request” and wait a few minutes for the certificate to be validated in Route 53.
- Once the certificate is valid, you should see something similar to the image below.


Step Two – Namespace Automation (Profile Manager)
This section describes how to create the Lambda function to manage the creation of the namespaces and group during the login workflow. The “Profile Manager” will be triggered by Amazon Cognito (this configuration is in the previous section) after the authentication succeeds, but before the redirection to Kubeflow.
How it works
- User tries to log in to Kubeflow.
- The Amazon Cognito flow will start and contact the ADFS to validate the user credentials.
- An Amazon Cognito trigger for “Pre-Auth token” will trigger the Lambda function KF_profile_Manager
- This Lambda function will:
- Create user owner profile with the name “profile-<username>” as this is mandatory for Kubeflow. This profile has no resource permissions, hence nothing can be created.
- Check if the group namespaces exist and/or create them.
- Based on groups from the ADFS, named with a certain prefix, will create the rolebindings and the serviceRolebindings to add the user to the respective groups namespaces.
Python requirements
urllib3>=1.25.10
PyYAML>=5.4.1
rsa==4.5.0
six==1.15.0
botocore>=1.20.112
s3transfer>=0.4.0
kubernetes
eks-token
Profile Lambda function
- Lambda function code can be found in GitHub
- Go to the AWS Lambda Console and create a new Function with Python3.9 as interpreter
- Timeout should be increased to 30 seconds and Memory to 256 MB
- handler: index.lambda_handler
- The function expects the following environment variables:
- The Lambda Environment Variable ClusterName, needs to be updated to the correct EKS cluster name
- Configure the following environment variables:
- clusterName = <clusterName>
cognitoGroupField = “custom:groups”
- clusterName = <clusterName>
- Additionally, we need to make sure that Amazon Cognito has permissions to invoke the Lambda function.
- Go to the AWS Lambda function, and select the Configuration Tab
- Select Permissions from the left hand menu
- And from the Resource-based policy, click on Add Permissions

- The Lambda function is now ready to be used by Amazon Cognito to create the namespaces and the respective group membership in Kubeflow.
Brief explanation of the function contents
- Role Binding Function
- Role Binding grants the permissions defined in a role to a user or set of users. It holds a list of subjects (users, groups, or service accounts), and a reference to the role being granted.
- Role Binding grants permissions within a specific namespace whereas a
ClusterRoleBindinggrants that access cluster-wide.
- Service Role Binding
- Istio needs a service role binding to allow the user to have permissions in a certain namespace
- A
ServiceRoleBindingspecification includes two parts:- The
roleReffield that refers to aServiceRoleobject in the same namespace. - A list of
subjectsthat are assigned the roles.
- The
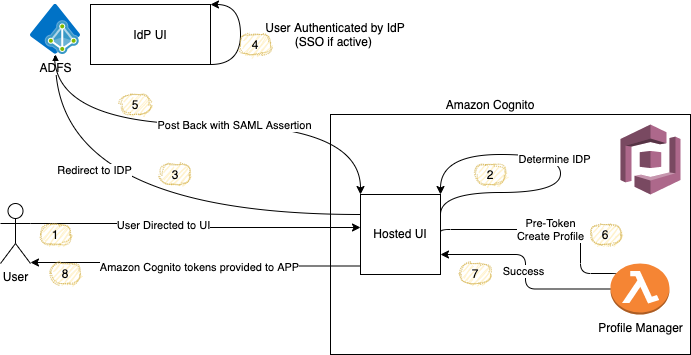
Step Three – Amazon Cognito IdP Integration Flow
This section describes how to configure Amazon Cognito with Microsoft ADFS as an Identity provider. The diagram below describes the user journey to authenticate.
Cognito User Pool and Identity Provider Configuration
We need to create the Amazon Cognito configuration, creating a user pool, identity provider, and link it to the ADFS IDP. We recommend you read the following blog post for a deep dive into Amazon Cognito before proceeding with the steps below, as we will cover only the steps necessary for this configuration in this blog post.
The following steps will need to be completed in the AWS console:
- Create a User Pool
- Add the following attributes:
- Select Username and allow validated email as secondary login
- In the attribute section select email as mandatory
- In the custom attributes create the following:
- Name: groups
- Type: String
- Min Length: 1
- Max Length: 2048

- Add the following attributes:
- Create an APP Client
- Give a name to the App Client
- Enable Security
- Select Generate client secret
- Press Create app client

- In the triggers section, choose a “Pre Token Generation” trigger to point the Lambda function that will manage the profiles in Kubeflow (Lambda function in this section is the pre-condition to select this option)
- Create a SAML Identity Provider with the following mappings:
- To create the SAML Provider, you will need to use the metadata file from your Microsoft ADFS environment (or alternatively, use a URL in which you can download this file)

- Edit the attribute mappings and add the following:
- https://aws.amazon.com/SAML/Attributes/validation → Email Verified
- https://aws.amazon.com/SAML/Attributes/Role → custom:groups
- http://schemas.xmlsoap.org/ws/2005/05/identity/claims/emailaddress → emailaddress

- Go back to the APP client and select the following options:
- Enable Identity providers
- ADFS
- Under Oauth 2.0, enable “Authorization code grant” under Allowed OAuth Flows, and then select
- Callback URL is the Route 53 Domain domain selected (Domain that was used in the second step for the certificate creation). This will also be used in a later step and Alias created for the kubeflow ALB
- IE: https://kubeflow.<mydomain>/oauth2/idpresponse
- Sign Out URL is optional
- This can be built based on the following template “https://<CognitoCustomDomainURL>/logout?client_id=<APPID>&logout_uri=https://<kubeflowURL>/logout”
- CognitoCustomDomainURL is the url from the customDomain Creation
- APPID is the Cognito APPID, identified on the top of the screenshot below
- kubeflowURL is the Alias created for the ALB of Kubeflow

- Enable Identity providers
- As a final step, we need to update the ADFS trust relation with the Amazon Cognito ARN in the Microsoft ADFS server
- Go to your ADFS server
- Go to the Federation Console and open the Relaying Party trust

- Make sure that the identifier is correct
- The region and the Amazon Cognito Pool ID should be updated to point to the one just created in this section

- Make sure also, that the Endpoints have the correct endpoint for your domain
- It should point to https://cognito.auth.<domain>/saml2/idpresponse


Step Four – Amazon EKS Cluster Creation
This section describes how to install Kubeflow in a running Amazon EKS Cluster and all the necessary configurations to integrate with the previous sections.
To create a cluster using eksctl we can use the following steps:
- Create a YAML file using the following command:
- Run the eksctl command to create the Amazon EKS cluster
eksctl create cluster -f cluster.yaml
- Wait until the cluster and nodes are created (usually takes around 15 minutes) before proceeding to the next step.
Step Five – Kubeflow installation
After the Amazon EKS Cluster is deployed we can deploy Kubeflow. Kubeflow has the following prerequisites:
- Download the Kfctl tool, created by Kubeflow to simplify the deployment of the component.
wget kfctl_v1.2.0-0-gbc038f9_linux.tar.gz -o kfctl_v1.2.0-0-gbc038f9_linux.tar.gz
tar -xvf kfctl_v1.2.0-0-gbc038f9_linux.tar.gz
export PATH=$PATH:$PWD - Download Aws-Iam-Authenticator. Amazon EKS uses AWS Identity and Access Management (IAM) to provide authentication to your Kubernetes cluster through the AWS IAM authenticator for Kubernetes.
curl -o aws-iam-authenticator https://amazon-eks.s3.us-west-2.amazonaws.com/1.21.2/2021-07-05/bin/linux/amd64/aws-iam-authenticator
chmod +x ./aws-iam-authenticator
mkdir -p $HOME/bin && cp ./aws-iam-authenticator $HOME/bin/aws-iam-authenticator && export PATH=$PATH:$HOME/bin
Create the Amazon EKS Cluster. Create a file called install_kubeflow.sh and paste the following content:
#!/bin/bash
export CONFIG_URI="https://raw.githubusercontent.com/kubeflow/manifests/v1.2-branch/kfdef/kfctl_aws_cognito.v1.2.0.yaml"
# 3. Set an environment variable for your AWS cluster name.
export AWS_CLUSTER_NAME=kubeflowworkshop-eksctl

# 4. Create the directory you want to store deployment, this has to be ${AWS_CLUSTER_NAME}
mkdir ${AWS_CLUSTER_NAME} && cd ${AWS_CLUSTER_NAME}

# 5. Download your configuration files, so that you can customize the configuration before deploying Kubeflow.
wget -O kfctl_aws.yaml $CONFIG_URI
Run the script that will download the manifest file for Kubeflow version 1.2.0 with Amazon Cognito Integration
./install_kubeflow.shThis will download this file:
apiVersion: kfdef.apps.kubeflow.org/v1kind: KfDefmetadata:namespace: kubeflowspec:...plugins:- kind: KfAwsPluginmetadata:creationTimestamp: nullname: awsspec:auth:cognito:certArn: <valid ACM certificate >cognitoAppClientId: <CognitoAppClientID>cognitoUserPoolArn: <CognitoUserPoolArn>cognitoUserPoolDomain: <CognitoUserPoolDomain>enablePodIamPolicy: falseregion: <Region>roles:- <EksClusteRole>repos:...
Modify the file downloaded and replace the following fields:
-
-
CertARN:- Certificate arn from the Certificate created in the section
arn:aws:acm:<region>:<accountID>:certificate/<acm cert id>
- cognitoAppClientId:
- App Client ID from Amazon Cognito
- cognitoUserPoolArn:
- Arn from the Amazon Cognito User Pool
- arn:aws:cognito-idp:<region>:<accountID>:userpool/<PoolID>
- cognitoUserPoolDomain:
- Domain used for the Custom Domain in cognito
- IE: cognito.auth.<mydomain>
- region: <Region>
- EKSClusterRole:
- This is the role of the worker nodes from the Amazon EKS cluster
- Can be found by issuing the following command:
-
aws iam list-roles \
    | jq -r ".Roles[] \
    | select(.RoleName \
    | startswith(\"eksctl-$AWS_CLUSTER_NAME\") and contains(\"NodeInstanceRole\")) \
    .RoleName"

It is a prerequisite to have the Amazon Cognito UserPool created before running the creation of the Cluster. You should also have it linked to ADFS. For more details, refer to “Step Three – Amazon Cognito IdP Integration Flow” above.
Setup the environment variables to point to your config file
export AWS_CLUSTER_NAME=eksworkshop-eksctl
export KF_NAME=${AWS_CLUSTER_NAME}

export BASE_DIR=/Users/<user>/environment
export KF_DIR=${BASE_DIR}/${KF_NAME}

export CONFIG_FILE=${KF_DIR}/kfctl_aws.yaml <- This is the file configured before
Once the environment is set up we can proceed with the Kubeflow installation.
CD ${BASE_DIR}
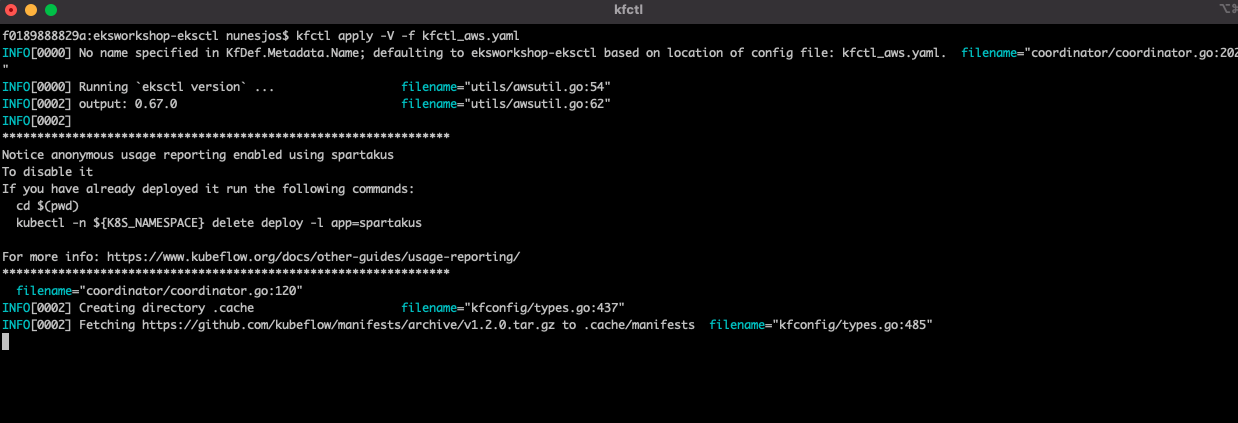
kfctl apply -V -f kfctl_aws.yaml
Wait until the process finishes.
Check if all pods are up and running with the following command.
kubectl get pods -A
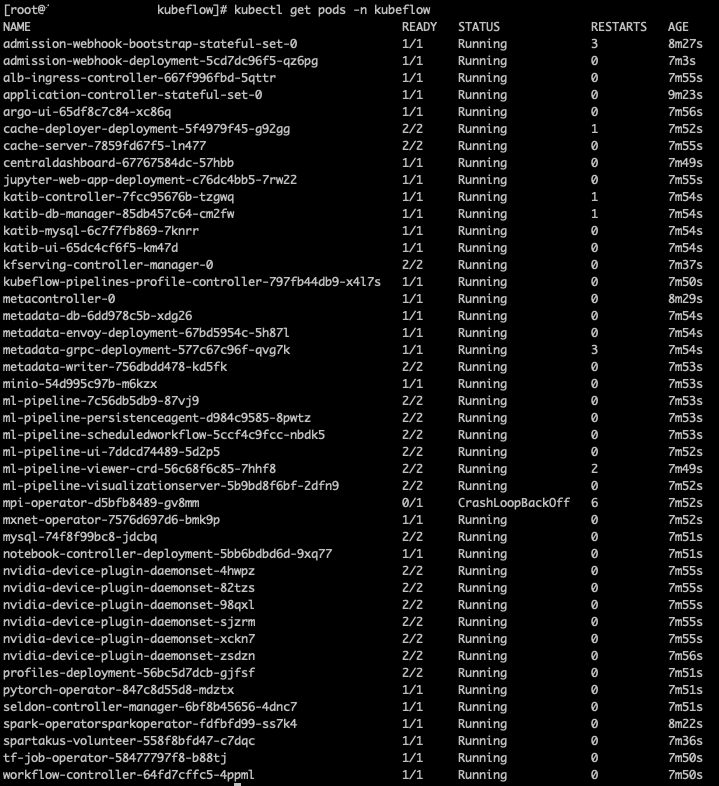
Kubeflow is now installed and we are ready to proceed with the next steps.
Check/add the lambda role to aws-auth to authorize the lambda to call the EKS APIs
Run the following command to edit aws-auth configmap.
kubectl edit configmap -n kube-system aws-auth
Please add the mapUsers section (in bold) to authorize the Lambda function to connect to Amazon EKS.
# Please edit the object below. Lines beginning with a '#' will be ignored,
# and an empty file will abort the edit. If an error occurs while saving this file will be
# reopened with the relevant failures.
#
apiVersion: v1
data:
mapRoles: |
- rolearn: arn:aws:iam::<accountid>:role/<kubeflowNodeIAMROLE>
username: system:node:{{EC2PrivateDNSName}}
groups:
- system:bootstrappers
- system:nodes
 mapUsers: |
 - userarn: arn:aws:iam::<accountid>:role/<lambdaIAMRole>
 username: eksadmin
 groups:
 - system:masters
kind: ConfigMap
metadata:
creationTimestamp: "2021-10-19T14:21:37Z"
name: aws-auth
namespace: kube-system
resourceVersion: "1198"
selfLink: /api/v1/namespaces/kube-system/configmaps/aws-auth
uid: 660272be-0aea-4b3d-a658-e4d93d964377
Step Six – Configure CallBack on Amazon Cognito
For Oauth to work we need to configure the callback URL in Amazon Cognito. This URL will be the ALB created with eksctl in the previous step. The following steps to configure the callback:
-
- Get the URL for the callback
kubectl get ingress istio-ingress -n istio-system

- Get the URL for the callback
-
- Create a Route 53 CNAME for the ELB
- This should match the certificate created on AWS Certificate Manager.
- Copy the “ADDRESS” from the terminal and go to Amazon Cognito App Client Settings to update the callback URL
- ALB address should be an alias to kubeflow.<mydomain>
- Create a Route 53 CNAME for the ELB
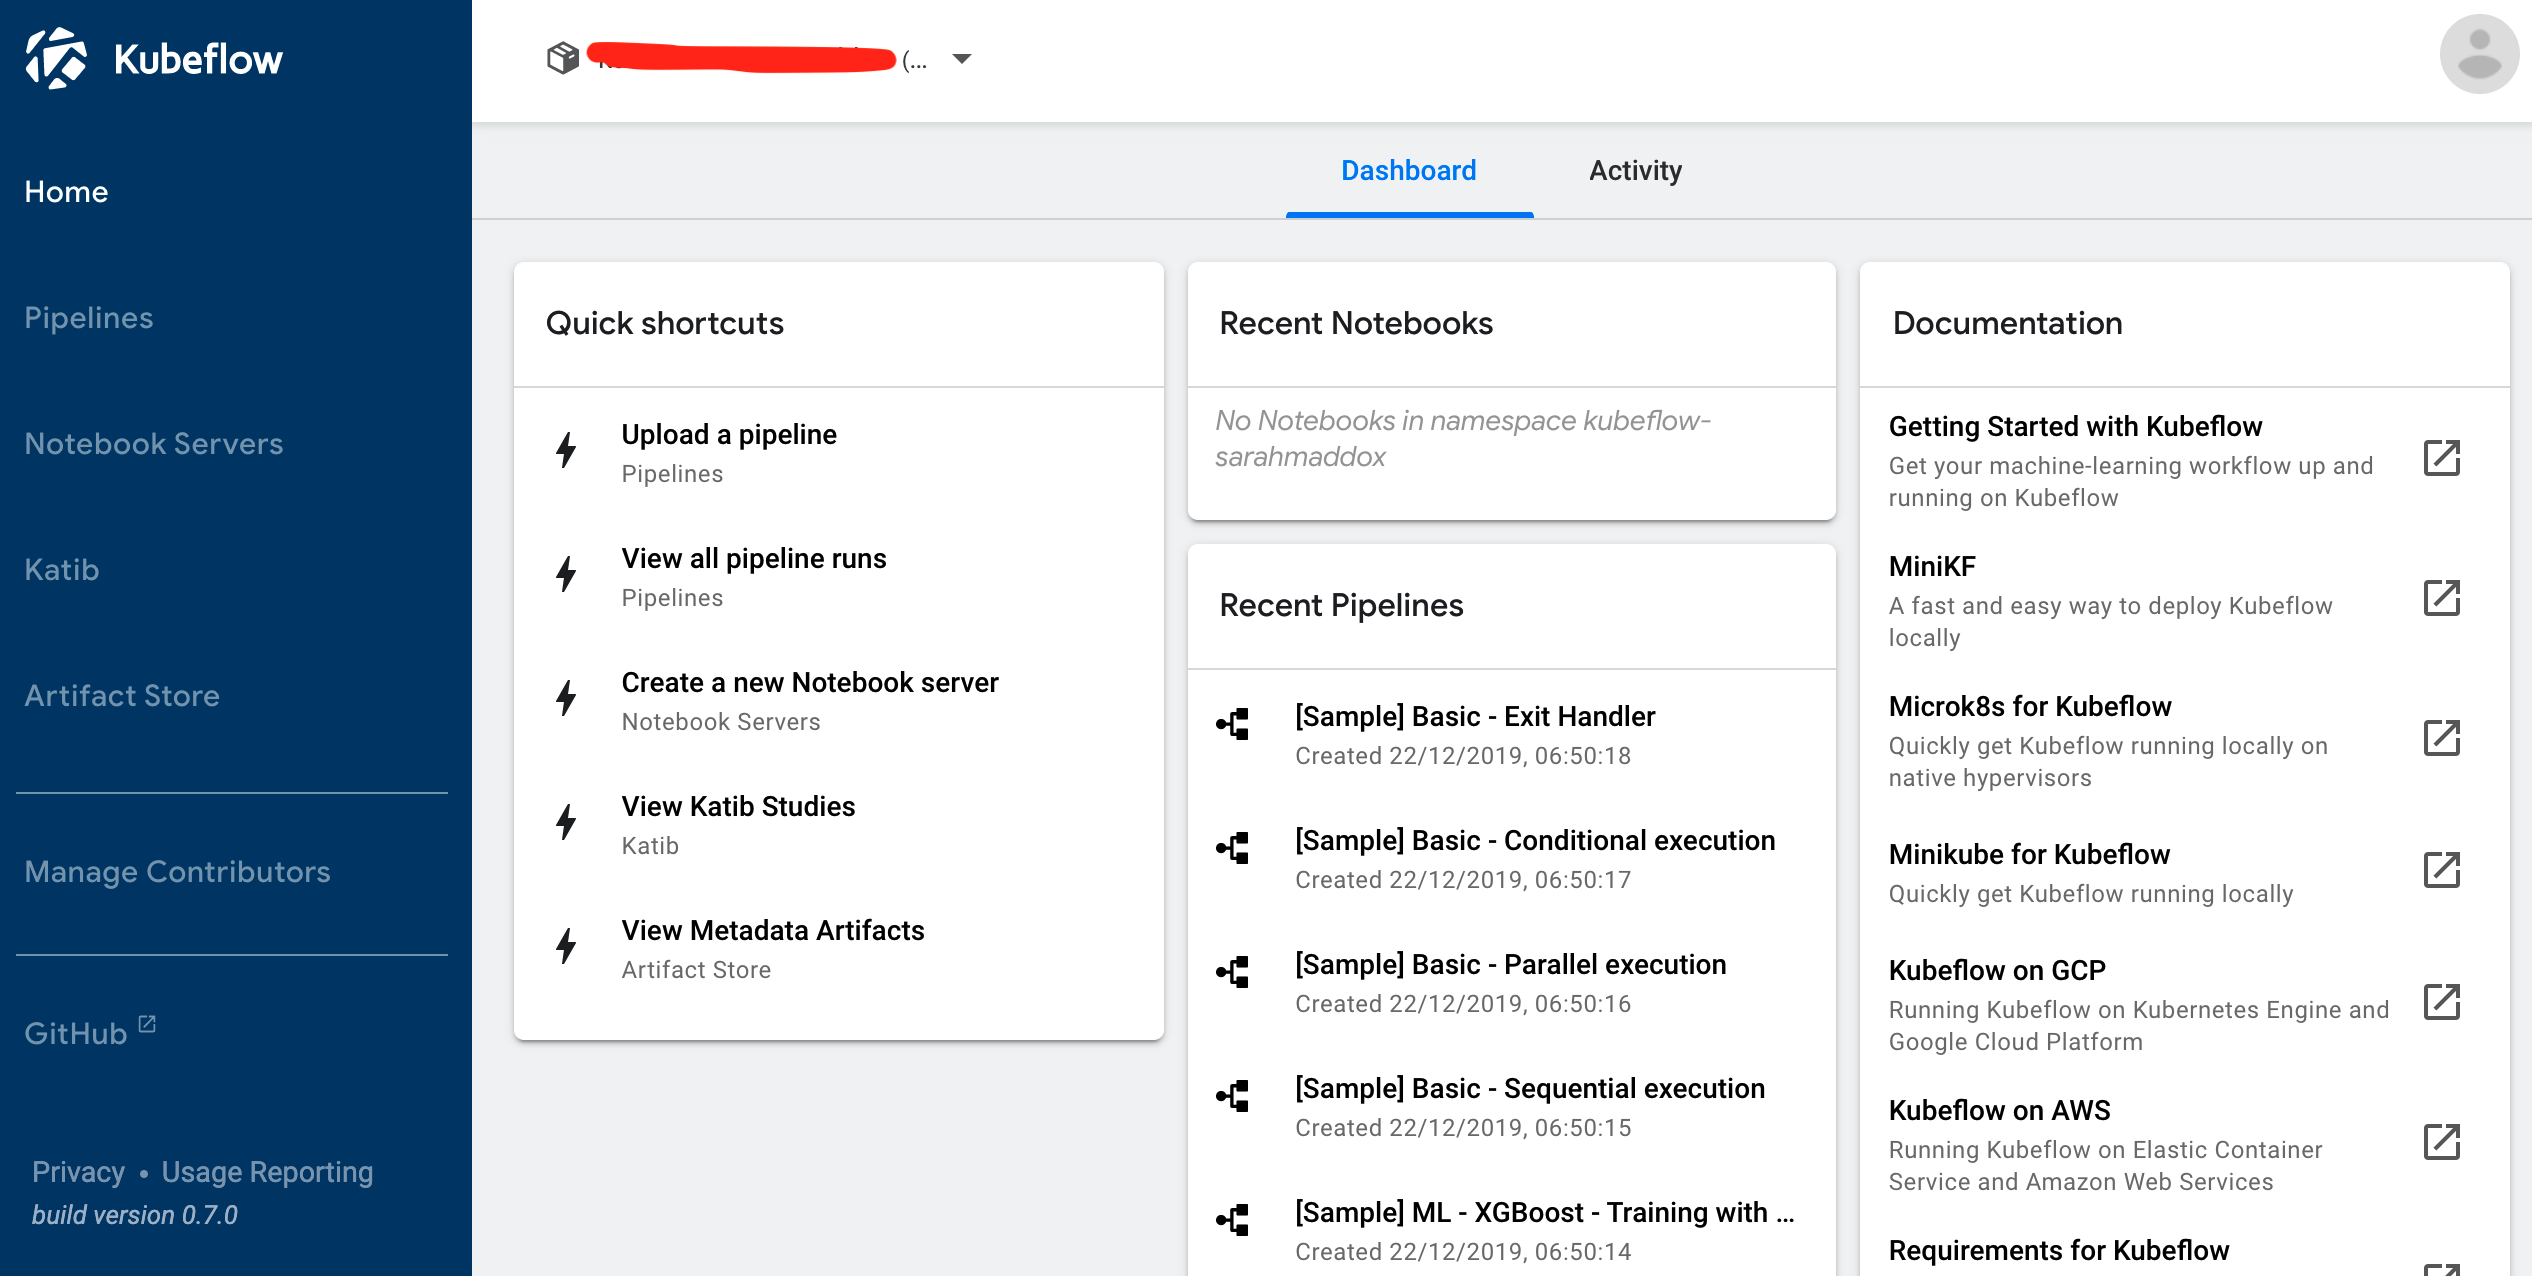
Step Seven – Log in to Kubeflow
Now that we have finished the steps, we can test by logging into our Kubeflow environment. In a new browser tab, type in the address bar the Route 53 CNAME that was created for ELB (in our example above, this is kubeflow.<mydomain).
During the login process, Kubeflow will redirect us to Cognito, which will then redirect to the ADFS Login Page. After filling the credentials, ADFS will redirect back to Amazon Cognito.
Before Amazon Cognito redirects us to the Kubeflow URL, the Lambda function will trigger (“Pre Token Generation”) and create the namespaces in Amazon EKS and add our membership.
Finally, we will end in the Kubeflow Main Page with access to the shared namespaces(groups), allowing team collaboration on resources.
Central Dashboard
Cleaning up
Cleanup is the exact reverse steps:
- To delete just Kubeflow:
- Set up the environment variables to point to your config file
export AWS_CLUSTER_NAME=eksworkshop-eksctl
export KF_NAME=${AWS_CLUSTER_NAME}
export BASE_DIR=/Users/<user>/environment
export KF_DIR=${BASE_DIR}/${KF_NAME}
export CONFIG_FILE=${KF_DIR}/kfctl_aws.yaml<- This is the file configured before- Once the environment is set up, we can proceed with the Kubeflow installation
CD ${BASE_DIR}
kfctl delete -V -f kfctl_aws.yaml
- To cleanup the infrastructure(GitHub code)
terraform destroy -auto-approve
Conclusion
Kubeflow is a great engine for ML workflows on Kubernetes. It’s simple, portable, and scalable. In this post we walked you through how to extend your Kubeflow environment to achieve multi-tenancy using Amazon Cognito and Microsoft ADFS as an Identity source provider. While we used Microsoft IdP as the IdP in this post, any other third-party solution that can integrate with Amazon Cognito can be used, IE: OpenSSO.