The Internet of Things on AWS – Official Blog
How to integrate AWS IoT Core with Amazon MSK
Post by Milo Oostergo, Principal Solutions Architect and Doron Bleiberg, Senior Solution Architect, AWS Startups
Introduction
Monitoring IoT devices in real time can provide valuable insights that can help you maintain the reliability, availability, and performance of your IoT devices. AWS IoT Core provides integrations with Amazon Kinesis Data Streams and Amazon Managed Streaming for Apache Kafka (“Amazon MSK”) to set up real-time streaming data pipelines. Amazon MSK is popular choice for customers who are familiar with Kafka, need infinite message retention, and are looking for the lowest latency. In this blog post, we describe how to set up AWS IoT Core to stream events to Amazon MSK and common asks from our customers.
| Time to read | 15 minutes |
| Time to complete | 60 minutes |
| Learning level | 300 |
| Services used | AWS IoT Core, AWS Identity and Access Management, Amazon Managed Streaming for Apache Kafka, Amazon Key Management Service |
| Cost to complete (estimated) | <$2 |
Overview
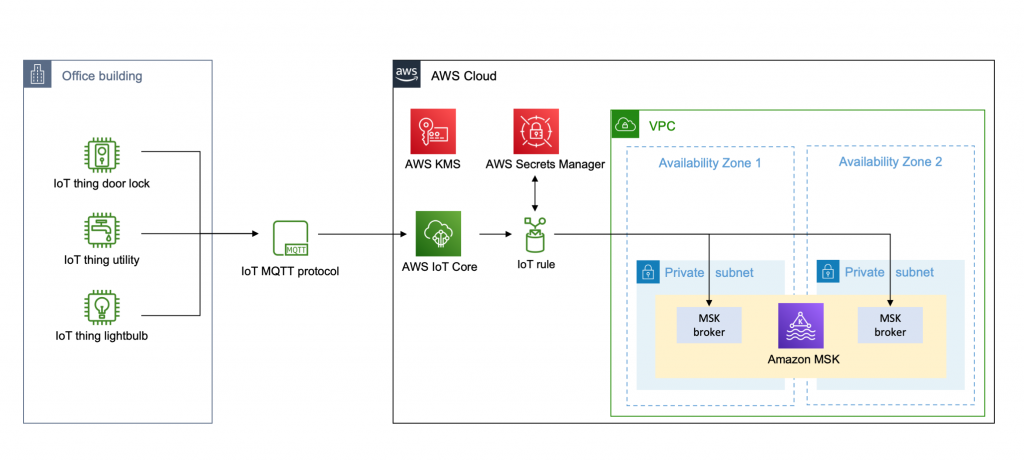
The diagram below illustrates the components and functionality you can build following this blog post or using this sample AWS CloudFormation template. As part of this solution, MQTT messages streamed to AWS IoT Core are routed to Amazon Managed Streaming for Apache Kafka (Amazon MSK) using AWS IoT Rules actions. Access to the Amazon MSK cluster is controlled using username and password that are securely stored in AWS Secrets Manager and encrypted using AWS Key Management Service.
Walkthrough
Prerequisites
- A VPC with at least 2 private subnets. If you don’t have a VPC, follow the Amazon MSK getting started documentation to create one.
Step 1: Setting up an Amazon MSK cluster
To deliver messages from IoT devices to Amazon MSK using AWS IoT Core rule actions, you need to enable authentication on your Amazon MSK cluster. IoT rule actions can authenticate with your Amazon MSK cluster with username and password authentication using the SASL framework or by using TLS client authentication through AWS Certificate Manager. In this blog post, we set up the cluster using SASL/SCRAM authentication method. Once a cluster is created, you can’t modify the the authentication settings.
To create the Amazon MSK cluster with authentication enabled
- From the Amazon MSK console, choose Create Cluster.
- Select, enter a cluster name, and keep the recommended Apache Kafka version.

- In Networking, select your VPC and choose “2” for Number of Availability Zones. From the drop-downs, select the two Availability Zones in the VPC, and choose the private subnets for each.
- In Access control method, choose SCRAM/SASL authentication.

- Keep the existing defaults and choose Create cluster. It takes up to 15 minutes to create the cluster and the status is displayed in the Cluster Summary panel.
Step 2: Create credentials in AWS Secrets Manager
After the cluster is successfully created, we create a set of credentials that can be used by the IoT rule to connect with the Amazon MSK cluster. The credentials must be stored in AWS Secrets Manager and associated with the cluster. Before we create the credentials in AWS Secrets Manager, we first create a customer-managed key in AWS Key Management Service (KMS). Secrets encrypted with a AWS managed CMK cannot be used with an Amazon MSK cluster.
- Open the AWS KMS console and choose Create key.
- Choose symmetric key and follow the wizard to create the key. You don’t have to define the key administrative permissions or key usage permissions at this point. We set this up later.Now that the KMS key is created, we can store the credentials in AWS Secrets Manager.
- Open the AWS Secrets Manager console and choose Store a new credential.
- Choose Other type of secrets (e.g. API key) for the secret type.

- Enter the user and password data, which must be in the following format:
- Select the customer managed key you created in previous step.
- To associate secrets with the Amazon MSK cluster, the secret name must have the prefix AmazonMSK_. In this example, we use the name AmazonMSK_secret.
- Record the ARN (Amazon Resource Name) value for your secret.
Step 3: Associate secret with Amazon MSK cluster
Once the secret is created in AWS Secrets Manager, we can associate the secret with our Amazon MSK cluster.
- Go back to the Amazon MSK console and select your cluster.
- Choose Associate secrets and copy-paste the ARN of the secret you created in previous step.

Step 4: Set up AWS Identity and Access Management (IAM) role and policy for AWS IoT rule
To grant AWS IoT access to stream data to our Amazon MSK cluster, you must create an IAM role with a policy that allows access to the required AWS resources.
To create an IAM role using AWS CLI
- Save the following trust policy document, which grants AWS IoT permission to assume the role, to a file named iot-role-trust.json:
- Use the create-role command to create an IAM role specifying the iot-role-trust.json file. Make sure to replace the AWS account id and region placeholders.
aws iam create-role --role-name IoT-Rule-MSK-Role --assume-role-policy-document file://iot-role-trust.json - Save the following JSON into a file named iot-msk-policy.json.
This JSON is an example policy document that provides access to create and manage elastic network interfaces in your Amazon Virtual Private Cloud and retrieve the credentials to reach your Kafka brokers.
- Use the create-policy command to define the actions and resources that AWS IoT Core can access upon assuming the role, by passing in the iot-msk-policy.json file:
aws iam create-policy --policy-name IoT-Rule-MSK-policy --policy-document file://iot-msk-policy.json - Use the attach-role-policy command to attach your policy and grant AWS IoT access. Replace the placeholder ARN by the policy ARN returned in the previous step.
aws iam attach-role-policy --role-name IoT-Rule-MSK-Role --policy-arn "arn:aws:iam::123456789012:policy/IoT-Rule-MSK-policy"
To grant the IAM role access to the KMS key
In order to decrypt the secret stored in AWS Secrets Manager, we must add the IAM role to the list of key users for the Customer Managed KMS key we earlier created.- Go to the AWS KMS console and select the KMS key you created in the previous step.
- In Key users add the IAM role IoT-Rule-MSK-Role.
Step 5 – Create VPC destination for AWS IoT core
Create a destination to your VPC where Apache Kafka clusters reside. This destination is used to route messages from devices to your Amazon MSK cluster.
- Go to AWS IoT console, choose Act, and then choose Destinations.
- Choose Create a VPC destination.
- Select the VPC and same subnets that are used for your Amazon MSK cluster.
- Select security group that is used for your Amazon MSK cluster.
- Select the IoT-Rule-MSK-Role you created in the previous step.
Step 6 – Create AWS IoT rule
- Go to AWS IoT console, choose Act, choose Rules, and create a new rule.
- In Actions choose Add action and select Kafka.
- Select the VPC destination you created in the previous step.
- Specify the Kafka topic.
- Specify the TLS bootstrap servers of your Amazon MSK cluster. You can view the bootstrap server URLs in client information of your MSK cluster details.

- As we set up our Amazon MSK cluster with the SCRAM SASL authentication method, select SSL_SASL as security.protocol and select SCRAM-SHA512 as sasl.mechanism.
- Specify the following variable in sasl.scram.username and replace the name AmazonMSK_secret with the name of the secret you stored in step 2.
${get_secret('AmazonMSK_secret', 'SecretString', 'username', 'arn:aws:iam::123456789012:role/iot-msk-role')} - Specify the following variable in sasl.scram.password and save the IoT rule action.
${get_secret('AmazonMSK_secret', 'SecretString', 'password', 'arn:aws:iam::123456789012:role/iot-msk-role')}
Testing the AWS IoT rule
At this point, you have created the Amazon MSK cluster and set up an AWS IoT Core rule with the necessary IAM permissions. To verify IoT events are streaming to your Amazon MSK cluster, you create the Kafka topic on your Amazon MSK cluster, connect a Kafka consumer to your bootstrap servers and send an event to your IoT topic using the MQTT test client available in the AWS IoT console.
To create a Kafka topic on your Amazon MSK cluster, you can use the following commands to install the Apache Kafka client and create a new topic using the ZooKeeper Connection string from an EC2 instance in the same VPC as the MSK Cluster.
sudo yum install java-1.8.0wget https://archive.apache.org/dist/kafka/2.6.2/kafka_2.12-2.6.2.tgztar -xzf kafka_2.12-2.6.2.tgzaws kafka describe-cluster --cluster-arn <MSK Cluster ARN><path-to-your-kafka-installation>/bin/kafka-topics.sh --create --zookeeper <Zookeeper-connection-string> --replication-factor 2 --partitions 1 --topic <topic-name-used-in-step-6>Once the Kafka topic is created, you can send an event to your IoT topic using the MQTT test client available in the AWS IoT console.

The Kafka consumer connected to your cluster can now receive messages on the Amazon MSK topic. To learn how you can connect to your Amazon MSK cluster, see the section Connecting to your cluster with a username and password in the Amazon MSK developer guide.

Setting up the permissions incorrectly is a common issue resulting in customers not receiving events on their Amazon MSK cluster. When AWS IoT is unable to deliver events, the rules engine triggers an Error action. For example, you can set up an error action to deliver the events to Amazon CloudWatch Logs and specify the CloudWatch log group to which the IoT rule action sends the data. When an error occurs while processing your rule, you can view the stream of log events in the log group in CloudWatch Logs.
Cleaning up
If you followed along with this solution, complete the following steps to avoid incurring unwanted charges to your AWS account.
AWS IoT Core
- In the Act section, delete the rule and VPC destination.
Amazon MSK
- Delete your cluster.
AWS KMS
- Delete the Customer Managed Key used to encrypt the secrets stored in AWS Secrets Manager.
AWS Secrets Manager
- Delete the secret created to authenticate with your Amazon MSK cluster.
AWS IAM
- Delete the policies and roles created along the way.
Amazon CloudWatch
- Delete the relevant Log groups.
Conclusion
In this post, we gave you an overview of how to build a real-time streaming data pipeline for your IoT devices by integrating AWS IoT Core with Amazon MSK. We showed how you setup Amazon MSK and IoT rule actions to deliver messages to Apache Kafka.
About the authors
Milo Oostergo
Milo is a Principal Solution Architect for AWS Startups team in Amsterdam. Before joining the Startup team, he worked as Principal Product Manager on various AWS services.
Doron Bleiberg
Doron is a senior Solution Architect for AWS Startups team in Israel, focusing on AWS IoT services