AWS DevOps Blog
Integrating with GitHub Actions – CI/CD pipeline to deploy a Web App to Amazon EC2
Many Organizations adopt DevOps Practices to innovate faster by automating and streamlining the software development and infrastructure management processes. Beyond cultural adoption, DevOps also suggests following certain best practices and Continuous Integration and Continuous Delivery (CI/CD) is among the important ones to start with. CI/CD practice reduces the time it takes to release new software updates by automating deployment activities. Many tools are available to implement this practice. Although AWS has a set of native tools to help achieve your CI/CD goals, it also offers flexibility and extensibility for integrating with numerous third party tools.
In this post, you will use GitHub Actions to create a CI/CD workflow and AWS CodeDeploy to deploy a sample Java SpringBoot application to Amazon Elastic Compute Cloud (Amazon EC2) instances in an Autoscaling group.
GitHub Actions is a feature on GitHub’s popular development platform that helps you automate your software development workflows in the same place that you store code and collaborate on pull requests and issues. You can write individual tasks called actions, and then combine them to create a custom workflow. Workflows are custom automated processes that you can set up in your repository to build, test, package, release, or deploy any code project on GitHub.
AWS CodeDeploy is a deployment service that automates application deployments to Amazon EC2 instances, on-premises instances, serverless AWS Lambda functions, or Amazon Elastic Container Service (Amazon ECS) services.
Solution Overview
The solution utilizes the following services:
- GitHub Actions – Workflow Orchestration tool that will host the Pipeline.
- AWS CodeDeploy – AWS service to manage deployment on Amazon EC2 Autoscaling Group.
- AWS Auto Scaling – AWS Service to help maintain application availability and elasticity by automatically adding or removing Amazon EC2 instances.
- Amazon EC2 – Destination Compute server for the application deployment.
- AWS CloudFormation – AWS infrastructure as code (IaC) service used to spin up the initial infrastructure on AWS side.
- IAM OIDC identity provider – Federated authentication service to establish trust between GitHub and AWS to allow GitHub Actions to deploy on AWS without maintaining AWS Secrets and credentials.
- Amazon Simple Storage Service (Amazon S3) – Amazon S3 to store the deployment artifacts.
The following diagram illustrates the architecture for the solution:
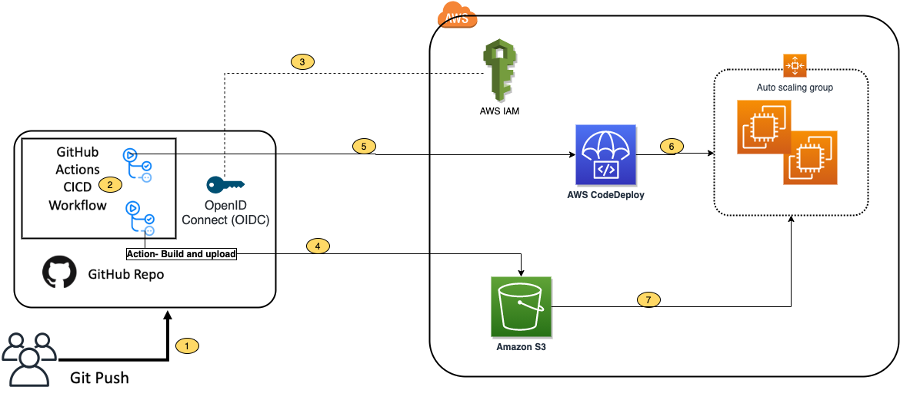
- Developer commits code changes from their local repo to the GitHub repository. In this post, the GitHub action is triggered manually, but this can be automated.
- GitHub action triggers the build stage.
- GitHub’s Open ID Connector (OIDC) uses the tokens to authenticate to AWS and access resources.
- GitHub action uploads the deployment artifacts to Amazon S3.
- GitHub action invokes CodeDeploy.
- CodeDeploy triggers the deployment to Amazon EC2 instances in an Autoscaling group.
- CodeDeploy downloads the artifacts from Amazon S3 and deploys to Amazon EC2 instances.
Prerequisites
Before you begin, you must complete the following prerequisites:
- An AWS account with permissions to create the necessary resources.
- A GitHub account with permissions to configure GitHub repositories, create workflows, and configure GitHub secrets.
- A Git client to clone the provided source code.
Steps
The following steps provide a high-level overview of the walkthrough:
- Clone the project from the AWS code samples repository.
- Deploy the AWS CloudFormation template to create the required services.
- Update the source code.
- Setup GitHub secrets.
- Integrate CodeDeploy with GitHub.
- Trigger the GitHub Action to build and deploy the code.
- Verify the deployment.
Download the source code
- Clone the source code repository aws-codedeploy-github-actions-deployment.
git clone https://github.com/aws-samples/aws-codedeploy-github-actions-deployment.git
- Create an empty repository in your personal GitHub account. To create a GitHub repository, see Create a repo. Clone this repo to your computer. Furthermore, ignore the warning about cloning an empty repository.
git clone https://github.com/<username>/<repoName>.git

- Copy the code. We need contents from the hidden .github folder for the GitHub actions to work.
cp -r aws-codedeploy-github-actions-deployment/. <new repository>
e.g. GitActionsDeploytoAWS
- Now you should have the following folder structure in your local repository.

Repository folder structure
- The .github folder contains actions defined in the YAML file.
- The aws/scripts folder contains code to run at the different deployment lifecycle events.
- The cloudformation folder contains the template.yaml file to create the required AWS resources.
- Spring-boot-hello-world-example is a sample application used by GitHub actions to build and deploy.
- Root of the repo contains appspec.yml. This file is required by CodeDeploy to perform deployment on Amazon EC2. Find more details here.
The following commands will help make sure that your remote repository points to your personal GitHub repository.
git remote remove origin
git remote add origin <your repository url>
git branch -M main
git push -u origin main
Deploy the CloudFormation template
To deploy the CloudFormation template, complete the following steps:
- Open AWS CloudFormation console. Enter your account ID, user name, and Password.
- Check your region, as this solution uses us-east-1.
- If this is a new AWS CloudFormation account, select Create New Stack. Otherwise, select Create Stack.
- Select Template is Ready
- Select Upload a template file
- Select Choose File. Navigate to template.yml file in your cloned repository at “aws-codedeploy-github-actions-deployment/cloudformation/template.yaml”.
- Select the template.yml file, and select next.
- In Specify Stack Details, add or modify the values as needed.
-
- Stack name = CodeDeployStack.
- VPC and Subnets = (these are pre-populated for you) you can change these values if you prefer to use your own Subnets)
- GitHubThumbprintList = 6938fd4d98bab03faadb97b34396831e3780aea1
- GitHubRepoName – Name of your GitHub personal repository which you created.

- On the Options page, select Next.
- Select the acknowledgement box to allow for the creation of IAM resources, and then select Create. It will take CloudFormation approximately 10 minutes to create all of the resources. This stack would create the following resources.
-
- Two Amazon EC2 Linux instances with Tomcat server and CodeDeploy agent are installed
- Autoscaling group with Internet Application load balancer
- CodeDeploy application name and deployment group
- Amazon S3 bucket to store build artifacts
- Identity and Access Management (IAM) OIDC identity provider
- Instance profile for Amazon EC2
- Service role for CodeDeploy
- Security groups for ALB and Amazon EC2
Update the source code
- On the AWS CloudFormation console, select the Outputs tab. Note that the Amazon S3 bucket name and the ARN of the GitHub IAM Role. We will use this in the next step.

- Update the Amazon S3 bucket in the workflow file deploy.yml. Navigate to /.github/workflows/deploy.yml from your Project root directory.
Replace ##s3-bucket## with the name of the Amazon S3 bucket created previously.
Replace ##region## with your AWS Region.

- Update the Amazon S3 bucket name in after-install.sh. Navigate to aws/scripts/after-install.sh. This script would copy the deployment artifact from the Amazon S3 bucket to the tomcat webapps folder.

Remember to save all of the files and push the code to your GitHub repo.
- Verify that you’re in your git repository folder by running the following command:
git remote -V
You should see your remote branch address, which is similar to the following:
username@3c22fb075f8a GitActionsDeploytoAWS % git remote -v
origin git@github.com:<username>/GitActionsDeploytoAWS.git (fetch)
origin git@github.com:<username>/GitActionsDeploytoAWS.git (push)
- Now run the following commands to push your changes:
git add .
git commit -m “Initial commit”
git push
Setup GitHub Secrets
The GitHub Actions workflows must access resources in your AWS account. Here we are using IAM OpenID Connect identity provider and IAM role with IAM policies to access CodeDeploy and Amazon S3 bucket. OIDC lets your GitHub Actions workflows access resources in AWS without needing to store the AWS credentials as long-lived GitHub secrets.
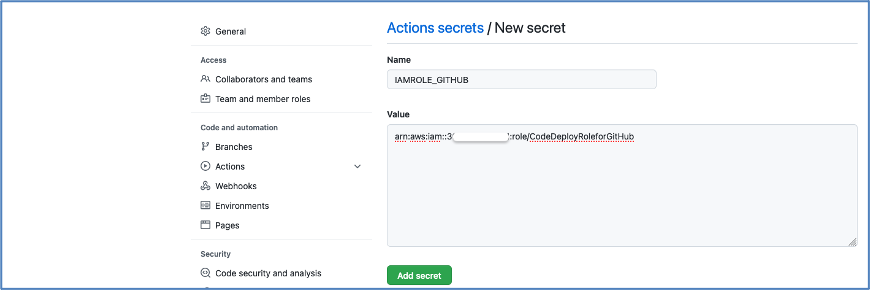
These credentials are stored as GitHub secrets within your GitHub repository, under Settings > Secrets. For more information, see “GitHub Actions secrets”.
- Navigate to your github repository. Select the Settings tab.
- Select Secrets on the left menu bar.
- Select New repository secret.
- Select Actions under Secrets.
- Enter the secret name as ‘IAMROLE_GITHUB’.
- enter the value as ARN of GitHubIAMRole, which you copied from the CloudFormation output section.

Integrate CodeDeploy with GitHub
For CodeDeploy to be able to perform deployment steps using scripts in your repository, it must be integrated with GitHub.
CodeDeploy application and deployment group are already created for you. Please use these applications in the next step:
CodeDeploy Application =CodeDeployAppNameWithASG
Deployment group = CodeDeployGroupName
To link a GitHub account to an application in CodeDeploy, follow until step 10 from the instructions on this page.
You can cancel the process after completing step 10. You don’t need to create Deployment.
Trigger the GitHub Actions Workflow
Now you have the required AWS resources and configured GitHub to build and deploy the code to Amazon EC2 instances.
The GitHub actions as defined in the GITHUBREPO/.github/workflows/deploy.yml would let us run the workflow. The workflow is currently setup to be manually run.
Follow the following steps to run it manually.
Go to your GitHub Repo and select Actions tab

Select Build and Deploy link, and select Run workflow as shown in the following image.

After a few seconds, the workflow will be displayed. Then, select Build and Deploy.

You will see two stages:
- Build and Package.
- Deploy.
Build and Package
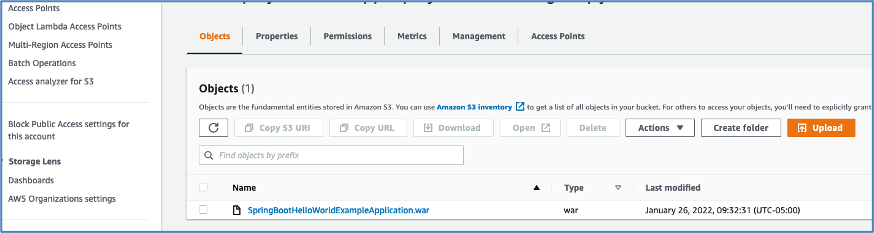
The Build and Package stage builds the sample SpringBoot application, generates the war file, and then uploads it to the Amazon S3 bucket.

You should be able to see the war file in the Amazon S3 bucket.
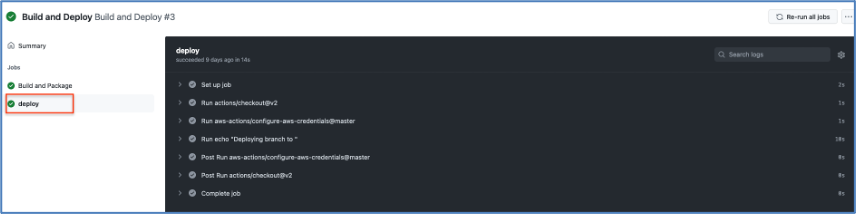
Deploy
In this stage, workflow would invoke the CodeDeploy service and trigger the deployment.
Verify the deployment
Log in to the AWS Console and navigate to the CodeDeploy console.
Select the Application name and deployment group. You will see the status as Succeeded if the deployment is successful.

Point your browsers to the URL of the Application Load balancer.
Note: You can get the URL from the output section of the CloudFormation stack or Amazon EC2 console Load Balancers.

Optional – Automate the deployment on Git Push
Workflow can be automated by changing the following line of code in your .github/workflow/deploy.yml file.
From
workflow_dispatch: {}
To
  #workflow_dispatch: {}
  push:
    branches: [ main ]
  pull_request:
This will be interpreted by GitHub actions to automaticaly run the workflows on every push or pull requests done on the main branch.
After testing end-to-end flow manually, you can enable the automated deployment.
Clean up
To avoid incurring future changes, you should clean up the resources that you created.
- Empty the Amazon S3 bucket:
- Delete the CloudFormation stack (CodeDeployStack) from the AWS console.
- Delete the GitHub Secret (‘IAMROLE_GITHUB’)
- Go to the repository settings on GitHub Page.
- Select Secrets under Actions.
- Select IAMROLE_GITHUB, and delete it.
Conclusion
In this post, you saw how to leverage GitHub Actions and CodeDeploy to securely deploy Java SpringBoot application to Amazon EC2 instances behind AWS Autoscaling Group. You can further add other stages to your pipeline, such as Test and security scanning.
Additionally, this solution can be used for other programming languages.
About the Authors
 |
Mahesh Biradar is a Solutions Architect at AWS. He is a DevOps enthusiast and enjoys helping customers implement cost-effective architectures that scale. |
 |
Suresh Moolya is a Cloud Application Architect with Amazon Web Services. He works with customers to architect, design, and automate business software at scale on AWS cloud. |