AWS Big Data Blog

Develop and test AWS Glue version 3.0 and 4.0 jobs locally using a Docker container

Apr 2023: This post was reviewed and updated with enhanced support for Glue 4.0 Streaming jobs.
Jan 2023: This post was reviewed and updated with enhanced support for Glue 3.0 Streaming jobs, ARM64, and Glue 4.0.

AWS Glue is a fully managed serverless service that allows you to process data coming through different data sources at scale. You can use AWS Glue jobs for various use cases such as data ingestion, preprocessing, enrichment, and data integration from different data sources. AWS Glue version 3.0 provides a performance-optimized Apache Spark 3.1 runtime experience for batch and stream processing. AWS Glue version 4.0, the latest version of AWS Glue Spark jobs, provides a performance-optimized Apache Spark 3.3 runtime experience.

You can author AWS Glue jobs in different ways. If you prefer coding, AWS Glue allows you to write Python/Scala source code with the AWS Glue ETL library. If you prefer interactive scripting, AWS Glue interactive sessions and AWS Glue Studio notebooks helps you to write scripts in notebooks by inspecting and visualizing the data. If you prefer a graphical interface rather than coding, AWS Glue Studio helps you author data integration jobs visually without writing code.

For a production-ready data platform, a development process and CI/CD pipeline for AWS Glue jobs is key. We understand the huge demand for developing and testing AWS Glue jobs where you prefer to have flexibility, a local laptop, a Docker container on Amazon Elastic Compute Cloud (Amazon EC2), and so on. You can achieve that by using AWS Glue Docker images hosted on Docker Hub or the Amazon Elastic Container Registry (Amazon ECR) Public Gallery. The Docker images help you set up your development environment with additional utilities. You can use your preferred IDE, notebook, or REPL using the AWS Glue ETL library.

This post is a continuation of blog post “Developing AWS Glue ETL jobs locally using a container“. While the earlier post introduced the pattern of development for AWS Glue ETL Jobs on a Docker container using a Docker image, this post focuses on how to develop and test AWS Glue version 3.0 and 4.0 jobs using the same approach.

Available Docker images

Spark

The following Docker images are available for AWS Glue on Docker Hub:

  • AWS Glue version 4.0amazon/aws-glue-libs:glue_libs_4.0.0_image_01
  • AWS Glue version 3.0amazon/aws-glue-libs:glue_libs_3.0.0_image_01
  • AWS Glue version 2.0amazon/aws-glue-libs:glue_libs_2.0.0_image_01

You can also obtain the images from the Amazon ECR Public Gallery:

  • AWS Glue version 4.0public.ecr.aws/glue/aws-glue-libs:glue_libs_4.0.0_image_01
  • AWS Glue version 3.0public.ecr.aws/glue/aws-glue-libs:glue_libs_3.0.0_image_01
  • AWS Glue version 2.0public.ecr.aws/glue/aws-glue-libs:glue_libs_2.0.0_image_01

Spark Streaming

The following Docker image is available for AWS Glue on Docker Hub:

  • AWS Glue version 4.0amazon/aws-glue-streaming-libs:glue_streaming_libs_4.0.0_image_01
  • AWS Glue version 3.0amazon/aws-glue-streaming-libs:glue_streaming_libs_3.0.0_image_01

You can also obtain the image from the Amazon ECR Public Gallery:

  • AWS Glue version 4.0public.ecr.aws/glue/aws-glue-streaming-libs:glue_streaming_libs_4.0.0_image_01
  • AWS Glue version 3.0public.ecr.aws/glue/aws-glue-streaming-libs:glue_streaming_libs_3.0.0_image_01

Note: AWS Glue Docker images are compatible with both x86_64 and arm64.

In this post, we use amazon/aws-glue-libs:glue_libs_3.0.0_image_01 and run the container on a local machine (Mac, Windows, or Linux). This container image has been tested for AWS Glue version 3.0 Spark jobs. The image contains the following:

  • Amazon Linux
  • AWS Glue ETL Library (aws-glue-libs)
  • Apache Spark 3.1.1
  • Spark history server
  • JupyterLab
  • Livy
  • Other library dependencies (the same as the ones of the AWS Glue job system)

To set up your container, you pull the image from Docker Hub and then run the container. We demonstrate how to run your container with the following methods, depending on your requirements:

  • spark-submit
  • REPL shell (pyspark)
  • pytest
  • JupyterLab
  • Visual Studio Code

Prerequisites

Before you start, make sure that Docker is installed and the Docker daemon is running. For installation instructions, see the Docker documentation for Mac, Windows, or Linux. Also make sure that you have at least 7 GB of disk space for the image on the host running Docker.

For more information about restrictions when developing AWS Glue code locally, see Local Development Restrictions.

Configure AWS credentials

To enable AWS API calls from the container, set up your AWS credentials with the following steps:

  1. Create an AWS named profile.
  2. Open cmd on Windows or a terminal on Mac/Linux, and run the following command:
    PROFILE_NAME="profile_name"

In the following sections, we use this AWS named profile.

Pull the image from Docker Hub

If you’re running Docker on Windows, choose the Docker icon (right-click) and choose Switch to Linux containers… before pulling the image.

Run the following command to pull the image from Docker Hub:

docker pull amazon/aws-glue-libs:glue_libs_3.0.0_image_01

Run the container

Now you can run a container using this image. You can choose any of following methods based on your requirements.

spark-submit

You can run an AWS Glue job script by running the spark-submit command on the container.

Write your ETL script (sample.py in the example below) and save it under the /local_path_to_workspace/src/ directory using the following commands:

$ WORKSPACE_LOCATION=/local_path_to_workspace
$ SCRIPT_FILE_NAME=sample.py
$ mkdir -p ${WORKSPACE_LOCATION}/src
$ vim ${WORKSPACE_LOCATION}/src/${SCRIPT_FILE_NAME}

These variables are used in the docker run command below. The sample code (sample.py) used in the spark-submit command below is included in the appendix at the end of this post.

Run the following command to run the spark-submit command on the container to submit a new Spark application:

$ docker run -it -v ~/.aws:/home/glue_user/.aws -v $WORKSPACE_LOCATION:/home/glue_user/workspace/ -e AWS_PROFILE=$PROFILE_NAME -e DISABLE_SSL=true --rm -p 4040:4040 -p 18080:18080 --name glue_spark_submit amazon/aws-glue-libs:glue_libs_3.0.0_image_01 spark-submit /home/glue_user/workspace/src/$SCRIPT_FILE_NAME
...22/01/26 09:08:55 INFO DAGScheduler: Job 0 finished: fromRDD at DynamicFrame.scala:305, took 3.639886 s
root
|-- family_name: string
|-- name: string
|-- links: array
| |-- element: struct
| | |-- note: string
| | |-- url: string
|-- gender: string
|-- image: string
|-- identifiers: array
| |-- element: struct
| | |-- scheme: string
| | |-- identifier: string
|-- other_names: array
| |-- element: struct
| | |-- lang: string
| | |-- note: string
| | |-- name: string
|-- sort_name: string
|-- images: array
| |-- element: struct
| | |-- url: string
|-- given_name: string
|-- birth_date: string
|-- id: string
|-- contact_details: array
| |-- element: struct
| | |-- type: string
| | |-- value: string
|-- death_date: string

...

REPL shell (pyspark)

You can run a REPL (read-eval-print loop) shell for interactive development. Run the following command to run the pyspark command on the container to start the REPL shell:

$ docker run -it -v ~/.aws:/home/glue_user/.aws -e AWS_PROFILE=$PROFILE_NAME -e DISABLE_SSL=true --rm -p 4040:4040 -p 18080:18080 --name glue_pyspark amazon/aws-glue-libs:glue_libs_3.0.0_image_01 pyspark
...
 ____ __
 / __/__ ___ _____/ /__
 _\ \/ _ \/ _ `/ __/ '_/
 /__ / .__/\_,_/_/ /_/\_\  version 3.1.1-amzn-0
 /_/

Using Python version 3.7.10 (default, Jun 3 2021 00:02:01)
Spark context Web UI available at http://56e99d000c99:4040
Spark context available as 'sc' (master = local[*], app id = local-1643011860812).
SparkSession available as 'spark'.
>>> 

pytest

For unit testing, you can use pytest for AWS Glue Spark job scripts.

Run the following commands for preparation:

$ WORKSPACE_LOCATION=/local_path_to_workspace
$ SCRIPT_FILE_NAME=sample.py
$ UNIT_TEST_FILE_NAME=test_sample.py
$ mkdir -p ${WORKSPACE_LOCATION}/tests
$ vim ${WORKSPACE_LOCATION}/tests/${UNIT_TEST_FILE_NAME}

Run the following command to run pytest on the test suite:

$ docker run -it -v ~/.aws:/home/glue_user/.aws -v $WORKSPACE_LOCATION:/home/glue_user/workspace/ -e AWS_PROFILE=$PROFILE_NAME -e DISABLE_SSL=true --rm -p 4040:4040 -p 18080:18080 --name glue_pytest amazon/aws-glue-libs:glue_libs_3.0.0_image_01 -c "python3 -m pytest"
starting org.apache.spark.deploy.history.HistoryServer, logging to /home/glue_user/spark/logs/spark-glue_user-org.apache.spark.deploy.history.HistoryServer-1-5168f209bd78.out
============================================================= test session starts =============================================================
platform linux -- Python 3.7.10, pytest-6.2.3, py-1.11.0, pluggy-0.13.1
rootdir: /home/glue_user/workspace
plugins: anyio-3.4.0
collected 1 item  

tests/test_sample.py . [100%]

============================================================== warnings summary ===============================================================
tests/test_sample.py::test_counts
 /home/glue_user/spark/python/pyspark/sql/context.py:79: DeprecationWarning: Deprecated in 3.0.0. Use SparkSession.builder.getOrCreate() instead.
 DeprecationWarning)

-- Docs: https://docs.pytest.org/en/stable/warnings.html
======================================================== 1 passed, 1 warning in 21.07s ========================================================

JupyterLab

You can start Jupyter for interactive development and ad hoc queries on notebooks. Complete the following steps:

  1. Run the following command to start JupyterLab:
    $ JUPYTER_WORKSPACE_LOCATION=/local_path_to_workspace/jupyter_workspace/
    $ docker run -it -v ~/.aws:/home/glue_user/.aws -v $JUPYTER_WORKSPACE_LOCATION:/home/glue_user/workspace/jupyter_workspace/ -e AWS_PROFILE=$PROFILE_NAME -e DISABLE_SSL=true --rm -p 4040:4040 -p 18080:18080 -p 8998:8998 -p 8888:8888 --name glue_jupyter_lab amazon/aws-glue-libs:glue_libs_3.0.0_image_01 /home/glue_user/jupyter/jupyter_start.sh
    ...
    [I 2022-01-24 08:19:21.368 ServerApp] Serving notebooks from local directory: /home/glue_user/workspace/jupyter_workspace
    [I 2022-01-24 08:19:21.368 ServerApp] Jupyter Server 1.13.1 is running at:
    [I 2022-01-24 08:19:21.368 ServerApp] http://faa541f8f99f:8888/lab
    [I 2022-01-24 08:19:21.368 ServerApp] or http://127.0.0.1:8888/lab
    [I 2022-01-24 08:19:21.368 ServerApp] Use Control-C to stop this server and shut down all kernels (twice to skip confirmation).
  2. Open http://127.0.0.1:8888/lab in your web browser in your local machine to access the JupyterLab UI.
  3. Choose Glue Spark Local (PySpark) under Notebook.

Now you can start developing code in the interactive Jupyter notebook UI.

Visual Studio Code

To set up the container with Visual Studio Code, complete the following steps:

  1. Install Visual Studio Code.
  2. Install Python.
  3. Install Visual Studio Code Remote – Containers.
  4. Open the workspace folder in Visual Studio Code.
  5. Choose Settings.
  6. Choose Workspace.
  7. Choose Open Settings (JSON).
  8. Enter the following JSON and save it:
    {
        "python.defaultInterpreterPath": "/usr/bin/python3",
        "python.analysis.extraPaths": [
            "/home/glue_user/aws-glue-libs/PyGlue.zip:/home/glue_user/spark/python/lib/py4j-0.10.9-src.zip:/home/glue_user/spark/python/",
        ]
    }

Now you’re ready to set up the container.

  1. Run the Docker container:
    $ docker run -it -v ~/.aws:/home/glue_user/.aws -v $WORKSPACE_LOCATION:/home/glue_user/workspace/ -e AWS_PROFILE=$PROFILE_NAME -e DISABLE_SSL=true --rm -p 4040:4040 -p 18080:18080 --name glue_pyspark amazon/aws-glue-libs:glue_libs_3.0.0_image_01 pyspark
  2. Start Visual Studio Code.
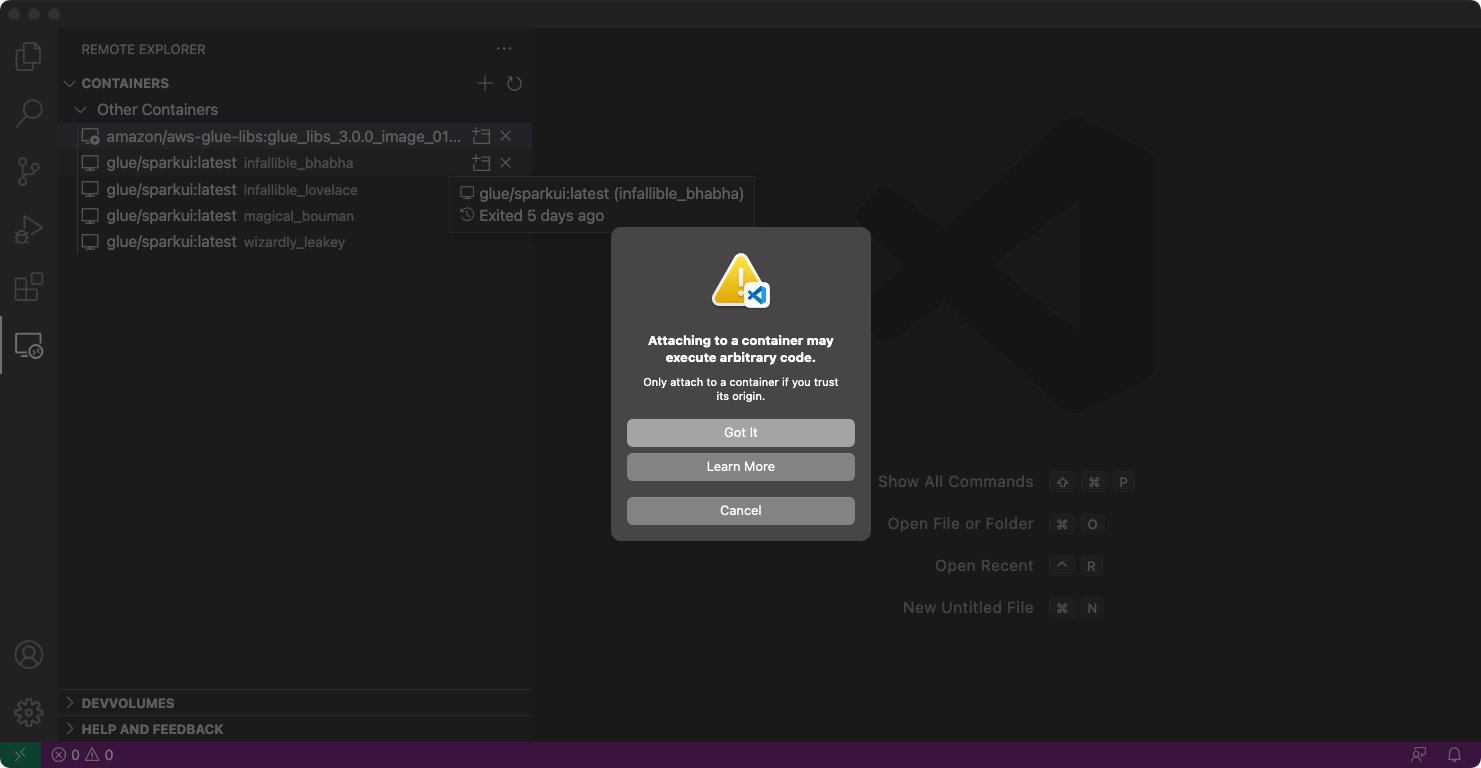
  3. Choose Remote Explorer in the navigation pane, and choose the container amazon/aws-glue-libs:glue_libs_3.0.0_image_01.
  4. Right-click and choose Attach to Container.
  5. If the following dialog appears, choose Got it.
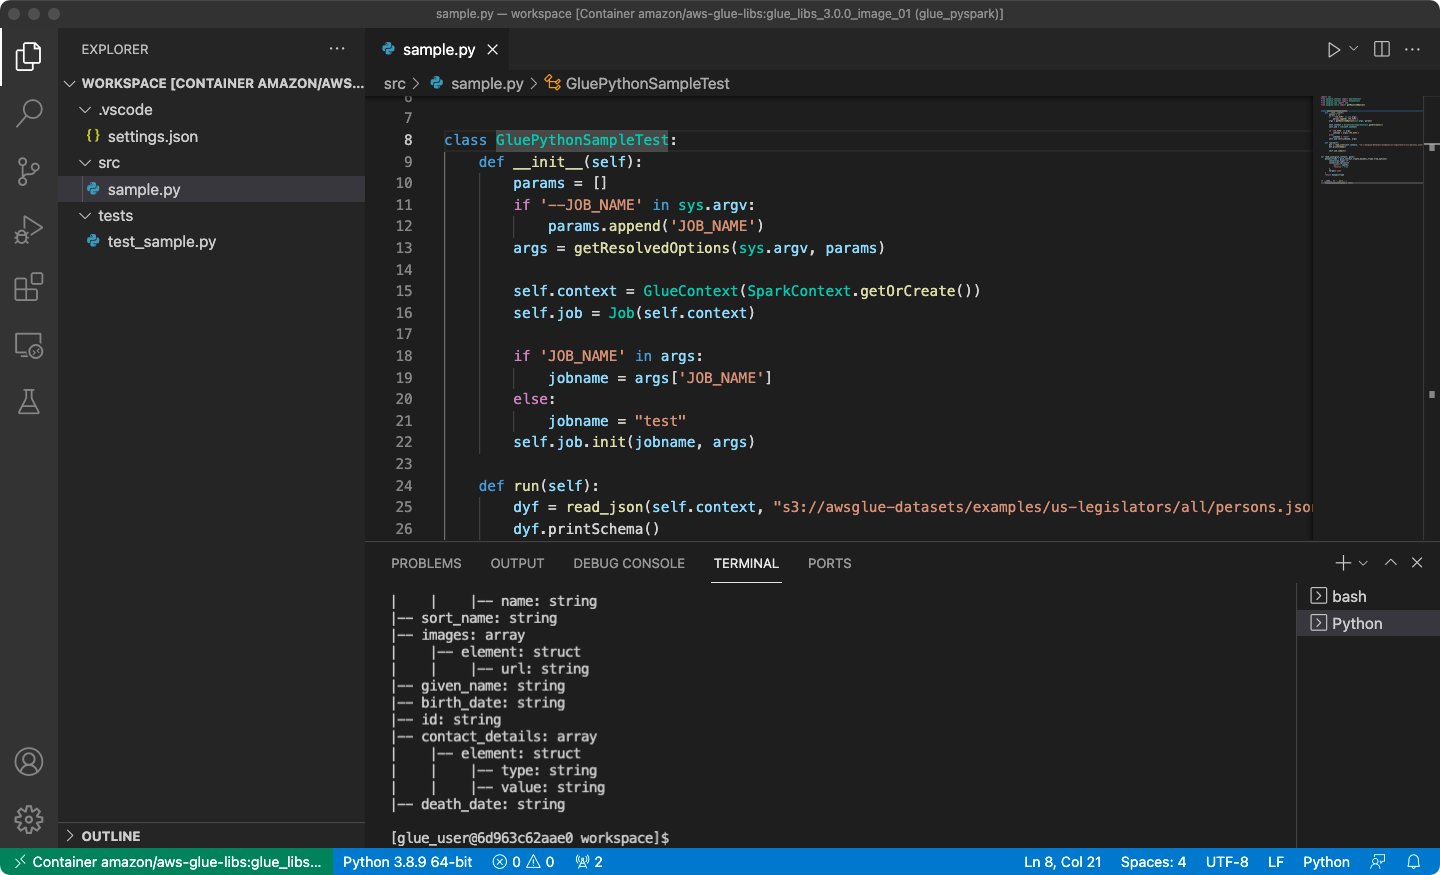
  6. Open /home/glue_user/workspace/.
  7. Create an AWS Glue PySpark script and choose Run.

You should see the successful run on the AWS Glue PySpark script.

Conclusion

In this post, we learned how to get started on AWS Glue Docker images. AWS Glue Docker images help you develop and test your AWS Glue job scripts anywhere you prefer. It is available on Docker Hub and Amazon ECR Public Gallery. Check it out, we look forward to getting your feedback.

Appendix A: AWS Glue job sample codes for testing

This appendix introduces three different scripts as AWS Glue job sample codes for testing purposes. You can use any of them in the tutorial.

The following sample.py code uses the AWS Glue ETL library with an Amazon Simple Storage Service (Amazon S3) API call. The code requires Amazon S3 permissions in AWS Identity and Access Management (IAM). You need to grant the IAM-managed policy arn:aws:iam::aws:policy/AmazonS3ReadOnlyAccess or IAM custom policy that allows you to make ListBucket and GetObject API calls for the S3 path.

import sys
from pyspark.context import SparkContext
from awsglue.context import GlueContext
from awsglue.job import Job
from awsglue.utils import getResolvedOptions


class GluePythonSampleTest:
    def __init__(self):
        params = []
        if '--JOB_NAME' in sys.argv:
            params.append('JOB_NAME')
        args = getResolvedOptions(sys.argv, params)

        self.context = GlueContext(SparkContext.getOrCreate())
        self.job = Job(self.context)

        if 'JOB_NAME' in args:
            jobname = args['JOB_NAME']
        else:
            jobname = "test"
        self.job.init(jobname, args)

    def run(self):
        dyf = read_json(self.context, "s3://awsglue-datasets/examples/us-legislators/all/persons.json")
        dyf.printSchema()

        self.job.commit()


def read_json(glue_context, path):
    dynamicframe = glue_context.create_dynamic_frame.from_options(
        connection_type='s3',
        connection_options={
            'paths': [path],
            'recurse': True
        },
        format='json'
    )
    return dynamicframe


if __name__ == '__main__':
    GluePythonSampleTest().run()z
	

The following test_sample.py code is a sample for a unit test of sample.py:

import pytest
from pyspark.context import SparkContext
from awsglue.context import GlueContext
from awsglue.job import Job
from awsglue.utils import getResolvedOptions
import sys
from src import sample


@pytest.fixture(scope="module", autouse=True)
def glue_context():
    sys.argv.append('--JOB_NAME')
    sys.argv.append('test_count')

    args = getResolvedOptions(sys.argv, ['JOB_NAME'])
    context = GlueContext(SparkContext.getOrCreate())
    job = Job(context)
    job.init(args['JOB_NAME'], args)

    yield(context)

    job.commit()


def test_counts(glue_context):
    dyf = sample.read_json(glue_context, "s3://awsglue-datasets/examples/us-legislators/all/persons.json")
    assert dyf.toDF().count() == 1961

Appendix B: Add extra libraries

You can add extra libraries in each option. Following examples are to add Snowflake Connector for Spark and Snowflake JDBC driver into the local container.

spark-submit: Add local JAR files

For spark-submit, use --jars option on a Docker volume to add local libraries:

  1. Download JAR files
    $ curl https://repo1.maven.org/maven2/net/snowflake/spark-snowflake_2.12/2.10.0-spark_3.1/spark-snowflake_2.12-2.10.0-spark_3.1.jar -o /tmp/spark-snowflake_2.12-2.10.0-spark_3.1.jar
    $ curl https://repo1.maven.org/maven2/net/snowflake/snowflake-jdbc/3.13.14/snowflake-jdbc-3.13.14.jar -o /tmp/snowflake-jdbc-3.13.14.jar
  2. Locate JAR files into the workspace directory
    $ cd glue_workspace/
    $ mkdir lib
    $ mv /tmp/spark-snowflake_2.12-2.10.0-spark_3.1.jar lib/
    $ mv /tmp/snowflake-jdbc-3.13.14.jar lib/
  3. Run spark-submit command with --jars option
    $ docker run -it -v ~/.aws:/home/glue_user/.aws -v $WORKSPACE_LOCATION:/home/glue_user/workspace/ -e AWS_PROFILE=$PROFILE_NAME -e DISABLE_SSL=true --rm -p 4040:4040 -p 18080:18080 --name glue_spark_submit amazon/aws-glue-libs:glue_libs_3.0.0_image_01 spark-submit --jars /home/glue_user/workspace/lib/spark-snowflake_2.12-2.10.0-spark_3.1.jar,/home/glue_user/workspace/lib/snowflake-jdbc-3.13.14.jar /home/glue_user/workspace/src/$SCRIPT_FILE_NAME

spark-submit: Add libraries from Maven

For spark-submit, use --packages option on a Docker volume to add libraries from Maven:

$ docker run -it -v ~/.aws:/home/glue_user/.aws -v $WORKSPACE_LOCATION:/home/glue_user/workspace/ -e AWS_PROFILE=$PROFILE_NAME -e DISABLE_SSL=true --rm -p 4040:4040 -p 18080:18080 --name glue_spark_submit amazon/aws-glue-libs:glue_libs_3.0.0_image_01 spark-submit --packages net.snowflake:spark-snowflake_2.12:2.10.0-spark_3.1,net.snowflake:snowflake-jdbc:3.13.14 /home/glue_user/workspace/src/$SCRIPT_FILE_NAME

JupyterLab: Add local Python libraries

For JupyterLab, run %%configure magic on a notebook to add local libraries:

  1. Locate your python libraries under $EXTRA_PYTHON_PACKAGE_LOCATION
    $ EXTRA_PYTHON_PACKAGE_LOCATION=/Users/username/extra_python_path/
  2. Run jupyter_start.sh with a new PYTHONPATH environment variable
    $ docker run -it -v ~/.aws:/home/glue_user/.aws -v $JUPYTER_WORKSPACE_LOCATION:/home/glue_user/workspace/jupyter_workspace/ -v $EXTRA_PYTHON_PACKAGE_LOCATION:/home/glue_user/workspace/extra_python_path/ -e AWS_PROFILE=$PROFILE_NAME -e DISABLE_SSL=true -e PYTHONPATH=$PYTHONPATH:/home/glue_user/workspace/extra_python_path/ --rm -p 4040:4040 -p 18080:18080 -p 8998:8998 -p 8888:8888 --name glue_jupyter_lab amazon/aws-glue-libs:glue_libs_3.0.0_image_01 /home/glue_user/jupyter/jupyter_start.sh

JupyterLab: Add libraries from Maven

For JupyterLab, run %%configure magic on a notebook to add extra libraries from Maven:

%%configure -f
{
    "conf": {
        "spark.jars.packages": "net.snowflake:spark-snowflake_2.12:2.10.0-spark_3.1,net.snowflake:snowflake-jdbc:3.13.14"
    }
}

Glue 4.0: Add native data lake libraries

AWS Glue 4.0 Docker image supports native data lake libraries; Apache Hudi, Delta Lake, and Apache Iceberg.
You can pass the environment variable DATALAKE_FORMATS to load the relevant JAR files.

-e DATALAKE_FORMATS=hudi,delta,iceberg

About the Authors

Subramanya Vajiraya is a Cloud Engineer (ETL) at AWS Sydney specialized in AWS Glue. He is passionate about helping customers solve issues related to their ETL workload and implement scalable data processing and analytics pipelines on AWS. Outside of work, he enjoys going on bike rides and taking long walks with his dog Ollie, a 1-year-old Corgi.

Vishal Pathak is a Data Lab Solutions Architect at AWS. Vishal works with customers on their use cases, architects solutions to solve their business problems, and helps them build scalable prototypes. Prior to his journey in AWS, Vishal helped customers implement business intelligence, data warehouse, and data lake projects in the US and Australia.

Noritaka Sekiyama is a Principal Big Data Architect on the AWS Glue team. He enjoys learning different use cases from customers and sharing knowledge about big data technologies with the wider community.