AWS Robotics Blog
Build and Simulate Robotics Applications in AWS Cloud9
AWS Cloud9 is a cloud-based integrated development environment (IDE) that lets you write, run, and debug your code with just a browser. It includes a code editor, debugger, and terminal. AWS Cloud9 comes prepackaged with essential tools for popular programming languages, including JavaScript, Python, PHP, and more. Since AWS Cloud9 IDE is cloud-based, you can work on your projects from your office, home, or anywhere using an internet-connected machine.
This blog will enable you to easily use AWS Cloud9 for Robot Operating System (ROS) based robotics development and testing. ROS is an open-source framework for writing robot software that enables the building of autonomous robotic systems with a collection of tools, libraries, and conventions. When combined with AWS Cloud9, you can get started developing robotic applications quickly, with no need to install robotics software locally.
Walkthrough
In this blog, you will walk through configuring your AWS Cloud9 IDE with ROS, Gazebo and NICE DCV to develop, debug, and test your robot and simulation applications all through a browser. This provides you the ability to run robot and simulation applications and interact with them via Gazebo, RViz, and other tools directly, as though they were running on your own desktop.
Step 1: Complete Prerequisites for configuring your AWS Account
Step 2: Build the Amazon Elastic Compute Cloud (Amazon EC2) instance. For building ROS applications, you can build our own custom Amazon EC2 instance, and then use that instance in your AWS Cloud9 integrated development environments.
Step 3: (Optional) Configuring NICE DCV to interact with your simulations.
Step 4: Start building!
Prerequisites
For this walkthrough, you should have an AWS account configured to use AWS Systems Manager to create your Amazon EC2 instance. To configure your AWS account, start by creating an AWS Identity and Access Management (IAM) role to be used for your Amazon EC2 instance profile. Afterwards, you can copy your custom public SSH key from the AWS Cloud9 console.
- Navigate to the AWS IAM console home (https://us-east-1.console.aws.amazon.com/iamv2/home?region=us-east-1#/home).
- In the AWS IAM console, select Roles under Access Management in the sidebar to access the AWS IAM roles list page. (Note: if you are accessing the AWS Console through AWS Academy, proceed to Step 20 below)
- Select Create Role near the top right of the screen to create a new role.
- On the trusted entity screen, select AWS Service and under Common use cases, select EC2.
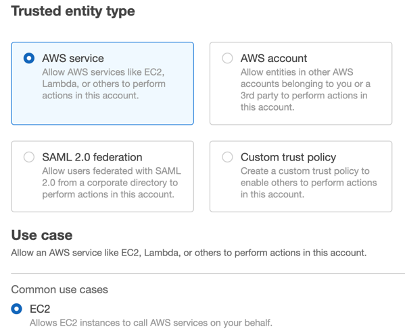
Figure 1: Create new IAM role.
- Select Next to proceed.
- Under Permission policies search for AmazonEC2FullAccess, select the permission policy with that name.
- Once that permission policy is selected, clear the filter and search for AmazonSSMManagedInstanceCore, and select the permission policy with that name.
- With those two permission policies selected, select Next to proceed.
- On the next screen, add a role name and a description to the role. In the image below, the role is defined as ec2-instance-builder, to build an Amazon EC2 instance from an AWS Systems Manager document.
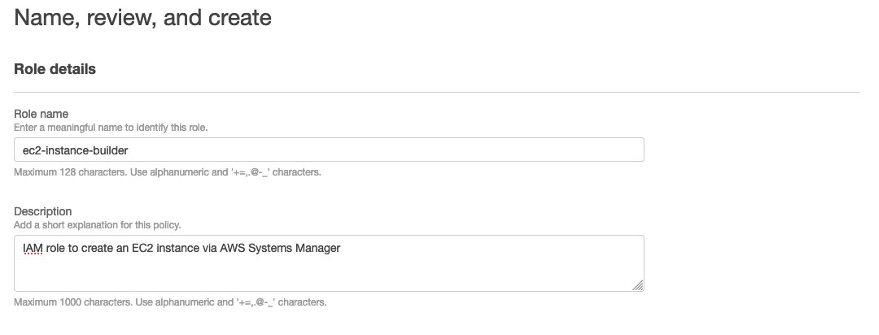
Figure 2: Name new IAM role.
- Select Create role to proceed in the role creation.
- View the role just created, navigate to Trust relationships, and select Edit trust policy.
- Edit the trust policy to include ssm.amazonaws.com and select Update trust policy.
- Now, this trust policy will allow AWS Systems Manager, and Amazon EC2 to assume this role, and its permission policy.
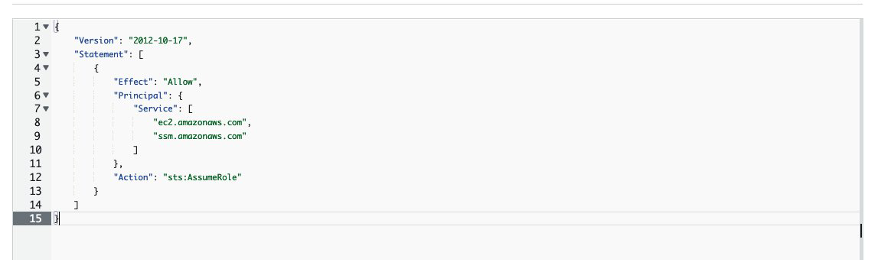
Figure 3: Update trust policies.
- To find your custom public SSH key, navigate to the AWS Cloud9 console (https://us-east-1.console.aws.amazon.com/cloud9/home?region=us-east-1#).
- Select Create Environment to begin an environment creation.
- For this step, a placeholder name is fine, you simply need to provide a name to proceed to the next step.
- Navigate to the Details section.
- Under Environment type, select “Existing compute”.
- In the Existing compute section, copy your SSH public key by selecting Copy key to clipboard to copy your custom SSH key. Store this key in a text editor of choice to be used in the next step.
- *This step is for AWS Academy users only* Select the pre-created LabRole then select Add permissions and Attach policies.
- *This step is for AWS Academy users only* Search for AmazonEC2FullAccess, select the permission policy with that name. Once that permission policy is selected, clear the filter and search for AmazonSSMManagedInstanceCore, and select the permission policy with that name.
Building the Amazon EC2 Instance
To complete the task of building the Amazon EC2 instance, you will take advantage of AWS Systems Manager. By providing a document to AWS Systems Manager, you will be able to create an Amazon EC2 instance ready to integrate into AWS Cloud9.
- Navigate to the AWS Systems Manager console home (https://us-east-1.console.aws.amazon.com/systems-manager/home?region=us-east-1). The example in the blog uses the us-east-1 (N. Virginia) region today, but to create Amazon EC2 instances in different regions the same instructions will apply for each region required.
- From the AWS Systems Manager console home screen, under Shared Resources, select Documents sub menu in the left navigation sidebar.
- From the documents screen, select Create document, and then select Automation to begin the automation document create workflow.
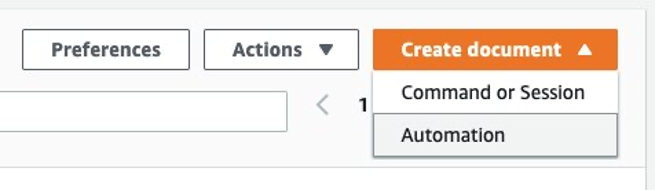
Figure 4: Create new automation document workflow.
- Once in the automation document creation wizard, add a name under Document details that describes the purpose of the document, that you can recall later. In the image below, the name used is ROS1-Cloud9-Instance-Builder, since this document will build an Amazon EC2 instance to use within AWS Cloud9 to build ROS1 applications.

Figure 5: Name new workflow.
- Above the document builder workflow, select Editor view, and select Edit. This will generate a warning that you will not be able to return to the builder view. Dismiss this warning by selecting OK.
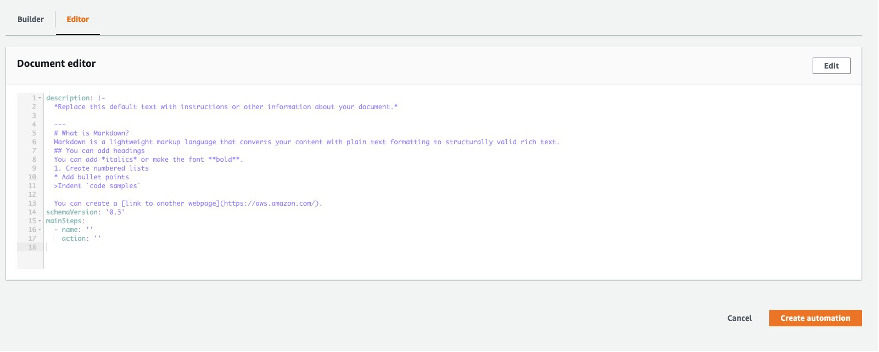
Figure 6: Update existing document content.
- Select all of the content in the editor, and delete the content.
- In the editor, paste the following document for ROS Melodic. This document will create an Amazon EC2 instance using Ubuntu Version 18.04, install a number of dependencies and a few useful packages including ROS Melodic. Alternatively, you can configure ROS 2 Foxy instead of ROS Melodic. If you would like to develop with ROS 2 Foxy, paste the document provided in Option 2. ROS 2 Foxy.
Option 1. SSM for ROS Melodic
description: |-
  ### RoboMaker Cloud9 IDE
  ---
  This document produces an EC2 instance configured to be used in a Cloud9 IDE.
schemaVersion: '0.3'
outputs:
  - startInstances.InstanceIds
parameters:
  instanceType:
    type: String
    default: c5.2xlarge
    description: EC2 Instance type to be used
  amiImageId:
    type: String
    description: 'Ubuntu 18.04 AMI ID to use on the EC2 instance. Use https://cloud-images.ubuntu.com/locator/ec2/ to locate the latest AMI ID for Ubuntu 18.04 hvm:ebs-ssd in the region you are running the automation in.'
  volumeSize:
    type: Integer
    default: 50
    description: Volume size for the EBS mounted volume
  instanceProfileARN:
    type: String
    description: ARN of the instance profile to be used
  cloud9PublicKey:
    type: String
    description: The Cloud9 public key copied from the environment creation wizard in the Cloud9 console
mainSteps:
  - name: startInstances
    action: 'aws:runInstances'
    maxAttempts: 1
    onFailure: Abort
    inputs:
      ImageId: '{{ amiImageId }}'
      MinInstanceCount: 1
      MaxInstanceCount: 1
      InstanceType: '{{ instanceType }}'
      BlockDeviceMappings:
        - DeviceName: /dev/sda1
          Ebs:
            VolumeSize: '{{ volumeSize }}'
            VolumeType: gp2
      IamInstanceProfileArn: '{{ instanceProfileARN }}'
    description: Launch EC2 instance
  - name: runUpdateCommand
    action: 'aws:runCommand'
    maxAttempts: 1
    timeoutSeconds: 300
    inputs:
      InstanceIds:
        - '{{ startInstances.InstanceIds }}'
      DocumentName: AWS-RunShellScript
      Parameters:
        commands:
          - 'apt-get update && DEBIAN_FRONTEND=noninteractive apt-get -y -o Dpkg::Options::=''--force-confdef'' -o Dpkg::Options::=''--force-confold'' dist-upgrade -y'
  - name: stopInstanceBeforeReboot
    action: 'aws:changeInstanceState'
    maxAttempts: 1
    inputs:
      InstanceIds:
        - '{{ startInstances.InstanceIds }}'
      DesiredState: stopped
  - name: startInstanceAfterReboot
    action: 'aws:changeInstanceState'
    maxAttempts: 1
    onFailure: Abort
    inputs:
      InstanceIds:
        - '{{ startInstances.InstanceIds }}'
      DesiredState: running
  - name: installAWSCLI
    action: 'aws:runCommand'
    maxAttempts: 1
    timeoutSeconds: 300
    inputs:
      InstanceIds:
        - '{{ startInstances.InstanceIds }}'
      DocumentName: AWS-RunShellScript
      Parameters:
        commands:
          - apt-get install -y python3 python3-dev python3-pip && pip3 install --upgrade awscli
  - name: install_https_support
    action: 'aws:runCommand'
    maxAttempts: 1
    timeoutSeconds: 300
    inputs:
      InstanceIds:
        - '{{ startInstances.InstanceIds }}'
      DocumentName: AWS-RunShellScript
      Parameters:
        commands:
          - apt-get install -y apt-transport-https ca-certificates curl software-properties-common
  - name: install_build_essentials
    action: 'aws:runCommand'
    maxAttempts: 1
    timeoutSeconds: 300
    inputs:
      InstanceIds:
        - '{{ startInstances.InstanceIds }}'
      DocumentName: AWS-RunShellScript
      Parameters:
        commands:
          - apt-get install -y build-essential
  - name: configure_swap_file
    action: 'aws:runCommand'
    maxAttempts: 1
    timeoutSeconds: 300
    inputs:
      InstanceIds:
        - '{{ startInstances.InstanceIds }}'
      DocumentName: AWS-RunShellScript
      Parameters:
        commands:
          - fallocate -l 512MB /var/swapfile && sudo chmod 600 /var/swapfile && sudo mkswap /var/swapfile && echo '/var/swapfile swap swap defaults 0 0' >> /etc/fstab
  - name: configure_unattended_upgrades
    action: 'aws:runCommand'
    maxAttempts: 1
    timeoutSeconds: 300
    inputs:
      InstanceIds:
        - '{{ startInstances.InstanceIds }}'
      DocumentName: AWS-RunShellScript
      Parameters:
        commands:
          - 'sudo sed -i ''s|//Unattended-Upgrade::InstallOnShutdown "true";|Unattended-Upgrade::InstallOnShutdown "true";|'' /etc/apt/apt.conf.d/50unattended-upgrades'
  - name: install_ubuntu_desktop_and_lightdm
    action: 'aws:runCommand'
    maxAttempts: 1
    timeoutSeconds: 2400
    inputs:
      InstanceIds:
        - '{{ startInstances.InstanceIds }}'
      DocumentName: AWS-RunShellScript
      Parameters:
        commands:
          - DEBIAN_FRONTEND=noninteractive apt-get install -y --no-install-recommends ubuntu-desktop lightdm
  - name: install_desktop_utilities
    action: 'aws:runCommand'
    maxAttempts: 1
    timeoutSeconds: 300
    inputs:
      InstanceIds:
        - '{{ startInstances.InstanceIds }}'
      DocumentName: AWS-RunShellScript
      Parameters:
        commands:
          - DEBIAN_FRONTEND=noninteractive apt-get install -y --no-install-recommends firefox xterm
  - name: get_dcv_pkg
    action: 'aws:runCommand'
    maxAttempts: 1
    timeoutSeconds: 300
    inputs:
      InstanceIds:
        - '{{ startInstances.InstanceIds }}'
      DocumentName: AWS-RunShellScript
      Parameters:
        commands:
          - 'wget https://d1uj6qtbmh3dt5.cloudfront.net/2020.1/Servers/nice-dcv-2020.1-9012-ubuntu1804-x86_64.tgz && echo "7569c95465743b512f1ab191e58ea09777353b401c1ec130ee8ea344e00f8900 nice-dcv-2020.1-9012-ubuntu1804-x86_64.tgz" | sha256sum -c && tar -xvzf nice-dcv-2020.1-9012-ubuntu1804-x86_64.tgz && rm nice-dcv-2020.1-9012-ubuntu1804-x86_64.tgz'
  - name: install_dcv
    action: 'aws:runCommand'
    maxAttempts: 1
    timeoutSeconds: 300
    inputs:
      InstanceIds:
        - '{{ startInstances.InstanceIds }}'
      DocumentName: AWS-RunShellScript
      Parameters:
        commands:
          - cd nice-dcv-2020.1-9012-ubuntu1804-x86_64 && DEBIAN_FRONTEND=noninteractive apt-get install -y ./nice-dcv-server_2020.1.9012-1_amd64.ubuntu1804.deb ./nice-xdcv_2020.1.338-1_amd64.ubuntu1804.deb
  - name: create_dcv_conf
    action: 'aws:runCommand'
    maxAttempts: 1
    timeoutSeconds: 300
    inputs:
      InstanceIds:
        - '{{ startInstances.InstanceIds }}'
      DocumentName: AWS-RunShellScript
      Parameters:
        commands:
          - |-
            cat << 'EOF' >> ./dcv.conf
            [license]
            [log]
            [display]
            [connectivity]
            web-port=8080
            web-use-https=false
            [security]
            authentication="none"
            EOF
  - name: mv_dcv_conf
    action: 'aws:runCommand'
    maxAttempts: 1
    timeoutSeconds: 300
    inputs:
      InstanceIds:
        - '{{ startInstances.InstanceIds }}'
      DocumentName: AWS-RunShellScript
      Parameters:
        commands:
          - mv ./dcv.conf /etc/dcv/dcv.conf
  - name: install_python_and_pip
    action: 'aws:runCommand'
    maxAttempts: 1
    timeoutSeconds: 300
    inputs:
      InstanceIds:
        - '{{ startInstances.InstanceIds }}'
      DocumentName: AWS-RunShellScript
      Parameters:
        commands:
          - apt-get install -y python python-dev python-pip python3 python3-dev python3-pip
  - name: update_pip
    action: 'aws:runCommand'
    maxAttempts: 1
    timeoutSeconds: 300
    inputs:
      InstanceIds:
        - '{{ startInstances.InstanceIds }}'
      DocumentName: AWS-RunShellScript
      Parameters:
        commands:
          - pip install --upgrade pip
  - name: add_cloud9_ssh_key
    action: 'aws:runCommand'
    maxAttempts: 1
    timeoutSeconds: 300
    inputs:
      InstanceIds:
        - '{{ startInstances.InstanceIds }}'
      DocumentName: AWS-RunShellScript
      Parameters:
        commands:
          - 'echo {{ cloud9PublicKey }} >> /home/ubuntu/.ssh/authorized_keys'
  - name: setup_cloud9
    action: 'aws:runCommand'
    maxAttempts: 1
    timeoutSeconds: 300
    inputs:
      InstanceIds:
        - '{{ startInstances.InstanceIds }}'
      DocumentName: AWS-RunShellScript
      Parameters:
        commands:
          - 'chmod u=rwx,g=rx,o=rx /home/ubuntu'
          - apt-get -y install python
          - 'runuser -l ubuntu -c ''curl -o- https://raw.githubusercontent.com/creationix/nvm/v0.33.0/install.sh | bash'''
          - echo 'source /home/ubuntu/.nvm/nvm.sh' >> /home/ubuntu/.bash_profile
          - sudo -iu ubuntu nvm install v12.22.11
          - 'runuser -l ubuntu -c ''curl -L https://raw.githubusercontent.com/c9/install/master/install.sh | bash'''
  - name: install_ros_melodic
    action: 'aws:runCommand'
    maxAttempts: 1
    timeoutSeconds: 300
    inputs:
      InstanceIds:
        - '{{ startInstances.InstanceIds }}'
      DocumentName: AWS-RunShellScript
      Parameters:
        commands:
          - 'git clone https://github.com/aws-robotics/aws-robomaker-sample-application-helloworld.git -b ros1 && cd aws-robomaker-sample-application-helloworld/ && bash -c scripts/setup.sh --install-ros melodic'
          - rm -rf aws-robomaker-sample-application-helloworld/
          - 'echo "[[ -e /opt/ros/melodic/setup.sh ]] && source /opt/ros/melodic/setup.sh" >> /home/ubuntu/.bash_profile'
  - name: install_docker
    action: 'aws:runCommand'
    maxAttempts: 1
    timeoutSeconds: 300
    inputs:
      InstanceIds:
        - '{{ startInstances.InstanceIds }}'
      DocumentName: AWS-RunShellScript
      Parameters:
        commands:
          - 'curl -fsSL https://download.docker.com/linux/ubuntu/gpg | sudo gpg --dearmor -o /usr/share/keyrings/docker-archive-keyring.gpg'
          - 'echo "deb [arch=$(dpkg --print-architecture) signed-by=/usr/share/keyrings/docker-archive-keyring.gpg] https://download.docker.com/linux/ubuntu $(lsb_release -cs) stable" | sudo tee /etc/apt/sources.list.d/docker.list > /dev/null'
          - apt-get update
          - apt-get -y install docker-ce docker-ce-cli containerd.io
Option 2: SSM for ROS2 Foxy
Note: This step is only if you want to configure your IDE with ROS 2 Foxy instead of ROS Melodic. If you are proceeding with ROS Melodic, skip this SSM document.
description: |-
  ### RoboMaker Cloud9 IDE
  ---
  This document produces an EC2 instance configured to be used in a Cloud9 IDE.
schemaVersion: '0.3'
outputs:
  - startInstances.InstanceIds
parameters:
  instanceType:
    type: String
    default: c5.2xlarge
    description: EC2 Instance type to be used
  amiImageId:
    type: String
    description: 'Ubuntu 20.04 AMI ID to use on the EC2 instance. Use https://cloud-images.ubuntu.com/locator/ec2/ to locate the latest AMI ID for Ubuntu 18.04 hvm:ebs-ssd in the region you are running the automation in.'
  volumeSize:
    type: Integer
    default: 50
    description: Volume size for the EBS mounted volume
  instanceProfileARN:
    type: String
    description: ARN of the instance profile to be used
  cloud9PublicKey:
    type: String
    description: The Cloud9 public key copied from the environment creation wizard in the Cloud9 console
mainSteps:
  - name: startInstances
    action: 'aws:runInstances'
    maxAttempts: 1
    onFailure: Abort
    inputs:
      ImageId: '{{ amiImageId }}'
      MinInstanceCount: 1
      MaxInstanceCount: 1
      IamInstanceProfileArn: '{{ instanceProfileARN }}'
      InstanceType: '{{ instanceType }}'
      BlockDeviceMappings:
        - DeviceName: /dev/sda1
          Ebs:
            VolumeSize: '{{ volumeSize }}'
            VolumeType: gp2
    description: Launch EC2 instance
  - name: runUpdateCommand
    action: 'aws:runCommand'
    maxAttempts: 1
    timeoutSeconds: 300
    inputs:
      InstanceIds:
        - '{{ startInstances.InstanceIds }}'
      DocumentName: AWS-RunShellScript
      Parameters:
        commands:
          - 'apt-get update && DEBIAN_FRONTEND=noninteractive apt-get -y -o Dpkg::Options::=''--force-confdef'' -o Dpkg::Options::=''--force-confold'' dist-upgrade -y'
  - name: stopInstanceBeforeReboot
    action: 'aws:changeInstanceState'
    maxAttempts: 1
    inputs:
      InstanceIds:
        - '{{ startInstances.InstanceIds }}'
      DesiredState: stopped
  - name: startInstanceAfterReboot
    action: 'aws:changeInstanceState'
    maxAttempts: 1
    onFailure: Abort
    inputs:
      InstanceIds:
        - '{{ startInstances.InstanceIds }}'
      DesiredState: running
  - name: installAWSCLI
    action: 'aws:runCommand'
    maxAttempts: 1
    timeoutSeconds: 300
    inputs:
      InstanceIds:
        - '{{ startInstances.InstanceIds }}'
      DocumentName: AWS-RunShellScript
      Parameters:
        commands:
          - apt-get install -y python3 python3-dev python3-pip && pip3 install --upgrade awscli
  - name: install_https_support
    action: 'aws:runCommand'
    maxAttempts: 1
    timeoutSeconds: 300
    inputs:
      InstanceIds:
        - '{{ startInstances.InstanceIds }}'
      DocumentName: AWS-RunShellScript
      Parameters:
        commands:
          - apt-get install -y apt-transport-https ca-certificates curl software-properties-common
  - name: install_build_essentials
    action: 'aws:runCommand'
    maxAttempts: 1
    timeoutSeconds: 300
    inputs:
      InstanceIds:
        - '{{ startInstances.InstanceIds }}'
      DocumentName: AWS-RunShellScript
      Parameters:
        commands:
          - apt-get install -y build-essential
  - name: configure_swap_file
    action: 'aws:runCommand'
    maxAttempts: 1
    timeoutSeconds: 300
    inputs:
      InstanceIds:
        - '{{ startInstances.InstanceIds }}'
      DocumentName: AWS-RunShellScript
      Parameters:
        commands:
          - fallocate -l 512MB /var/swapfile && sudo chmod 600 /var/swapfile && sudo mkswap /var/swapfile && echo '/var/swapfile swap swap defaults 0 0' >> /etc/fstab
  - name: install_ubuntu_desktop_and_lightdm
    action: 'aws:runCommand'
    maxAttempts: 1
    timeoutSeconds: 2400
    inputs:
      InstanceIds:
        - '{{ startInstances.InstanceIds }}'
      DocumentName: AWS-RunShellScript
      Parameters:
        commands:
          - DEBIAN_FRONTEND=noninteractive apt-get install -y --no-install-recommends ubuntu-desktop lightdm
  - name: install_desktop_utilities
    action: 'aws:runCommand'
    maxAttempts: 1
    timeoutSeconds: 300
    inputs:
      InstanceIds:
        - '{{ startInstances.InstanceIds }}'
      DocumentName: AWS-RunShellScript
      Parameters:
        commands:
          - DEBIAN_FRONTEND=noninteractive apt-get install -y --no-install-recommends firefox xterm
  - name: get_dcv_pkg
    action: 'aws:runCommand'
    maxAttempts: 1
    timeoutSeconds: 300
    inputs:
      InstanceIds:
        - '{{ startInstances.InstanceIds }}'
      DocumentName: AWS-RunShellScript
      Parameters:
        commands:
          - 'wget https://d1uj6qtbmh3dt5.cloudfront.net/2021.0/Servers/nice-dcv-2021.0-10242-ubuntu2004-x86_64.tgz && echo "431e977dc936bd347146a57eb09033ff8945fe99ad85da64f5ce74c8de6e655c nice-dcv-2021.0-10242-ubuntu2004-x86_64.tgz" | sha256sum -c && tar -xvzf nice-dcv-2021.0-10242-ubuntu2004-x86_64.tgz && rm nice-dcv-2021.0-10242-ubuntu2004-x86_64.tgz'
  - name: install_dcv
    action: 'aws:runCommand'
    maxAttempts: 1
    timeoutSeconds: 300
    inputs:
      InstanceIds:
        - '{{ startInstances.InstanceIds }}'
      DocumentName: AWS-RunShellScript
      Parameters:
        commands:
          - cd nice-dcv-2021.0-10242-ubuntu2004-x86_64 && DEBIAN_FRONTEND=noninteractive apt-get install -y ./nice-dcv-server_2021.0.10242-1_amd64.ubuntu2004.deb ./nice-xdcv_2021.0.380-1_amd64.ubuntu2004.deb
  - name: create_dcv_conf
    action: 'aws:runCommand'
    maxAttempts: 1
    timeoutSeconds: 300
    inputs:
      InstanceIds:
        - '{{ startInstances.InstanceIds }}'
      DocumentName: AWS-RunShellScript
      Parameters:
        commands:
          - |-
            cat << 'EOF' >> ./dcv.conf
            [license]
            [log]
            [display]
            [connectivity]
            web-port=8080
            web-use-https=false
            [security]
            authentication="none"
            EOF
  - name: mv_dcv_conf
    action: 'aws:runCommand'
    maxAttempts: 1
    timeoutSeconds: 300
    inputs:
      InstanceIds:
        - '{{ startInstances.InstanceIds }}'
      DocumentName: AWS-RunShellScript
      Parameters:
        commands:
          - mv ./dcv.conf /etc/dcv/dcv.conf
  - name: install_python_and_pip
    action: 'aws:runCommand'
    maxAttempts: 1
    timeoutSeconds: 300
    inputs:
      InstanceIds:
        - '{{ startInstances.InstanceIds }}'
      DocumentName: AWS-RunShellScript
      Parameters:
        commands:
          - apt-get install -y python3 python3-dev python3-pip
  - name: update_pip
    action: 'aws:runCommand'
    maxAttempts: 1
    timeoutSeconds: 300
    inputs:
      InstanceIds:
        - '{{ startInstances.InstanceIds }}'
      DocumentName: AWS-RunShellScript
      Parameters:
        commands:
          - pip install --upgrade pip
  - name: add_cloud9_ssh_key
    action: 'aws:runCommand'
    maxAttempts: 1
    timeoutSeconds: 300
    inputs:
      InstanceIds:
        - '{{ startInstances.InstanceIds }}'
      DocumentName: AWS-RunShellScript
      Parameters:
        commands:
          - 'echo {{ cloud9PublicKey }} >> /home/ubuntu/.ssh/authorized_keys'
  - name: setup_cloud9
    action: 'aws:runCommand'
    maxAttempts: 1
    timeoutSeconds: 300
    inputs:
      InstanceIds:
        - '{{ startInstances.InstanceIds }}'
      DocumentName: AWS-RunShellScript
      Parameters:
        commands:
          - 'chmod u=rwx,g=rx,o=rx /home/ubuntu'
          - apt-get -y install python
          - 'runuser -l ubuntu -c ''curl -o- https://raw.githubusercontent.com/creationix/nvm/v0.33.0/install.sh | bash'''
          - echo 'source /home/ubuntu/.nvm/nvm.sh' >> /home/ubuntu/.bash_profile
          - sudo -iu ubuntu nvm install v12.22.11
          - 'runuser -l ubuntu -c ''curl -L https://raw.githubusercontent.com/c9/install/master/install.sh | bash'''
  - name: install_ros_foxy
    action: 'aws:runCommand'
    maxAttempts: 1
    timeoutSeconds: 300
    inputs:
      InstanceIds:
        - '{{ startInstances.InstanceIds }}'
      DocumentName: AWS-RunShellScript
      Parameters:
        commands:
          - 'git clone https://github.com/aws-robotics/aws-robomaker-sample-application-helloworld.git -b ros2 && cd aws-robomaker-sample-application-helloworld/ && bash -c scripts/setup.sh --install-ros foxy'
          - rm -rf aws-robomaker-sample-application-helloworld/
          - 'echo "[[ -e /opt/ros/foxy/setup.sh ]] && source /opt/ros/foxy/setup.sh" >> /home/ubuntu/.bash_profile'
  - name: install_docker
    action: 'aws:runCommand'
    maxAttempts: 1
    timeoutSeconds: 300
    inputs:
      InstanceIds:
        - '{{ startInstances.InstanceIds }}'
      DocumentName: AWS-RunShellScript
      Parameters:
        commands:
          - 'curl -fsSL https://download.docker.com/linux/ubuntu/gpg | sudo gpg --dearmor -o /usr/share/keyrings/docker-archive-keyring.gpg'
          - 'echo "deb [arch=$(dpkg --print-architecture) signed-by=/usr/share/keyrings/docker-archive-keyring.gpg] https://download.docker.com/linux/ubuntu $(lsb_release -cs) stable" | sudo tee /etc/apt/sources.list.d/docker.list > /dev/null'
          - apt-get update
- apt-get -y install docker-ce docker-ce-cli containerd.io- Once this content is pasted in, select Create automation in the bottom right corner of the screen. After the document is created, you are ready to execute the automation.
- From the Documents screen in the AWS Systems Manager console, select the Owned by me tab to navigate to your documents.
- Select the name of the document that you created in the previous step to take you to the document details screen.

Figure 7: Execute automation workflow.
- Select Execute automation to begin executing the document.
- Under Input parametersin the execute automation screen you will find four inputs that can be configured. The first, instanceType is the EC2 instance type that you would like to use for your development environment. By default, this is set to a c5.2xlarge*. (*Note: if you are accessing AWS through AWS Academy, you will need to change to large)
- The second configuration is the AMI Image ID, this is the latest Amazon Machine Image ID for Ubuntu that has been distributed for use within EC2. You can use the Amazon EC2 AMI Finder provided by Ubuntu to locate the AMI ID for the distro you require. For ROS1 applications use the Ubuntu 18.04 distribution. For ROS2 applications you will need an Ubuntu 20.04 distribution. Once you have identified which version of Ubuntu you require, you can query the EC2 AMI finder by using the format
region hvm:ebs-ssd distrofor exampleus-east-1 hvm:ebs-ssd 18.04will return two results. Any AMI ID that matches that query will work within your automation. The region provided to the query is the region you are running the automation in within AWS. Once you have located the appropriate AMI ID from the image finder, paste that value into theamiImageIdinput. - The next configuration is the Amazon Elastic Block Store (EBS)volume storage size and by default is 50.
- The fourth parameter, Amazon Resource Name (ARN), has no default. This is the instance profile that was created in the Prerequisitessection of this article. You can find your instance profile ARN within the role summary in the IAM console.
- The final parameter, cloud9PublicKey, is your custom AWS Cloud9 public SSH key that was copied earlier. Paste the full public SSH key into this input.

17. Once you have configured the automation, select Execute at the bottom right of the screen to begin the automation.
18. The automation will take approximately ~30 minutes to complete all steps.
19. Once the automation is complete, drop down the Outputs section and copy the instance ID that was created to be used in the next step.

Figure 9: Copy Output details.
Integrating the Amazon EC2 instance into an AWS Cloud9 IDE
With an Amazon EC2 instance created, you can now use that instance in AWS Cloud9. First, you need to make some minor modifications to the Amazon EC2 instance’s security group.
- Navigate to the Amazon EC2 console in the region you created the instance in. Navigate to the instances screen by selecting Instances from the left-hand navigation sidebar.
- Filter instances by the ID you copied from Step 18 above and select into the instance that was created.
- From this screen copy the Public IPv4 DNS from the details screen and store it for a future step.
- Open the Security tab for the Amazon EC2 instance, and select the attached security group to open the security groups console.
- Under Inbound Rules you will need to allow traffic on port 22 for AWS Cloud9 to be able to SSH to your instance. You can restrict the IPs by referencing this article Inbound SSH IP address ranges for AWS Cloud9. However, if you want to SSH to this instance from your personal computer, you need to allow all traffic on port 22.
- Optionally, if want to connect to a NICE DCV session running on the host, you will need to allow inbound traffic on port 8080 as well from all locations.
- Select Edit inbound rules to modify.
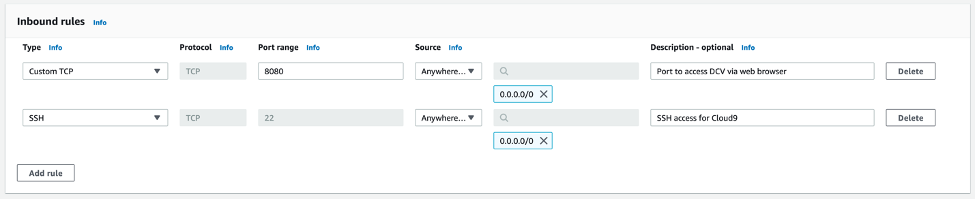
Figure 10: Update Inbound rules.
- Once your inbound rules are modified, save the configuration and navigate to the AWS Cloud9 console in the region that you created the instance in https://us-east-1.console.aws.amazon.com/cloud9/home?region=us-east-1.
- Select Your environments from the left-hand navigation sidebar. Select Create environment from the environments list screen.
- Name your environment and then select Next step.
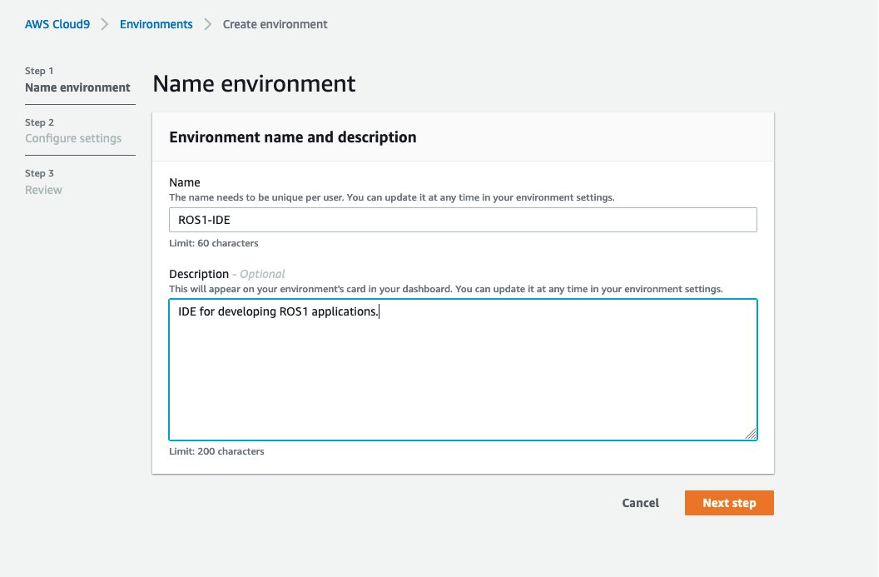
Figure 11: Name AWS Cloud9 environment.
- Under Environment type select Create and run-in remote server (SSH connection).
- Under User input ubuntu, under Host input the Public IPv4 DNS of the EC2 instance that was copied earlier, and for port, the default of 22 is sufficient.
- Expand the Advanced settings section. Under Node.js binary path input the following:/home/ubuntu/.nvm/versions/node/v12.22.11/bin/node
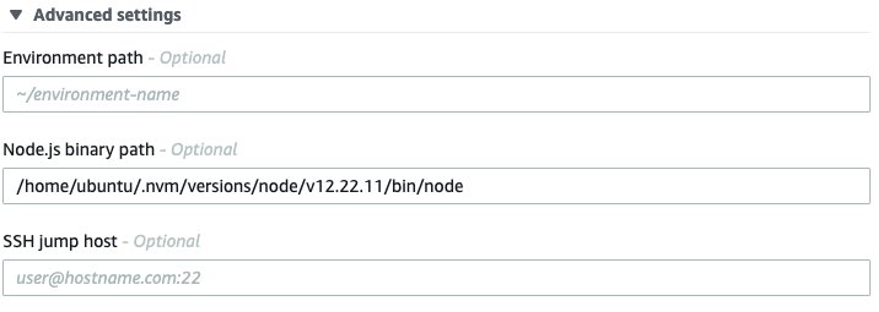
Figure 12: Update advanced settings.
- Select Next step, then select Create environment after you have reviewed the details.
(Optional) Configuring NICE DCV
The Ubuntu instance you’ve created comes with a full Ubuntu desktop install, and an install of NICE DCV. Connecting to NICE DCV will enable you to interact with your simulations with such tools like Gazebo. In order to connect to NICE DCV, every time the instance is rebooted, you will need to create a NICE DCV session. Using this script, you can start and enable NICE DCV server, create a session, and generate a preview URL.
cat << 'EOF' >> dcvsession
#!/bin/bash
dbus-launch gsettings set org.gnome.desktop.lockdown disable-lock-screen true
dbus-launch gsettings set com.ubuntu.update-notifier no-show-notifications true
dbus-launch gsettings set org.gnome.shell enabled-extensions "['ubuntu-dock@ubuntu.com']"
sudo  /sbin/iptables -A INPUT -p tcp ! -s localhost --dport 8080 -j DROP
sudo systemctl start dcvserver
sudo systemctl enable dcvserver
dcv create-session my-session --owner ubuntu &> /dev/null
sudo apt-get install -y jq &> /dev/null
echo DCV preview URL : https://$C9_PID.vfs.cloud9.$(curl --silent http://169.254.169.254/latest/dynamic/instance-identity/document | jq -r .region).amazonaws.com
EOF- To use this script, paste the above content into a terminal within your IDE then enter the following:
chmod 755 ./dcvsession - Afterwards you can run:
./dcvsession - This will output a URL that you can use to view the NICE DCV session. Run this script anytime you need that URL, or when the instance reboots.
- Copy the URL, then open a new browser tab and paste the URL in the address bar then <Enter>. You should see a Ubuntu desktop appear in the tab.
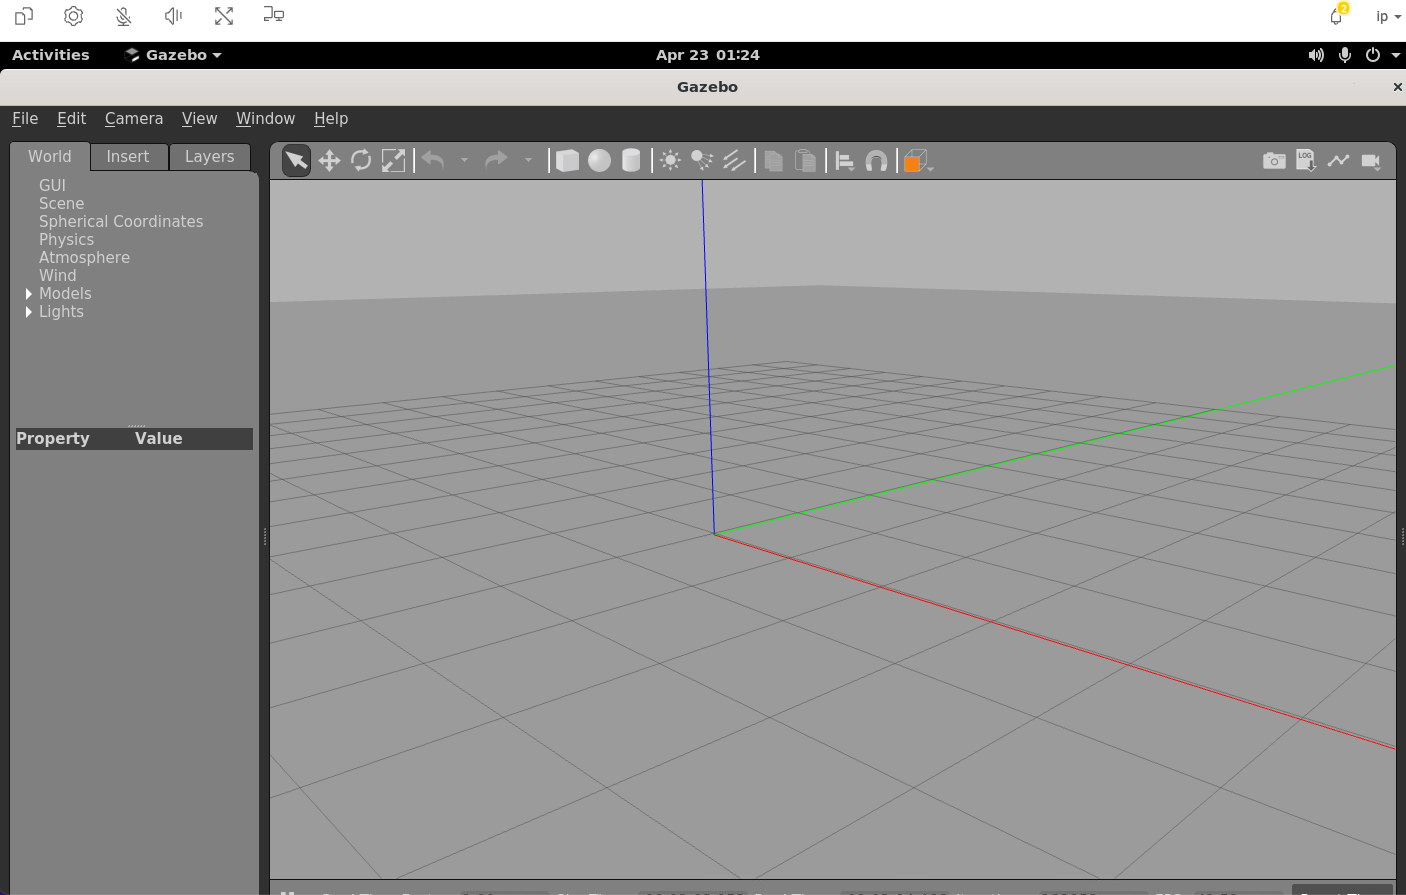
Figure 13: NICE DCV with Gazebo launched.
Start Building
Once you have completed these steps, you can get started developing robotics applications quickly with a reference application or upload your own files. Then, explore your application and iterate using the virtual desktop or launch simulations using Gazebo, visualize data in rqt, or use other robotics tools to introspect your data all in the cloud.
Cleaning up
Once you have finished using the IDE, to clean up any resources used, open the AWS Cloud9 console.
- Close your development environment browser tab.
- You can either leave it for use another time or you can delete it by choosing Your environments from the AWS Cloud9 menu, choosing your environment from the list, then selecting Delete.
Conclusion
In this blog, you can now configure an AWS Cloud9 for ROS-based robotics development. Building in the cloud AWS Cloud9 development environment enables you to quickly get start building and iterating on a simulated robot. To learn more about AWS Cloud9, visit the AWS Cloud9 webpage.