Front-End Web & Mobile
NEW in Amplify DataStore: Selective sync and sort functionality
AWS Amplify is the fastest and easiest way to build cloud-powered mobile and web apps on AWS. Amplify comprises a set of tools and services that enables front-end web and mobile developers to leverage the power of AWS services to build innovative and feature-rich applications.
Amplify DataStore (JavaScript, Android, and iOS) provides frontend web and and mobile developers a persistent on-device storage repository for you to write, read, and observe changes to data even if you are online or offline, and seamlessly sync to the cloud as well as across devices. With the recent Amplify Library release, DataStore gains the ability to selectively sync a subset of your app data and to sort your app data.
What’s New:
- Selectively sync: Only sync a subset of your app data to the local device based on dynamic predicates. For example, you can choose to only sync data based on a logged-in user’s information. By only syncing the data that the end-user needs, customers can also optimize their app’s network efficiency.
- Sort capability: Sort your app data in ascending or descending order. DataStore also supports multi-level sorting. For example: First sort the ”contacts” ascending by their “workplace” and then descending by their “last names”. No additional changes to your app’s GraphQL schema are required to take advantage of data sorting.
What we’ll build & learn:
- A “Favorite song playlist” React app that enables a user to add their favorite songs (name + genre)
- How to ensure to only synchronize the songs downstream of the user’s preferred genre
- How to enable alphabetical sorting of songs by name
Prerequisites:
- Install the latest Amplify CLI version
- Using NPM:
npm install -g @aws-amplify/cli - cURL on Linux and Mac:
curl -sL https://aws-amplify.github.io/amplify-cli/install | bash && $SHELL - cURL on Windows:
curl -sL https://aws-amplify.github.io/amplify-cli/install-win -o install.cmd && install.cmd
- Using NPM:
- Amplify is already configured
- If you haven’t configured the Amplify CLI yet, follow this guide on our documentation page
Setup a new React project
Run the following command to create a new Amplify project called “songs” or if you already have an existing Amplify project skip to the next section.
npx create-react-app songs
cd songs
Setup your app backend with Amplify CLI
Initialize an Amplify project by running:
amplify initFor the purposes of this blog post, you can just accept all the default values in the amplify init workflow.
Let’s add a GraphQL API to sync your app data to the cloud. Run the following command:
amplify add apiand select the following options.
IMPORTANT: Make sure to select the following options to correctly enable DataStore. DataStore requires conflict resolution to be enabled.
Go to amplify/backend/api/songs/schema.graphql and edit your app’s data model:
For this example, we’ll keep it simple. You have a “Song” model that has a field called “name” a field called “genre”.
Now that you have your schema set up, let’s deploy your app backend. Run the following command and accept all defaults:
amplify pushYour app backend is successfully deployed! Let’s move on to our client-side code.
Install and initialize the Amplify libraries
Run the following command to install the Amplify libraries:
npm install aws-amplifyIn your index.js initialize the Amplify library by adding the following lines of code:
import Amplify from 'aws-amplify'
import awsconfig from './aws-exports'

Amplify.configure(awsconfig)
Setup your app’s UI code
Replace your App.js file with the following content:
import { DataStore, Predicates, SortDirection, syncExpression } from 'aws-amplify'
import { Song } from './models'
import { useEffect, useState, useCallback } from 'react';

// TODO: Configure selective sync

function App() {
  const [sortDir, setSortDir] = useState(SortDirection.ASCENDING)
  const [songs, setSongs] = useState([])
  const [name, setName] = useState('')
  const [genre, setGenre] = useState('')

  // TODO: Update later with sort functionality
  const querySongs = useCallback(async () => {
    setSongs(await DataStore.query(Song))
  }, [])

  useEffect(() => querySongs(), [querySongs])

  return (
    <div className="App">
      <div>
        <h2>My Songs</h2>
        <div>
          Sort:
          <select value={sortDir} onChange={(e) => setSortDir(e.target.value)}>
            <option value={SortDirection.ASCENDING}>A to Z</option>
            <option value={SortDirection.DESCENDING}>Z to A</option>
          </select>
          <button onClick={() => querySongs()}>Refresh</button>
        </div>
        <ul>
          {songs.map(song => <li key={song.id}>{song.name} - {song.genre}</li>)}
        </ul>
      </div>
      <div>
        <h2>Add new song</h2>
        <input type='text' placeholder='name' value={name} onChange={e => setName(e.target.value)}></input>
        <input type='text' placeholder='genre' value={genre} onChange={e => setGenre(e.target.value)}></input>
        <button onClick={async () => {
          const toAddSong = new Song({ name, genre })
          await DataStore.save(toAddSong)
          querySongs()
          setName('')
          setGenre('')
        }}>Add</button>
      </div>
    </div>
  );
}

export default App;
Test your app on your local machine by running:
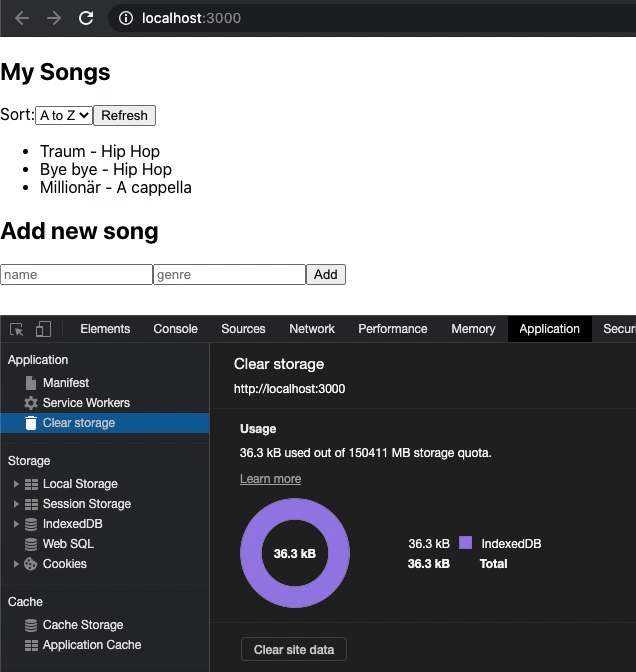
npm startThis serves you an app to add new song entries and list them. Play around with the app and add a few songs from your favorite genres.

Selectively sync your app data based on active functionality
By default, DataStore downloads the entire contents of your cloud data source to your local device. You can now limit what data DataStore should sync based on customizable conditions.
Let’s say, we want to only sync “Songs” if they are from the “Hip Hop” genre. To do that, we have to configure our DataStore to filter its sync expressions based on the preferred genre.
Update the TODO: Configure selective sync section to include a DataStore Sync Expression configuration. In there, we will define that DataStore should only sync “Song” records whose genre is “Hip Hop“.
DataStore.configure({
  syncExpressions: [syncExpression(Song, s => s.genre('eq', 'Hip Hop'))]
})
Now, the user’s song will only be syncing when the genre is “Hip Hop”. To demonstrate this, clear the web app’s local storage from the dev tools and refresh the web app and re-query. You’ll see how only songs matching the sync expression showing up.
Note: you can also clear the DataStore by calling DataStore.clear().
I’ve simplified the workflow for the purpose of this demo but you can actually reconfigure the sync expressions during runtime. Refer to the documentation for more details on selective sync runtime updates.
Sort your DataStore queries
To sort your app data, we have a new “sort” expression that you can pass in the DataStore.query API call.
  // Queries for items -- TODO: Update later with sort functionality
    const querySongs = useCallback(async () => {
    setSongs(await DataStore.query(Song, Predicates.ALL, {
      sort: s => s.name(sortDir)
    }))
  }, [sortDir])
You can specify the the Sort Direction either as “SortDirection.ASCENDING” or “SortDirection.DESCENDING”.

In addition to a simple sorting as above, you can setup “multi-level” sorting. For example: “First sort by the name field ascending and then by the genre field descending”. Review our documentation for multi-level sort.
? Success!
This blog post demonstrates how you can selectively sync a subset of your app data with Amplify DataStore and also the new sort capability. There is so much more to Amplify DataStore! Here are some other cool features you’ll want to check out:
- Set up authorization rules
- Observe your data changes in real-time
- Hook into DataStore events for network and sync notifications
- Optimize selective sync for performance and cost-effectiveness
Look out for future blog posts on Amplify DataStore and review our documentation for DataStore selective sync and sort capabilities for more details.