Containers
Customizing scheduling on Amazon EKS
The interest in Kubernetes spiked in the fall of 2019, according to Google Trends. The US Department of Defense’s announcement that they had deployed Kubernetes on an F-16 could have attributed to the surge in interest. Today, Kubernetes is found in virtually every industry; from building Blockchain networks to 5G networks, customers use Kubernetes to accelerate innovation and construct the foundation of tomorrow’s Internet.
Kubernetes continues to grow in this ever-changing landscape because it is flexible to adapt to a wide array of use cases. Its extensibility allows us to tune Kubernetes to meet the needs of the business. In this post, we demonstrate a proof of concept that makes it easy for you to customize the way Kubernetes schedules your workloads.
Workload scheduling in Kubernetes
The Kubernetes scheduler process (kube-scheduler) is a control plane process that assigns pods to nodes. When you create a pod, kube-scheduler picks the most suitable node in your cluster and schedules the pod on the node. The scheduler filters and ranks matching nodes based on pod configuration, taking into consideration resource requests, affinity rules, topology spread, and more. Kube-scheduler’s default behavior is to spread pods across nodes but there are situations that require fine-grained control over scheduling of pods.
For example, many Amazon Elastic Kubernetes Service (Amazon EKS) customers want to run their workloads on Amazon EC2 Spot to save money, but they also want to run a small percentage of pods on Amazon EC2 On-Demand to account for a potential widespread Spot interruption. Other customers want to spread pods more in a given Availability Zone (AZ) compared to other AZs for specific use cases.
Kube-scheduler doesn’t currently support scheduling pods with arbitrary ratios across nodes with different labels. The solution proposed in this blog is to build a mutating admission webhook that allows you to configure the logic used to filter and rank nodes right in your deployment manifest.
Custom pod scheduling using a mutating admission webhook
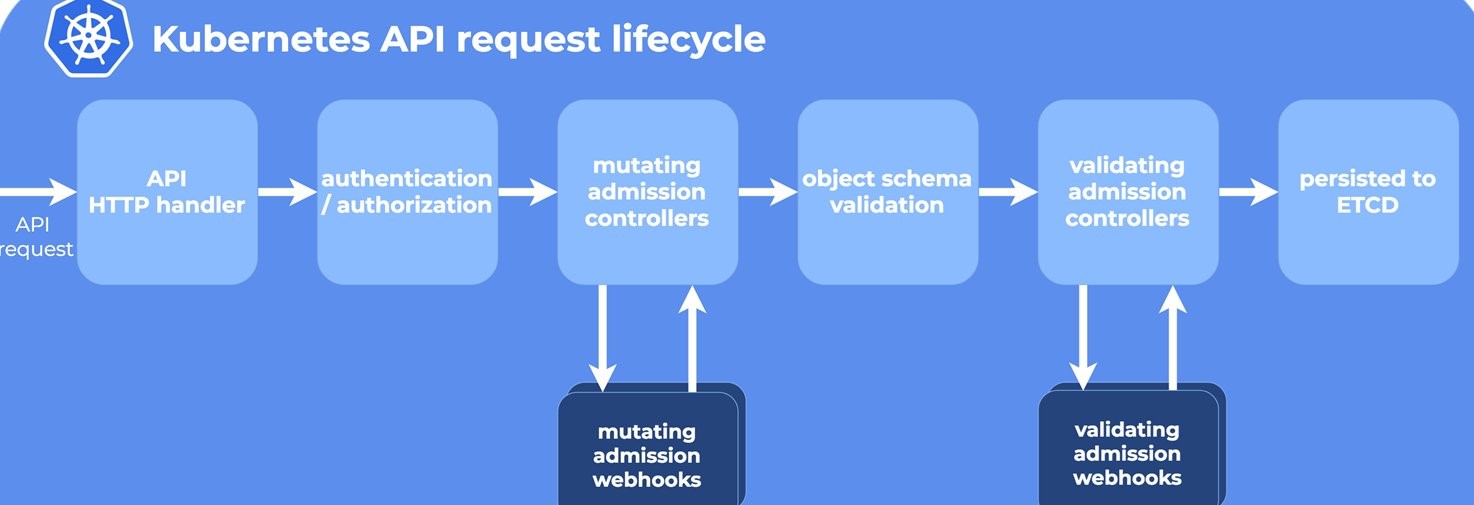
In Kubernetes, an admission controller is a piece of code that intercepts requests to the Kubernetes API server before they are persisted in the etcd key-value store. A mutating controller is capable of changing a resource’s properties before creation. For example, you can use a mutating admission controller to add labels to or inject a sidecar into pods before they are created.
The solution proposed in this post uses a mutating admission webhook to intercept pod creation requests and assign pods to nodes. It allows you to define a custom pod scheduling strategy that utilizes node labels to schedule pods proportionally. Below is an example of a custom scheduling strategy:
When the custom-pod-schedule-strategy annotation is specified in the deployment, the webhook considers this annotation to assign pods across different node labels. Each node label can have base and weight parameters. Base indicates the minimum number of pods to be scheduled on the corresponding node label. Weight indicates the relative distribution of pods across different node labels. Note that only one node label should have base parameter configured.
To understand this better, let’s define two types of nodes, each with a dedicated label, N1 and N2 respectively. The webhook assigns pods to these nodes (using selectors).
D = number of pod replicas in the deployment
N1 = desired number of pods out of D, to be scheduled on nodes with label 1
N2 = desired number of pods out of D, to be scheduled on nodes with label 2
D = N1 + N2
M1 = current number of pods (either in running or pending state) already using nodeSelector with label 1
M2 = current number of pods (either in running or pending state) already using nodeSelector with label 2
Let’s take a look at an example of a Kubernetes deployment manifest:
In this example above, nodes with the label1Key=label1Value label have a base value of 2 and weight of 1.
Let’s assume nodes with the label1Key=label1Value label are On-Demand nodes, whereas Spot nodes are labeled as label2Key=label2Value and have weight set to 3.
Applying the calculation,
D = 10 (total replicas in the deployment)
N1 = number of pods on nodes with the label1Key=label1Value label
N1 = base + (D – base) x (individual weight / total weight)
N1 = 2 + (10 – 2) x ( 1 / 4) = 2 + 8/4 = 4
N2 = number of pods on nodes with the label2Key=label2Value label
N2 = (D – base) x (individual weight / total weight)
N2 = (10 – 2) x ( 3 / 4) = 8 x 3/4 = 6
D (in this case 10) = N1 (in this case 4) + N2 (in this case 6)
Therefore, if we create 10 pods, the webhook will assign the first 2 pods to an On-Demand node (because the base is set to 2), and the remaining 8 pods be will spread with a ratio of 1:3 (configured through weights) between the On-Demand and Spot instances. Therefore, the On-Demand nodes will run 4 pods (2 + 2) while Spot instances run 6.
The proposed solution comprises one component, PodToNodeAllocator.
PodToNodeAllocator
The PodToNodeAllocator assigns pods proportionally as they are created or scaled. It implements a mutating admission webhook that watches incoming requests to create pods. As the Kubernetes cluster receives requests to create pods, the webhook considers the custom-pod-schedule-strategy and assigns pods to nodes by adding a nodeSelector field in PodSpec. However, please note that it only guarantees the ratio distribution at the launch, such as initial scheduling of the pods when deployment is created.
The PodToNodeAllocator then runs the following steps for every new pod for each node label specified in the custom pod scheduling specification in the deployment’s annotation:
- for every new pod (P) created on the API Server
- for every node label (L)
- M = get the current number of pods (either in running or pending state) already assigned to this node label
- N = calculate the desired number of pods out of D, to be scheduled on nodes with this label
- if M >= N, ignore this label L
- else if M < N, update the pod P’s specification with
nodeSelectorfor label L- After the pod’s specification is updated with
nodeSelector, the Kubernetes scheduler assigns the pod to the node with the specified node label.
- After the pod’s specification is updated with
- for every node label (L)

Proof of concept walkthrough
Prerequisites
You will need the following to complete the tutorial:
Note: We have tested the CLI steps in this post on Amazon Linux 2.
Let’s start by setting a few environment variables:
Create an EKS cluster
You can skip this step if you would like to use an existing cluster.
Create an EKS cluster using the eksctl command line tool:
Once the cluster is created successfully, proceed to install Karpenter, which is an open-source node provisioning project built for Kubernetes. Its goal is to improve the efficiency and cost of running workloads on Kubernetes clusters. See this blog post to get started.
If you would like to reuse an existing cluster, ensure that the CLUSTER_NAME environment variable is set to match your EKS cluster name.
Deploy the custom scheduling webhook
Once your EKS cluster is available, clone the GitHub repository that contains the source code and deployment files for the admission webhook:
Create an Amazon Elastic Container Registry (Amazon ECR) repository to store the container image for the webhook. The following commands create a new repository if one does not already exist:
Build a container image that contains the Go application and push it to Amazon ECR:
The output from the make command looks like the following:
Create a Kubernetes namespace
Create the custom-kube-scheduler-webhook namespace in which the mutating pod webhook will be deployed:
Create the certificate and secrets
Create a signed certificate and store it in a Kubernetes secret that will be consumed by the mutating pod webhook deployment:
Verify that the Kubernetes secret has been successfully created:
Deploy the webhook
Create and apply a MutatingWebhookConfiguration:
Deploy the webhook:
Test with sample deployment
Verify that the solution works. First, create a namespace and annotate it so that the webhook monitors the namespace for new pods:
Next, create a sample deployment with annotations for custom pod scheduling:
On a different terminal, run this command to see the logs from the webhook:
The project includes a helper script that shows you the pod distribution across node types:
Now, scale the sample deployment from 10 replicas to 20:
Check the pod distribution to verify proportionality:
As you can see, when we double the replica count, new pods are scheduled proportionally.
Cleanup
Use these commands to delete the resources created during this post:
Conclusion
This post demonstrates how you can use a mutating pod admission webhook to customize pod scheduling across nodes. You can use this solution for a variety of use cases such as prioritizing nodes in an Availability Zone to reduce data transfer costs, spreading workloads across Availability Zones, or running workloads across On-Demand and Spot instances.