AWS Robotics Blog
Build and simulate a Mini Pupper robot in the cloud without managing any infrastructure
Introduction
Traditionally, building, and testing applications for robots is challenging, complicated, and resource intensive in physical environments. To speed up development time, developers often do simulation before building their own robot application. Unfortunately, simulators require high-performance computing environments and specialized skills. Robotics enthusiasts need to invest additional cost and time to manage infrastructure and the development environment. For robotics companies, the infrastructure and operation costs often limit the use of simulation, which then in turn limiting the benefits of automated testing at scale.
With cloud-based simulation, robotics enthusiasts can build and simulate robot applications in the cloud without managing any infrastructure. Robotics companies can use cloud to support massively parallel simulations and automated scaling to make improvements to their robot designs. Developers can increase testing coverage, reduce cost, and accelerate development velocity by using cloud-based simulation.
MangDang, founded in 2020, specializes in the research, development, and production of robot products. Inspired by Stanford Pupper open-source project, they launched their first Robot Operating System (ROS) based quadruped robot (robot with four legs), named Mini Pupper in 2021. Mini Pupper was originally designed and developed to make it easier for robotics enthusiasts, especially students, to build their own quadruped robot systems at a lower price, especially students and educational institutions.
MangDang was looking for a one-stop solution for robotics development and simulation, so they selected AWS RoboMaker as a key component. AWS RoboMaker provides a comprehensive cloud solution for robotics development. It features fully managed simulation capabilities built on scalable infrastructure. With AWS Cloud9, robotics enthusiasts can develop application on a cloud-based integrated development environment (IDE) with a ROS environment. Integrating with open source AWS IoT Greengrass, AWS RoboMaker also provides the ability to deploy applications to physical robots. AWS RoboMaker provides seamless integration with various AWS management, monitoring, security, and storage capabilities to empower customers to innovate and provide best-in-class robotics solutions.
AWS RoboMaker can run open-source ROS and multiple simulation engines. Robotics enthusiasts can run the open source Gazebo simulations engine in the cloud. You don’t need to configure or manage infrastructure for either development or simulation tasks. For robotics companies, AWS RoboMaker can run commercial simulators (Unity, Unreal, Nvidia Isaac, etc.). With AWS RoboMaker Simulation, you can run hundreds of automatically generated test scenarios using the application programming interface (API), making it possible to increase testing coverage and resolve errors before problematic code reaches the robot.
In this post, we use a simple Mini Pupper sample application to demonstrate how to use AWS RoboMaker for robotics application development, testing, and simulation.
Solution overview
In this solution, you will build a navigation application for Mini Pupper. This application uses the robot’s camera and light detection and ranging sensor (LIDAR) to determine the robot’s location and direction. Operators set a destination point, and the robot calculates the route and walk to the destination.
Mini Pupper runs Robot Operating System (ROS). ROS is an open-source robotics software framework. ROS provides a set of software libraries and tools that help you build robot applications. You will develop and run application in an ROS development environment.
You can simulate the robot and application with Gazebo simulator. Gazebo is an open-source 3D robotics simulator. It can render 3D scenes and simulate the robot’s sensor and actuator controls.
You can use an online IDE with a ROS environment and Gazebo simulator for application development and testing. After that, you simulate the robotics application in a hosted simulation environment.
The following diagram illustrates how you build, test, and run robotics application in four steps:
- Deploy a development environment. A development environment is an online IDE with a ROS environment and Gazebo simulator for application development and testing.
- Develop and test their application in the AWS RoboMaker development environment. You can run and debug robotics applications and simulator in development environment.
- Build container image for application. The image is stored in Amazon Elastic Container Registry (Amazon ECR).
- Run the application on AWS RoboMaker’s hosted simulation environment.
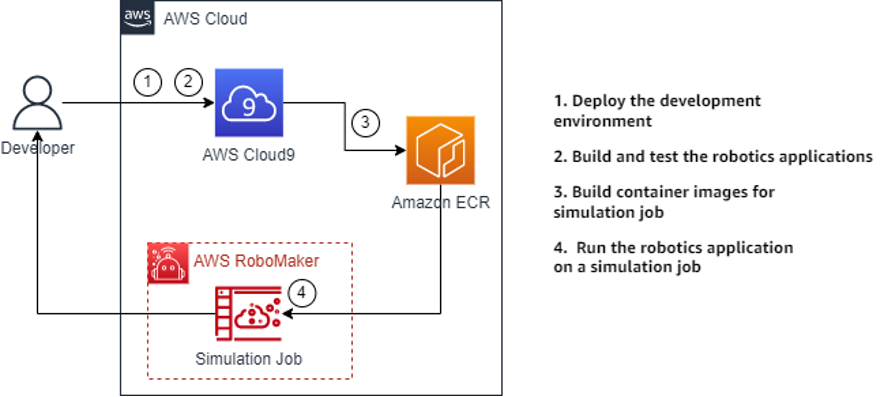
Figure 1 Architecture Diagram for this walkthrough
The solution includes the following components:
- AWS RoboMaker: Provides fully hosted simulation capabilities on top of a scalable infrastructure. In this walkthrough, you can use the hosted simulation environment provided by AWS RoboMaker.
- AWS Cloud9: Online IDE. Allows users to develop in the cloud with a ROS environment and Gazebo simulator.
- Amazon Elastic Container Registry (Amazon ECR): Stores container images of robotic applications and simulation applications.
Prerequisites
For this walkthrough, you need the following:
- Basic understanding of Linux operating systems and containers.
- Basic understanding of ROS and Gazebo.
- An AWS account.
- Administrator or equivalent access to deploy the required resources.
The source code required for this article is available from https://github.com/mangdangroboticsclub/aws-robomaker-mini-pupper-application .
Solution walkthrough
Step 1: Deploy the development environment
The development environment is a cloud-based IDE based on AWS Cloud9, using Amazon Elastic Compute Cloud (Amazon EC2) as the underlying infrastructure. This environment providing a preinstalled Ubuntu operation system. Users can install ROS development environment and Gazebo emulator to quickly start developing robot application.
You can build a development environment by following this blog post: Build and Simulate Robotics Applications in AWS Cloud9. Make sure you finished Configuring NICE DCV step so you can access NICE DCV environment.
Step 2: Build and test the robotics applications
1. Obtain the source code from GitHub.
Run the following command to clone code from Github.
git clone --recursive https://github.com/mangdangroboticsclub/aws-robomaker-mini-pupper-application.git
You can explore the folder structure. The robot application resides in robot_ws folder and the simulation application source code is in simulation_ws folder (also known as workspaces).
The robot application is the software contains the behaviors of the robot, such as ROS navigation. Components will communicate with each other via ROS topics and services.
The simulation application contains models. The simulator will load a world model and robot model to provide the robot environment and sensor data as the robot is moving in simulation. Simulator also communicates with the robot application using ROS topics and services.
2. Install dependencies for the robot application.
In the AWS Cloud9 development environment, you have installed ROS development environment with essential packages. The robot application needs additional packages that can be installed using rosdep. rosdep is the package manager for ROS. It can detect package dependencies from the source code and calls the system’s package manager (apt in this case) to install them.
a. Navigate to robot_ws directory.
cd aws-robomaker-mini-pupper-application/robot_ws
b. Run the following command to install dependencies.
rosdep install --from-paths src --ignore-src -r -y
This process will last three to five minutes. After you see #All required rosdeps installed successfully, all dependencies of the robot application are installed.
3. Install dependencies for the simulation application.
a. Navigate to simulation_ws directory.
cd ../simulation_ws/
b. Run the following command to install dependencies.
rosdep install –from-paths src –ignore-src -r -y
4. Build the robot application.
You can use colcon tool is for building and packaging robotic applications. colcon is a generic ROS build tool that supports both ROS and ROS2. colcon can call cmake or other building tools to build executable from source code. The robot and the simulation application should be built separately.
a. Navigate to robot_ws directory.
cd ../robot_ws
b. Run the following command to start build.
colcon build –cmake-args ‘-Wno-dev’
You will see 2 packages finished.
5. Build the simulation application.
a. Navigate to simulation_ws directory.
cd ../simulation_ws
b. Run the following command to start build.
colcon build –cmake-args ‘-Wno-dev’
You will see 11 packages finished.
6. Launch GUI session.
Once building is complete, you can test it in our development environment using the open-source Gazebo simulator. Your development environment provides a NICE DCV virtual desktop to get a high-quality GUI experience. Run the following command to get access URL to NICE DCV:
./dcvsession
You will see a URL like https://1234567890abcdef0.vfs.cloud9.us-east-1.amazonaws.com. Open the URL in your browser and you will see Ubuntu Desktop.
To run GUI applications from terminal, set the DISPLAY environment variable in the IDE.
a. Run the following command on all open terminals.
export DISPLAY=:0
b. Run xclock command to test launching a simple clock application GUI.
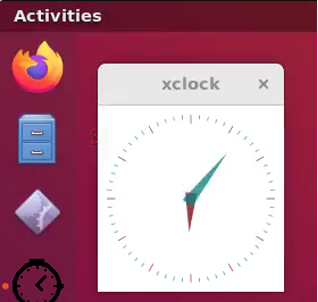
Figure 2 A clock should show on virtual desktop
If the clock GUI does not render, you might receive the following message like Cannot connect to display :0. In this case, run the following command and try launching
xclockonce again.
export DISPLAY=:1
7. Run the robot application.
Now you can launch Gazebo to simulate the robot application. Run the following command.
You can see the quadruped robot standing in a scene on the Gazebo simulator.
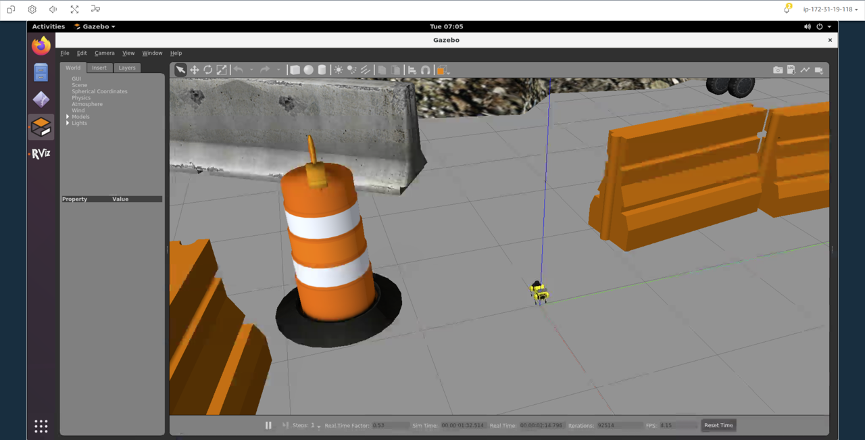
Figure 3 Robot in Gazebo simulator with prebuilt world model
To get the robot moving, launch the robot application.
a. Open a new terminal by choosing on the plus sign in the upper right corner, choose New Terminal.
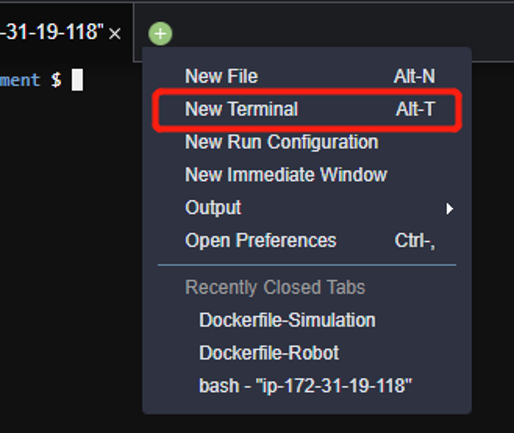
Figure 4 Open new terminal window
b. In the new terminal, run the following command to initialize display.
export DISPLAY=:0
c. Navigate to the directory of the robot application.
cd aws-robomaker-mini-pupper-application/robot_ws
d. Run the robot application.
source install/local_setup.bash
roslaunch mini_pupper_navigation navigate.launch
After a short initialization, the navigation application of the Mini Pupper will appear in RViz. RViz is an ROS topic visualization tool, which can be used to visualize the robot’s sensor inputs.

Figure 5 Running robot application and simulator
You can control the robot through RViz. Choose 2D Nav Goal to enter control mode. Click and drag to set the robot’s destination and direction.
Figure 6 Robot moving to destination
After setting the destination, you can see that the robot moves towards it and turns in place when it reaches the destination.
When you finish testing, press Ctrl+C in both terminal windows to stop the running application. Keep these terminal windows and the virtual desktop open, as you will use them later.
Step 3: Build container images for simulation job
Now that you have a working simulation on the virtual desktop, you can build the applications into container images so they can run on AWS RoboMaker simulation jobs. Simulation jobs is a hosted environment to run a pair of robot and simulation application. Simulation jobs provides larger compute resources, a world generator, and is suitable for long runs. In this walkthrough, you will build three images:
- mini-pupper-base: The base image contains ROS runtime environment and Gazebo 9 simulator. Source code and shared dependencies will also be built into image. This image is used as base layer and is not executable.
- mini-pupper-robot: The robot image contains the executable robot application and its startup script.
- mini-pupper-simulation: The simulator image contains the executable simulator application, worlds, and its startup script.
Image building requires build scripts called Dockerfiles. A Dockerfile is a text document that contains all the commands a user could call on the command line to assemble an image. You can find all three Dockerfiles in the root directory of the code repository.
1. Build the base image.
The base image contains the ROS runtime environment, Gazebo 9 simulator, source code, and shared dependencies. Start the build by running the following command.
sudo docker build . -t mini-pupper-base:1.0 -f Dockerfile-Base
Using docker build, Docker can build images automatically by reading the instructions from a Dockerfile and runs several command line instructions in succession. Normally during the building process, Docker will install the dependency, build the application’s source code to executable, and set up startup configuration to launch the application.
This image is named mini-pupper-base:1.0. An image name contains repository and tag, split by a colon. A repository is a set of similar images, and different versions are identified using tags. If you have multiple versions of images, you can keep the same repository but different tags for version control. Repository can also represent the registry hostname when the image is pushed to a remote registry. You will change it and push to Amazon ECR later.
2. Build the robot application images.
To build an AWS RoboMaker compatible container image, the image should contain a startup script. The startup script can contain environment variable settings and preprocessing command. In this walkthrough, you use a minimal startup script containing only environment variables. You can find it in script directory and named robot-entrypoint.sh.
a. Run the following command to start build the robot application image using Dockerfile-Robot.
sudo docker build . -t mini-pupper-robot:1.0 -f Dockerfile-Robot
b. Run the following command to start build the simulator image using Dockerfile-Simulation.
sudo docker build . -t mini-pupper-simulation:1.0 -f Dockerfile-Simulation
c. Run docker images command to list images you have built so far. You should see at least 4 images.

Figure 7 List of images. At least 4 images should reside.
3. Validate images locally.
a. Run the following command to start robot application.
You can see output in the terminal and RViz window in the virtual desktop.
b. Switch to the other terminal window and run the following command to start simulation application.
Now you can see the Gazebo simulator in the virtual desktop. You can control the robot with the same method as we mentioned in the previous section.
4. Create image repository.
A simulation job pulls and run the corresponding images from container image registry. Amazon ECR is a fully managed Docker container registry. You can use Amazon ECR to store previously built images.
A repository is where you store your images in Amazon ECR. One repository can have multiple versions of an image. You need to create repositories before push any image.
a. Navigate to the Amazon ECR console.
b. In the navigation pane, choose
c. Choose Create Repository.
d. For Repository Name, specify the name of repository. In this walkthrough, enter mini-pupper-robot.
e. Choose Create Repository.
Repeat the preceding process to create another repository named mini-pupper-simulation. You don’t need to create the third one as the base image is not executable.
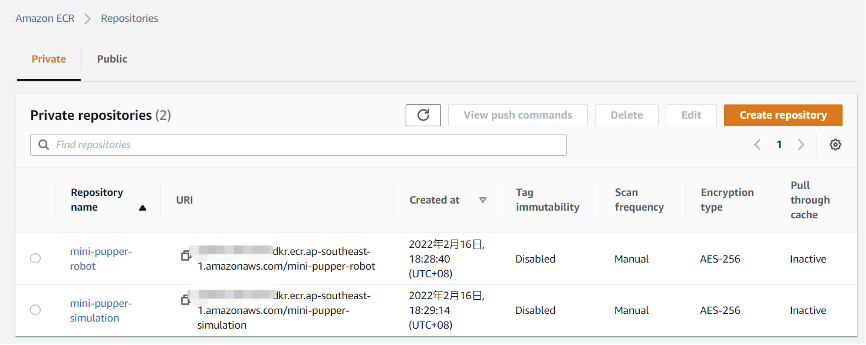
Figure 8 Repositories in Amazon ECR
5. Log in to Amazon ECR
To use docker commands with Amazon ECR, manually log in to Amazon ECR in your terminal.
a. Select any repository you created.
b. Choose View push commands to view the log in command.
c. Copy the command in section 1.
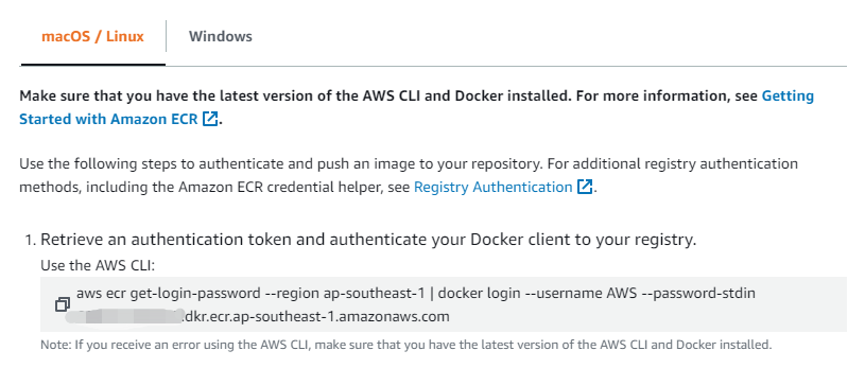
Figure 9 Copy log in command on section 1
d. Run copied command in AWS Cloud9 terminal.
The login is successful once you see Login succeed. Each token valid for 24 hours. Log in again if token expired.
6. Tag your images.
Docker requests images to be tagged with registry hostname. Amazon ECR will provide a unique hostname, and you need to add it as prefix of your image name for proper upload. We use docker tag command to rename image.
a. Replace 111122223333 with your 12-digit AWS account number, and your-region with your region. Run the following command.
docker tag mini-pupper-robot:1.0 111122223333.dkr.ecr.your-region.amazonaws.com/mini-pupper-robot:1.0
docker tag mini-pupper-simulation:1.0 111122223333.dkr.ecr.your-region.amazonaws.com/mini-pupper-simulation:1.0
b. Run docker images to list available images. The aliased images are with a different repository but has the same image ID.
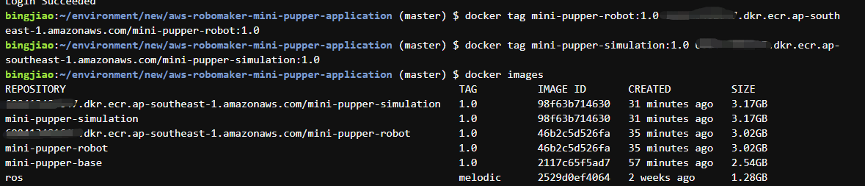
Figure 10 Aliased image with the same image ID
7. Push images to Amazon ECR.
Replace 111122223333 with your 12-digit AWS account number, and your-region with your region. Run the following command.
docker push 111122223333.dkr.ecr.your-region.amazonaws.com/mini-pupper-robot:1.0
docker push 111122223333.dkr.ecr.your-region.amazonaws.com/mini-pupper-simulation:1.0
After the push completes, you can see the newly pushed images in the Amazon ECR console.
Step 4: Run the robotics application on a simulation job
1. Define the robot application.
The simulation job requires a pair of robot application and simulation application. These definitions include image location.
a. Open the AWS RoboMaker console.
b. In the navigation pane, under Development, choose Robot Applications.
c. Choose Create Robot Application.
d. For Name, specify the name of robot application. In this walkthrough, enter mini-pupper-demo-robot.
e. For Container image, choose Browse ECR to locate the previously uploaded robot application image.
f. Choose Create to create the robot application.
2. Define the simulation application.
a. In the navigation pane, under Development, choose Simulation Applications.
b. Choose Create simulation Application.
c. For Name, specify the name of simulation application. In this walkthrough, enter mini-pupper-demo-simulation.
d. For Container image, choose Browse ECR to locate the previously uploaded simulation application image.
e. Choose Create to create the simulation application.
3. Start an AWS RoboMaker simulation job.
Simulation Jobs is a fully managed environment to run robot applications and simulator applications. You can specify configuration in different simulation jobs to simulate different environments. It also provides a graphical interface for interaction.
a. In the navigation pane, under Simulation Run, choose Simulation jobs.
b. Choose Create Simulation Job.
Creating a Simulation Job is a 4-steps process.
In Configuring simulation page, you configure the simulation job’s details and optional parameters.
a. For Simulation job duration, specify a time. For this walkthrough, specify 30 minutes.
b. For IAM Role, choose Create a new role. Then, specify a name for newly created IAM Role in text box below. For this walkthrough, enter mini-pupper-demo-role. This IAM role allows AWS RoboMaker to retrieve image from the corresponding ECR repository and send logs to CloudWatch Logs.
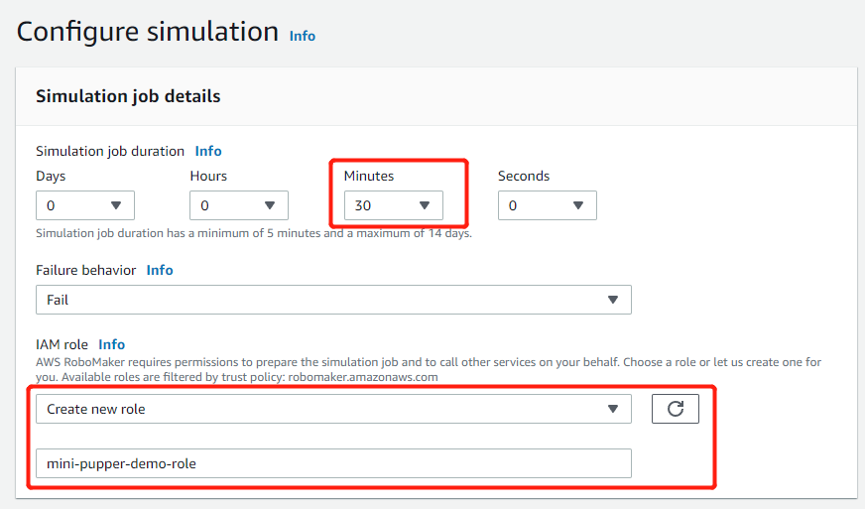
Figure 11 Simulation job details page
In the Compute section on the same page, you can select the compute type and compute limits for the simulation job.
a. For Compute type, Choose CPU. You don’t need GPU for this walkthrough.
b. For Simulation Unit (SU) limit, leave it unchanged for 15 SUs. Each SU represents 1 vCPU and 2 GB of memory. You are billed by the number of SUs consumed by the job, up to the configured limit.
c. Choose Next to proceed to the next page.
In Specify robot application page, you set the launch configuration of the robot application.
a. For Robot Application, choose the previously configured robot application.
b. For Launch Command field, specify the launch command as a comma-separated list of arguments. In this walkthrough, enter roslaunch, mini_pupper_navigation, navigate.launch.
c. Turn on Run with streaming session for RViz-based GUI.
To ensure that the robot application and simulator application can communicate to each other, define some environment variables so these two applications can connect to the same ROS master.
d. Choose Add item and add the following to the Environment variables.
| Name | Value | ||||
| GAZEBO_MASTER_URI | http://ROBOMAKER_SIM_APP_IP:11345 |
||||
| ROS_IP | ROBOMAKER_ROBOT_APP_IP |
||||
| ROS_MASTER_URI | http://ROBOMAKER_ROBOT_APP_IP:11311 |

Figure 12 Environment variables
AWS RoboMaker will automatically replace the value with the IP of the corresponding container.
e. Choose Next to proceed to the next page.
In Specify simulation application page, you set the launch configuration of the simulation application.
a. For Simulation Application, choose the previously configured simulator application.
b. For Launch Command field, specify the launch command as a comma separated list of arguments. In this walkthrough, enter roslaunch, mini_pupper_gazebo, gazebo.launch.
c. Turn on Run with streaming session for Gazebo GUI.
d. For Environment variables, specify the following environment variables.
| Name | Value | ||||
| GAZEBO_MASTER_URI | http://ROBOMAKER_SIM_APP_IP:11345 |
||||
| ROS_IP | ROBOMAKER_SIM_APP_IP |
||||
| ROS_MASTER_URI | http://ROBOMAKER_ROBOT_APP_IP:11311 |
e. Choose Next to proceed to the next page.
In Review and create page, you review the configuration, then choose Create at the bottom of the page. You can select the newly created simulation job to view the details.
Task initialization takes three to five minutes. While the task is running, you can choose Connect under Robot application tools and Simulation application tools to interact with the running simulation job.
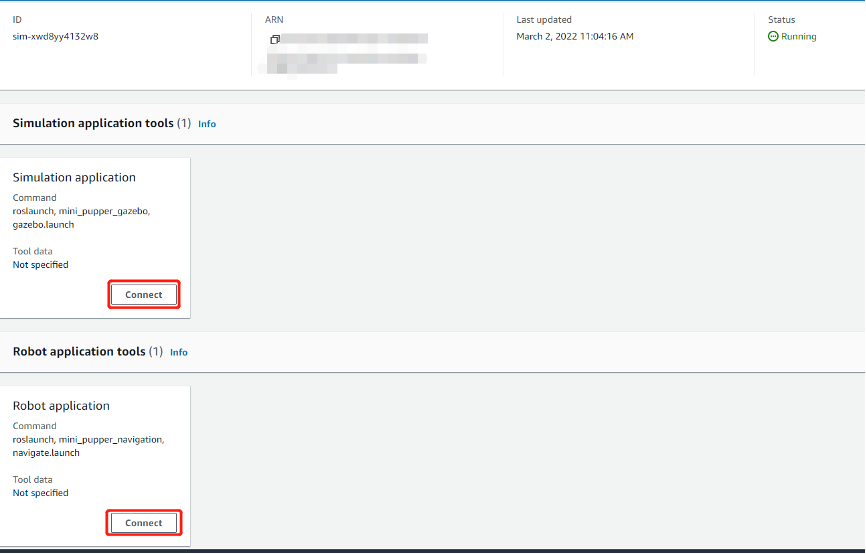
Figure 13 Created simulation job
You can control the robot through RViz. Choose 2D Nav Goal to enter control mode. Click and drag to set the robot’s destination and direction. Then you can see the robot walk to the selected destination.
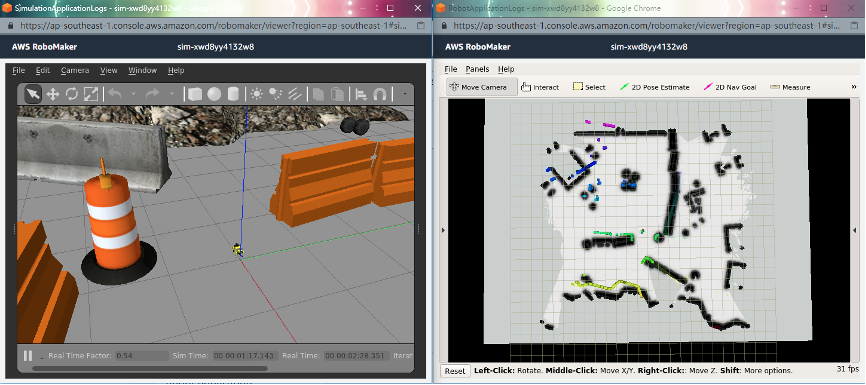
Figure 14 Running simulation job
Clean up
To avoid ongoing charges in your AWS account, you can delete the AWS resources created in this walkthrough.
a. Navigate to the AWS Cloud9 console. Select created development environment, then choose Delete.
b. Simulation job will automatically stop after desired duration (30 minutes in this walkthrough). You can stop it early by navigating to the RoboMaker console. Choose simulation job, in Actions menu, choose Cancel.
c. Navigate to the Amazon ECR console. Select created repository and choose Delete.
Conclusion
In this post, we have walked you through developing, testing, and running robotics applications and simulation applications using AWS RoboMaker. With AWS RoboMaker, you can focus on robotics software development. Professionals, students, and robotics enthusiasts can learn to develop robotics applications and simulate them using AWS RoboMaker.
You can shop for Mini Pupper at Amazon and get started with AWS RoboMaker in the AWS Console. You can learn more at AWS RoboMaker Document and at this blog Preparing ROS application and simulation containers for AWS RoboMaker. You can also email AWS for further information.