Containers
Run an active-active multi-region Kubernetes application with AppMesh and EKS
As application architects we have come across many customers who are moving towards a container-only strategy for their most critical application workloads. While using managed container services like Amazon Elastic Container Service (ECS), Amazon Elastic Kubernetes Service (EKS), and AWS Fargate make it easy to manage complex workloads, AWS offers a lot more in terms of seamless failover and disaster recovery for critical applications.
A multi-region active-active architecture not only helps with disaster recovery by limiting the blast radius, it can also provide the best customer experience by optimizing traffic routes based on the customer’s location.
In this tutorial, we will leverage several AWS services, including AWS App Mesh, Amazon Route 53, and Amazon EKS, to run a resilient, highly available application in two different regions.
AWS App Mesh is a service mesh that provides application-level networking to make it easy for your services to communicate with each other across multiple types of compute infrastructure. In addition to inter-service communications, or what is sometimes referred to as east-west traffic within your service mesh, AWS App Mesh also offers support for the north-south traffic coming into your mesh using Ingress Gateway. You can learn more about Ingress Gateways in this blog post.
Amazon Route 53 provides highly available and scalable Domain Name System (DNS), domain name registration, and health-checking web services. You can combine your DNS with health-checking services to route traffic to healthy endpoints or to independently monitor and/or alarm on endpoints. We will use Amazon Route 53 Latency Based Failover records to improve performance by serving requests from the AWS region that provides the lowest latency.
Amazon EKS is a managed Kubernetes service that makes it easy for you to run Kubernetes on AWS and on-premises. Amazon EKS automatically manages the availability and scalability of the Kubernetes control plane nodes responsible for scheduling containers, managing application availability, storing cluster data, and other key tasks.
Architecture
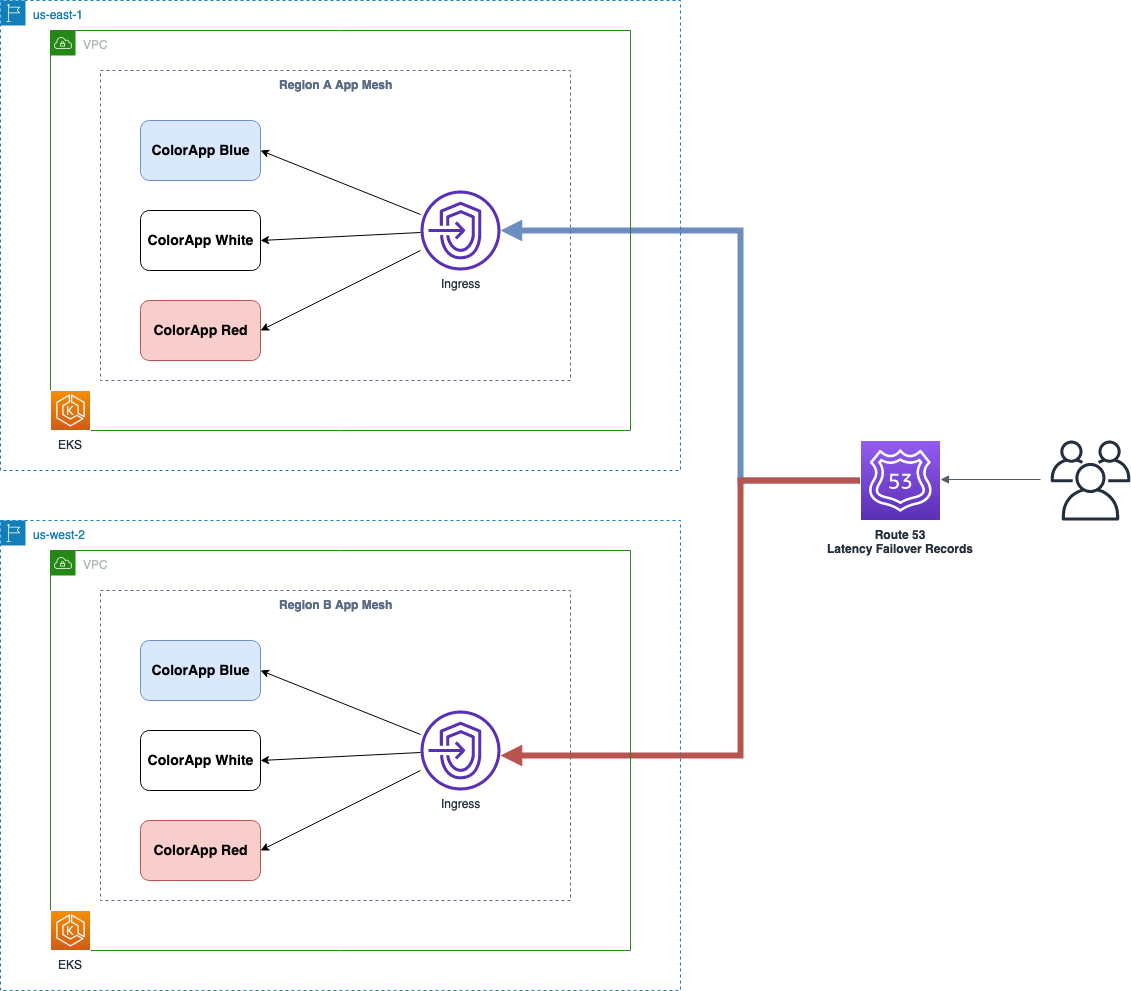
In this post, we will show you how to leverage AWS App Mesh and Amazon Route 53 capabilities to run an active-active, multi-region, highly available application on Amazon EKS. AWS App Mesh will allow access to multiple applications within each Amazon EKS cluster using a single ingress gateway. We will also use Amazon Route 53 latency records to ensure high availability and regional failover. Having a separate and isolated Amazon EKS cluster helps achieve the active-active, multi-region setup. Please note that the same architecture and outcome can also be achieved using Ingress controller instead of AWS App Mesh and the active-active availability is achieved using Amazon Route 53.
Hands-on walkthrough
The following walkthroughs deploy Color App to two Amazon EKS clusters running on AWS, along with the required objects to route to these applications within the cluster using AWS App Mesh. To familiarize yourself with the various AWS App Mesh abstractions, see the AWS App Mesh concepts page here.
As part of the application deployment, a virtual gateway is configured along with virtual nodes, virtual services, and virtual routers. Gateway routes are specified for HTTP traffic routing based on path values. This allows us to leverage the Ingress configuration to get requests to the right backend services.
These walkthroughs can be found in the App Mesh examples repository on GitHub. Start by cloning a local copy of the repository.
Prerequisites
To get started with this walkthrough, you’ll also need:
- AWS Account ID.
- AWS Command Line Interface (AWS CLI) installed and configured for use in your development environment.
- Docker development environment and familiarity with using Docker.
- kubectl installed, at least version 1.19 or above.
- eksctl installed.
- Helm installed and configured for use.
- jq installed.
- Registered public domain to create route53 hosted zone.
Let’s start with Region A.
Step 1: Provision the EKS cluster
The Amazon EKS cluster is provisioned by executing the script eks-multi-region-eksCluster.sh. We will configure some environment variables and provide executable permissions to the script before we invoke it. In the following set of commands, replace us-east-2 with your preferred AWS region and clusterA with your preferred cluster name and execute it. Please note that this process can take between 20 and 25 minutes.
Step 2: Verify KUBECONFIG
Ensure kubectl is pointing to the correct cluster by running the following command:
Step 3: Install the AWS App Mesh Controller for Kubernetes
This is an open-source Kubernetes controller that helps manage AWS App Mesh resources within Kubernetes. We will also create a service account for AWS App Mesh and associate it with an AWS Identity and Access Management (AWS IAM) role. To learn more about IAM Roles for Service Accounts (IRSA), see the Amazon EKS documentation.
Execute the eks-multi-region-appMeshController.sh script to create appmesh-system namespace, AWS IAM service account. This script will install the appmesh-controller Helm chart.
Step 4: Review the output for the Helm chart installation
You can examine the objects in the appmesh-system namespace and observe the set of AWS App Mesh custom resource definitions (CRDs).
The deployment of the sample application is also scripted for you. The eks-multi-region-deploy.sh script will build the Color App container image locally, tag the image, and push it to Amazon ECR. It will then deploy the application, along with the AWS App Mesh configuration, to your cluster in a new howto-k8s-multi-region namespace.
The AWS App Mesh controller will automatically inject Envoy proxy instances and manage them for you. See the App Mesh user guide for further information.
Step 5: Invoke the deployment script to build the Color App image locally
This script will also push the image to Amazon ECR and deploy the mesh and application to your cluster.
You’ll see the output of the container image build and the deployment. When it’s complete, you can observe the objects that were created, including those representing the App Mesh configuration constructs in the howto-k8s-multi-region namespace.
kubectl get all -n howto-k8s-multi-regionStep 6: Test the application
You can use curl or access the endpoint of your Load Balancer in a web browser. This may take a few minutes to become fully available.
There is a Gateway route gateway-route-paths setup in the example and will route traffic to VirtualService color-paths. VirtualService color-paths uses HTTP path prefixes to choose backend VirtualNode.
Run the following command to get the Gateway URL.
Test the application using HTTP Path.
The endpoint returns the requested color along with the region and availability zone of the node this application pod is running in.
Region B
Now that the setup for the first region is done, we will replicate this entire setup in Region 2 (us-west-2).
Run the following commands, replacing us-west-2 with your preferred AWS Region and clusterB with your preferred cluster name.
Repeat Steps 2 through 6 above.
Now that we have our application running in both regions, we’ll set up Amazon Route 53 to enable High Availability and automatic failover capabilities.
Route 53 Setup
Step 7: Create Route 53 Domain Health Checks
Amazon Route 53 health checks monitor the health and performance of your web applications, web servers, and other resources. You can find information about Amazon Route 53 health checks here.
There are different health check types, including ones that monitor whether Amazon Route 53 considers other health checks healthy or unhealthy. One situation where this might be useful is when you have multiple resources that perform the same function, such as multiple load balancers in different regions, and your chief concern is whether some minimum number of your resources are healthy. You can create a health check for each resource without configuring notifications for those health checks. Then, you can create a health check that monitors the status of the other health checks and notifies you only when the aggregate number of available web resources drops below a specified threshold.
Since the AWS App Mesh Ingress gateway allows us to access the different color sub-applications, we will set up Amazon Route 53 health checks for each color using its endpoint, and then a combined health check to monitor the sub-health checks.
Please note, you need a registered public domain to successfully create the Amazon Route 53 public hosted zone and test the automatic failover capabilities.
The eks-multi-region-configureRoute53.sh script will create the required hosted zone and health checks. Please note, if you already have a hosted zone in Amazon Route 53, you can pass in the hosted zone Id as a parameter to the script. If you don’t provide a hosted zone Id, the script will create the hosted zone for you.
The script can be invoked using the following command.
Here is an example invocation for reference.
After the script executes successfully, the Amazon Route 53 hosted zone will look like this:

The Amazon Route 53 health checks will look like this:

At the end of this step, you should have the following Amazon Route 53 health checks.
| Load Balancer Region | Health Check Name | Path |
| RegionA (us-east-2) | regionA-white | /paths/white |
| RegionA (us-east-2) | regionA-red | /paths/red |
| RegionA (us-east-2) | regionA-blue | /paths/blue |
| RegionB (us-west-2) | regionB-white | /paths/white |
| RegionB (us-west-2) | regionB-red | /paths/red |
| RegionB (us-west-2) | regionB-blue | /paths/blue |
| RegionA (us-east-2) | regionA-health | Combined health check of all region A health checks |
| RegionB (us-west-2) | regionB-health | Combined health check of all region B health checks |
The Amazon Route 53 hosted zone will also have latency record sets created for both the regions.
With latency-based routing, Amazon Route 53 can direct your users to the lowest-latency AWS endpoint available. The Amazon Route 53 DNS servers decide, based on network conditions of the previous couple of weeks, which Load Balancer endpoint should serve users from which region.
To test this, we will launch an Amazon EC2 instance in both regions, and invoke the Amazon Route 53 record from those instances.
Create an AWS Cloud Formation stack using the template ec2_cfn.yaml included in the GitHub repository. This template will launch an Amazon EC2 instances along with the required security groups in both regions. The template takes an existing KeyPair name as a parameter to allow Secure Shell Protocol (SSH) access to the hosts. Execute the following command to create Amazon EC2 instances in both regions. Please change parameter value of KeyPairName parameter to a valid value before executing the command.
Connect to the Amazon EC2 instances using SSH and test the application using curl.
RegionA EC2 instance
RegionB EC2 instance
Step 8: Simulate Failover
We will now simulate a failover scenario wherein one of the sub-applications in Region B will fail to respond.
Ensure that kubectl config is pointed towards the Amazon EKS cluster in Region B.
Run this command to delete the deployment for the “white” sub-application.
You can confirm that the deployment and all its pods for the “white” sub-application have been terminated.
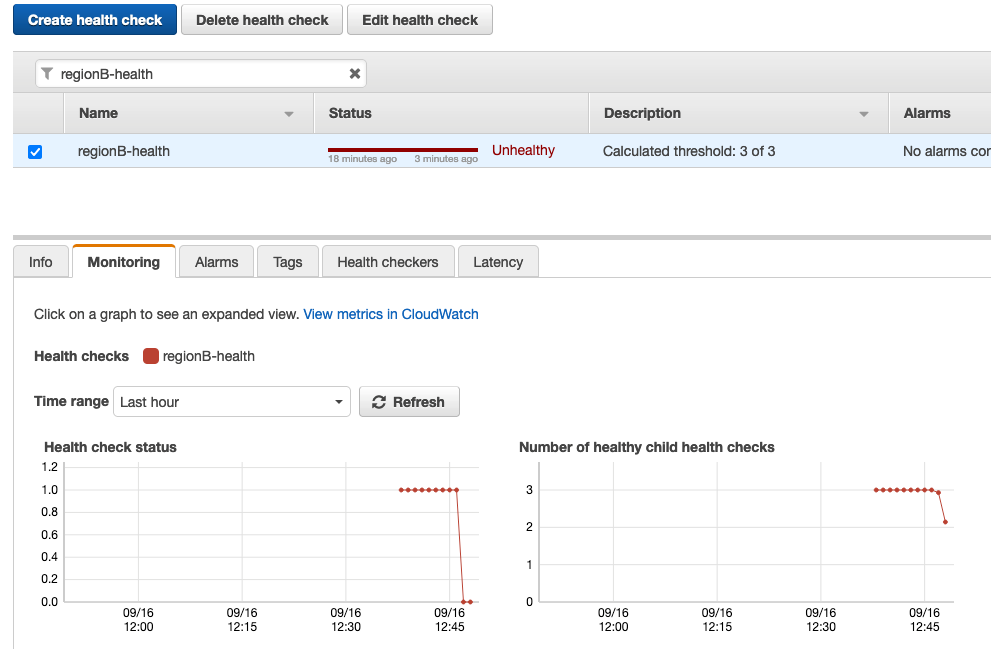
Now that the white sub-application in Region B has been deleted, the regionB-white health check should turn unhealthy, which should cause the cumulative regionB-health health check to turn unhealthy as well. Note that it can take a few minutes for this change to reflect in the console.
Step 9: Verify Failover
Since our application in Region B is currently down, all traffic going to our DNS record should be redirected to the application in Region A. We can confirm this by accessing the application from the Amazon EC2 Instance in Region B.
RegionB EC2 instance
Clean up
After you complete this walkthrough, you can delete the example resources to avoid incurring future costs.
Run the following commands to remove the resources that were created earlier.
1. Set the kubectl context for the cluster in each region and delete the resources that were created.
2. Delete the clusters in both regions using eksctl.
3. Delete the Amazon EC2 instances that were launched in both regions to test the application.
4. Delete the Amazon ECR repository `howto-k8s-multi-region/colorapp` in both regions.
5. Delete the envoy AWS IAM policies created for the clusters in both regions.
6. Go to the Amazon Route53 console and delete the health checks created as part of the walkthrough for both regions.
7. Delete the CNAME records created in the public hosted zone as part of the walkthrough.
8. If the Amazon Route 53 hosted zone was created by this walkthrough, delete it as well.
Summary
From this walkthrough, you can see that making use of AWS App Mesh virtual Service, virtual nodes, virtual routers and gateway routes provides robust and secure ingress routing to your application. Additionally, Amazon Route53 Latency based Failover records allow us to leverage our AWS App Mesh Ingress endpoints to efficiently run a Highly Available active-active application with automatic instant regional failover.
These examples are fairly basic and we hope that you use them as a starting point for your own solutions. Be sure to check out the AWS App Mesh documentation and the Amazon Route53 documentation for details on working with these services, as well as detailed sections on Getting Started, Best Practices, and Troubleshooting.
Let us know what you think of this feature, review our roadmaps, and suggest new features on the AWS App Mesh Roadmap and the AWS Containers Roadmap, also hosted on GitHub.