The Internet of Things on AWS – Official Blog
Automating workflows for AWS IoT Greengrass V2 components
Introduction
AWS IoT Greengrass V2 Development Kit Command-Line Interface (GDK CLI) was announced at AWS re:Invent 2021. With GDK CLI you can easily create AWS IoT Greengrass V2 components, flexibly define recipes, and publish these components to AWS IoT Greengrass V2. However, every time there is a change to the AWS Greengrass V2 component recipe, you typically have to manually provision it. For example, every new version of the component must be re-built and re-published, resulting in redundant tasks. Additionally, if the component is part of an automated workflow, the re-building and re-publishing task becomes inconvenient for overall development efforts.
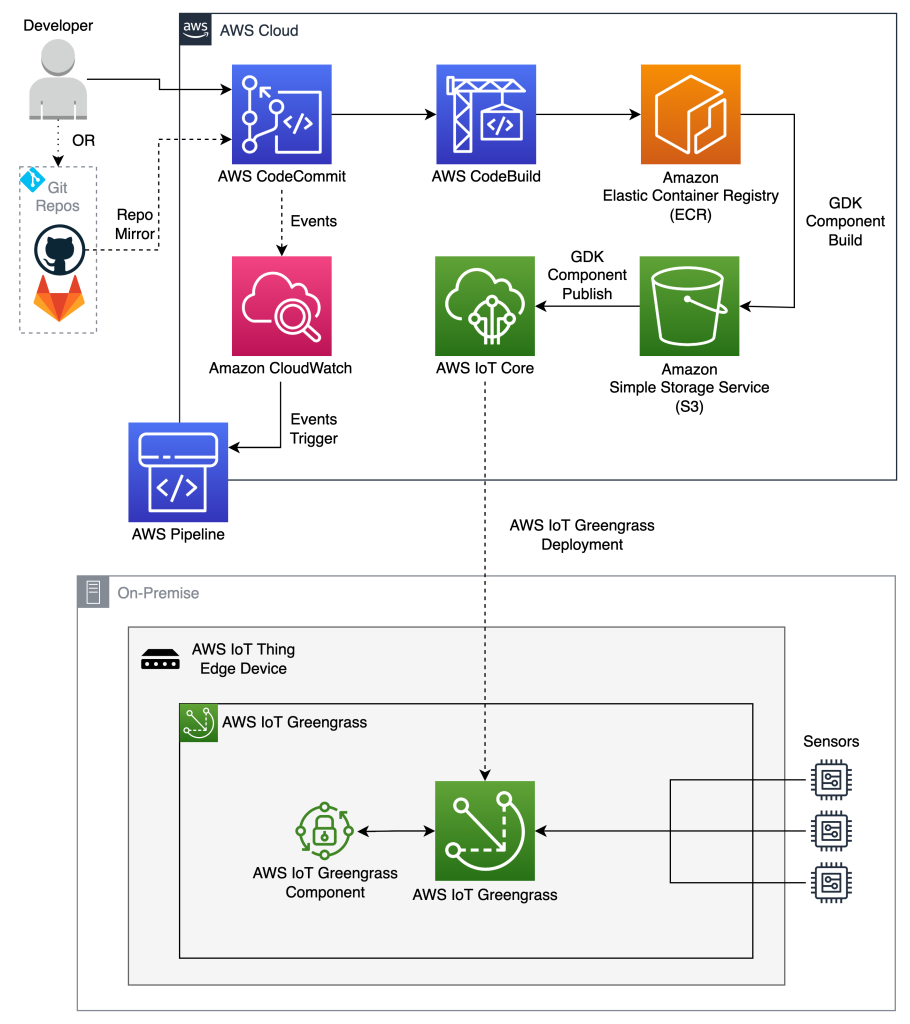
To overcome these challenges, you can create an automated workflow using AWS CodePipeline along with AWS CodeCommit and AWS CodeBuild. The automated workflow will build and publish the components whenever a new change to the source is detected. The solution presented in this blog demonstrates this workflow with the use of an example.
The following image shows an outline of AWS services used in the automated workflow. AWS CodeCommit can be replaced with other Git repositories like GitHub or GitLab and eventually mirrored into AWS CodeCommit repositories.
1. Getting Started
This section highlights the basic requirements like setting up AWS Identity and Access Management (IAM) policies for different services that are being used. IAM policies define the access granted to a resource. For example, AWS CodeBuild needs to have a read/write access to AWS IoT Greengrass V2 in order to publish components.
Pre-requisites
The following are requirements to proceed with the build solution:
- An AWS profile with permissions to Amazon Simple Storage Service (S3), Amazon CloudWatch, Developer Tools (AWS CodeCommit, AWS CodeBuild, AWS CodePipeline, etc.)
- Understanding of Python and Bash scripts
1.1 AWS CodePipeline
AWS CodePipeline is used for creating and managing a continuous delivery service. You can use it to manage the processes by accessing AWS CodeCommit logs. Based on the changes pushed to AWS CodeCommit, the pipeline that runs AWS CodeBuild will be triggered to run the build commands as specified. To store the build artifacts, you will need Amazon S3 access which can be enlisted from the IAM policies.
- IAM policies:

1.2 AWS CodeCommit
AWS CodeCommit is the source control service used to host Git repositories. This can be accomplished in a couple of different ways as follows:
- Create a Git repository in AWS CodeCommit directly – there are no additional IAM policy requirements
- Mirror Git repositories currently present in GitLab or GitHub into AWS CodeCommit – need to configure your GitLab or GitHub repository to mirror into AWS CodeCommit or migrate a Git repository to AWS CodeCommit
1.3 AWS CodeBuild
AWS CodeBuild defines the source in AWS CodeCommit to build the project, therefore you must configure the default IAM policy to enable access to AWS CodeCommit to implement git pull. Furthermore, access to Amazon S3 is required to store build artifacts. This is optional but good to store the artifacts for future access. To build and publish AWS IoT Greengrass V2 components, additional permissions must be added to list and create components:
- IAM policies:


1.4 AWS IoT Greengrass V2
Once the component is built and published to AWS IoT Greengrass V2, you will be able to access the component from the AWS IoT Greengrass V2 console or CLI. AWS IoT Greegrass V2 Deployments can be made as required once the right component is published and available.
2. Managing Source and Build
To build and publish a component with GDK you can use Python and Bash scripts. This section demonstrates how a GDK Python sample can be used to accomplish building and publishing of a component.
2.1 GDK
Step 2.1.1: Using a GDK Python sample
For Python component, use GDK to create a basic sample. The command will create following files:
- README.md - A standard Readme file
- gdk-config.json - Used to define the GDK build parameters
- recipe.yaml - Used to define the component run processes and related parameters
- main.py - An example Python script that will be run once the component is deployed
- src/ - Directory with a supporting script for main.py
- tests/ - Directory with test scripts
Commands to create a default Python based component:
$ mkdir HelloWorldPython
$ cd HelloWorldPython/
$ gdk component init -l python -t HelloWorld
Step 2.1.2: Modifying the GDK Python sample
Next, modify the default main.py script and the src/greeter.py script as shown below. Add a sample run.sh bash script too. Currently, for examples, GDK supports Python and Java. However, if your applications require running binaries, Bash scripts, or any other Terminal/CMD commands, then you can use run.sh Bash script. Hence, instead of running main.py Python script directly, the run.sh Bash script can be used to execute it.
Here is an example of the modified main.py script:
import sys
import src.greeter as greeter

def main():
    args = sys.argv[1:]
    if len(args) == 2:
        print(greeter.get_greeting(args[0], args[1]))

if __name__ == "__main__":
    main()
Here is an example of the modified src/greeter.py script:
def get_greeting(msg1, msg2):
   """
   Returns greeting string

   Parameters
   ----------
       msg1(string): msg1 to append in the greeting.
       msg2(string): msg2 to append in the greeting.

   Returns
   -------
       string : Returns greeting for the name
   """

   print('The message is {} and {}!'.format(msg1, msg2))
   return '{} {}!'.format(msg1, msg2)
Here is an example of what is contained in the run.sh script:
#!/bin/bash

print_usage() { printf "Usage: run.sh -a message1 -b message2" }

while getopts a:b: flag; do
    case "${flag}" in
        a) message1=${OPTARG} ;;
        b) message2=${OPTARG} ;;
        *) print_usage
            exit 1 ;;
    esac
done

echo "Message #1 = $message1"
echo "Message #2 = $message2"

echo "Running main.py script ..."
python3 -u main.py $message1 $message2
Here is an example of what is contained in the updated gdk-config.json file:
{
  "component": {
    "com.example.HelloWorldPython": {
      "author": "<PLACEHOLDER_AUTHOR>",
      "version": "0.0.1",
      "build": {
        "build_system": "zip"
      },
      "publish": {
        "bucket": "<PLACEHOLDER FOR BUCKET>",
        "region": "<PLACEHOLDER FOR REGION>"
      }
    }
  },
  "gdk_version": "1.0.0"
}
Here is an example of what is contained in the updated recipe.yaml file:
---
RecipeFormatVersion: "2020-01-25"
ComponentName: "{COMPONENT_NAME}"
ComponentVersion: "0.0.1"
ComponentDescription: "This is simple Hello World component written in Python."
ComponentPublisher: "{COMPONENT_AUTHOR}"
ComponentConfiguration:
  DefaultConfiguration:
    configMessage1: "Hello"
    configMessage2: "World"
Manifests:
  - Platform:
      os: all
    Artifacts:
      - URI: "s3://BUCKET_NAME/COMPONENT_NAME/COMPONENT_VERSION/HelloWorldPythonComponent.zip"
        Unarchive: ZIP
    Lifecycle:
      Run: "/bin/bash {artifacts:decompressedPath}/HelloWorldPythonComponent/run.sh -a {configuration:/configMessage1} -b {configuration:/configMessage2}
Add a buildspec.yml file that will be used by AWS CodeBuild to run commands for pre-build, build, and post-build processes. Here is an example of a buildspec.yml file with the necessary commands:
version: 0.2

phases:
  install:
    commands:
      - apt-get update && apt-get install -y zip unzip build-essential wget git curl software-properties-common python3.7 python3-pip
      - curl "https://awscli.amazonaws.com/awscli-exe-linux-x86_64.zip" -o "awscliv2.zip" && unzip awscliv2.zip && ./aws/install && rm awscliv2.zip
  build:
    commands:
      - python3 -m pip install -U git+https://github.com/aws-greengrass/aws-greengrass-gdk-cli.git@v1.1.0
      - export PATH=$PATH:~/.local/bin
      - CURRDIR=$(basename "$PWD")
      - cd ../ && mv $CURRDIR HelloWorldPythonComponent && cd HelloWorldPythonComponent
      - gdk component build
      - gdk component publish
      - mkdir package && cp -r greengrass-build package/. && cp -r zip-build package/.
      - pwd && ls -al && ls -al ..
artifacts:
  files:
    - package/**/*
  name: gg-component-$(date +%Y-%m-%d-%H-%M-%S).zip
2.2. AWS CodeCommit
To create the AWS CodeCommit repository, from the Developer Tools, select CodeCommit and Create repository. This would prompt for details like Repository name, Tags, etc. Once created, you can push the code that has been previously created.
The following image shows an example of an AWS CodeCommit repository with the necessary files required for GDK CLI component build and publish commands. This also contains the modified scripts namely run.sh, main.py, src/greeter.py , recipe.yaml, gdk-config.json, and buildspec.yml.

2.3. AWS CodeBuild
The next step is to setup AWS CodeBuild to use the above AWS CodeCommit repository as a source and use build commands provided in the buildspec.yml file to run the build process. For this, select CodeBuild from Developer Tools and create project. The process to setup the AWS CodeBuild is as follows:
Step 2.3.1: Setting up build environment
To set the build environment for AWS CodeBuild, use the Amazon Elastic Container Registry (ECR) service with Ubuntu 18.04: public.ecr.aws/ubuntu/ubuntu:18.04. Following shows how the build environment is setup:

Step 2.3.2: Selecting the source for build
For the source, connect the AWS CodeCommit repository and point it to the right Branch/Tag/Commit ID. In this example it will be connected to the master branch. Select the IAM policies that were provisioned earlier:

Step 2.3.3: Selecting the commands to run the build
Next, define the Buildspec which uses the commands to run the actual build. This buildspec is defined in the buildspec.yml which is a part of the source. Hence you need to provide the file name here. Optionally build commands can be added here if not using a buildspec.yml file.

Step 2.3.4: Storing the build artifacts
In order to store the build artifacts, connect the right Amazon S3 bucket. Select zip as an option to save the build artifacts in a compressed package in the Amazon S3 location:

2.4 Creating Pipeline
To manage the artifacts, GDK build, and to publish changes, you can create the build pipeline and automate the build processes.
Step 2.4.1: Choosing pipeline settings
From the Developer Tools, select CodePipeline and create a new Pipeline. For the service roles, select the role that was defined earlier.

Step 2.4.2: Add source stage
Next, choose the AWS CodeCommit repository and branch that was created earlier. Select Amazon CloudWatch Events in this section which would trigger the Pipeline to start if it detects any changes in the Amazon CloudWatch Events of the AWS CodeCommit repository mentioned here.

Step 2.4.3: Add build stage
Now, connect the AWS CodeBuild Project in this stage which would trigger the build from the source AWS CodeCommit changes.

Step 2.4.4: Add deploy stage
If you are connecting the pipeline with the AWS CodeDeploy, you can use this section to add that part. Skip AWS CodeDeploy stage as this is not demonstrated here.
Step 2.4.5: Review the pipeline
Now that all the pieces are connected, you can create your pipeline. The pipeline when invoked through Amazon CloudWatch Events, it would trigger the build. The following image shows the flow that is defined in the AWS CodePipeline. Here, the source is connected to the build. Hence, the pipeline pulls from the source first and then runs the build commands mentioned in the AWS CodeBuild buildspec.yml.

3. Deploy the component
3.1. Check logs of AWS CodePipeline
- Once AWS CodePipeline runs successfully, the component would be built and published.
- To check the logs, go to AWS CodeBuild project and select the Build logs from the Build history.
- Upon checking the logs, you can make sure that the component is stored in the Amazon S3 bucket and is also published to AWS IoT Greengrass V2 Components.

3.2. Checking the component in AWS IoT Greengrass V2
- Once the component is available in AWS IoT Greengrass V2, it can be deployed on the IoT Things. You can do this by revising existing deployments using the updated component or by creating new deployment for the IoT Thing or Thing groups.

- Upon checking the component in the AWS IoT Greengrass V2 console, you can see the details like the ‘Default configuration,’ ‘Lifecycle’ details, and ‘Artifacts’ location in Amazon S3 bucket, all of which is based on the
recipe.yamlscript.


4. Cleanup
AWS CodePipeline is provisioned to listen to Amazon CloudWatch Events so every small update to the AWS CodeCommit repository will trigger the pipeline and it will build and publish components. Hence, the pipeline can be stopped by selecting the Stop execution.
This would also prevent updating build artifacts as well as component artifacts in Amazon S3.
5. Conclusion
AWS IoT Greengrass V2 services are usually used in an automated framework where deployments of components are provisioned based on certain events. GDK CLI helps in being more flexible for creating AWS IoT Greengrass V2 components using Python/Java/Bash. However, instead of manually provisioning the build and publish tasks whenever there is any change to the component, automation would be ideal. This build solution highlights the use of AWS CodePipeline for building/publishing AWS IoT Greengrass V2 components and reduces development efforts as well as manual intervention. Furthermore, for continuous integration and continuous deployment (CI/CD), versioning is an important aspect which can be simplified and automated by this build solution.
To learn more about AWS IoT Greengrass V2, visit the Documentation and Development Tools. To get started with automated workflows, visit the Blog.
About the Authors