AWS HPC Blog
Efficient and cost-effective rendering pipelines with Blender and AWS Batch
Borja Pérez Guasch, Specialist Solutions Architect
Carlos Manzanedo Rueda, WW SA Leader, Flexible Compute
Visual effects rendering is computationally intensive but can be done efficiently and cost effectively with AWS Batch. Rendering is the process of generating a 2D or 3D image from a model. This technique is used in different scenarios, such as video game design, creating visual effects, and compositing animated movies.
This blog post explains how to run parallel rendering workloads and produce an animation in a cost and time effective way using AWS Batch and AWS Step Functions. AWS Batch manages the rendering jobs on Amazon Elastic Compute Cloud (Amazon EC2), and AWS Step Functions coordinates the dependencies across the individual steps of the rendering workflow. Additionally, Amazon EC2 Spot instances can be used to reduce compute costs by up to 90% compared to On-Demand prices.
Overview
Rendering is a task that can be parallelized by splitting the overall task into individual frames. Processing the individual frames can be ran in parallel, and an individual frame can be retried if there is an unexpected failure. These properties make it great for AWS Batch and Spot Instances.
AWS Batch provides fully managed batch processing at any scale. It dynamically provisions the optimal quantity and type of compute resources based on the volume and requirements of the batch jobs submitted. With AWS Batch, you can execute a series of jobs and specify input parameters through command line arguments. It also supports job dependencies.
Blender is a free rendering open-source 3D creation suite broadly used by rendering enthusiasts that supports the entirety of the 3D pipeline and 2D animation pipeline. Although Blender is a great choice to run with AWS Batch, professional VFX teams should also consider AWS Thinkbox Deadline. AWS Thinkbox Deadline empowers creative studios to produce visual effects, animations, and interactive content from storyboard sketch to the final deliverable, entirely in the cloud.
When using Blender, you can parallelize a portion of your rendering pipeline. Blender can render an individual frame per task, and AWS Batch can run the rendering tasks in parallel. Using this split technique, you can launch as many jobs in AWS Batch as there are frames in the file you want to render. The following diagram shows a pipeline implemented using AWS Batch and AWS Step Functions:
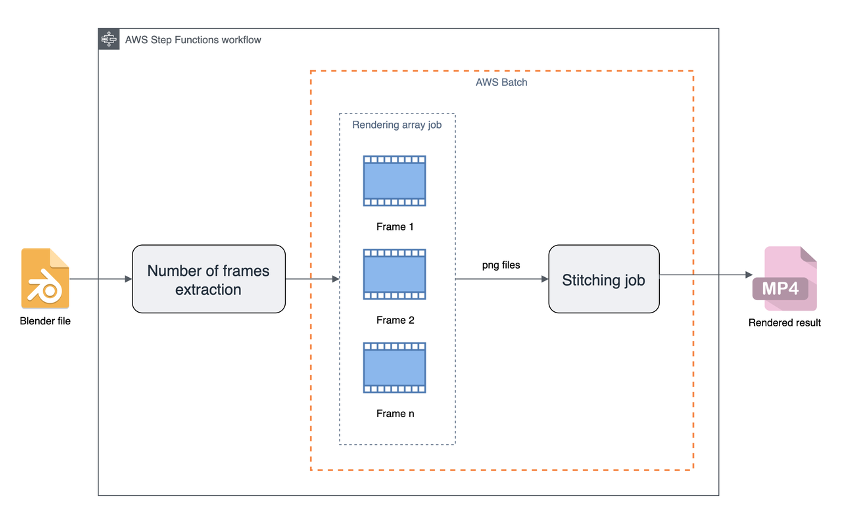
Figure 1: Rendering pipeline that includes the number of frames extraction from the Blender file, the parallel rendering using an array job and the stitching job that produces an MP4 file.
The diagram illustrates the following workflow:
- Extracting frames to be rendered
- Rendering the extracted frames in parallel
- Stitching the rendered frames, or individual images, into a video
Since each rendering process is independent, an individual rendering job can be retried if it fails rather than rerunning the entire workflow. This retries behavior makes the rendering jobs a great fit for using Spot Instances. Spot Instances are spare Amazon EC2 capacity and available at a steep discount. However, Spot Instances can be interrupted if Amazon EC2 needs the capacity.
You can also combine Spot and On-Demand Instances to balance cost-effective compute resources and minimize workload interruption. For example, the stitching process is serial, and if interrupted, the entire video needs to be rebuilt again from the beginning. The stitching process is a great fit for On-Demand Instances. AWS Batch can manage Spot and On-Demand Instances for building an efficient rendering pipeline.
Configuring the Compute Environments
This tutorial assumes you have an AWS account and a container already built with Blender.
AWS Batch defines a Compute Environment (CE) as a collection of compute resources. CEs can provision Spot or On-Demand resources. Once you select the Amazon EC2 provisioning model, you select your preferred instance allocation strategy. Compute environments can be created by using the AWS Management Console, AWS Command Line Interface (CLI), or an AWS SDK. We cover configuring compute environments with the AWS CLI that uses a JSON configuration file in the following examples.
On-Demand Compute Environment
For On-Demand Instances, set the computeResources type to EC2. We recommend setting the allocation strategy to BEST_FIT_PROGRESSIVE for our rendering example. With this configuration, AWS Batch selects instance types that are large enough to meet the job requirements with a preference for lower cost per vCPU instance types. If the selected instance types aren’t available, AWS Batch selects the next available lowest cost per vCPU instance type. AWS Batch selects from C, M, and R instance families with instanceTypes set to optimal.
Stitching and some rendering tasks use the On-Demand CE with most rendering tasks running on the Spot CE. For configuring vCPUs, specify lower values than your Spot CE for scaling up the environment. Your vCPU values depend on your rendering requirements of each file. The following is a possible configuration for the On-Demand CE:
{
    "computeEnvironmentName": "On-Demand_Rendering_CE",
    "type": "MANAGED",
    "state": "ENABLED",
    "computeResources": {
        "type": "EC2",
        "allocationStrategy": "BEST_FIT_PROGRESSIVE",
        "minvCpus": 0,
        "maxvCpus": 32,
        "desiredvCpus": 4,
        "instanceTypes": [
            "optimal"
        ],
        "subnets": [
            "Subnet_in_AZ_1",
            "Subnet_in_AZ_2"
        ],
        "launchTemplate": {
            "launchTemplateName": "RenderingLaunchTemplate"
        },
        "instanceRole": "ECSInstanceProfile_ARN"
    }
}
Assuming that the above configuration is in a file named on-demand-ce-config.json, you could create the compute environment executing the following AWS CLI command:
aws batch create-compute-environment --cli-input-json file://on-demand-ce-config.jsonSpot Compute Environment
For EC2 Spot Instances, set the computeResources type to SPOT. We recommend setting the allocation strategy to SPOT_CAPACITY_OPTIMIZED. With this configuration, AWS Batch allocates instances that are large enough to meet the job requirements with a preference for instance types that are less likely to be interrupted.
Set a higher maxvCpus value for your Spot CE to scale up for rendering jobs. Running more jobs on Spot Instances will be more cost and time effective. The following is a possible configuration for the Spot CE:
{
    "computeEnvironmentName": "Spot_Rendering_CE",
    "type": "MANAGED",
    "state": "ENABLED",
    "computeResources": {
        "type": "SPOT",
        "allocationStrategy": "SPOT_CAPACITY_OPTIMIZED",
        "minvCpus": 0,
        "maxvCpus": 256,
        "desiredvCpus": 0,
        "instanceTypes": [
            "optimal"
        ],
        "subnets": [
            "Subnet_in_AZ_1",
            "Subnet_in_AZ_2"
        ],
        "launchTemplate": {
            "launchTemplateName": "RenderingLaunchTemplate"
        },
        "instanceRole": "ECSInstanceProfile_ARN"
    }
}
Assuming that the above configuration is in a file named spot-ce-config.json, you could create the compute environment executing the following AWS CLI command:
aws batch create-compute-environment --cli-input-json file://spot-ce-config.jsonCombining strategies
Create a job queue to combine your two new CEs. An AWS Batch job queue supports multiple CEs with different priorities. As AWS Batch schedules jobs, it places jobs in the higher priority CE in ascending order. When a CE scales to the maxVCpus, AWS Batch schedules jobs in the next highest priority CE. In our configuration, we run a high-priority On-Demand CE (order 1) with just a few instances and overflow to a Spot CE (order 2) with a larger number of Spot Instances. The following diagram illustrates our job queue configuration:
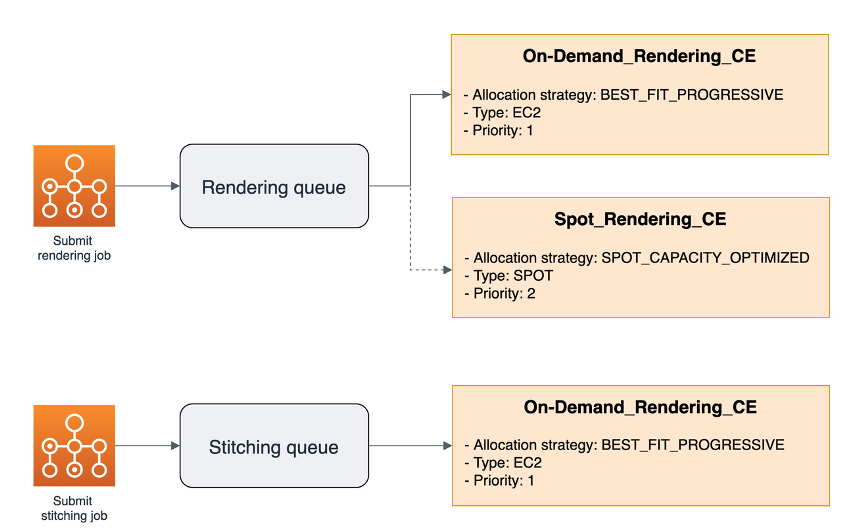
Figure 2: Mapping of Batch job queues to the two compute environments that were defined.
The rendering jobs use of both CEs, and the stitching job only uses the On-Demand CE. Create multiple job queues to serve different compute requirements. A possible configuration for the rendering job queue can be the following:
{
    "jobQueueName": "Rendering_Queue",
    "state": "ENABLED",
    "priority": 1,
    "computeEnvironmentOrder": [
        {
            "order": 1,
            "computeEnvironment": "On-Demand_Rendering_CE_ARN"
        },
        {
            "order": 2,
            "computeEnvironment": "Spot_Rendering_CE_ARN"
        }
    ]
}
Assuming that the above configuration is in a file named rendering-queue-config.json, you could create the job queue executing the following AWS CLI command:
aws batch create-job-queue --cli-input-json file://spot-ce-config.jsonUse a similar configuration for the stitching queue without the Spot CE.
Rendering using array jobs
An array job is an AWS Batch job that shares common parameters and runs a collection of separate jobs that are related to each other. These jobs may be distributed across multiple hosts and run concurrently. Since each job will render a different frame from a common Blender file, using AWS Batch array jobs is a great fit with our submission pattern.
Array jobs provide an environment variable, AWS_BATCH_JOB_ARRAY_INDEX, to identify the corresponding child job array index number. We will use the environment variable value as a parameter of the Blender command to indicate the frame to render:
blender -b <input_path> -E <rendering_engine> -o <output_path> -s $(AWS_BATCH_JOB_ARRAY_INDEX + 1) -e $(AWS_BATCH_JOB_ARRAY_INDEX + 2) -aThis results in rendering all frames from the array job with each job rendering a single frame.
Orchestrating with AWS Step Functions
AWS Step Functions is a low-code, visual workflow service that developers use to build distributed applications and automate processes, such as our rendering pipeline. AWS Step Functions and AWS Batch integrate with optimized integrations and support submitting AWS Batch jobs with different parameters, such as job name, definition, and queue. You define a state machine in AWS Step Functions to coordinate your workflow. We defined a three-part state machine:
- Extract the number of frames from the Blender file by invoking an AWS Lambda function that uses the Blender Python library.
- Submit a rendering array job with the array size set to the number of frames.
- Submit a stitching job when all the frames have been rendered.
Configuring the rendering job to be launched as an array job
We define the job as an array job by setting the ArrayProperties API parameter. Inside the ArrayProperties text box of the rendering state, set the array size to the $.output.Payload.body.numberOfFrames value returned by the previous state, as shown in Figure 3.
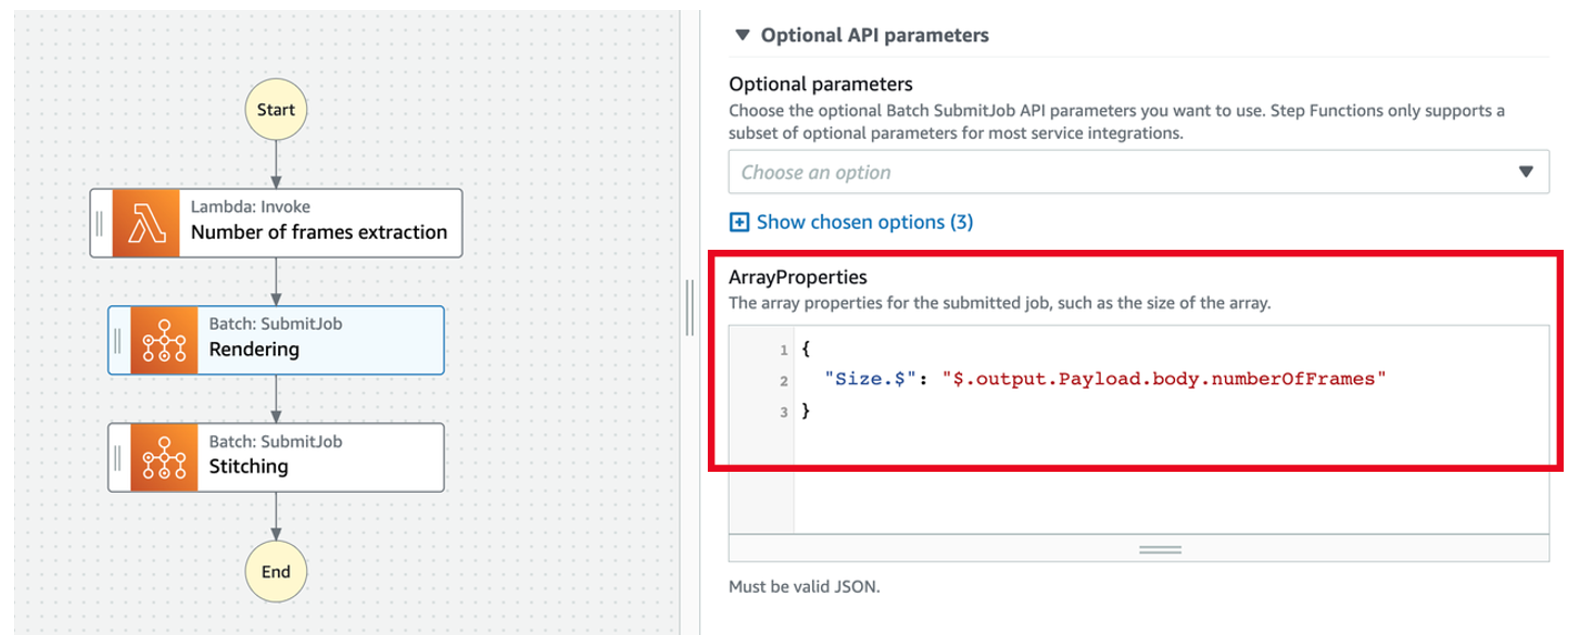
Figure 3: Array job configuration in AWS Step Functions by using the ArrayProperties API parameter
Retrying Jobs on failure
You can retry failed jobs with AWS Step Functions and AWS Batch to handle application errors or instance termination. The Batch: SubmitJob integration has an API parameter RetryStrategy that defines how many additional times a job is to be retried if it fails, with a maximum of 10 attempts. It can be configured as follows:
{
    "Attempts": 3
}
Conclusion
In this post, we showed how rendering pipelines can be done efficiently and cost effectively with AWS Batch and AWS Step Functions. We demonstrated how to properly configure CEs in AWS Batch based on job requirements, allocation strategy, and instance selection. We also explained how to combine CEs into a single job queue with different priorities. This can be used to mix On-Demand Instances to meet a service level agreement (SLA) and complete additional work on Spot Instances for time- and cost-effective results. Finally, we coordinated the pipeline with AWS Step Functions to reduce manual effort.
If you want to learn more, the workshop Rendering with AWS Batch guides you step by step on configuring all the resources to implement the pipeline explained in this blog post. The Clean up section explains how to delete all the architectural components. By following the workshop, you will learn to configure the AWS Batch components, orchestrate the pipeline using AWS Step Functions, and monitor the status of submitted jobs.