AWS Big Data Blog
Design patterns to manage Amazon EMR on EKS workloads for Apache Spark
Amazon EMR on Amazon EKS enables you to submit Apache Spark jobs on demand on Amazon Elastic Kubernetes Service (Amazon EKS) without provisioning clusters. With EMR on EKS, you can consolidate analytical workloads with your other Kubernetes-based applications on the same Amazon EKS cluster to improve resource utilization and simplify infrastructure management. Kubernetes uses namespaces to provide isolation between groups of resources within a single Kubernetes cluster. Amazon EMR creates a virtual cluster by registering Amazon EMR with a namespace on an EKS cluster. Amazon EMR can then run analytics workloads on that namespace.
In EMR on EKS, you can submit your Spark jobs to Amazon EMR virtual clusters using the AWS Command Line Interface (AWS CLI), SDK, or Amazon EMR Studio. Amazon EMR requests the Kubernetes scheduler on Amazon EKS to schedule pods. For every job you run, EMR on EKS creates a container with an Amazon Linux 2 base image, Apache Spark, and associated dependencies. Each Spark job runs in a pod on Amazon EKS worker nodes. If your Amazon EKS cluster has worker nodes in different Availability Zones, the Spark application driver and executor pods can spread across multiple Availability Zones. In this case, data transfer charges apply for cross-AZ communication and increases data processing latency. If you want to reduce data processing latency and avoid cross-AZ data transfer costs, you should configure Spark applications to run only within a single Availability Zone.
In this post, we share four design patterns to manage EMR on EKS workloads for Apache Spark. We then show how to use a pod template to schedule a job with EMR on EKS, and use Karpenter as our autoscaling tool.
Pattern 1: Manage Spark jobs by pod template
Customers often consolidate multiple applications on a shared Amazon EKS cluster to improve utilization and save costs. However, each application may have different requirements. For example, you may want to run performance-intensive workloads such as machine learning model training jobs on SSD-backed instances for better performance, or fault-tolerant and flexible applications on Amazon Elastic Compute Cloud (Amazon EC2) Spot Instances for lower cost. In EMR on EKS, there are a few ways to configure how your Spark job runs on Amazon EKS worker nodes. You can utilize the Spark configurations on Kubernetes with the EMR on EKS StartJobRun API, or you can use Spark’s pod template feature. Pod templates are specifications that determine how to run each pod on your EKS clusters. With pod templates, you have more flexibility and can use pod template files to define Kubernetes pod configurations that Spark doesn’t support.
You can use pod templates to achieve the following benefits:
- Reduce costs – You can schedule Spark executor pods to run on EC2 Spot Instances while scheduling Spark driver pods to run on EC2 On-Demand Instances.
- Improve monitoring – You can enhance your Spark workload’s observability. For example, you can deploy a sidecar container via a pod template to your Spark job that can forward logs to your centralized logging application
- Improve resource utilization – You can support multiple teams running their Spark workloads on the same shared Amazon EKS cluster
You can implement these patterns using pod templates and Kubernetes labels and selectors. Kubernetes labels are key-value pairs that are attached to objects, such as Kubernetes worker nodes, to identify attributes that are meaningful and relevant to users. You can then choose where Kubernetes schedules pods using nodeSelector or Kubernetes affinity and anti-affinity so that it can only run on specific worker nodes. nodeSelector is the simplest way to constrain pods to nodes with specific labels. Affinity and anti-affinity expand the types of constraints you can define.
Autoscaling in Spark workload
Autoscaling is a function that automatically scales your compute resources up or down to changes in demand. For Kubernetes auto scaling, Amazon EKS supports two auto scaling products: the Kubernetes Cluster Autoscaler and the Karpenter open-source auto scaling project. Kubernetes autoscaling ensures your cluster has enough nodes to schedule your pods without wasting resources. If some pods fail to schedule on current worker nodes due to insufficient resources, it increases the size of the cluster and adds additional nodes. It also attempts to remove underutilized nodes when its pods can run elsewhere.
Pattern 2: Turn on Dynamic Resource Allocation (DRA) in Spark
Spark provides a mechanism called Dynamic Resource Allocation (DRA), which dynamically adjusts the resources your application occupies based on the workload. With DRA, the Spark driver spawns the initial number of executors and then scales up the number until the specified maximum number of executors is met to process the pending tasks. Idle executors are deleted when there are no pending tasks. It’s particularly useful if you’re not certain how many executors are needed for your job processing.
You can implement it in EMR on EKS by following the Dynamic Resource Allocation workshop.
Pattern 3: Fully control cluster autoscaling by Cluster Autoscaler
Cluster Autoscaler utilizes the concept of node groups as the element of capacity control and scale. In AWS, node groups are implemented by auto scaling groups. Cluster Autoscaler implements it by controlling the DesiredReplicas field of your auto scaling groups.
To save costs and improve resource utilization, you can use Cluster Autoscaler in your Amazon EKS cluster to automatically scale your Spark pods. The following are recommendations for autoscaling Spark jobs with Amazon EMR on EKS using Cluster Autoscaler:
- Create Availability Zone bounded auto scaling groups to make sure Cluster Autoscaler only adds worker nodes in the same Availability Zone to avoid cross-AZ data transfer charges and data processing latency.
- Create separate node groups for EC2 On-Demand and Spot Instances. By doing this, you can add or shrink driver pods and executor pods independently.
- In Cluster Autoscaler, each node in a node group needs to have identical scheduling properties. That includes EC2 instance types, which should be of similar vCPU to memory ratio to avoid inconsistency and wastage of resources. To learn more about Cluster Autoscaler node groups best practices, refer to Configuring your Node Groups.
- Adhere to Spot Instance best practices and maximize diversification to take advantages of multiple Spot pools. Create multiple node groups for Spark executor pods with different vCPU to memory ratios. This greatly increases the stability and resiliency of your application.
- When you have multiple node groups, use pod templates and Kubernetes labels and selectors to manage Spark pod deployment to specific Availability Zones and EC2 instance types.
The following diagram illustrates Availability Zone bounded auto scaling groups.

As multiple node groups are created, Cluster Autoscaler has the concept of expanders, which provide different strategies for selecting which node group to scale. As of this writing, the following strategies are supported: random, most-pods, least-waste, and priority. With multiple node groups of EC2 On-Demand and Spot Instances, you can use the priority expander, which allows Cluster Autoscaler to select the node group that has the highest priority assigned by the user. For configuration details, refer to Priority based expander for Cluster Autoscaler.
Pattern 4: Group-less autoscaling with Karpenter
Karpenter is an open-source, flexible, high-performance Kubernetes cluster auto scaler built with AWS. The overall goal is the same of auto scaling Amazon EKS clusters to adjust un-schedulable pods; however, Karpenter takes a different approach than Cluster Autoscaler, known as group-less provisioning. It observes the aggregate resource requests of unscheduled pods and makes decisions to launch minimal compute resources to fit the un-schedulable pods for efficient binpacking and reducing scheduling latency. It can also delete nodes to reduce infrastructure costs. Karpenter works directly with the Amazon EC2 Fleet.
To configure Karpenter, you create provisioners that define how Karpenter manages un-schedulable pods and expired nodes. You should utilize the concept of layered constraints to manage scheduling constraints. To reduce EMR on EKS costs and improve Amazon EKS cluster utilization, you can use Karpenter with similar constraints of Single-AZ, On-Demand Instances for Spark driver pods, and Spot Instances for executor pods without creating multiple types of node groups. With its group-less approach, Karpenter allows you to be more flexible and diversify better.
The following are recommendations for auto scaling EMR on EKS with Karpenter:
- Configure Karpenter provisioners to launch nodes in a single Availability Zone to avoid cross-AZ data transfer costs and reduce data processing latency.
- Create a provisioner for EC2 Spot Instances and EC2 On-Demand Instances. You can reduce costs by scheduling Spark driver pods to run on EC2 On-Demand Instances and schedule Spark executor pods to run on EC2 Spot Instances.
- Limit the instance types by providing a list of EC2 instances or let Karpenter choose from all the Spot pools available to it. This follows the Spot best practices of diversifying across multiple Spot pools.
- Use pod templates and Kubernetes labels and selectors to allow Karpenter to spin up right-sized nodes required for un-schedulable pods.
The following diagram illustrates how Karpenter works.

To summarize the design patterns we discussed:
- Pod templates help tailor your Spark workloads. You can configure Spark pods in a single Availability Zone and utilize EC2 Spot Instances for Spark executor pods, resulting in better price-performance.
- EMR on EKS supports the DRA feature in Spark. It is useful if you’re not familiar how many Spark executors are needed for your job processing, and use DRA to dynamically adjust the resources your application needs.
- Utilizing Cluster Autoscaler enables you to fully control how to autoscale your Amazon EMR on EKS workloads. It improves your Spark application availability and cluster efficiency by rapidly launching right-sized compute resources.
- Karpenter simplifies autoscaling with its group-less provisioning of compute resources. The benefits include reduced scheduling latency, and efficient bin-packing to reduce infrastructure costs.
Walkthrough overview
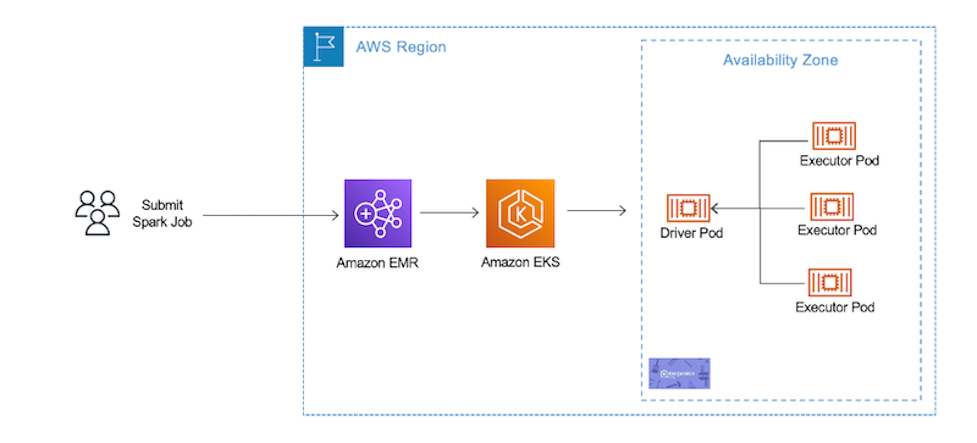
In our example walkthrough, we will show how to use Pod template to schedule a job with EMR on EKS. We use Karpenter as our autoscaling tool.
We complete the following steps to implement the solution:
- Create an Amazon EKS cluster.
- Prepare the cluster for EMR on EKS.
- Register the cluster with Amazon EMR.
- For Amazon EKS auto scaling, set up Karpenter auto scaling in Amazon EKS.
- Submit a sample Spark job using pod templates to run in single Availability Zone and utilize Spot for Spark executor pods.
The following diagram illustrates this architecture.
Prerequisites
To follow along with the walkthrough, ensure that you have the following prerequisite resources:
- An AWS account that provides access to AWS services.
- An AWS Identity and Access Management User (IAM) user with an access key and secret key to configure the AWS CLI, and permissions to create IAM roles, IAM policies, Amazon EKS IAM roles and service linked roles, AWS CloudFormation stacks, and a VPC. For more information, see Actions, resources, and condition keys for Amazon Elastic Container Service for Kubernetes and Using service-linked roles. You must complete all steps in this post as the same user.
- An Amazon Simple Storage Service (Amazon S3) bucket to store your pod templates.
- The AWS CLI, eksctl, and kubectl. Instructions for installation of these tools are given in Step 1.
Create an Amazon EKS cluster
There are two ways to create an EKS cluster: you can use AWS Management Console and AWS CLI, or you can install all the required resources for Amazon EKS using eksctl, a simple command line utility for creating and managing Kubernetes clusters on EKS. For this post, we use eksctl to create our cluster.
Let’s start with installing the tools to set up and manage your Kubernetes cluster.
- Install the AWS CLI with the following command (Linux OS) and confirm it works:
For other operating systems, see Installing, updating, and uninstalling the AWS CLI version.
- Install eksctl, the command line utility for creating and managing Kubernetes clusters on Amazon EKS:
eksctl is a tool jointly developed by AWS and Weaveworks that automates much of the experience of creating EKS clusters.
- Install the Kubernetes command-line tool, kubectl, which allows you to run commands against Kubernetes clusters:
- Create a new file called
eks-create-cluster.yamlwith the following: - Create an Amazon EKS cluster using the
eks-create-cluster.yamlfile:In this Amazon EKS cluster, we create a single managed node group with a general purpose
m5.xlargeEC2 Instance. Launching Amazon EKS cluster, its managed node groups, and all dependencies typically takes 10–15 minutes. - After you create the cluster, you can run the following to confirm all node groups were created:
You can now use kubectl to interact with the created Amazon EKS cluster.
- After you create your Amazon EKS cluster, you must configure your kubeconfig file for your cluster using the AWS CLI:
You can now use kubectl to connect to your Kubernetes cluster.
Prepare your Amazon EKS cluster for EMR on EKS
Now we prepare our Amazon EKS cluster to integrate it with EMR on EKS.
- Let’s create the namespace emr-on-eks-blog in our Amazon EKS cluster:
- We use the automation powered by eksctl to create role-based access control permissions and to add the EMR on EKS service-linked role into the
aws-authconfigmap: - The Amazon EKS cluster already has an OpenID Connect provider URL. You enable IAM roles for service accounts by associating IAM with the Amazon EKS cluster OIDC:
Now let’s create the IAM role that Amazon EMR uses to run Spark jobs.
- Create the file
blog-emr-trust-policy.json:This IAM role contains all permissions that the Spark job needs—for instance, we provide access to S3 buckets and Amazon CloudWatch to access necessary files (pod templates) and share logs.
Next, we need to attach the required IAM policies to the role so it can write logs to Amazon S3 and CloudWatch.
- Create the file
blog-emr-policy-documentwith the required IAM policies. Replace the bucket name with your S3 bucket ARN. - Now we update the trust relationship between the IAM role we just created with the Amazon EMR service identity. The namespace provided here in the trust policy needs to be same when registering the virtual cluster in next step:
Register the Amazon EKS cluster with Amazon EMR
Registering your Amazon EKS cluster is the final step to set up EMR on EKS to run workloads.
We create a virtual cluster and map it to the Kubernetes namespace created earlier:
After you register, you should get confirmation that your EMR virtual cluster is created:
Set up Karpenter in Amazon EKS
To get started with Karpenter, ensure there is some compute capacity available, and install it using the Helm charts provided in the public repository. Karpenter also requires permissions to provision compute resources. For more information, refer to Getting Started.
Karpenter’s single responsibility is to provision compute for your Kubernetes clusters, which is configured by a custom resource called a provisioner. Once installed in your cluster, the Karpenter provisioner observes incoming Kubernetes pods, which can’t be scheduled due to insufficient compute resources in the cluster, and automatically launches new resources to meet their scheduling and resource requirements.
For our use case, we provision two provisioners.
The first is a Karpenter provisioner for Spark driver pods to run on EC2 On-Demand Instances:
The second is a Karpenter provisioner for Spark executor pods to run on EC2 Spot Instances:
Note the highlighted portion of the provisioner config. In the requirements section, we use the well-known labels with Amazon EKS and Karpenter to add constraints for how Karpenter launches nodes. We add constraints that if the pod is looking for a label karpenter.sh/capacity-type: spot, it uses this provisioner to launch an EC2 Spot Instance only in Availability Zone us-west-2b. Similarly, we follow the same constraint for the karpenter.sh/capacity-type: on-demand label. We can also be more granular and provide EC2 instance types in our provisioner, and they can be of different vCPU and memory ratios, giving you more flexibility and adding resiliency to your application. Karpenter launches nodes only when both the provisioner’s and pod’s requirements are met. To learn more about the Karpenter provisioner API, refer to Provisioner API.
In the next step, we define pod requirements and align them with what we have defined in Karpenter’s provisioner.
Submit Spark job using Pod template
In Kubernetes, labels are key-value pairs that are attached to objects, such as pods. Labels are intended to be used to specify identifying attributes of objects that are meaningful and relevant to users. You can constrain a pod so that it can only run on particular set of nodes. There are several ways to do this, and the recommended approaches all use label selectors to facilitate the selection.
Beginning with Amazon EMR versions 5.33.0 or 6.3.0, EMR on EKS supports Spark’s pod template feature. We use pod templates to add specific labels where Spark driver and executor pods should be launched.
Create a pod template file for a Spark driver pod and save them in your S3 bucket:
Create a pod template file for a Spark executor pod and save them in your S3 bucket:
Pod templates provide different fields to manage job scheduling. For additional details, refer to Pod template fields. Note the nodeSelector for the Spark driver pods and Spark executor pods, which match the labels we defined with the Karpenter provisioner.
For a sample Spark job, we use the following code, which creates multiple parallel threads and waits for a few seconds:
Copy the sample Spark job into your S3 bucket:
Before we submit the Spark job, let’s get the required values of the EMR virtual cluster and Amazon EMR job execution role ARN:
To enable the pod template feature with EMR on EKS, you can use configuration-overrides to specify the Amazon S3 path to the pod template:
In the Spark job, we’re requesting two cores for the Spark driver and one core each for Spark executor pod. Because we only had a single EC2 instance in our managed node group, Karpenter looks at the un-schedulable Spark driver pods and utilizes the on-demand provisioner to launch EC2 On-Demand Instances for Spark driver pods in us-west-2b. Similarly, when the Spark executor pods are in pending state, because there are no Spot Instances, Karpenter launches Spot Instances in us-west-2b.
This way, Karpenter optimizes your costs by starting from zero Spot and On-Demand Instances and only creates them dynamically when required. Additionally, Karpenter batches pending pods and then binpacks them based on CPU, memory, and GPUs required, taking into account node overhead, VPC CNI resources required, and daemon sets that will be packed when bringing up a new node. This makes sure you’re efficiently utilizing your resources with least wastage.
Clean up
Don’t forget to clean up the resources you created to avoid any unnecessary charges.
- Delete all the virtual clusters that you created:
- Delete the Amazon EKS cluster:
- Delete the
EMR_EKS_Job_Execution_Rolerole and policies.
Conclusion
In this post, we saw how to create an Amazon EKS cluster, configure Amazon EKS managed node groups, create an EMR virtual cluster on Amazon EKS, and submit Spark jobs. Using pod templates, we saw how to ensure Spark workloads are scheduled in the same Availability Zone and utilize Spot with Karpenter auto scaling to reduce costs and optimize your Spark workloads.
To get started, try out the EMR on EKS workshop. For more resources, refer to the following:
- Amazon EMR on EKS Development Guide
- EMR Containers Best Practices Guides
- Amazon EMR on EKS advanced workshop: EMR on EKS
About the author

Jamal Arif is a Solutions Architect at AWS and a containers specialist. He helps AWS customers in their modernization journey to build innovative, resilient, and cost-effective solutions. In his spare time, Jamal enjoys spending time outdoors with his family hiking and mountain biking.