Microsoft Workloads on AWS
Accelerate containerization and migration of ASP.NET Core applications to AWS using AWS App2Container
In this blog post, we provide a tutorial to containerize your ASP.NET Core applications to Linux containers and migrate to AWS using AWS App2Container (A2C). AWS App2Container is a command-line tool for modernizing .NET and Java applications into containerized applications.
Customers modernize their legacy ASP.NET applications to ASP.NET Core to take advantage of the performance, cost savings, and robust ecosystem of Linux. However, the deployment models of these ASP.NET Core applications on Linux instances often do not take full advantage of features provided by cloud platforms. In some scenarios, customers have modernized their code base to .NET Core and continued running their applications on Windows because of the lack of skill set within their team to migrate and manage applications on Linux.
With the support of containerization of ASP.NET Core applications in AWS App2Container, customers can now accelerate the containerization and migration journey of their ASP.NET Core applications to AWS. A2C analyzes and builds an inventory of all applications running in virtual machines, on premises or in the cloud. You simply select the application you want to containerize, and A2C packages the application artifact and identified dependencies into container images, configures the network ports, and generates the ECS task and Kubernetes pod definitions.
For ASP.NET applications running on Linux, A2C detects the .NET runtime version (.NET Core 3.1, .NET 5, .NET 6) and containerizes the application using the corresponding runtime base images. Customers can continue to deploy these containerized applications to their choice of container platforms — Amazon Elastic Container Service (Amazon ECS), Amazon Elastic Kubernetes Service (Amazon EKS), AWS Fargate, and AWS App Runner — using A2C.
In this tutorial, you will deploy an application to an Amazon Elastic Compute Cloud (Amazon EC2) Linux instance through AWS Elastic Beanstalk using AWS Toolkit for Visual Studio. Then you will set up the A2C tool on a Linux server to containerize the application and deploy it to Amazon ECS.
Prerequisites
For this tutorial, you should:
- Clone sample application from AWS Samples GitHub repository.
- Create an Amazon S3 bucket to store A2C-generated artifacts.
- Deploy ASP.NET Core application on Linux application server using AWS Elastic Beanstalk:
- Manually host ASP.NET core on Linux with Apache.
- Step-by-step instructions to deploy .NET Core application using AWS Elastic Beanstalk.
- Create an admin IAM user and policy to be used with A2C.
- Configure AWS profile on the application server using the IAM user created from step4.
- Install Docker Engine on the application server.
- Install App2Container on application server.
Initialize AWS App2Container on Application Server
Connect to the Amazon EC2 Linux instance using session manager where the application is deployed and follow the steps to complete the App2Container setup process.
- Download the App2Container installation file using the curl command from Amazon S3: curl -o AWSApp2Container-installer-linux.tar.gz https://app2container-release-us-east-1.s3.us-east-1.amazonaws.com/latest/linux/AWSApp2Container-installer-linux.tar.gz
- Extract the package to a local folder on the server: sudo tar xvf AWSApp2Container-installer-linux.tar.gz

Figure 1: App2Container installer setup – Application Server
- Run the install script you extracted from the package: sudo ./install.sh

Figure 2: App2Container installation – Application Server
- Initialize App2Container using the command below: sudo app2container init

Figure 3: App2Container initialization – Application Server
- On the application server, follow these steps to prepare to containerize the applications: sudo app2container inventory

Figure 4: App2Container inventory – Application Server
The output includes a JSON object collection with one entry for each application.
Analyze and containerize the application
- Locate the application ID for the application to containerize in the JSON output of the inventory command, and then run the analyze command as follows, replacing donet-app-id with the application ID that you located. sudo app2container analyze –application-id dotnet-app-id

Figure 5: App2Container analyze application – Application Server
The output is a JSON file, analysis.json, stored in the workspace directory that you specified when you ran the init command.
- App2Container will pick the dotnet version for this deployment based on dotnet –list-runtimes. If you have higher versions on the application server, by default App2container will pick the latest version. We need to change the dotnet version in the analysis.json to 5.0. You can find the analysis.json file under /root/app2container/dotnet-generic-072cf0f1.

Figure 6: App2Container analysis json config – Application Server
Now that your application has gone through the analysis phase, it’s ready for containerization. app2container containerize –application-id dotnet-app-id

Figure 7: App2Container containerize application – Application Server
- If you have a pre-validation check fail, one of the reasons can be your application is not allowing a HEAD request. You can fix the issue using any one of the following three options:
- Fix the application to take a HEAD request and return a successful response. Using this option, you just need to rerun containerize without any flags.
- Update the Dockerfile HEALTHCHECK command and rerun containerize command with –build-only flag. For this blog post, I updated the HEALTHCHECK command to get past the pre-validation check. Steps to update the command are below:
- Go to your application folder Artifacts and open Dockerfile.
- Update the HEALTHCHECK command by removing “–spider” option from the parameters.

Figure 8: Update HEALTHCHECK command– Application Server
- Rerun the command with –build-only flag now: app2container containerize –application-id dotnet-app-id –build-only

Figure 9: Run build only command – Application Server
- Directly re-run the containerize command with –no-validate flag, which will not validate the HEALTHCHECK command.
- Run the generate app-deployment command as follows to deploy the application on AWS: app2container generate app-deployment –application-id dotnet-app-id

Figure 10: App2Container generate application deployment – Application Server
This will create a CloudFormation template and artifacts to deploy your application through AWS CloudFormation stack. You can deploy this AWS CloudFormation stack in any AWS Region. You can check the stack details in your Amazon S3 bucket, which was previously configured when initializing A2C.
You can deploy ecs-master.yml file using AWS CloudFormation. You can scale your application based on your needs by adjusting the parameters of the CloudFormation template.

Figure 11: App2Container template parameters – CloudFormation
Deploy the application
To deploy the application to an Amazon ECS cluster, run the command below: sudo app2container generate app-deployment –application-id dotnet-app-id –deploy

Figure 12: Deploy application using App2Container – Application Server
This will deploy a CloudFormation template from your Amazon S3 bucket artifacts.
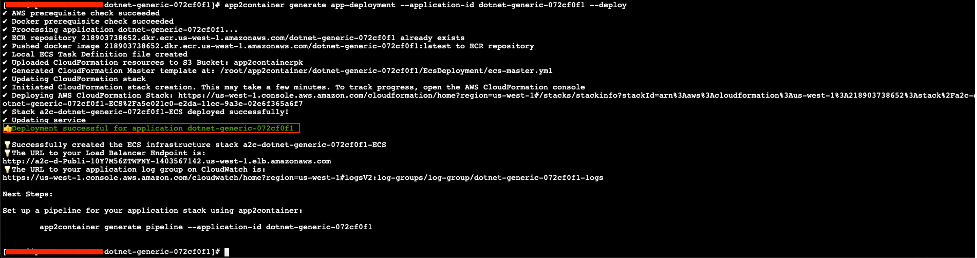
Figure 13: App2Container deployment status – Application Server
Finally, launch the URL to your load balancer from the deployment result above.
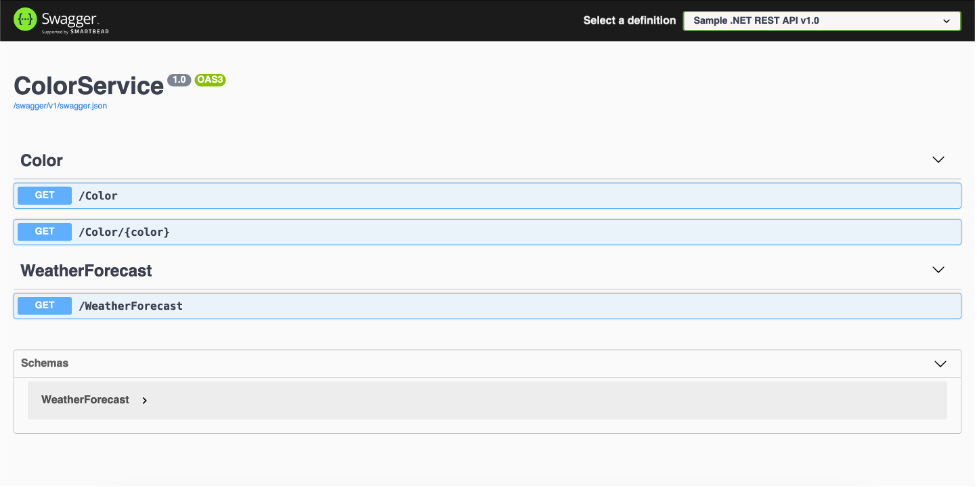
Figure 14: API documentation of deployed application
The above application is deployed in an Amazon ECS cluster. To check out the cluster, open the Amazon ECS console and choose clusters in the navigation pane.
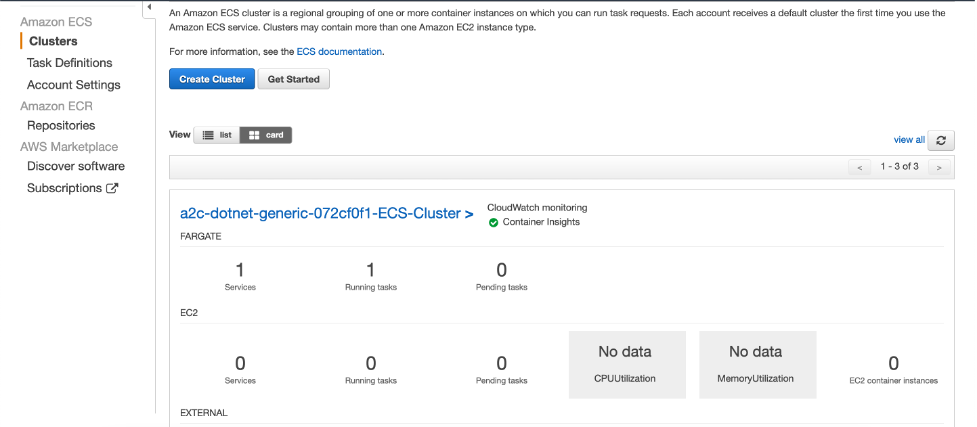
Figure 15: ECS cluster for deployed application
There will be a service in your Amazon ECS cluster that is running a task as defined in your deployment settings for App2Container. If you click on the cluster, it will provide a detailed view of the resources in the cluster. This service ensures that the needed number of tasks are running for scaling. A service creates and destroys tasks as part of its role and can optionally add or remove them from an Application Load Balancer as targets. This deployment is using AWS Fargate, which is a serverless compute service to run our application.
Cleanup
Please follow the steps in the documentation to cleanup and delete the resources you have provisioned.
- Delete stack on the AWS CloudFormation console to delete your resources deployed on Amazon ECS
- Cleanup App2Container to remove App2Container from your application server.
Conclusion
With App2Container, customers can quickly containerize their ASP.NET Core applications and migrate to AWS without modifying their code. Containerizing applications as a cloud migration approach brings in added advantages over rehosting, such as enhanced performance and scalability.
Further, deploying your containerized applications to fully managed container orchestration services like Amazon ECS or Amazon EKS helps you to automatically scale and run web applications in multiple Availability Zones with the performance, scale, reliability, and availability of AWS.
AWS can help you assess how your company can get the most out of cloud. Join the millions of AWS customers that trust us to migrate and modernize their most important applications in the cloud. To learn more on modernizing Windows Server or SQL Server, visit Windows on AWS. Contact us to start your modernization journey today.