


Deploy in a few minutes an high available K3s cluster on Amazon AWS using mixed on-demand and spot instances
- Requirements
- Before you start
- Pre flight checklist
- Notes about K3s
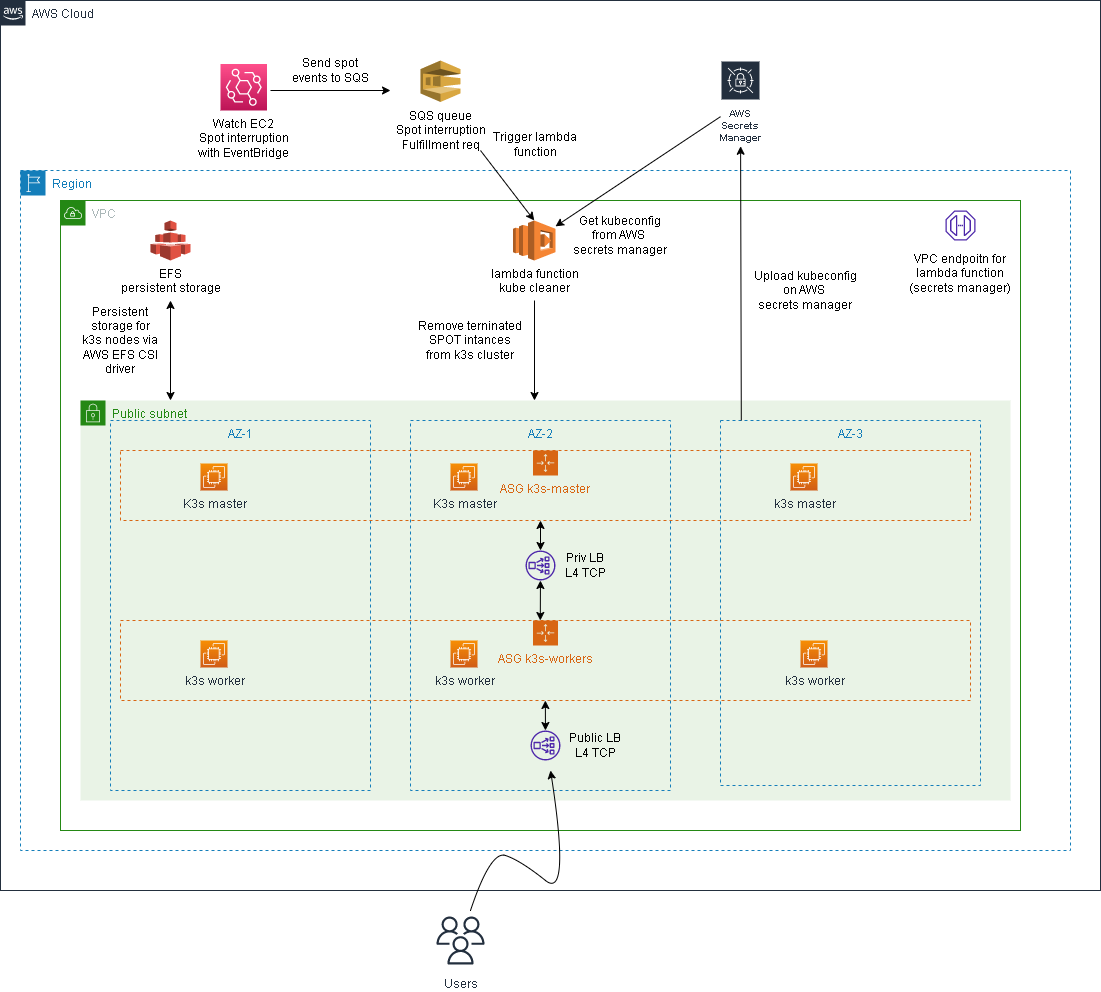
- Infrastructure overview
- Instances used
- Deploy
- Cluster resource deployed
- Optional cluster resources
- Clean up
- Terraform - Terraform is an open-source infrastructure as code software tool that provides a consistent CLI workflow to manage hundreds of cloud services. Terraform codifies cloud APIs into declarative configuration files.
- Amazon AWS Account - Amazon AWS account with billing enabled
- kubectl - The Kubernetes command-line tool (optional)
- Python pip package - Python package installer (python3-pip under Ubuntu distro)
- aws cli - the cli is needed to fix this problem.
Note that this tutorial uses AWS resources that are outside the AWS free tier, so be careful!
Follow the prerequisites step on this link. Create a file named terraform.tfvars on the root of this repository and add your AWS_ACCESS_KEY and AWS_SECRET_KEY, example:
AWS_ACCESS_KEY = "xxxxxxxxxxxxxxxxx"
AWS_SECRET_KEY = "xxxxxxxxxxxxxxxxx"
build the lambda package (not provided in this repo):
pip install --target k3s_cluster/lambda/kube_cleaner_src/ kubernetes
cd k3s_cluster/lambda/kube_cleaner_src/
zip -r ../kube_cleaner.zip .
configure the aws cli:
aws cli configure
edit the main.tf files and set the following variables:
| Var | Required | Desc |
|---|---|---|
AWS_REGION |
yes |
set the correct aws region based on your needs |
vpc_id |
yes |
set your vpc-id. You can find your vpc_id in your AWS console (Example: vpc-xxxxx) |
vpc_subnets |
yes |
set the list of your VPC subnets. You can find the list of your vpc subnets in your AWS console (Example: subnet-xxxxxx) |
vpc_subnet_cidr |
yes |
set your vcp subnet cidr. You can find the VPC subnet CIDR in your AWS console (Example: 172.31.0.0/16) |
cluster_name |
yes |
the name of your K3s cluster. Default: k3s-cluster |
my_public_ip_cidr |
yes |
your public ip in cidr format (Example: 195.102.xxx.xxx/32) |
k3s_version |
no |
K3s version. Default: latest |
k3s_subnet |
no |
Subnet where K3s will be exposed. Rquired if the subnet is different from the default gw subnet (Eg. 192.168.1.0/24). Default: default_route_table |
environment |
yes |
Current work environment (Example: staging/dev/prod). This value is used for tag all the deployed resources |
common_prefix |
no |
Prefix used in all resource names/tags. Default: k3s |
create_extlb |
no |
Boolean value true/false, specify true for deploy an external LB pointing to k3s worker nodes. Default: false |
install_nginx_ingress |
no |
Boolean value, install kubernetes nginx ingress controller instead of Traefik. Default: true. For more information see Nginx ingress controller |
nginx_ingress_release |
no |
nginx ingress controller release. Default: v1.3.1 |
install_node_termination_handler |
no |
Boolean value, install node termination handler) Default: true. |
node_termination_handler_release |
no |
node termination handler release. Default: v1.17.3 |
install_certmanager |
no |
Boolean value, install cert manager "Cloud native certificate management". Default: true |
certmanager_release |
no |
Cert manager release. Default: v1.8.2 |
certmanager_email_address |
no |
Email address used for signing https certificates. Defaul: changeme@example.com |
efs_persistent_storage |
no |
Deploy EFS for persistent sotrage |
efs_csi_driver_release |
no |
EFS CSI driver Release: v1.4.2 |
extlb_http_port |
no |
http port used by the external LB. Default: 80 |
extlb_https_port |
no |
https port used by the external LB. Default: 443 |
expose_kubeapi |
no |
Boolean value, default false. Expose or not the kubeapi server to the internet. Access is granted only from my_public_ip_cidr for security reasons. |
PATH_TO_PUBLIC_KEY |
no |
Path to your public ssh key (Default: "~/.ssh/id_rsa.pub) |
PATH_TO_PRIVATE_KEY |
no |
Path to your private ssh key (Default: "~/.ssh/id_rsa) |
default_instance_type |
no |
Default instance type used by the Launch template. Default: t3.medium |
instance_types |
no |
Array of instances used by the ASG. Dfault: { asg_instance_type_1 = "t3.medium", asg_instance_type_2 = "t3a.medium", asg_instance_type_2 = "c5a.large", asg_instance_type_4 = "c6a.large" } |
kube_api_port |
no |
Kube api default port Default: 6443 |
k3s_server_desired_capacity |
no |
Desired number of k3s servers. Default 3 |
k3s_server_min_capacity |
no |
Min number of k3s servers: Default 4 |
k3s_server_max_capacity |
no |
Max number of k3s servers: Default 3 |
k3s_worker_desired_capacity |
no |
Desired number of k3s workers. Default 3 |
k3s_worker_min_capacity |
no |
Min number of k3s workers: Default 4 |
k3s_worker_max_capacity |
no |
Max number of k3s workers: Default 3 |
This module will deploy a custom instance profile with the following permissions:
- AmazonEC2ReadOnlyAccess and AmazonSSMManagedInstanceCore (AWS managed)
- custom inline policy for cluster autoscaler
- custom inline policy for EFS cis driver
- custom inline policy for manage secrets in secrets manager
For the cluster autoscaler policy you can find more details here The full documentation for the cluster autoscaler is available here
In this tutorial the High Availability of the K3s cluster is provided using the Embedded DB. More details here
The final infrastructure will be made by:
- two autoscaling groups:
- one autoscaling group for the server nodes named "k3s_servers"
- one autoscaling group for the worker nodes named "k3s_workers"
- one internal LB (Layer 4 LB - NLB) with kubeapi listener
The other resources created by terraform are:
- two launch templates (one for the servers and one for the workers) used by the autoscaling groups
- an ssh key pair associated with each EC2 instance
- one lambda function that will clean all removed spot instances from k3s cluster
- two Amazon event bridge rules that will capture all:
- EC2 Spot Instance Interruption Warning
- EC2 Spot Instance Request Fulfillment
- two SQS queues to capture the eventbridge rules
- one VPC endpoint to allow the lambda function to call the AWS api
- one secret to store the kubeconfig from k3s server
- a securiy group that will allow:
- incoming traffic only from your public ip address on port 22 (ssh)
- incoming traffic inside the vpc subnet on port 6443 (kube-api server)
- outgoing traffic to the internet
- one security group to allwo the lambda funcion to reach the internal LB and all the k3s servers
- one security group for the VPC endpont (allow all traffic)
Optional resources:
- one public LB (Layer 4 LB - NLB) with http/https listener (optional kubeapi listener)
- EFS filesystem for persistent storage
- one security group to allow NFS traffic from allt the EC2 instances to EFS
Notes about the auoscaling group:
- each autoscaling group will be made by 3 EC2 instance.
- the autoscaling is configured to use a mix of spot and on-demand instances.
- the total amount of the on-demand instances is 20% so for example if we launch a total of 10 instances 2 instances will be on-demand instances.
- the autoscaling group is configured to maximize the succes of the spot request using different types of EC2 instances (See Instance used above)
You can change this setting by editing the value of on_demand_percentage_above_base_capacity in asg.tf. You can require that all the EC2 will be launced using on-demand instances setting on_demand_percentage_above_base_capacity to 100. More details here
The types of instances used on this tutorial are:
- t3.large (default), defined in launchtemplate.tf
The other EC2 instance types are defined/overrided in asg.tf, and are:
- t3.large, like the default one
- m4.large
- t3a.large
With these settings there are more probability that our spot instance request will be fullified. Also the allocation strategy is a very important settings to check. In this configurations is defined as "capacity-optimized" on asg.tf
You can change the kind of instance used editing asg.tf and launchtemplate.tf
Very important note
Since we are deploying a Kubernetes cluster, is very important that all the instances have the same amount of memory (RAM) and the same number of CPU!
We are now ready to deploy our infrastructure. First we ask terraform to plan the execution with:
terraform plan
if everything is ok the output should be something like:
...skip

  # module.k3s_cluster.random_password.k3s_token will be created
  + resource "random_password" "k3s_token" {
      + bcrypt_hash = (sensitive value)
      + id          = (known after apply)
      + length      = 55
      + lower       = true
      + min_lower   = 0
      + min_numeric = 0
      + min_special = 0
      + min_upper   = 0
      + number      = true
      + numeric     = true
      + result      = (sensitive value)
      + special     = false
      + upper       = true
    }

Plan: 61 to add, 0 to change, 0 to destroy.

Changes to Outputs:
  + elb_dns_name           = [
      + (known after apply),
    ]
  + k3s_server_public_ips  = [
      + (known after apply),
    ]
  + k3s_workers_public_ips = [
      + (known after apply),
    ]

────────────────────────────────────────────────────────────────────────────────────────────────────────────────────────────────────────────────────────────────────────────────────────────────────────────────

Note: You didn't use the -out option to save this plan, so Terraform can't guarantee to take exactly these actions if you run "terraform apply" now.
now we can deploy our resources with:
terraform apply

...skip

  # module.k3s_cluster.random_password.k3s_token will be created
  + resource "random_password" "k3s_token" {
      + bcrypt_hash = (sensitive value)
      + id          = (known after apply)
      + length      = 55
      + lower       = true
      + min_lower   = 0
      + min_numeric = 0
      + min_special = 0
      + min_upper   = 0
      + number      = true
      + numeric     = true
      + result      = (sensitive value)
      + special     = false
      + upper       = true
    }

Plan: 61 to add, 0 to change, 0 to destroy.

Changes to Outputs:
  ~ elb_dns_name           = [] -> [
      + (known after apply),
    ]
  + k3s_server_public_ips  = [
      + (known after apply),
    ]
  + k3s_workers_public_ips = [
      + (known after apply),
    ]

Do you want to perform these actions?
  Terraform will perform the actions described above.
  Only 'yes' will be accepted to approve.

  Enter a value: yes

...skip

module.k3s_cluster.aws_lambda_event_source_mapping.trigger_lambda_on_ec2_interruption: Creation complete after 8s [id=64512b66-b60d-4c39-971f-35e00b9241ae]
module.k3s_cluster.aws_sqs_queue_policy.ec2_spot_interruption_warn_queue_policy: Still creating... [10s elapsed]
module.k3s_cluster.aws_sqs_queue_policy.ec2_spot_request_fulfillment_queue_policy: Still creating... [10s elapsed]
module.k3s_cluster.aws_sqs_queue_policy.ec2_spot_request_fulfillment_queue_policy: Still creating... [20s elapsed]
module.k3s_cluster.aws_sqs_queue_policy.ec2_spot_interruption_warn_queue_policy: Still creating... [20s elapsed]
module.k3s_cluster.aws_sqs_queue_policy.ec2_spot_request_fulfillment_queue_policy: Creation complete after 26s [id=https://sqs.eu-west-1.amazonaws.com/379923184599/k3s-ec2-spot-fulfillment-queue-staging]
module.k3s_cluster.aws_sqs_queue_policy.ec2_spot_interruption_warn_queue_policy: Creation complete after 26s [id=https://sqs.eu-west-1.amazonaws.com/379923184599/k3s-ec2-spot-interruption-warn-queue-staging]

Apply complete! Resources: 61 added, 0 changed, 0 destroyed.

Outputs:

elb_dns_name = tolist([
  "k3s-ext-lb-staging-xxxx.elb.REGION.amazonaws.com",
])
k3s_server_public_ips = [
  tolist([
    "x.x.x.x",
    "x.x.x.x",
    "x.x.x.x",
  ]),
]
k3s_workers_public_ips = [
  tolist([
    "x.x.x.x",
    "x.x.x.x",
    "x.x.x.x",
  ]),
]
After about five minutes our Kubernetes cluster will be ready. You can now ssh into one master (you can find the ips in AWS console or use the aws command line to find the ips).
If you have the aws cli installed you can find the ips of the master nodes with:
aws ec2 describe-instances --filters Name=tag-value,Values=k3s-server Name=instance-state-name,Values=running --query "Reservations[*].Instances[*].[PublicIpAddress, Tags[?Key=='k3s-instance-type'].Value|[0]]"
On one master node the you can check the status of the cluster with:
ssh X.X.X.X -lubuntu

ubuntu@i-09a42419e18e4dd0a:~$ sudo su -
root@i-09a42419e18e4dd0a:~# kubectl get nodes

NAME                  STATUS   ROLES                       AGE   VERSION
i-015f4e5b0c790ec07   Ready    <none>                      53s   v1.22.6+k3s1
i-0447b6b00c6f6422e   Ready    <none>                      42s   v1.22.6+k3s1
i-06a8449d1ea425e42   Ready    control-plane,etcd,master   96s   v1.22.6+k3s1
i-09a42419e18e4dd0a   Ready    control-plane,etcd,master   55s   v1.22.6+k3s1
i-0a01b7c89c958bc4b   Ready    control-plane,etcd,master   38s   v1.22.6+k3s1
i-0c4c81a33568df947   Ready    <none>                      47s   v1.22.6+k3s1
root@i-09a42419e18e4dd0a:~#
and see all the nodes provisioned.
Optional resources can be deployed on the clustr:
- Node termination Handler
- Nginx ingress controller
- Cert-manager
- AWS EFS csi drive
- Cluster autoscaler (optional/manual deploy)
In this setup will be automatically installed on each node of the cluster the Node termination Handler. You can find more details here If for any reason you don't need the node termination handler set the value of install_node_termination_handler to false
In this environment Nginx ingress controller is used instead of the standard Traefik ingress controller.
The installation is the bare metal installation, the ingress controller then is exposed via K3s LoadBalancer Service.
---
apiVersion: v1
kind: Service
metadata:
  name: ingress-nginx-controller-loadbalancer
  namespace: ingress-nginx
spec:
  selector:
    app.kubernetes.io/component: controller
    app.kubernetes.io/instance: ingress-nginx
    app.kubernetes.io/name: ingress-nginx
  ports:
    - name: http
      port: 80
      protocol: TCP
      targetPort: 80
    - name: https
      port: 443
      protocol: TCP
      targetPort: 443
  type: LoadBalancer
NOTE with k3s is possible to expose "protected ports* via LoadBalancer. More info here
To get the real ip address of the clients using a public L4 load balancer the installer enables the Nginx proxy-prtocol:
---
apiVersion: v1
data:
  allow-snippet-annotations: "true"
  enable-real-ip: "true"
  proxy-real-ip-cidr: "0.0.0.0/0"
  proxy-body-size: "20m"
  use-proxy-protocol: "true" # <- this value is set to *true* to get the real ip address of the client
kind: ConfigMap
metadata:
  labels:
    app.kubernetes.io/component: controller
    app.kubernetes.io/instance: ingress-nginx
    app.kubernetes.io/managed-by: Helm
    app.kubernetes.io/name: ingress-nginx
    app.kubernetes.io/part-of: ingress-nginx
    app.kubernetes.io/version: 1.1.1
    helm.sh/chart: ingress-nginx-4.0.16
  name: ingress-nginx-controller
  namespace: ingress-nginx
NOTE the proxy protocol on the load balancer target group is enabled: proxy_protocol_v2 set to true.
cert-manager is used to issue certificates from a variety of supported source. To use cert-manager take a look at nginx-ingress-cert-manager.yml and nginx-configmap-cert-manager.yml example. To use cert-manager and get the certificate you need set on your DNS configuration the public ip address of the load balancer.
The Amazon Elastic File System Container Storage Interface (CSI) Driver implements the CSI specification for container orchestrators to manage the lifecycle of Amazon EFS file systems. More details here.
To use EFS csi driver use static provisioning:
apiVersion: v1
kind: PersistentVolume
metadata:
  name: efs-pv
spec:
  capacity:
    storage: 5Gi
  volumeMode: Filesystem
  accessModes:
    - ReadWriteOnce
  storageClassName: ""
  persistentVolumeReclaimPolicy: Retain
  csi:
    driver: efs.csi.aws.com
    volumeHandle: fs-e8a95a42
or create a StorageClass (dynamic provisioning)
kind: StorageClass
apiVersion: storage.k8s.io/v1
metadata:
  name: efs-sc
provisioner: efs.csi.aws.com
parameters:
  provisioningMode: efs-ap
  fileSystemId: fs-92107410
  directoryPerms: "700"
  gidRangeStart: "1000" # optional
  gidRangeEnd: "2000" # optional
  basePath: "/dynamic_provisioning" # optional
Here you can find more examples.
You can deploy the cluster autoscaler tool, more details here. To deploy the cluster autoscaler follow this steps:
wget https://raw.githubusercontent.com/kubernetes/autoscaler/master/cluster-autoscaler/cloudprovider/aws/examples/cluster-autoscaler-autodiscover.yaml
edit the cluster-autoscaler-autodiscover.yaml and change the command of the cluster-autoscaler deployment. The command is the following:
command:
  - ./cluster-autoscaler
  - --v=4
  - --stderrthreshold=info
  - --cloud-provider=aws
  - --skip-nodes-with-local-storage=false
  - --skip-nodes-with-system-pods=false
  - --balance-similar-node-groups
  - --expander=random
  - --node-group-auto-discovery=asg:tag=k8s.io/cluster-autoscaler/enabled,k8s.io/cluster-autoscaler/k3s-cluster
we need to edit also the ssl-certs volume. The updated volume will be:
volumes:
  - name: ssl-certs
    hostPath:
      path: "/etc/ssl/certs/ca-certificates.crt"
Note the certificate path may change from distro to distro so adjust the value based on your needs.
Now we can deploy the cluster autscaler with:
kubectl apply -f cluster-autoscaler-autodiscover.yaml
Remember to clean all the previously created resources when you have finished! We don't want surprises from AWS billing team:
terraform destroy