AWS Open Source Blog
Automate Python Flask Deployment to the AWS Cloud
In our previous post, we demonstrated how to use open source tools to deploy an application to the AWS cloud. In this post, we expand on those concepts by introducing additional AWS services that demonstrate how to manage and deploy an application in the AWS Cloud. The updated workflow includes the following additions: Continuous Integration / Continuous Deployment (CI / CD) pipeline, applications tests, Blue / Green application deployment pattern, and updated Terraform modules. This additional functionality enables developers to automatically test and deploy new versions of the Flask application. Using Python Flask, Terraform, and Docker in conjunction with several AWS services, you configure a CI/CD pipeline for deploying a Python Flask application.
After going through this exercise, readers will know how to use AWS services and open source tools for managing an open source application in the AWS Cloud.
Prerequisites
- An AWS account with local credentials properly configured (typically under
~/.aws/credentials). - The latest version of the AWS Command Line Interface (AWS CLI). For more information, refer to the documentation for installing, updating, and uninstalling the AWS CLI.
- Terraform14.7+ installed on local workstation.
- Docker Desktop 3.1.0+ installed on local workstation.
- A Git client to clone the source code provided and a GitHub repository.
- Python6+ installed on local workstation.
- Boto3 installed on local workstation.
Solution Overview
There is a sample Python Flask application that is deployed by AWS CodePipeline. The pipeline uses Docker to build and deploy the image to the Amazon Elastic Container Registry (Amazon ECR). Unit tests are run during the Docker image build. Next, the appspec file is updated to point to the latest ECS task Definition. AWS CodeDeploy kicks off a Blue / Green deployment and deploys the latest Docker image to Elastic Container Service running on EC2 instances. Once traffic is shifted to the new version of the application, CodeDeploy completes successfully and the latest version of the Flask application is running on ECS.

The pipeline deploys the Flask application:
- The developer pushes code to the main branch.
- An update to the main branch invokes the pipeline.
- The pipeline clones the AWS CodeCommit repository.
- Docker builds the container image, runs unit tests, and assigns tags.
- Docker pushes the image to Amazon ECR.
- CodeDeploy Blue / Green deployment with the latest version of Flask app deployed to ECS
Application Overview
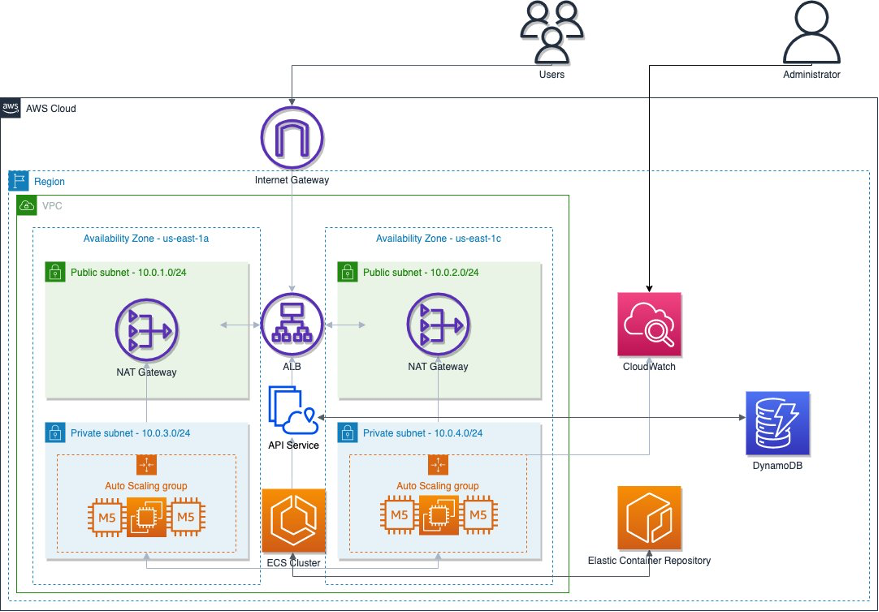
Python Flask is the foundation for the rest API. Python Flask is a micro framework for building web applications. The Flask application has has a back end database of Amazon DynamoDB. The Flask API defines two routes. The first route maps to /, and the second maps to /v1/bestmusic/90s/artist. These are the only paths recognized by the application. If you enter any other URL when accessing the API, you will receive an error message. You can define specific error responses in the API routes. For example, referencing the Python functions in the get_artist method, “Artist does not exist” is the response returned when a users requests an artist that is not present in the DynamoDB table (musicTable). The create_artist method posts an artist and song to your DynamoDB.
Unit and functional tests are also included as part of this workflow. PyUnit is used for the unit tests. The below diagram depicts the application architecture.
Deployment
You now configure and deploy the AWS services:
- Clone the demo code:
git clone https://github.com/aws-samples/deploy-python-flask-microservices-to-aws-using-open-source-tools-part2
- Change directory into the terraform/ directory:
cd terraform/
- Create the CodeCommit repository:
make configure-repo
You should see output similar to the following:
INFO: Creating CodeCommit repository.
{ repositoryMetadata: { accountId: 01234567890, repositoryId: 1b807cbf-c184-4e9c-823b-3262973b39cc, repositoryName: FlaskDemoRepo-01234567890, repositoryDescription: Flask demo application repo., lastModifiedDate: 2022-05-12T11:40:09.129000-04:00, creationDate: 2022-05-12T11:40:09.129000-04:00, cloneUrlHttp: https://git-codecommit.us-east-1.amazonaws.com/v1/repos/FlaskDemoRepo-01234567890, cloneUrlSsh: ssh://git-codecommit.us-east-1.amazonaws.com/v1/repos/FlaskDemoRepo-01234567890, Arn: arn:aws:codecommit:us-east-1:1234567890:FlaskDemoRepo-01234567890 } }
INFO: Successfully created CodeCommit repository.
INFO: The CodeCommit HTTP clone URL is https://git-codecommit.us-east-1.amazonaws.com/v1/repos/FlaskDemoRepo-01234567890
- Clone the AWS CodeCommit repository, you may be prompted for your CodeCommit username / password:
make clone
The output should look like the following:
Cloning into 'FlaskDemoRepo-01234567890-'...
warning: You appear to have cloned an empty repository.
- Configure the CodeCommit repository:
make upload-codecommit
The output should look like the following:
cd /home/ssm-user/private-rest-api/terraform/FlaskDemoRepo-01234567890 && \
git checkout -b main && \
cd /home/ssm-user/private-rest-api && \
tar czf demo-code.tar.gz app Dockerfile appspec.yaml buildspec.yml && \
tar -tvf demo-code.tar.gz && \
mv /home/ssm-user/private-rest-api/demo-code.tar.gz /home/ssm-user/private-rest-api/terraform/FlaskDemoRepo-01234567890 && \
cd /home/ssm-user/private-rest-api/terraform/FlaskDemoRepo-01234567890 && \
tar -xvf /home/ssm-user/private-rest-api/terraform/FlaskDemoRepo-01234567890/demo-code.tar.gz && \
rm /home/ssm-user/private-rest-api/terraform/FlaskDemoRepo-01234567890/demo-code.tar.gz && \
git add . && \
git commit -m "Configuring repo." && \
git push -u origin main
Switched to a new branch 'main'
drwxr-xr-x ssm-user/ssm-user 0 2022-07-13 00:47 app/
drwxr-xr-x ssm-user/ssm-user 0 2022-07-13 00:47 app/tests/
drwxr-xr-x ssm-user/ssm-user 0 2022-07-12 19:25 app/tests/lambda-tests/
-rw-r--r-- ssm-user/ssm-user 1970 2022-07-12 19:25 app/tests/lambda-tests/functional_test.py
-rw-r--r-- ssm-user/ssm-user 918 2022-07-12 19:25 app/tests/lambda-tests/functional_test.zip
-rw-r--r-- ssm-user/ssm-user 194 2022-07-13 00:47 app/tests/test.py
-rw-r--r-- ssm-user/ssm-user 1319 2022-07-13 00:47 app/app.py
-rw-r--r-- ssm-user/ssm-user 399 2022-07-12 19:25 Dockerfile
-rw-r--r-- ssm-user/ssm-user 291 2022-07-12 19:25 appspec.yaml
-rw-r--r-- ssm-user/ssm-user 957 2022-07-12 19:25 buildspec.yml
app/
app/tests/
app/tests/lambda-tests/
app/tests/lambda-tests/functional_test.py
app/tests/lambda-tests/functional_test.zip
app/tests/test.py
app/app.py
Dockerfile
appspec.yaml
buildspec.yml
[main (root-commit) 3e37158] Configuring repo.
7 files changed, 179 insertions(+)
create mode 100644 Dockerfile
create mode 100644 app/app.py
create mode 100644 app/tests/lambda-tests/functional_test.py
create mode 100644 app/tests/lambda-tests/functional_test.zip
create mode 100644 app/tests/test.py
create mode 100644 appspec.yaml
create mode 100644 buildspec.yml
Username for 'https://git-codecommit.us-east-1.amazonaws.com': awsjoe-at-01234567890
Password for 'https://awsjoe-at-01234567890@git-codecommit.us-east-1.amazonaws.com':
Enumerating objects: 12, done.
Counting objects: 100% (12/12), done.
Delta compression using up to 2 threads
Compressing objects: 100% (12/12), done.
Writing objects: 100% (12/12), 3.73 KiB | 3.73 MiB/s, done.
Total 12 (delta 0), reused 0 (delta 0), pack-reused 0
To https://git-codecommit.us-east-1.amazonaws.com/v1/repos/FlaskDemoRepo-01234567890
* [new branch] main -> main
Branch 'main' set up to track remote branch 'main' from 'origin'.
- Deploy the AWS Services:
make deploy-infra
This will result in great deal of output ending in:
Apply complete! Resources: 118 added, 1 changed, 0 destroyed.
Outputs:
aws_lb_dns_name = "ecsalb-123456789.us-east-1.elb.amazonaws.com"
- In the AWS Console open CodePipeline → Pipelines and select flask-demo-pipeline:

- Scroll down to the Deploy phase and click Details:

- Wait for the deployment to complete, it should take around 8 minutes:

- Back in your terminal, run the following command to list the Terraform outputs:
terraform output
You should see output similar to the following:
aws_lb_dns_name = "ecsalb-123456789.us-east-1.elb.amazonaws.com"
- Run the following command using the aws_lb_dns_name from the previous step to test that the application is functioning properly:
curl http://ecsalb-123456789.us-east-1.elb.amazonaws.com/
You should see output similar to the following:
Hello World!
Update the application
Now that you successfully deployed the Flask application. Test the CI / CD pipeline by making a change to the application. You now update the application and tests which triggers the pipeline to deploy the updated application.
- Change directory back to the root of the repository and run the following command to change directory to the CodeCommit repository directory:
cd terraform/FlaskDemoRepo-01234567890
- Open the app/app.py file in the text editor of your choice. Update the base_url text to “Hello Updated World!”:
import os
import boto3
from flask import Flask, jsonify, request
app = Flask(__name__)
client = boto3.client('dynamodb', region_name='us-east-1')
dynamoTableName = 'musicTable'
base_url = 'Hello Updated World!'
@app.route("/")
def hello():
return base_url
- Update the unit test to reflect the new base URL path. Open app/tests/test.py and update the file so that it looks like the following:
# test.py
from app import app
def test_base_route():
response = app.test_client().get('/')
assert response.status_code == 200
assert response.data.decode('utf-8') == 'Hello Updated World!'
- Change directory back to the
terraform/directory and update the CodeCommit repository by running the following command:
make update-flask-app
The output should look like the following:
[main cca0ab8] Updating Flask base path to Hello Updated World.
2 files changed, 2 insertions(+), 2 deletions(-)
Enumerating objects: 11, done.
Counting objects: 100% (11/11), done.
Delta compression using up to 2 threads
Compressing objects: 100% (6/6), done.
Writing objects: 100% (6/6), 619 bytes | 619.00 KiB/s, done.
Total 6 (delta 2), reused 0 (delta 0), pack-reused 0
To https://git-codecommit.us-east-1.amazonaws.com/v1/repos/FlaskDemoRepo-01234567890
3e37158..cca0ab8 main -> main
Branch 'main' set up to track remote branch 'main' from 'origin'.
- In the AWS Console open CodePipeline → Pipelines and select flask-demo-pipeline:

- Scroll down to the Deploy phase and click Details:

- Wait for the deployment to complete, it should take around 8 minutes:

- Back in your terminal, run the following command from the terraform/ directory to list the Terraform outputs:
terraform output
You should see output similar to the following:
aws_lb_dns_name = "ecsalb-01234567890.us-east-1.elb.amazonaws.com"
- Run the following command using the aws_lb_dns_name from the previous step to test that the application is functioning properly:
curl http://ecsalb-01234567890.us-east-1.elb.amazonaws.com/
You should see output similar to the following:
Hello World!
Cleanup
To delete all of the AWS infrastructure you previously deployed, run the following command from the root module directory:
make destroy
The command will result in a great deal of output. The final result should look like the following:
Destroy complete! Resources: 119 destroyed.
Conclusion
This post demonstrated how to use AWS services and open source tools to automate the deployment of a Python Flask application to the AWS Cloud. Using CodePipeline, you created a CI/CD pipeline and updated and deployed a Python Flask application. You then verified a successful pipeline deployment by testing the Flask application. Thanks for reading!