Containers
Authenticate to Amazon EKS using Google Workspace
Introduction
Amazon Elastic Kubernetes Service (Amazon EKS) makes it easy to deploy, manage, and scale containerized applications using Kubernetes. It has native support for AWS Identity and Access Management (AWS IAM) users and roles as entities that can authenticate against a cluster. Many of our customers use enterprise identity providers (IdP) like Active Directory, OKTA, Google workspace, etc., to manage identities in their organization. We often see our customers integrate the Amazon EKS cluster authentication with their enterprise IdP to use existing identities. In this post, we’ll walk through the approach to integrate Amazon EKS authentication with Google Workspace (formerly called G-suite). Amazon EKS continues to use AWS IAM for authentication for components, like the kubelet running on Amazon EKS worker nodes when using Google workspace integration as well.
Today, group claims information is not available in Google OIDC ID Token. To overcome this limitation, we use Dex to pull the group information from Google workspace. Dex is an OpenID Connect (OIDC) provider that provides connectors for external OAuth providers to obtain an identity. In this case, a Google Workspace connector will be used.
Solution overview
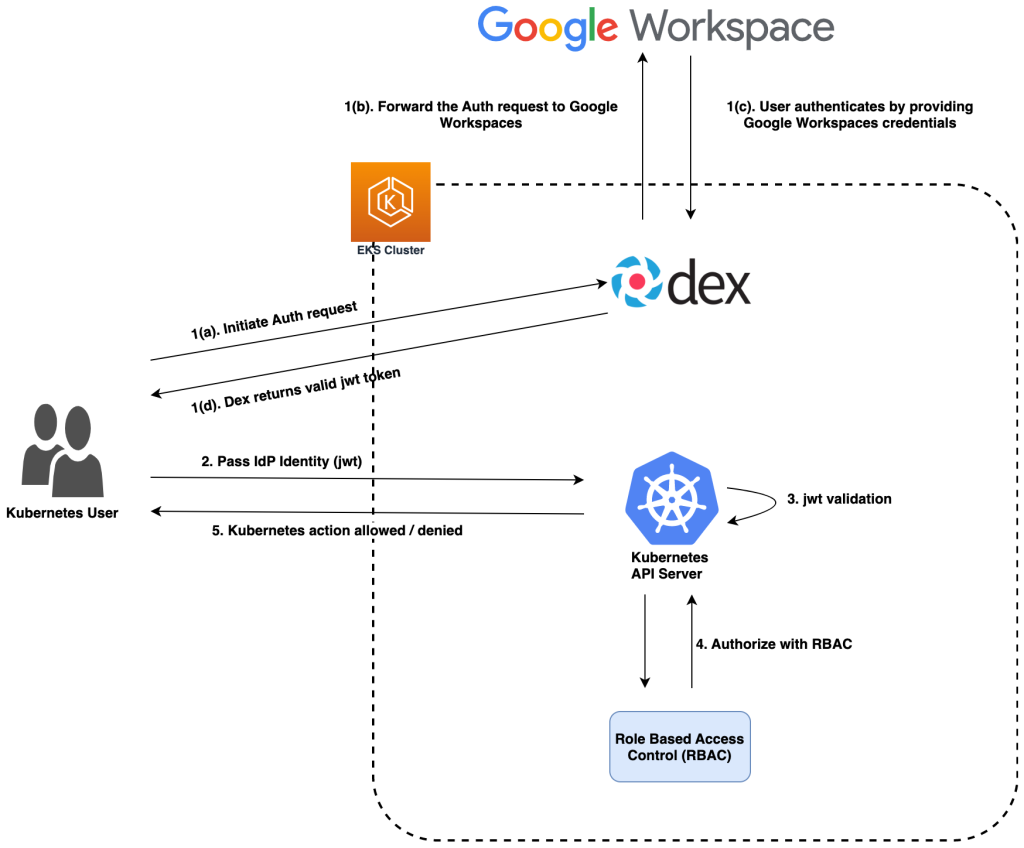
Figure 1: Solution overview
Prerequisites
- AWS Account
- Amazon EKS Cluster
- Follow the guidance in Amazon EKS documentation to create a new Amazon EKS cluster.
- Amazon EKS Cluster
- A valid Domain Name System (DNS) domain for your organization and SSL Certificate(s) imported in AWS Certificate Manager (ACM). We’ll use example.com in this walkthrough.
- Follow the instructions in this documentation to import a SSL certificate in ACM.
- SSL Certificate should be issued to dex.example.com and login.example.com. Alternatively, a wild card certificate can be used.
- Google Workspace account
- You must have administrator-level access to your organization’s Google Workspace account to create a new project, or permissions to create and configure OAuth 2.0 credentials for an existing project.
- One or more users
- In this post, we use adminuser1@example.com, readonlyuser1@example.com.
- One or more groups
- In this post, we use admins@example.com and readonlygroup@example.com
- eksctl – a simple CLI tool for creating and managing Amazon EKS clusters.
- helm – a tool that streamlines installing and managing Kubernetes applications
Walkthrough
Step 1: Create OAuth Client ID in Google Cloud Platform (GCP)
To configure Google Workspace as an identity provider in Amazon EKS, you must first configure OAuth 2.0 credentials for your Google Cloud Platform (GCP) project.
- Create a new project or open an existing one in GCP console, refer the Google documentation for creating and managing projects.
- Configure the OAuth Consent screen
- Navigate to APIs & Services → OAuth consent screen
- Choose the User type as Internal and click on Create
- In the App Registration screen
- Enter an application name, for example: EKS SSO
- Provide the User support email, developer contact information, and select Save and Continue
- Verify that the Scopes for Google APIs lists email, profile, and openid scopes as shown below. Then select Save and Continue. Only these scopes are required for single sign-on.
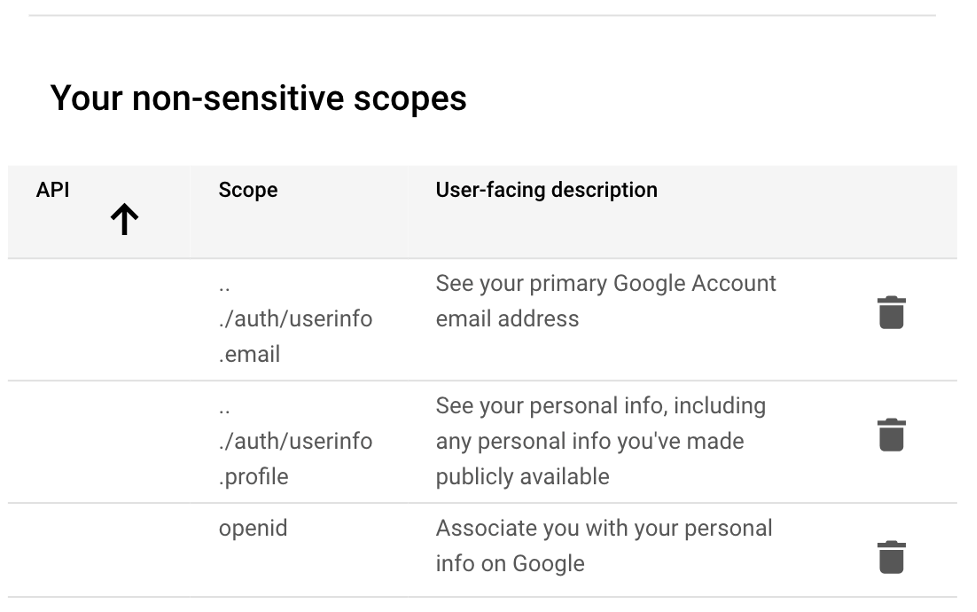
Figure 2: GCP Console – OAuth Consent
- Create the OAuth Client ID
- Navigate to APIs & Services → Credentials screen
- On the Credentials screen choose Create Credentials followed by OAuth client ID.

Figure 3: GCP Console – Create Credentials
-
- Choose Application type as Web application.
- In the Name box, enter a name for the application (e.g., EKS).
- In the Authorized redirect URIs box, enter https://dex.example.com/callback
- Select Create to view the OAuth client credentials.
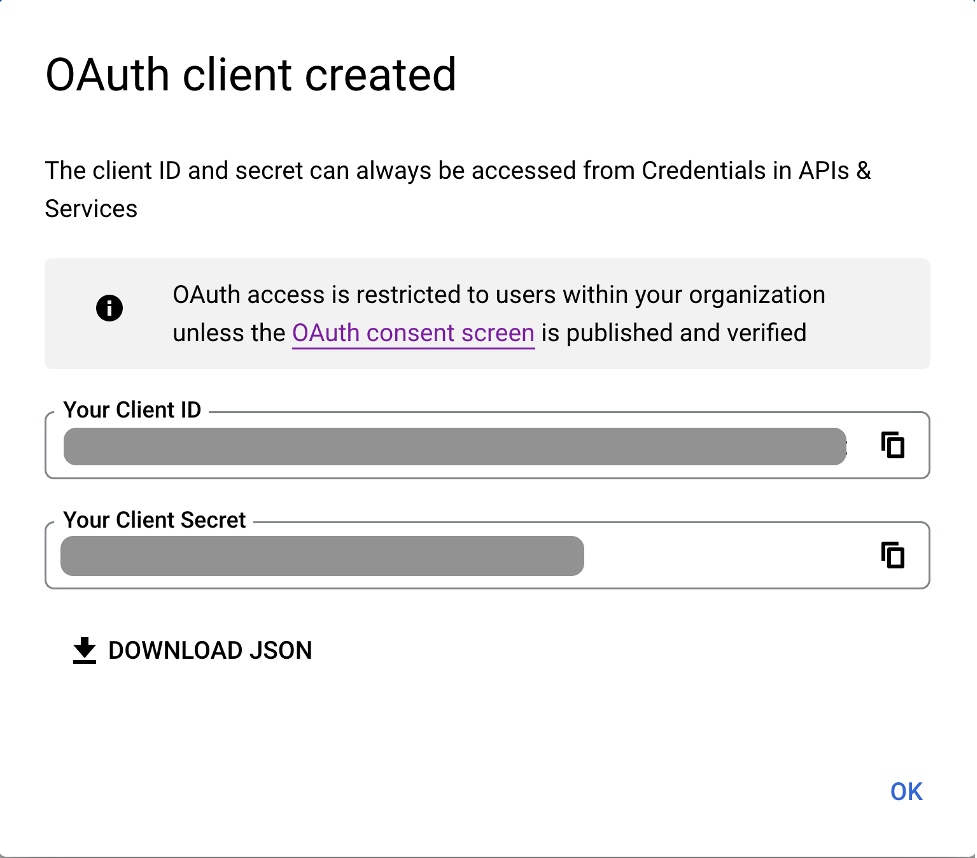
Figure 4: GCP Console – OAuth Client ID
- Download and save the OAuth Client ID and Client Secret for later use.
Step 2: Setup service account in Google
We use a Service Account to connect to the Google Directory application programming interface (API) and pull information about your user’s group membership.
- Follow Google instructions to create a service account with Domain-Wide Delegation
- When assigning API scopes to the service account, only select https://www.googleapis.com/auth/admin.directory.group.readonly scope and nothing else. If you assign any other scopes, then it won’t be able to fetch information from the API.
- Create the credentials in JSON format (googleAuth.json) and save it for later use.
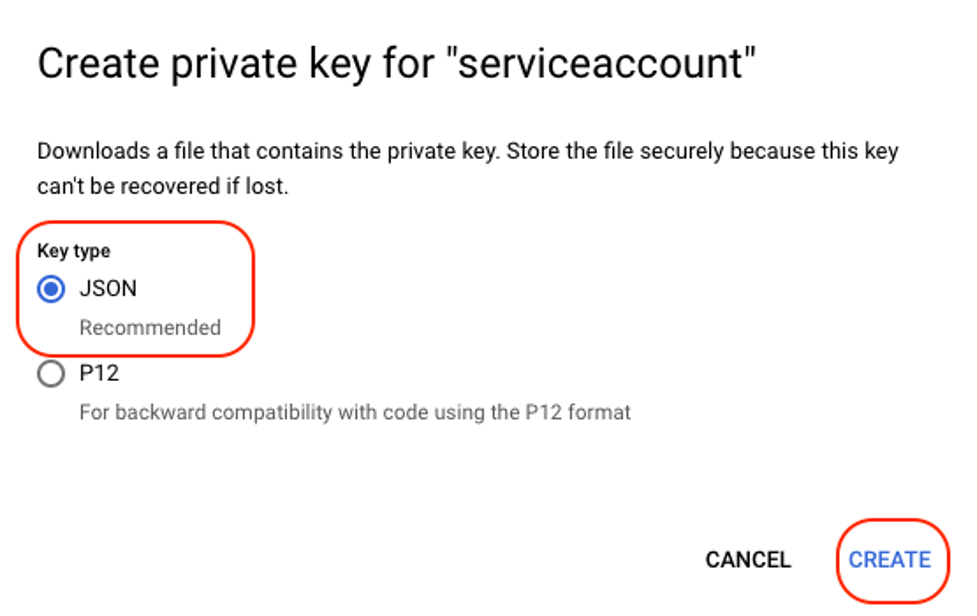
Figure 5: GCP Console – Service Account
- Enable the Admin SDK to view and manage resources like users and groups.
Step 3: Install the AWS Load Balancer controller
The AWS Load Balancer Controller manages AWS Elastic Load Balancers for a Kubernetes cluster. The controller provisions an AWS Application Load Balancer (ALB) when you create a Kubernetes Ingress object and an AWS Network Load Balancer (NLB) when you create a Kubernetes service of type LoadBalancer.
Follow the instructions from Amazon EKS documentation to install the AWS Load Balancer controller.
Step 4: Install the ExternalDNS add-on
Optionally, you can install ExternalDNS add-on to manage DNS records dynamically via Kubernetes resources in a DNS provider-agnostic way. In this walkthrough, we are using external-dns integration with Amazon Route 53 hosted zone to automatically create DNS records for the ingress hostnames.
Follow the instructions to install the external-dns add-on on Amazon EKS Cluster.
Step 5: Install and configure Dex
Add the Dex helm repository and export the environment variables with your values.
helm repo add dex https://charts.dexidp.io
helm repo update
export EKS_CLUSTER_NAME=eks-demo #replace with your EKS cluster name
export ADMIN_EMAIL=admin@example.com #replace with your admin email address
export DNS_DOMAIN=example.com #replace with your organization DNS Domain
export ACM_CERTIFICATE_ARN=<<replace with ACM Certificate ARN>>
export OAUTH_CLIENT_ID=<<replace with OAuth ClientID downloaded from Step 1>>
export OAUTH_CLIENT_SECRET=<<replace with OAuth Client secret downloaded from Step 1>>
export CLIENT_ID=random-id #Random client id used to authenticate with Dex
export CLIENT_SECRET=random-secret #Random client secret used to authenticate with Dex
Create dex-values.yaml and replace bolded text with your own values.
cat << EOF > dex-values.yaml
ingress:
  enabled: true
  className: alb
  annotations:
    alb.ingress.kubernetes.io/scheme: internet-facing
    alb.ingress.kubernetes.io/target-type: ip
    service.beta.kubernetes.io/aws-load-balancer-type: "external"
    alb.ingress.kubernetes.io/certificate-arn: $AWS_CERTIFICATE_ARN
    alb.ingress.kubernetes.io/healthcheck-path: /healthz
    alb.ingress.kubernetes.io/group.name: dex
  hosts:
  - host: dex.${DNS_DOMAIN}
    paths:
    - path: /
      pathType: Prefix
config:
  issuer: https://dex.${DNS_DOMAIN}
  storage:
    type: kubernetes
    config:
      inCluster: true
  oauth2:
    responseTypes: ["code", "token", "id_token"]
    skipApprovalScreen: true

  connectors:
  - type: google
    id: google
    name: google
    config:
      clientID: $OAUTH_CLIENT_ID
      clientSecret: $OAUTH_CLIENT_SECRET
      redirectURI: https://dex.$DNS_DOMAIN/callback
      # Google does not support the OpenID Connect groups claim and only supports fetching a user's group membership with a service account.
      # This service account requires an authentication JSON file and the email of a Google Workspace admin to impersonate:
      serviceAccountFilePath: /tmp/oidc/googleAuth.json
      adminEmail: $ADMIN_EMAIL

  staticClients:
  - id: $CLIENT_ID
    secret: $CLIENT_SECRET
    name: $EKS_CLUSTER_NAME
    redirectURIs:
    - https://login.$DNS_DOMAIN/callback
EOF
Run the below command to install the Dex helm chart:
helm install dex dex/dex --namespace dex --create-namespace --version 0.11.1 --values dex-values.yamlCreate a k8s secret with googleAuth.json downloaded in step 2.
kubectl -n dex create secret generic dex-google-groups-json --from-file=googleAuth.json=googleAuth.jsonAs specified in the dex-values.yaml above, the Dex OIDC connector expects the Google service account credentials in /tmp/oidc/ path. Let’s update the Dex k8s deployment resource to mount the dex-google-groups-json secret as a volume. Below patch file is based on the k8s deployment object.
cat << EOF > dex-patch.yaml
spec:
  template:
    spec:
      containers:
      - name: dex
        volumeMounts:
        - mountPath: /tmp/oidc
          name: google-json
          readOnly: true
      volumes:
      - name: google-json
        secret:
          defaultMode: 420
          secretName: dex-google-groups-json
EOF

kubectl patch deployment dex -n dex --patch-file dex-patch.yaml
Verify the dex deployment is ready before proceeding to the next step
Step 6: Install and configure dex-k8s-authenticator
The dex-k8s-authenticator is a helper web-app that talks to one or more Dex Identity services to generate kubectl commands for creating and modifying a kubeconfig. Run the below commands to add the dex-k8s-authenticator helm repository:
helm repo add skm https://charts.sagikazarmark.dev
helm repo update
export EKS_API_ENDPOINT=$(aws eks describe-cluster \
--name $EKS_CLUSTER_NAME \
--query 'cluster.endpoint' \
--output text)
Fetch the client certificate data of the Amazon EKS cluster:
aws eks describe-cluster \
--name $EKS_CLUSTER_NAME \
--query 'cluster.certificateAuthority' \
--output text | base64 -d
The output will look similar to the following:
Create a values file for the dex-k8s-authenticator and replace bolded text with your own values.
cat << EOF > dex-k8s-authenticator.yaml
config:
clusters:
- name: $EKS_CLUSTER_NAME
short_description: $EKS_CLUSTER_NAME
description: $EKS_CLUSTER_NAME
issuer: https://dex.$DNS_DOMAIN
client_id: $CLIENT_ID
client_secret: $CLIENT_SECRET
redirect_uri: https://login.$DNS_DOMAIN/callback
k8s_master_uri: $EKS_API_ENDPOINT
k8s_ca_pem: |
-----BEGIN CERTIFICATE-----
YOUR CLIENT CERTIFICATE DATA
-----END CERTIFICATE-----
ingress:
enabled: true
className: alb
annotations:
alb.ingress.kubernetes.io/scheme: internet-facing
alb.ingress.kubernetes.io/target-type: ip
service.beta.kubernetes.io/aws-load-balancer-type: "external"
alb.ingress.kubernetes.io/certificate-arn: $AWS_CERTIFICATE_ARN
alb.ingress.kubernetes.io/healthcheck-path: /healthz
alb.ingress.kubernetes.io/group.name: dex
hosts:
- host: login.$DNS_DOMAIN
paths:
- path: /
pathType: Prefix
EOF
Run the below command to install the dex-k8s-authenticator helm chart:
helm install dex-k8s-authenticator \
skm/dex-k8s-authenticator \
--namespace dex \
--version 0.0.2 \
--values dex-k8s-authenticator.yaml
Step 7: Associate OIDC identity provider for the Amazon EKS cluster
Run the below commands to associate an OIDC Provider configuration with the Amazon EKS cluster:
export ISSUER_URL=https://dex.$DNS_DOMAIN

aws eks associate-identity-provider-config \
--cluster-name $EKS_CLUSTER_NAME\
--oidc identityProviderConfigName="dex-idp",issuerUrl=$ISSUER_URL,clientId=$CLIENT_ID,usernameClaim=email,groupsClaim=groups
Wait until the provider status is ACTIVE and proceed to the next step. You can utilize either AWS console or below command to check the status.
aws eks describe-identity-provider-config \
--cluster-name $EKS_CLUSTER_NAME \
--identity-provider-config name="dex-idp",type="oidc"
--query 'identityProviderConfig.oidc.status' --output text
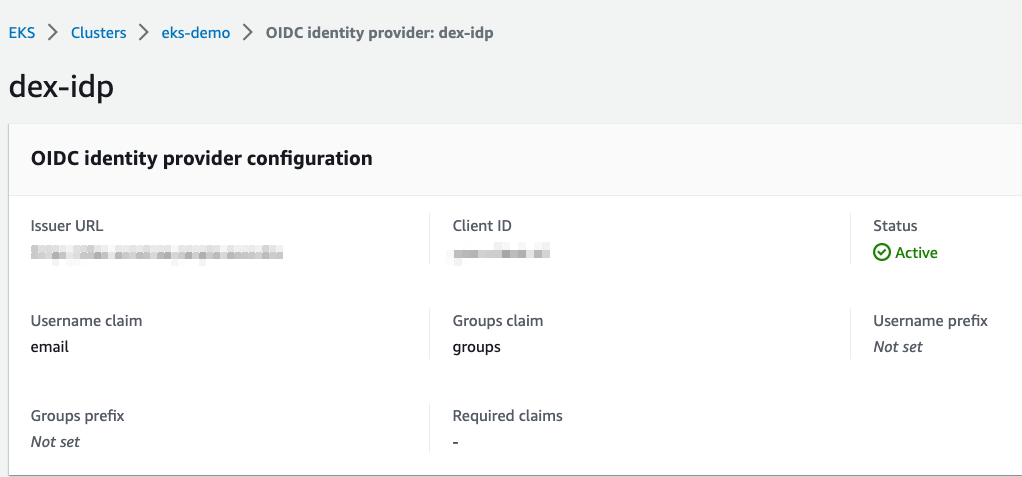
Figure 6: AWS Console – OIDC Identity Provider
Step 8: Add DNS records in DNS server
Now add necessary CNAME records to access Dex and Dex-k8s-authenticator applications using your domain name. The DNS records corresponds to the Fully qualified domain name (FQDN) of the ALB that was provisioned when you installed the Dex controller. In this walkthrough, we used external-dns (Step 4) integration with Route 53 to automatically create these DNS records in Route 53 hosted zone as shown below.

Figure 7: AWS Console – Route 53 Hosted zone
Step 9: Create roles and bindings for google users and groups in Amazon EKS
Now that the EKS Cluster is associated with the Dex OIDC and Google Workspace authentication, let’s configure the users and groups with appropriate Role-based access control (RBAC) permissions in the cluster. For this, we create two kubernetes role bindings, one with elevated permissions (cluster-admin) and the other with read only (view) permissions and associate them with Google Workspace groups. Replace the bolded text with your own values.
kubectl create clusterrolebinding eksadmin-google-binding \
--clusterrole cluster-admin \
--group admins@example.com

kubectl create clusterrolebinding eksreadonly-google-binding \
--clusterrole view \
--group readonlygroup@example.com
Step 10: Log in
To test the access, open web browser and enter the URL for the dex-k8s-authenticator web application (e.g., https://login.example.com/). You’ll be prompted to enter your Google Workspace credentials.
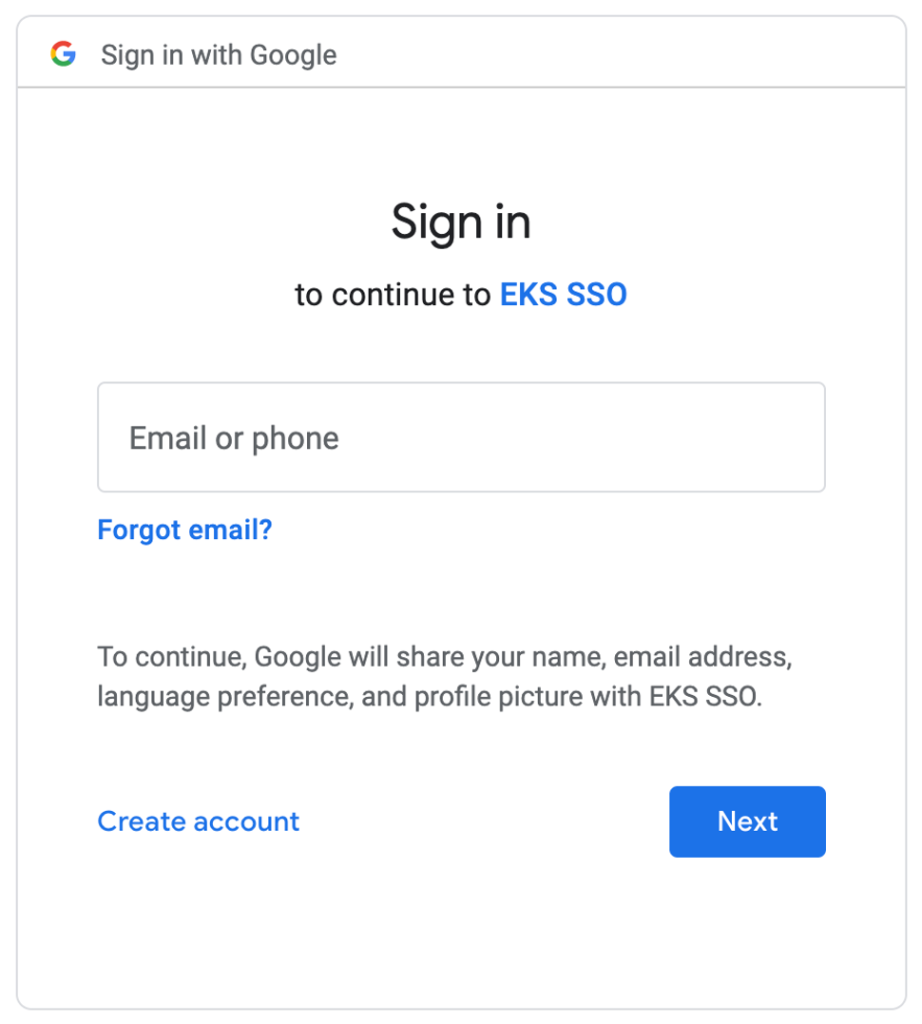
Figure 8: Google Workspace login
Proceed by entering email and password to authenticate with Google Workspace IdP. After successful authentication, you’ll be presented with instructions to configure the kubectl.
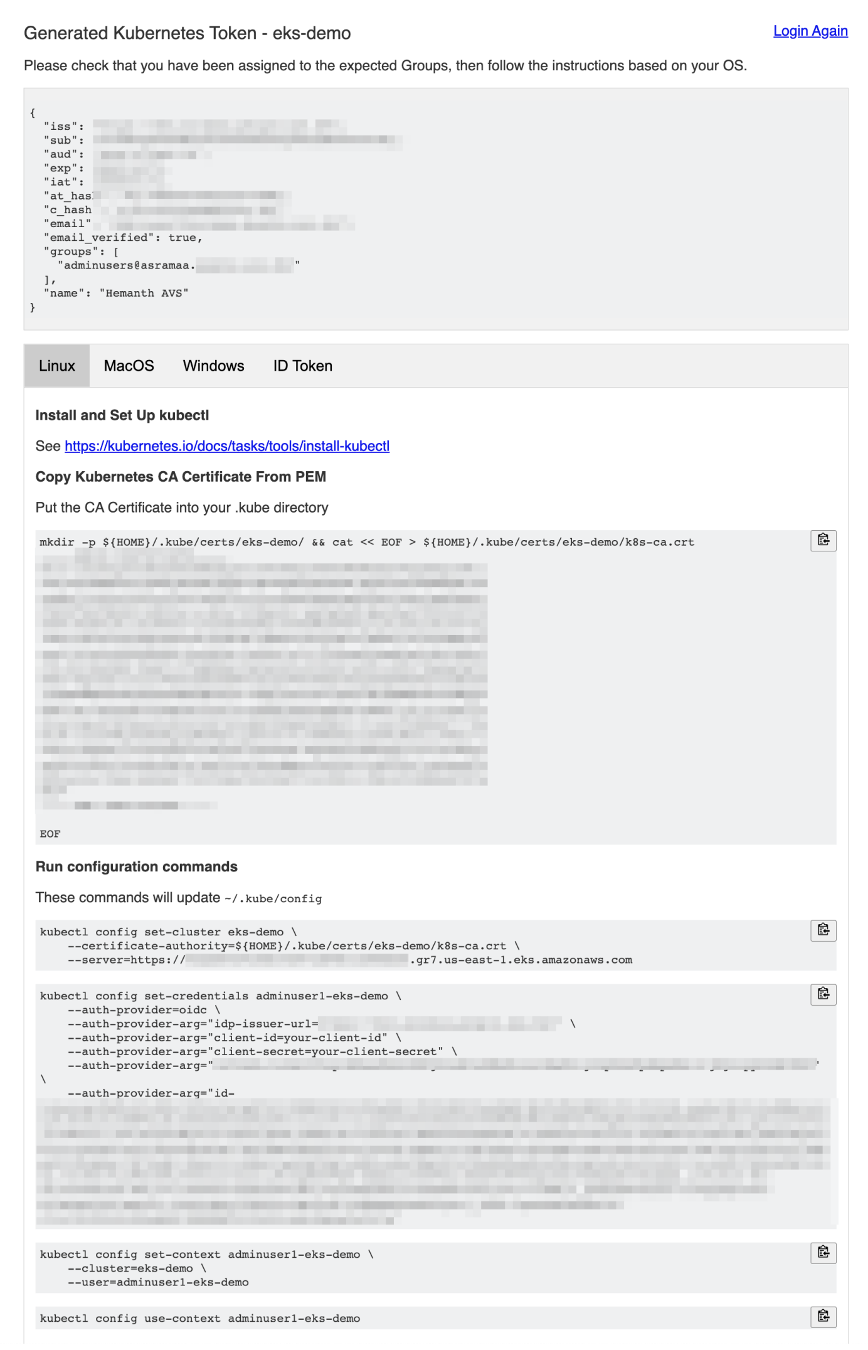
Figure 9: kubectl instructions
Step 11: Test the access
Run the below command to verify if you can create kubernetes objects like Deployment.
Repeat Steps 10 and 11 with a read only group user. You’ll notice the read only operations succeed, while create and delete fail.
This output demonstrates the ability to use Google Workspace groups along with users to assign RBAC permissions in the EKS cluster.
Clean up
To avoid incurring any additional costs, destroy all the infrastructure that you provisioned in relation to the solution described in this post.
Delete Dex and dex-k8s-authenticator applications along with ALB
helm uninstall dex-k8s-authenticator
helm uninstall dex
Delete the Amazon EKS cluster
eksctl delete cluster --name=${EKS_CLUSTER_NAME}Delete the OAuth Client
Open the GCP Console:
- Navigate to APIs & Services → Credentials screen
- Select the OAuth client ID → EKS from the list and click on Delete OAuth Client button
Delete the Service Account
Open the GCP Console:
- Navigate to IAM & Admin → Service Accounts screen
- Select the Service account from the list and click on Delete button
Conclusion
In this post, we showed how to integrate Amazon EKS cluster authentication with Google workspace. Because group claims information isn’t available in the Google OIDC ID Token, we used Dex to overcome this limitation. Using the Dex OIDC connector, we are able to pull google group claims and assigned RBAC permissions using k8s native constructs (e.g., Roles, RoleBindings, etc.) for authorization.
Call to action
Learn more about supported container solutions, customer case studies, and additional resources at Containers at AWS.