AWS Storage Blog
Automate backups for AWS Amplify GraphQL backends with AWS Backup
Modern cloud based mobile and web applications require a rich set of functional features as well as non-functional features to support operations, for example database backups and restore jobs. IT leaders and developers are looking for simplified ways of building these cloud based applications and adding features to them. Organizations that prioritize agility when building web and mobile applications are using AWS Amplify and AWS AppSync to build modern NoSQL applications without having to write database access code or manage infrastructure. These teams, especially in regulated industries like financial services and health care, require centralized protection of their data.
This post will help you integrate an automated backup strategy into your Amplify application using GraphQL. For organizations new to AWS or looking to accelerate delivery with a focus on business features and application logic rather than defining cloud infrastructure, you can use Amplify to create your application. To protect your operational data, you can use AWS Backup which provides a fully managed and centralized backup service that makes it easy to protect application data to meet failure management, regulatory, and compliance requirements.
Amplify makes it easy to deploy scalable and secure full stack web and mobile applications with AWS. When you build your Amplify web application with AppSync for APIs and Amazon Cognito for authentication and authorization, you get secure GraphQL service endpoints backed by Amazon DynamoDB tables without hand-authoring data access codes or defining infrastructure. In this post, I explain how to implement failure management with AWS Backup, seamlessly using Infrastructure-as-Code (IaC) with the built-in continuous integration/continuous development (CI/CD) capabilities of Amplify.
Solution overview
In this solution, you’ll create an Amplify application using Vue 3 and populate the application code with a prebuilt sample application cloned from GitHub. Next you’ll add authentication to the application with Amazon Cognito to secure logins to your application as well as secure access to the GraphQL queries you’ll add with AWS AppSync that read or modify data from DynamoDB. Once you have your application developed, you’ll add an AWS Backup strategy using an Amplify custom resource with the AWS Cloud Development Kit (CDK). This strategy applies dynamic backup plan rules to store snapshots of DynamoDB tables into a backup vault secured with a vault policy and encrypted restore points using a customer managed AWS Key Management Service (KMS) encryption key. This post guides you through building a foundational cloud native AWS Backup architecture that you can customize with cross region or immutable backups by following Data Protection Reference Architectures with AWS Backup.
Implementing the solution
The following diagram shows an overview of what you’ll be building in the following walkthrough. The Amplify CLI will enable you to quickly add each feature.
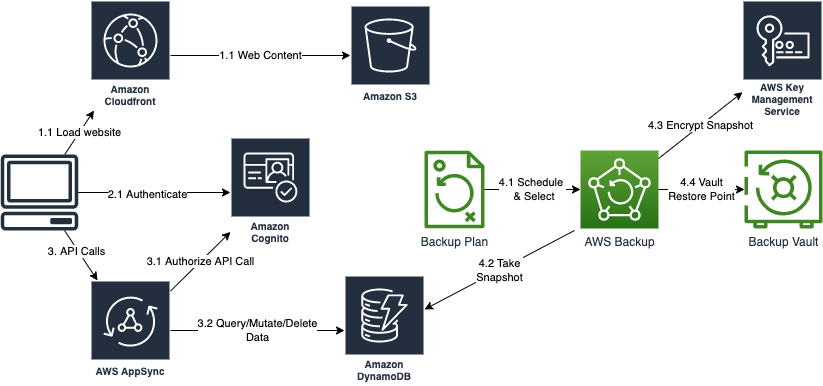
Prerequisites
The deployment steps assume that you have:
- Access to an AWS account and permissions to create AWS Identity and Access Management (IAM) roles and policies
- Knowledge of JavaScript programming for web development
- Familiarity with Amplify and AWS AppSync or GraphQL and how to setup your environment
- Familiarity with DynamoDB or NoSQL
- Familiarity with AWS Backup
- Familiarity with AWS CDK
- Familiarity working within a terminal of your OS. This solution was tested on MacOS but will also work on Linux or Windows
Step 1: Configure your Amplify environment
First, you must clone the repository for this project, move into the project directory and initialize Amplify after you’ve installed the required Amplify and npm CLI tooling. Run the following commands to get started:
git clone https://github.com/aws-samples/aws-backup-amplify-appsync.git
cd aws-backup-amplify-appsync
Next, install the required project dependencies by running npm install. While your dependencies are installing, you may want to explore the project code. The amplify folder is where Amplify will build out configurations for your backend resources. The graphql-schema-and-cdk folder contains pre-coded files to simplify deploying this solution in your environment (I will explain how you can use these later). The public folder contains CSS and images, and the src folder contains your Vue application code.
Step 2: Initialize the Amplify application
Before you initialize your backend, Amplify will need access to your account. I advise using an existing profile with the required policies or a new IAM Role configured with a profile that you can assume with your organization’s preferred login method. Make sure that the profile or role that you use has the managed policies AdministratorAccess-Amplify, AWSKeyManagementServicePowerUser, and AWSBackupFullAccess. See the project setup section of the README in GitHub for more details.
Now you can initialize your Amplify environment by running amplify init in your terminal. Answer the following questions when prompted:
- Enter a name for the project awsbackupamplifyapps
- Initialize the project with the above configuration? Yes
- Select the authentication method you want to use: (Use arrow keys) AWS profile
- Please choose the profile you want to use (Use arrow keys) Select your profile with the managed policies listed above
Step 3: Add Authentication and API resources
You are now ready to add authentication with Amazon Cognito and add an AppSync API. Note that the code in this repo for the API is already built into the Vue application. Therefore, you must add these resources before running your application to avoid errors where your code is referring to cloud resources before they’re created.
Authentication with Amazon Cognito
In your terminal, run amplify add auth and answer the prompts as defined in the following steps. We’ll go through the manual auth configuration to remain secure with no anonymous access. Most features are disabled or left at default values for brevity, and you may need to provide specific options depending on your implementation.
- Do you want to use the default authentication and security configuration? (Use arrow keys): Default configuration
- How do you want users to be able to sign in? (Use arrow keys) Username
- Do you want to configure advanced settings? (Use arrow keys) No, I am done
GraphQL API with AWS AppSync
Run amplify add api and use the following inputs at the prompts.
- Select from one of the following mentioned services: (Use arrow keys) GraphQL
- Here is the GraphQL API that we will create. Select a setting to edit or continue: Authorization modes: API key (default, expiration time: 7 days from now)
- Choose the default authorization type for the API: Amazon Cognito User Pool
- Configure additional auth types? N
- Continue
- Choose a schema template: (Use arrow keys) Blank Schema
- Do you want to edit the schema now? N
Finally, update your schema with a predefined schema that I’ve supplied for this application. Run the following block of commands into your terminal to copy the prepared schema.graphql file into your project and create APIs in the cloud.
cp graphql-schema-and-cdk/schema.graphql
amplify/backend/api/awsbackupamplifyapps/schema.graphql
amplify push
The Amazon Cognito user pool that you’re creating will enable self-sign-up. It’s important to consider your use case to determine if you would apply a more secure site by federating to a corporate identity provider or assign an admin over the Amazon Cognito user pool to govern authentication privileges.
During the push command, Amplify will ask you some questions about your API, and you can answer the prompts as follows:
- Do you want to generate code for your newly created GraphQL API Yes
- Choose the code generation language target (Use arrow keys) JavaScript
- Enter the file name pattern of graphql queries, mutations and subscriptions: src/graphql/**/*.js
- Do you want to generate/update all possible GraphQL operations – queries, mutations and subscriptions: Yes
- Enter maximum statement depth [increase from default if your schema is deeply nested]: 4
Start your local application and register a user
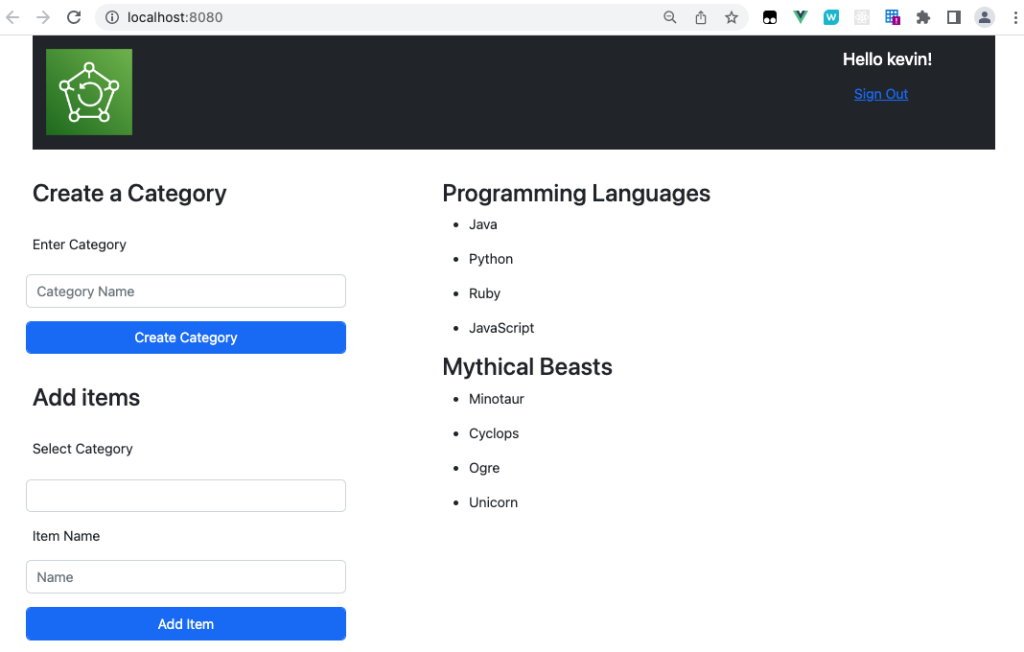
After the push command completes, run npm run serve in your terminal. Once the application is up and running, navigate your browser to http://localhost:8080/. You’ll be presented with an Amazon Cognito login prompt for your application. Navigate to the Create a new user, confirm it, and login.
Now you can create some data in your DynamoDB tables over GraphQL APIs. I setup a category for “Mythical Beasts” and added the items “Minotaur”, “Cyclops”, “Ogre”, “Unicorn”, and another category for “Programming Languages”, and then added the items “Java”, “Python”, “Ruby”, and “JavaScript”
At this point you’ve leveraged Amplify and AWS AppSync to quickly create a secure and scalable application in the AWS cloud. However, without backups configured, this application lacks the reliability failure management tenant of the AWS Well Architected Framework (AWS WAF). In the next step, you’ll use Amplify Custom Resources with AWS CDK to configure AWS Backup.
Step 4: Adding AWS Backups
Stop your web server if it’s still running, then in your terminal enter amplify add custom and choose AWS CDK. Enter the custom resource name backups. Amplify will ask if you want to edit the stack now, type N and press Enter. Finally, you’ll update your AWS CDK stack with the one that I’ve already prepared and then push our changes to the cloud by entering the following commands in your terminal:
cp graphql-schema-and-cdk/cdk-stack.ts amplify/backend/custom/backups/cdk-
stack.ts
cp graphql-schema-and-cdk/package.json
amplify/backend/custom/backups/package.json
amplify push
You’ve successfully enabled backups for your Vue application built with Amplify, GraphQL, and DynamoDB. You can leave this application running overnight to see the daily backups show up in your AWS Backup Vault.
If you review the cdk-stack.ts file, then you’ll see the resources defined to enable foundational backups for the DynamoDB tables created by your AWS AppSync APIs including:
- An AWS KMS customer managed key.
- A backup plan including
a. Three backup plan rules including daily, weekly, and monthly. You can review the AWS CDK documentation for BackupPlanRule to see the retention and cold storage settings of these plan rules.
b. A backup vault configured with your AWS KMS key and a policy restricting recovery point deletion to an IAM user named BackupAdmin1. You can configure this principal according to your organization and project requirements.
c. A selection currently targeting any resources supported by AWS Backup including the Amplify resource tag user:Stack with a value matching your Amplify environment name. Because all your Amplify created resources are tagged, your DynamoDB tables will be picked up by your backup plan selection rule.
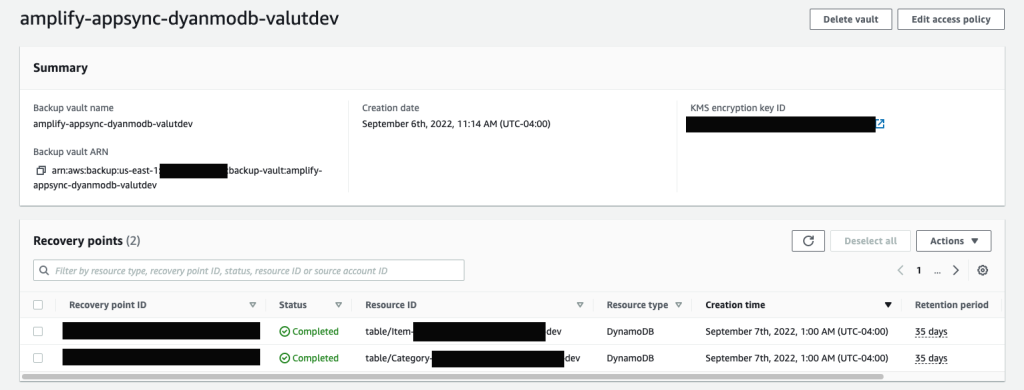
If you leave this application running for at least one day, then you’ll begin to see restore points as shown in the following screenshot. You can also choose to run amplify add hosting and choose Amplify Hosting followed by amplify push in your terminal to deploy your web UI to Amazon S3 and CloudFront so that you can access your application over the internet.
Cleaning up
To avoid accruing costs associated with this solution architecture, you can remove your Amplify application and all associated resources by running amplify delete at your terminal. Note that the AWS Backup vault and restore points won’t be deleted automatically. Therefore, you must delete those first manually if you’d like to remove them. Per your vault policy, you must do this with the principal created by your AWS CDK custom resource. Using the console, switch roles to the BackupAdminRole, then proceed to delete any restore points and your vault if you no longer need them.
Conclusion
In this post, we demonstrated how you can easily build a modern full stack cloud based application with an automated backup solution to meet your data protection needs. We worked through a foundational AWS Backup strategy defined as IaC with the AWS CDK that you can include in your Amplify CI/CD lifecycle. This post provides a solution to help you achieve your organizations resiliency posture with an AWS Well-Architected (WA) failure management strategy that uses AWS Backups to provide backup restore points for your application database.
To learn more about AWS Backup, start building in the console or refer to the technical documentation. Thank you for reading this blog post. If you have any questions or feedback about this post, leave a comment in the comments section.