Containers
Eliminate Kubernetes node scaling lag with pod priority and over-provisioning
Introduction
In Kubernetes, the Data Plane consists of two layers of scaling: a pod layer and a worker node layer. The pods can be autoscaled using Horizontal Pod Autoscaler (HPA) or Vertical Pod Autoscaler. Nodes can be autoscaled using Cluster Autoscaler (CA) or Karpenter. If worker nodes are running at full capacity and new pods are still being added, then the new worker nodes are added to the Data Plane so that pending pods can be scheduled on these newly created nodes. However, provisioning new nodes and adding them to the cluster adds lag time (approximately 1–2 minutes) to the scaling process. This lag can be minimized or eliminated by over‑provisioning the worker nodes.
In this post, we show you how to over-provision the worker nodes using dummy pods. The dummy pods contain a pause container that is scheduled by the kube-scheduler according to pod specifications’ placements and CPU/memory. The pause container then waits for the termination signals, which come if Kubernetes needs to pre-empt its capacity for our higher priority workload. The real workload’s pods have higher priority, whereas dummy pods have the least priority. So, when a real workload’s pods are created, the dummy pods are evicted by kube-scheduler from the worker nodes, and then schedule the real workload’s pods on these nodes. As dummy pods go into the pending state, more worker nodes are added by Karpenter to schedule these pending dummy pods. Thus, the lag caused by worker nodes’ start up time can be eliminated or minimized using dummy pods.
The number of dummy pods to be over-provisioned is based on the trade-offs of performance required for scaling of the worker nodes and the cost of running the dummy pods. A simple approach to achieve over-provisioning is by creating the deployment of pod that has the pause container, and setting the replica count to a static value. However, as a cluster grows (e.g., to hundreds, or thousands of nodes), having static replica count for over-provisioning may not be effective. To autoscale the size of over-provisioning to complement the size of the cluster, we can use the tools available in the Kubernetes ecosystem. One such tool is Horizontal cluster-proportional-autoscaler container. It resizes the number of replicas of over-provisioning application as per number of worker nodes and cores (i.e., vCPUs) of the cluster.
Workload that is latency sensitive and/or has spikes in traffic can use this solution. Please note that this solution is applicable to Amazon Elastic Kubernetes Service (Amazon EKS) on Amazon Elastic Compute Cloud (Amazon EC2), but isn’t applicable to Amazon EKS on AWS Fargate because AWS Fargate scales underlying worker nodes and isn’t visible to customer.
| Time to read | 15 minutes |
| Time to complete | 60 minutes |
| Cost to complete (estimated) | Approx. $40 (at publication time) for region us-west-2 |
| Learning level | Expert (400) |
| Services used |
Solution overview

- Initially, there are two services running on Amazon EKS. High priority Nginx service and low priority dummy service. The solution starts with only one replica of each of these services (i.e., Nginx-1 pod and Dummy-1 pod, respectively). Each of these pods is running on a separate node. The HPA is enabled for high priority Nginx service. Also, the Cluster Autoscaler or Karpenter is enabled for autoscaling of the worker nodes.
The priority of Nginx service is higher, whereas the priority of dummy service is lower.
- As load increases on the Nginx service, HPA adds a new high priority pod (Nginx‑2), which is initially in pending state.
- Since, the Nginx-2 pod has higher priority and it’s in the pending state, the kube‑scheduler evicts the dummy service pod (i.e., Dummy-1) to make the room for Nginx-2 pod.
- Then, the kube-scheduler schedules the high priority pod Nginx-2 on the node from which the dummy pod was evicted.
- The dummy service pod goes in pending state. So, the Cluster Autoscaler or Karpenter adds an additional node (Node 3) to the cluster.
- As soon as new node (Node 3) is ready, the kube-scheduler places the pending dummy pod (Dummy-1) on it.
Prerequisites
The prerequisites for this walkthrough are provided in the following list:
- An AWS account
- Permission to create AWS resources (e.g., IAM Roles, IAM policies, Amazon EC2 instances, AWS Cloud9, and Amazon EKS clusters)
- Basic knowledge of Kubernetes and Linux shell commands
Walkthrough
This solution consists of the following steps that create and configure all the necessary resources. It uses Karpenter Autoscaler; however, you can use the Cluster Autoscaler (CA) as well.
- Step 1 – Create Amazon EKS cluster with Karpenter Autoscaler
- Step 2 – Create Provisioner with t3.small on-demand instance type
- Step 3 – Create high and low priority classes
- Step 4 – Deploy high priority sample application
- Step 5 – Deploy low priority dummy (over-provisioning) application
- Step 6 – Test the scaling
- Step 7 – Deploy Horizontal cluster-proportional-autoscaler container
- Step 8 – Test the scaling using proportional autoscaler
- Step 9 – Clean up
Step 1 – Create Amazon EKS cluster with Karpenter Autoscaler
In this step, we’ll create an Amazon EKS cluster with Karpenter Autoscaler. We’ll use the instructions here to create a cluster.
- Choose Get Started on the landing page, which takes you to the documentation
- Expand the Getting Started menu in left pane
- Choose Getting Started with eksctl in left pane
- Then, follow the instructions in right pane through Install Karpenter Helm Chart and pay attention to the following points:
- In Create a cluster Step, use “Example 1: Create basic cluster”.
- You can skip the step “Create the EC2 Spot Service Linked Role” because we’ll use the on-demand instances for simplicity in this post.
Step 2 – Create Provisioner with t3.small on-demand instance type
To simplify the demonstration, we’ll use on-demand instances and restrict the type and size of node to t3.small.
Step 3 – Create high and low priority classes
Step 4 – Deploy the high priority sample application
Deploy Sample Application named nginx-app. Please note that priorityClassName is high-priority in the following object definition.
Step 5 – Deploy the low priority dummy (over-provisioning) application
Deploy the dummy Application (i.e., dummy-app). Please note that priorityClassName is low-priority in the following object definition.
After completing the previous steps, you’ll see one replica running for each of the nginx and dummy deployments. Each replica runs on a separate t3.small node, as shown in the following screenshot.

Step 6 – Test the scaling
Watch the pods in a separate terminal window.

Also, watch the nodes managed by Karpenter in a separate terminal window.

Now, scale the nginx deployment from one replica to two replicas. Please note that for demonstration purposes, we’re manually scaling the replica of the nginx-app. In reality, you can use HPA, which automatically increases or decreases the number of replicas to match the demand.
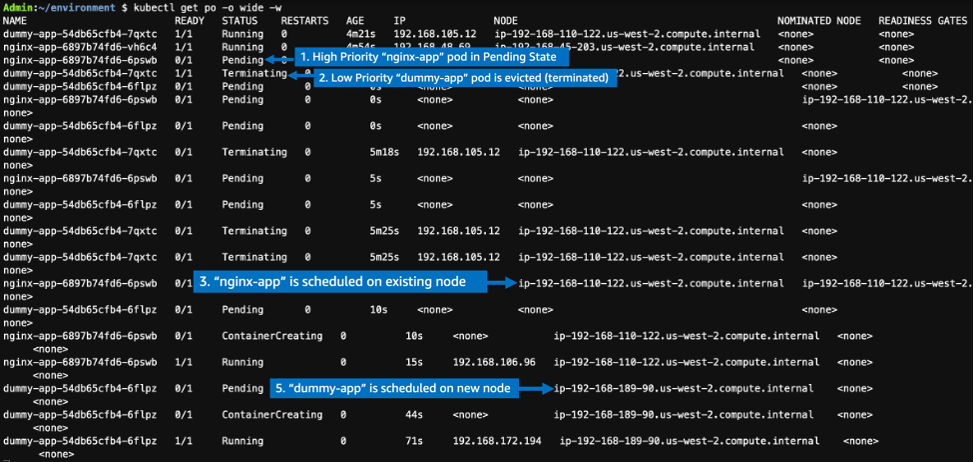
The following is the reference screenshot of the terminal where the pods are viewed:
The following is the reference screenshot of the terminal where the nodes created by Karpenter are viewed:

The expected results are as follows:
- As nginx-app is scaled from one replica to two replicas, one additional pod is created. Initially, this pod is in pending state.
- Since the newly created nginx-app pod is in the pending state and it has higher priority, the existing running lower priority pod (i.e., dummy-app) is evicted from its node to make room for nginx-app pod.
- The newly created nginx-app pod is placed on the node from which dummy-app pod was evicted.
- Since the dummy-app pod is in the pending state and there is no node to schedule it, the Karpenter adds another node.
- Once the newly added node is ready, dummy-app pod is scheduled onto newly added node.
Thus, the new higher priority nginx-app pod doesn’t wait for node to be provisioned and starts as soon as the lower priority dummy-app pod is evicted. Moreover, the evicted dummy-app pod re-runs as soon as Karpenter adds new node for it.
Step 7 – Deploy the Horizontal cluster-proportional-autoscaler container application
Now, we’ll deploy the autoscaler, which autoscales the dummy application proportionally to the cluster size.
We ‘ll use image registry.k8s.io/cpa/cluster-proportional-autoscaler:1.8.5. For details about this image, please refer to Kubernetes Cluster Proportional Autoscaler Container.
As per our configuration:
- The autoscaler watches the nodes in cluster with the label sh/initialized=true and sets the replica count of dummy application as one count per four nodes or per eight cores, whichever is greater.
- The autoscaler has priority of system-cluster-critical and is placed on one of the initial nodes created as part of cluster in kube-system namespace.
Step 8 – Test the scaling using proportional autoscaler
View the pods in a separate terminal window:

Also, watch the nodes in a separate terminal window

Initially, two replicas of nginx-app and one replica of dummy-app are running. Each replica is running on a separate node provisioned by Karpenter. Thus, three nodes of t3.small with label karpenter.sh/initialized=true are running. The total cores of these three nodes are six. As per proportional autoscaler’s formula, the replica count of dummy (i.e, over-provisioning) app should be is one, and no change is made by autoscaler in the replica count.
Now, scale the nginx app to four replicas. Please note we’re manually scaling the replica for nginx-app. In reality, you can use HPA.
The expected results are as follows:
- As nginx-app is scaled to four replicas, two more pods are created for it. Initially, these pods are in pending state.
- Since the newly created nginx-app pods have higher priority and are in pending state, the existing running pod (i.e., dummy-app) is evicted from its node to make room for pending nginx-app pods.
- One of the newly created nginx-app pod is placed on to the node from which dummy-app pod was evicted.
- Since the newly created nginx-app pod and evicted dummy-app pod are in pending state and there are no nodes to schedule them, Karpenter adds two more nodes to schedule these pending pods.
- As newly added nodes are ready, the nginx-app pod and dummy-app pod are scheduled in that order by kube-scheduler.
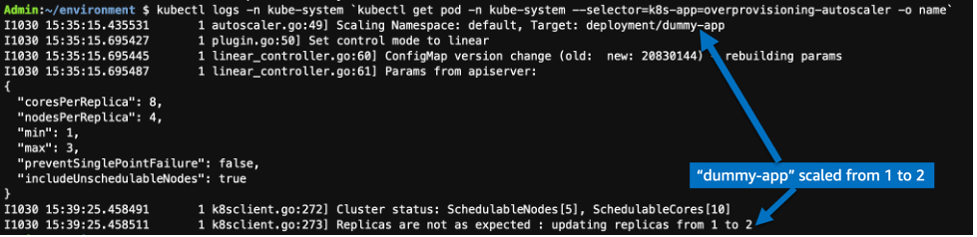
- Now the cluster has five nodes with label sh/initialized=true (i.e., four nodes for four replicas of nginx-app and one node for one replica of dummy-app). The total number of cores for these five nodes is 10. As per the proportional autoscaler’s formula, the desired replica count of dummy (over-provisioning) app is two now.
- So, the autoscaler proportionally increases the replica count of the dummy-app (over-provisioning) from one to two. Thus, one more pod is created for the dummy-app.
- As the newly created pod of the dummy-app is in the pending state, one more node is added by Karpenter and this pod is placed onto it.
- Now, the cluster has six nodes with the label sh/initialized=true (i.e., four nodes for four replicas of nginx-app and two nodes for two replicas of dummy-app). Thus, the size of over-provisioning has proportionally increased as cluster has grown.
Use the following command to see the logs of proportional autoscaler. The screenshot of proportional autoscaler’s log shows that as soon as it detected the change in number of nodes or cores, it scaled the replica of dummy-app (over-provisioning) as per the defined proportion.
The following screenshot shows the final state of the pods and nodes. It has four replicas of nginx-app and two replicas of dummy-app. It has 6 nodes with label karpenter.sh/initialized=true. Each pod of the nginx-app and dummy-app is placed on a separate node.

Cleaning up
Follow the instructions below to remove the demonstration infrastructure from your account.
- Delete the deployments & related objects using commands:
- Uninstall Karpenter and delete AWS IAM roles, policies, AWS CloudFormation stack, the Amazon EKS cluster using the Cleanup instructions found here:
- Choose Get Started in landing page ,which takes you to the documentation
- Expand the Getting Started menu in left pane
- Choose Getting Started with eksctl in left pane
- In right pane, scroll down to the Cleanup section and follow the instructions.
Conclusion
In this post, we showed you how to implement high performance scaling. You can use this technique on applicable workloads to quickly scale your service.
In this post, we saw how to use pod priority and dummy pods that have a pause container to eliminate or minimize the time required for provisioning the worker nodes during scaling. The number of dummy pods to be over-provisioned is based on the trade-offs of performance required for scaling of the worker nodes and the cost of running dummy pods.