AWS Storage Blog
Scaling container workloads with shared storage for Red Hat OpenShift Service on AWS
Kubernetes is a popular choice among many developers for application deployments, and many of these deployments can benefit from a persistent, shared storage layer. Red Hat OpenShift Service on AWS (ROSA) is a managed OpenShift integration on AWS developed by Red Hat and jointly supported by AWS and Red Hat. ROSA clusters typically store data on locally-attached Amazon Elastic Block Store (EBS) volumes; however, some customers need the underlying data to be persistent and shared across multiple containers, including containers deployed across multiple Availability Zones (AZs). These customers are looking for a storage solution that scales automatically and provides a consistent interface to run workloads across on-prem and cloud environments.
ROSA offers an integration with Amazon FSx for NetApp ONTAP – a scalable, fully managed shared storage service built on NetApp’s ONTAP file system. With FSx for ONTAP, customers have access to popular ONTAP features like snapshots, FlexClones, cross-region replication with SnapMirror, and a highly available file server with seamless failover. FSx for ONTAP is integrated with the NetApp Trident driver, a dynamic Container Storage Interface (CSI) to handle Kubernetes Persistent Volume Claims (PVCs) on storage disks. The Trident CSI driver manages on-demand provisioning of storage volumes across different deployment environments and makes it easier to scale and protect data for your applications.
In this blog, we demonstrate the use of FSx for ONTAP as a persistent storage layer for ROSA applications. We’ll walk through a step-by-step installation of the NetApp Trident CSI driver on a ROSA cluster, provision an FSx for ONTAP file system, deploy a sample stateful application, and demonstrate pod scaling across multi-AZ nodes using dynamic persistent volumes. Finally, we’ll cover backup and restore for your application. With this solution, you can set up shared storage solution that scales across AZ and makes it easier to scale, protect, and restore your data using the Trident CSI driver.
Solution overview
This diagram shows the ROSA cluster deployed in multiple AZs. ROSA cluster’s master nodes, infrastructure nodes, and worker nodes run in a private subnet of a customer’s VPC. We’ll create an FSx for ONTAP file system within the same VPC and install the Trident driver in the ROSA cluster, allowing all the subnets of this VPC to connect to the file system.
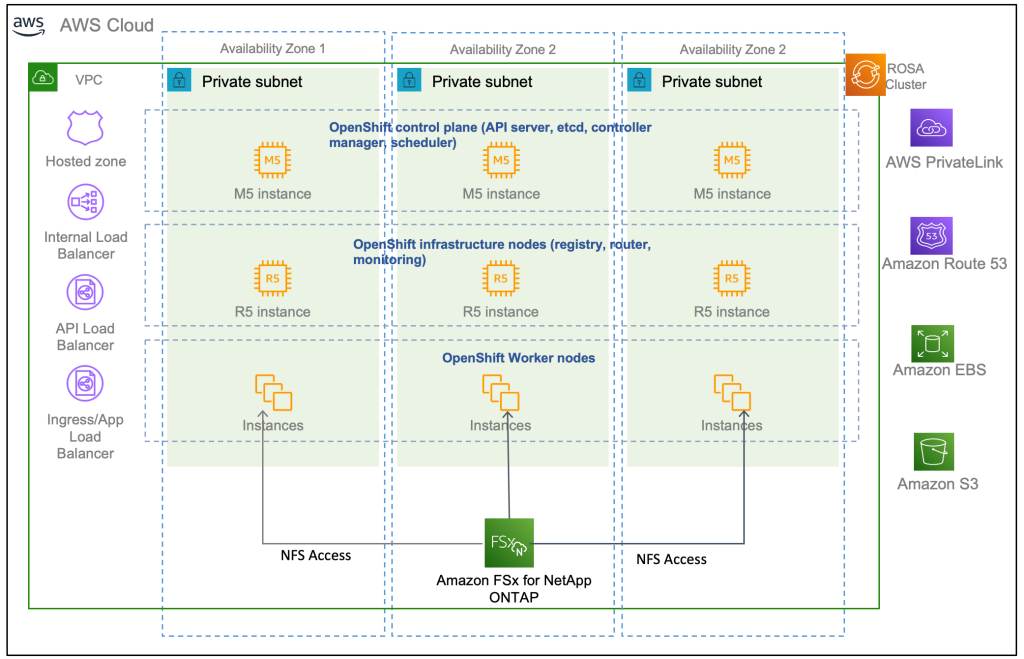
Figure 1: ROSA Integration with Amazon FSx for NetApp ONTAP
Prerequisites
You will need the following resources:
- AWS account
- A Red Hat account
- IAM user with appropriate permissions to create and access ROSA cluster (refer to the ROSA workshop for more detail)
- Install AWS CLI based on your OS
- Install ROSA CLI based on your OS
- Install OpenShift command-line interface (
oc) - Helm 3 documentation
- A ROSA cluster created (refer to this ROSA workshop)
- Access to Red Hat OpenShift web console
Walkthrough
- Clone GitHub repository.
- Provision FSx for ONTAP file system using CloudFormation.
- Install and configure the Trident CSI driver for ROSA cluster.
- Deploy sample MySQL stateful application on ROSA cluster.
- Scale MySQL application pods across multi-Availability Zones.
- Backup and restore volumes in the FSx for ONTAP file system.
1. Clone GitHub repository
You will need Git to clone the github repository- https://github.com/aws-samples/rosa-fsx-netapp-ontap. If you do not have git, install git with the following command:
sudo yum install git -y
Clone the git repository:
git clone https://github.com/aws-samples/rosa-fsx-netapp-ontap.git
2. Provision FSx for ONTAP
We will create a multi-AZ FSx for ONTAP file system in the same VPC as the ROSA cluster.
Take note of the VPC ID, 2 Subnet IDs corresponding to the subnets you want your file system to be in, as well as all route table IDs associated with the ROSA VPC subnets, and enter those values in the following command.
The FSxAllowedCIDR is the allowed CIDR range set up for the FSx for ONTAP security groups ingress rules to control the access. You could use 0.0.0.0/0 or any appropriate CIDR to allow all traffic to access the specific ports of FSx for ONTAP. Run the command in a terminal to create FSx for ONTAP file system.
Note: If you want to provision file system with different Storage Capacity and throughput, you can override the default values by setting StorageCapacity and ThroughputCapacity parameters in the CFN template.
cd rosa-fsx-netapp-ontap\fsx

aws cloudformation create-stack \
  --stack-name ROSA-FSXONTAP \
  --template-body file://./FSxONTAP.yaml \
  --region <region-name> \
  --parameters \
  ParameterKey=Subnet1ID,ParameterValue=[subnet1_ID] \
  ParameterKey=Subnet2ID,ParameterValue=[subnet2_ID] \
  ParameterKey=myVpc,ParameterValue=[VPC_ID] \
  ParameterKey=FSxONTAPRouteTable,ParameterValue=[routetable1_ID,routetable2_ID] \
  ParameterKey=FileSystemName,ParameterValue=ROSA-myFSxONTAP \
  ParameterKey=ThroughputCapacity,ParameterValue=256 \
  ParameterKey=FSxAllowedCIDR,ParameterValue=[your_allowed_CIDR] \
  ParameterKey=FsxAdminPassword,ParameterValue=[Define password] \
  ParameterKey=SvmAdminPassword,ParameterValue=[Define password] \
  --capabilities CAPABILITY_NAMED_IAM
Verify your file system and storage virtual machine (SVM) has been created using the Amazon FSx console:

Figure 2: Creating storage virtual machine in the Amazon FSx Console
3. Install and configure the Trident CSI driver for ROSA cluster
We will be installing the Trident CSI driver in the Openshift “trident” namespace. To create the “trident” namespace, open a command line interface (CLI) on your computer and login to the ROSA cluster using the OpenShift CLI (oc) tool.
oc create ns trident
Next, download the Trident CSI driver from git:
curl -L -o trident-installer-22.10.0.tar.gz https://github.com/NetApp/trident/releases/download/v22.10.0/trident-installer-22.10.0.tar.gz
Then, extract the contents:
tar -xvf ./trident-installer-21.10.1.tar.gz
Use the following helm command to install the Trident CSI driver in the “trident” namespace on the OpenShift cluster.
cd trident-installer/helm
helm install trident -n trident trident-operator-22.10.0.tgz
Run the following command to verify the Trident driver installation.
helm status trident -n trident

Figure 3: Trident installation status
3.1 Create secret to store the SVM username and password in ROSA cluster
Create a new file with the SVM username and admin password, and save it as svm_secret.yaml. A sample svm_secret.yaml file is included in the fsx folder.
svm_secret.yaml
apiVersion: v1
kind: Secret
metadata:
  name: backend-fsx-ontap-nas-secret
  namespace: trident
type: Opaque
stringData:
  username: vsadmin
  password: step#2 password
Note: The SVM username and its admin password have been created via step 2. You can retrieve it from the AWS Secrets Manager console as shown in the following screenshot:

Figure 4: Creating secret file in AWS Secrets Manager Console
Add the secrets to the ROSA cluster with the following command:
oc apply -f svm_secret.yaml
To verify the secrets have been added to the ROSA cluster, run the following command.
oc get secrets -n trident |grep backend-fsx-ontap-nas
You should see following output:
![]()
3.2 Configure Trident CSI backend to FSx for ONTAP
The Trident backend configuration tells the Trident how to communicate with the storage system (in this case, FSx for ONTAP). We’ll use the ontap-nas driver to provision storage volumes.
To get started, move into the fsx directory of your cloned git repository. Open the file backend-ontap-nas.yaml. Replace the managementLIF and dataLIF in that file with the Management DNS name and NFS DNS name of Amazon FSx Storage Virtual Machine and svm with SVM name as per the following screenshot.
Note: ManagementLIF and DataLIF can be found via the Amazon FSx Console under “Storage virtual machines” as shown in the following screenshot.

Figure 5: Management LIF from SVM details page
Now let’s execute the following commands in the terminal to configure the Trident backend in our ROSA cluster.
Verify the backend configuration.
oc get tbc -n trident
![]()
After successful configuration of the trident backend, we will create a storage class that will use the backend we created above. This is a resource object that describes and classifies the type of storage you can request from different storages types available to Kubernetes cluster. Review the file storage-class-csi-nas.yaml in fsx folder.
3.3 Create storage class in ROSA cluster
Now, let’s create the storage class.
oc apply -f storage-class-csi-nas.yaml
Verify the status of the trident-csi storage class creation.
oc get sc

This completes installation of Trident CSI driver and its connectivity to FSx for ONTAP file system. Now we’ll deploy a sample MySQL stateful application on ROSA using file volumes in FSx for ONTAP.
Note: If you want to verify applications can create PV using trident operator, create PVC using the pvc-trident.yaml file provided in fsx folder.
4. Deploy sample MySQL stateful application
In this section, we will deploy the highly available MySQL application onto the ROSA cluster using a Kubernetes StatefulSet and have the PersistentVolume provisioned by Trident. Kubernetes StatefulSet ensures the original PersistentVolume (PV) is mounted on the same pod identity when it’s rescheduled again to retain data integrity and consistency. For more information about the MySQL application replication configuration, please refer to MySQL Official document
Before we begin with MySQL application deployment, we’ll store the application’s sensitive information like username and password in Secrets. Here, we’ll be creating simple secrets.
Open the mysql folder in your cloned git repository , review the file mysql-secrets.yaml file, and execute the following command to create the secret.
Create mysql namespace.
cd mysql

oc create namespace mysql

oc apply -f mysql-secrets.yaml

Now we’ll deploy MySQL StatefulSet application on the ROSA cluster. Open mysql/mysql-statefulset.yaml and review the details –metadata, replicas, and storageclass name. then, execute the following command.
oc apply -f mysql-statefulset.yaml
Verify the application deployment.
oc get pods -n mysql

Verify the PVCs are created by the MySQL application.
oc get pvc -n mysql

4.1 Create a service for the StatefulSet application
A kubernetes service defines logical set of pods and a policy to access pods. StatefulSet currently requires a headless service to control the domain of its pods, directly reaching each pod with stable DNS entries. By specifying “None” for the clusterIP, you can create a headless service.
oc apply -f mysql-service.yaml
Verify the service.
oc get svc -n mysql
![]()
4.2 Create MySQL client for MySQL
The MySQL client is for us to access the MySQL applications that we just deployed. Review the content mysql-client.yaml. Deploy MySQL client using the following command.
oc apply -f mysql-client.yaml
Verify the pod status.
oc get pods
![]()
Log in to the MySQL client pod.
oc exec --stdin --tty mysql-client -- sh
Then, Install the MySQL client tool.
apk add mysql-client
Within the mysql-client pod, connect to the MySQL server.
mysql -u root -p -h mysql-set-0.mysql.mysql.svc.cluster.local
Enter the password that is stored in the mysql-secrets.yaml. Once connected, Create a database on the MySQL database.
MySQL [(none)]> CREATE DATABASE erp;
MySQL [(none)]> CREATE TABLE erp.Persons ( ID int, FirstName varchar(255),Lastname varchar(255));
MySQL [(none)]> INSERT INTO erp.Persons (ID, FirstName, LastName) values (1234 , "John" , "Doe");
MySQL [(none)]> commit;

MySQL [(none)]> select * from erp.Persons;
+------+-----------+----------+
| ID | FirstName | Lastname |
+------+-----------+----------+
| 1234 | John | Doe |
+------+-----------+----------+
5. Scaling StatefulSet pods
You can easily scale the MySQL StatefulSet application using the following command.
oc scale statefulsets mysql-set --replicas=4 -n mysql
Check the number of pods running using this command
oc get pods -n mysql
This demonstrates the horizontal scaling of Statefulset pods.
6. Backup and Restore
FSx for ONTAP supports snapshots, which are point-in-time read-only images of your volumes that consume minimal space and can be created near-instantly. You can use snapshots to create online backups of your data that are stored within the volume itself.
Check out the blog “Run containerized applications efficiently using Amazon FSx for NetApp ONTAP and Amazon EKS” to backup and restore data persistent volumes with FSx for ONTAP. We will walk through how to leverage the FSx for ONTAP snapshot feature to instantly restore data on ROSA cluster.
6.1 Create snapshot for backup point 01
We’ll log into the SVM hosting your ROSA data and create a snapshot. To do this, get your SVM’s vsadmin credentials from AWS Secrets Manager. The IP or the DNS Endpoints of the FSx for ONTAP could be found from the SVM page as shown in the following screenshot:

Figure 6: DNS Endpoint of the FSx for ONTAP – SVM page
Launch an EC2 instance in the same VPC to access the SVM, then SSH to the management IP of the SVM to access the ONTAP CLI.
ssh vsadmin@198.19.XXX.YY
Password:

Last login time: XXXX
SVM1::>
Show the volume by running the following command:
vol show
You will see the output like the following:
Vserver Volume Aggregate State Type Size Available Used%
--------- ------------ ------------ ---------- ---- ----------

SVM1 trident_pvc_81731fc1_7e84_4f4f_9525_fb16125aeba0
aggr1 online RW 10GB 10.00GB 0%
Now, create a snapshot using the following command.
Note: The Volume name should match with the PVC name.
SVM1::> snap create -volume trident_pvc_81731fc1_7e84_4f4f_9525_fb16125aeba0 -snapshot backup_point_01
SVM1::> snap show -volume trident_pvc_81731fc1_7e84_4f4f_9525_fb16125aeba0
---Blocks---
Vserver  Volume   Snapshot                                  Size Total% Used%
-------- -------- ------------------------------------- -------- ------ -----
SVM1     trident_pvc_81731fc1_7e84_4f4f_9525_fb16125aeba0
backup_point_01                          160KB     0%   49%
6.2 Delete the database erp
This step is to delete the database erp after the snapshot (backup) was created in 6.1.
Log into the container console using a new terminal (Note: this is not the same as 6.1).
oc exec --stdin --tty mysql-client -n mysql -- sh
mysql -u root -p -h mysql-set-0.mysql.mysql.svc.cluster.local
Delete the database erp.
MySQL [(none)]>  DROP DATABASE erp;
Query OK, 1 row affected
6.3 Restore the snapshot backup_point_01 from SVM
Now, go back to the ONTAP CLI and restore the volume with the snapshot backup_point_01 you created earlier.
SVM1::> snap restore -volume
trident_pvc_81731fc1_7e84_4f4f_9525_fb16125aeba0 -snapshot
backup_point_01
6.4 Validate the database restored immediately
Given we just restored the database in 6.3, we will validate the database is restored as expected.
Go back to the container console in 6.2:
From this walkthrough, you can see how quick and easy it is to near-instantly restore a stateful application using snapshots.
Conclusion
In this blog, we demonstrated the integration of FSx for ONTAP as a shared file system for a ROSA cluster using the NetApp Trident CSI driver. We also walked through deploying a stateful application across multi-AZ using FSx for ONTAP file system. We then showed how you can use the rich NetApp snapshots feature to quickly and easily protect and restore your stateful application. Combining all the capabilities of FSx for ONTAP with the sub-millisecond latencies and multi-AZ availability, FSx for ONTAP is a great storage option for your containerized applications running in ROSA on AWS.
For more information on this solution, refer to the NetApp Trident documenation. If you’d like to clean up the solution set up in this post, follow the instructions in the github repository.
If you have questions or comments, feel free to leave them in the comments section.