Containers
How to deploy your Quarkus application to Amazon EKS
This blog post is a continuation of an existing series of articles covering different use cases for Quarkus (Optimize your Java application for AWS Lambda with Quarkus and Optimize your Java application for Amazon ECS with Quarkus). In this blog post, I want to show how the Quarkus stack and additional extensions can be used to easily develop applications, compile them natively with GraalVM, package them in container images, and deploy them to an Amazon Elastic Kubernetes Service (Amazon EKS) cluster.
Traditional Java applications are usually built using a monolithic approach: different modules of one application are communicating with each other. Cloud-native applications designed for containers and serverless have completely different requirements, which also need to be reflected in the frameworks used. Quarkus was designed to enable Java developers to write Java-based cloud-native microservices. For this blog post, Quarkus was used as a framework at this point because it has a container-first approach that includes characteristics like fast boot time and low memory usage. This is important for fast scale-out scenarios. In addition, Quarkus also supports a developer-friendly way to deploy applications to Kubernetes without having to dive deep into its complexity. It’s not necessary for developers to write YAML files with Kubernetes resources; those can be generated during build time.
You can find the demo application code on GitHub.
Overview of solution
Our application is a Simple REST-based create, read, update, and delete (CRUD) service that implements basic customer management functionalities. All data is persisted in an Amazon DynamoDB table. As the base framework, we’re using Quarkus, which is a Kubernetes native stack for OpenJDK HotSpot and GraalVM. It offers a core platform and a mechanism for extensions called Quarkus extensions. For this application, we’re using different extensions, from which we will cover the Kubernetes extension in depth in this blog post.
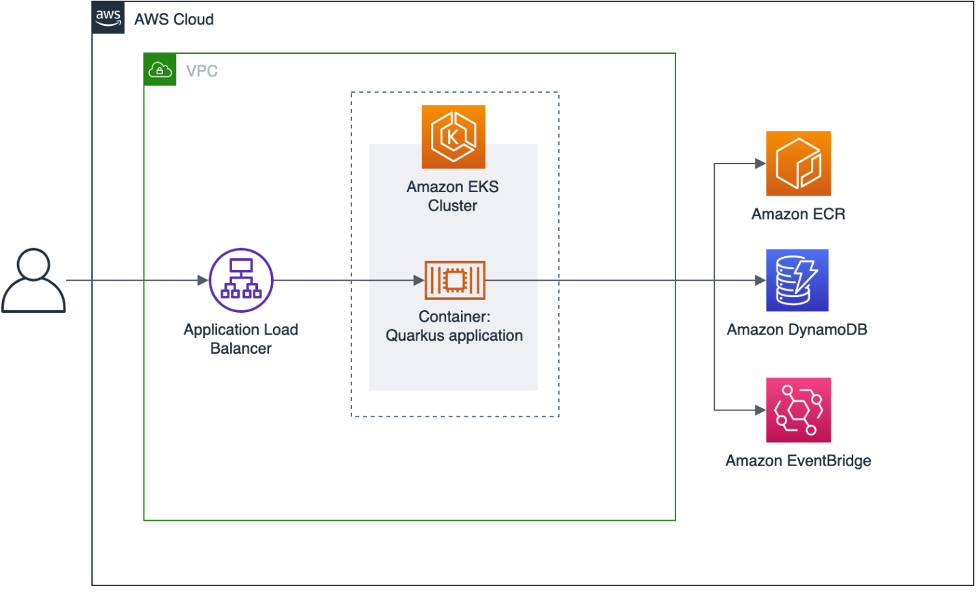
Simple REST-based create, read, update, and delete (CRUD) service that implements basic customer management functionalities.
For local development, Quarkus also supports DynamoDB Local. This is the downloadable version of DynamoDB that lets you write and test applications without accessing the DynamoDB service. Instead, the database is self-contained on your computer. When you are ready to deploy your application in production, you can make a few minor changes to the code so that it uses the DynamoDB service. The REST functionality is located in the class CustomerResource, which uses the JAX-RS implementation RESTEasy. This class invokes the CustomerService that implements the functionalities to access a DynamoDB table with the AWS SDK for Java. All customer-related information is stored in a Plain Old Java Object (POJO) called Customer.
Pod security with IAM roles for service accounts
Applications in a pod’s containers use an AWS SDK to make API requests to AWS services using AWS Identity and Access Management (IAM) permissions. IAM roles for service accounts (IRSA) provide the ability to manage credentials for your applications, similar to the way that Amazon Elastic Compute Cloud (Amazon EC2) instance profiles provide credentials to EC2 instances. Instead of creating and distributing your AWS credentials to the containers or using the EC2 instance’s role, you associate an IAM role with a Kubernetes service account and configure your pods to use the service account. You can scope IAM permissions to a service account, and only pods that use that service account have access to those permissions. A pod’s containers can only retrieve credentials for the IAM role that’s associated with the service account that the container uses. A container never has access to credentials that are used by other containers in other pods. In our application, we use IRSA to access AWS services like DynamoDB and Amazon EventBridge.
As already mentioned, we’re using the Quarkus Kubernetes extension, which allows us to automatically generate Kubernetes resources based on user-defined configurations and default values. You find the configuration in main/resources/application.properties. The following snippet shows a few properties:
For our application, we also need an ingress controller because we want to access our application using an Application Load Balancer. The AWS CDK application to set up the infrastructure also deploys the AWS Load Balancer Controller, which is a controller to help manage Elastic Load Balancers for a Kubernetes cluster. In order to create the necessary annotations (like kubernetes.io/ingress.class), we need to specify those annotations in our configuration. The Kubernetes resources are created during the Maven build of the application. In our case, a Kubernetes Deployment, a Service, and an Ingress is generated.
A snippet of the generated resources, which can be found in target/kubernetes/kubernetes.yml, looks like this:
Walkthrough
To be able to deploy our application, we of course first need an appropriate infrastructure, which we create with the help of an AWS CDK application. For this blog post, the AWS CDK application is implemented using Java. This application creates the following resources:
- a dedicated VPC
- an Amazon Elastic Kubernetes Service (Amazon EKS) cluster with a managed node group
- a dedicated service account for IRSA
- a dedicated namespace for the Quarkus application
- a DynamoDB table
- an Amazon ECR repository
- an event bus for Amazon EventBridge
Prerequisites
- AWS CLI version 2
- AWS CDK version 2.19.0 or later
- Kubectl
- Git
- SDKMAN!
- Amazon Corretto 17
- Apache Maven 3.8.1 or later
- Quarkus version 2.15.0 or later
- Optionally the Quarkus CLI if you want to use it
Detailed instructions on how to install all necessary software packages are in the README file of the project.
Creating the infrastructure using AWS CDK
Now we check out the code and set up the necessary infrastructure.
The deploy command returns an output that should be used to update the kubeconfig. In the following section, you can see an example output:
You can use this output to update the kubeconfig file:
Building and testing the application
After we’ve set up the EKS cluster, we build the application. It’s not necessary to create an Amazon ECR repository because this has already been created using the AWS CDK application. Building the application and the container images is really simple because we’re using a standard Maven build.
Of course, we can also build and push the GraalVM version of the application:
After we’ve successfully built our application and pushed the container images in our registry, we deploy the application using kubectl, get the load balancer address, and test the application. It may take a few minutes until the DNS address of the load balancer is resolvable.
Cleaning up
After you are finished, you can easily destroy these resources with a single command to save costs. The only exception is Amazon ECR: the repository cannot be deleted automatically because it still contains container images. If the repository with the images is also to be deleted, this must be done via the AWS CLI or the AWS Management Console.
Conclusion
In this post, I described how Java applications can be implemented using Quarkus, compiled to a native-image, and run using Amazon EKS on a managed node group. I also showed how AWS CDK can be used to set up the basic infrastructure. I hope I’ve given you some ideas about how to use Quarkus and its extensions to implement Java applications for Kubernetes in a developer-friendly way. Feel free to submit enhancements to the sample template in the source repository or provide feedback in the comments.