AWS Compute Blog
Building serverless Java applications with the AWS SAM CLI
This post was written by Mehmet Nuri Deveci, Sr. Software Development Engineer, Steven Cook, Sr.Solutions Architect, and Maximilian Schellhorn, Solutions Architect.
When using Java in the serverless environment, the AWS Serverless Application Model Command Line Interface (AWS SAM CLI) offers an easier way to build and deploy AWS Lambda functions. You can either use the default AWS SAM build mechanism or tailor the build behavior to your application needs.
Since Java offers a variety of plugins and tools for building your application, builders usually have custom requirements for their build setup. In addition, when targeting GraalVM or non-LTS versions of the JVM, the build behavior requires additional configuration to build a Lambda custom runtime.
This blog post provides an overview of the common ways to build Java applications for Lambda with the AWS SAM CLI. This allows you to make well-informed decisions based on your projects’ requirements. This post focuses on Apache Maven, however the same concepts apply for Gradle.
You can find the source code for these examples in the GitHub repo.
Overview
The following diagram provides an overview of the build and deployment process with AWS SAM CLI. The default behavior includes the following steps:
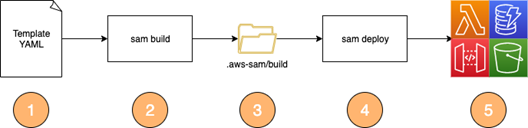
- Define your infrastructure resources such as Lambda functions, Amazon DynamoDB Tables, Amazon S3 buckets, or an Amazon API Gateway endpoint in a template.yaml file.
- The CLI command “sam build” builds the application based on the chosen runtime and configuration within the template.
- The sam build command populates the .aws-sam/build folder with the built artifacts (for example, class files or jars).
- The sam deploy command uploads your template and function code from the .aws-sam/build folder and starts an AWS CloudFormation deployment.
- After a successful deployment, you can find the provisioned resources in your AWS account.
Using the default Java build mechanism in AWS SAM CLI
AWS SAM CLI supports building Serverless Java functions with Maven or Gradle. You must use one of the supported Java runtimes (java8, java8.al2, java11) and your function’s resource CodeUri property must point to a source folder.

AWS SAM CLI ships with default build mechanisms provided by the aws-lambda-builders project. It is therefore not required to package or build your application in advance and any customized build steps in pom.xml will not be used. For example, by default the AWS SAM Maven Lambda Builder triggers the following steps:
- mvn clean install to build the function.
- mvn dependency:copy-dependencies -DincludeScope=runtime -Dmdep.prependGroupId=true to prepare dependency jar files.
- Class files in target/classes and dependency jar archives in target/dependency are copied to the final build artifact location in .aws-sam/build/{ResourceLogicalId}.
Start the build process by running the following command from the directory where the template.yaml resides:
This results in the following outputs:

The .aws-sam build folder contains the necessary classes and libraries to run your application. The transformed template.yaml file points to the build artifacts directory (instead of pointing to the original source directory).
Run the following command to deploy the resources to AWS:
This zips the HelloWorldFunction directory in .aws-sam/build and uploads it to the Lambda service.
Building Uber-Jars with AWS SAM CLI
A popular way for building and packaging Java projects, especially when using frameworks such as Micronaut, Quarkus and Spring Boot is to create an Uber-jar or Fat-jar. This is a jar file that contains the application class files with all the dependency class files within a single jar file. This simplifies the deployment and management of the application artifact.
Frameworks typically provide a Maven or Gradle setup that produces an Uber-jar by default. For example, by using the Apache Maven Shade plugin for Maven, you can configure Uber-jar packaging:
The maven-shade-plugin modifies the package phase of the Maven build to produce the Uber-jar file in the target directory.
To build and package an Uber-jar with AWS SAM, you must customize the AWS SAM CLI build process. You can do this by using a Makefile to replace the default steps discussed earlier. Within the template.yaml, declare a Metadata resource attribute with a BuildMethod entry. The sam build process then looks for a Makefile within the CodeUri directory.

The Makefile is responsible for building the artifacts required by AWS SAM to deploy the Lambda function. AWS SAM runs the target in the Makefile. This is an example Makefile:
The Makefile runs the Maven clean and package goals that build Uber-jar in the target directory via the Apache Maven Plugin. As the Lambda Java runtime loads jar files from the lib directory, you can copy the uber-jar file to the $ARTIFACTS_DIR/lib directory as part of the build steps.
To build the application, run:
This triggers the customized build step and creates the following output resources:

The deployment step is identical to the previous example.
Running the build process inside a container
AWS SAM provides a mechanism to run the application build process inside a Docker container. This provides the benefit of not requiring your build dependencies (such as Maven and Java) to be installed locally or in your CI/CD environment.
To run the build process inside a container, use the command line options –use-container and optionally –build-image. The following diagram outlines the modified build process with this option:

- Similar to the previous examples, the directory with the application sources or the Makefile is referenced.
- To run the build process inside a Docker container, provide the command line option:
- By default, AWS SAM uses images for container builds that are maintained in the GitHub repo aws/aws-sam-build-images. AWS SAM pulls the container image depending on the defined runtime. For this example, it pulls the public.ecr.aws/sam/build-java11 image, which has prerequisites such as Maven and Java11 pre-installed to build the application. In addition, the source code folder is mounted in the container and the Makefile target or default build mechanism is run within the container.
- The final artifacts are delivered to the.aws-sam/build directory on the local file system. If you are using a Makefile, you can copy the final artifact to the $ARTIFACTS_DIR.
- The sam deploy command uploads the template and function code from the .aws-sam/build directory and starts a CloudFormation deployment.
- After a successful deployment, you can find the provisioned resources in your AWS account.
To test the behavior, run the previous examples with the –use-container option. No additional changes are needed.
Using your own base build images for creating custom runtimes
When you are targeting a non-supported Lambda runtime, such as a non-LTS Java version or natively compiled GraalVM native images, you can create your own build image with the necessary dependencies installed.
For example, to build a native image with GraalVM, you must have GraalVM and the native image tool installed when building your application.
To create a custom image:
- Create a Dockerfile with the needed dependencies:
- Build your image locally or upload it to a container registry:
- Use AWS SAM build with the build image argument to provide your custom image:
You can find the source code and an example Dockerfile, Makefile, and pom.xml for GraalVM native images in the GitHub repo.
When you use the official AWS SAM build images as a base image, you have all the necessary tooling such as Maven, Java11 and the Lambda builders installed. If you want to use a more customized approach and use a different base image, you must install these dependencies.
For an example, check the GraalVM with Java 17 cookiecutter template. In addition, there are multiple additional components involved when building custom runtimes, which are outlined in “Build a custom Java runtime for AWS Lambda”.
To avoid providing the command line options on every build, include them in the samconfig.toml file:
For additional information, refer to the official AWS SAM CLI documentation.
Deploying the application without building with AWS SAM
There might be scenarios where you do not want to rely on the build process offered by AWS SAM. For example, when you have highly customized or established build processes, or advanced dependency caching or visibility requirements.
In this case, you can still use the AWS SAM CLI commands such as sam local and sam deploy. But you must point your CodeUri property directly to the pre-built artifact (instead of the source code directory):
In this case, there is no need to use the sam build command, since the build logic is outside of AWS SAM CLI:

Here, the sam build command fails because it looks for a source folder to build the application. However, there might be cases where you have a mixed setup that includes some functions that point to pre-built artifacts and others that are built by AWS SAM CLI. In this scenario, you can mark those functions to explicitly skip the build process by adding the following SkipBuild flag in the Metadata section of your resource definition:
Conclusion
This blog post shows how to build Java applications with the AWS SAM CLI. You learnt about the default build mechanisms, and how to customize the build behavior and abstract the build process inside a container environment. Visit the GitHub repository for the example code templates referenced in the examples.
To learn more, dive deep into the AWS SAM documentation. For more serverless learning resources, visit Serverless Land.