Data quality is one of the biggest challenges that companies face nowadays, as it's necessary to ensure that the data is accurate, reliable, and relevant so that the decisions made based on this data are successful.
In this regard, we have seen several trends emerge, such as the Modern Data Stack that brings data quality as one of the main practices.
The Modern Data Stack (MDS) is a set of tools and technologies that help companies store, manage, and learn from their data quickly and efficiently. Concepts such as Data Quality and Data Observability are highlights of the MDS.
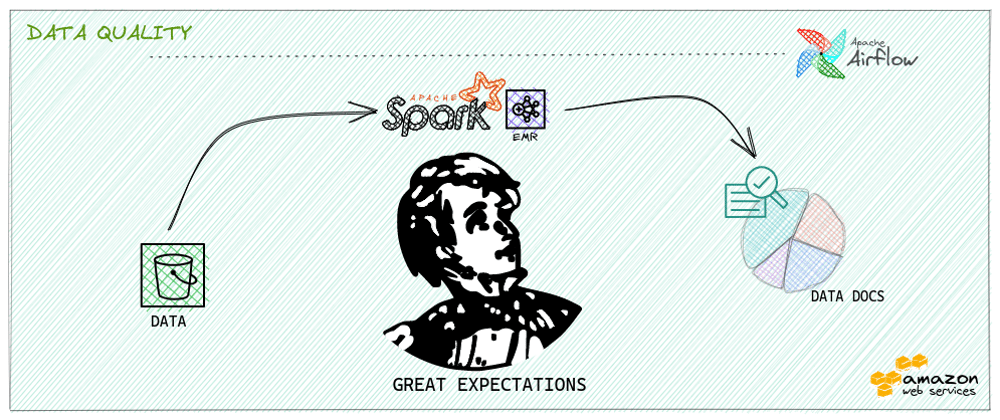
This article aims to explore Great Expectations, a data validation tool contained within the MDS, which can be used in conjunction with Spark to ensure data quality at scale.
The code used in this article can be found in this repository.
The link to the data docs generated by Great Expectations can also be accessed here.
Great Expectations
Great Expectations (GE) is an open-source data validation tool that helps ensure data quality.
With Great Expectations, it's possible to define expectations about your data and check whether they meet them or not.
Some of the existing functionalities include the ability to validate data schema, ensure referential integrity, check consistency, and detect anomalies.
GE is very flexible and scalable, allowing integration into our data pipelines, whether to validate, generate reports, or even prevent the pipeline from advancing by recording inconsistent data in the most "curated" layers of the Data Lake.
Some points that we can highlight:
- it's possible to create tests for your data directly from Spark or Pandas dataframe;
- it's possible to create data documentation in HTML including expectation suites and validation reports;
- it's possible to save a set of tests (suite) to be used later (checkpoints);
- we can use a large number of ready-made expectations or easily create custom expectations that meet our test cases; -it has a CLI that simplifies the creation of test cases, or we can generate tests by coding in Python;
- it's possible to connect directly to data source origins, consequently validating data more quickly.
Practical case with Great Expectations
In this article, we present a scenario that is closest to what we find in our daily lives, so we will work with the following case:
We have data stored in a Data Lake located on AWS S3 and need to verify data quality before the business makes critical decisions based on it.
The dataset used is about product sales from an e-commerce website (Amazon) and tells us a lot about the behavior of that store's customers.
The dataset used in this article is open and can be found on Kaggle at this this link.
Using Great Expectations with Spark on EMR
This article will use Great Expectations with Spark to execute test cases.
The Spark environment will be on EMR and Airflow will be the means of orchestrating the jobs that will run.
To facilitate the understanding of the process, we will analyze the architecture design below:
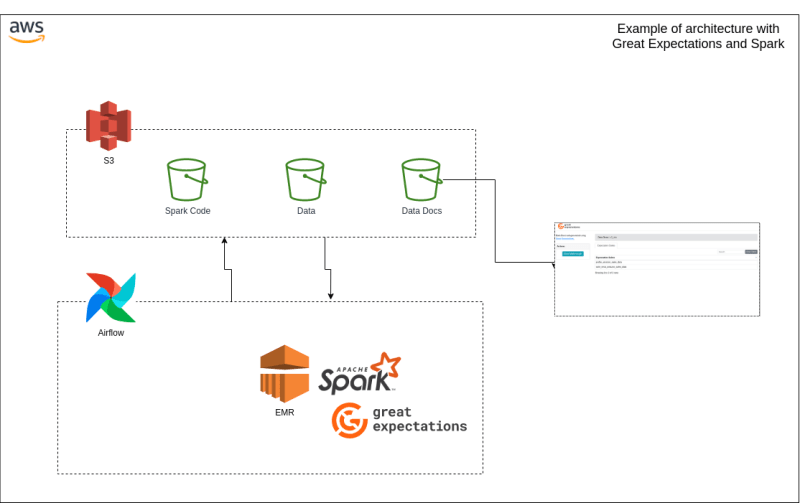
We can highlight the following points:
- the Spark code containing all the logic to execute GE with Spark will be stored in S3;
- the data is also stored in S3 in CSV format;
- the generated data docs will also be stored in an S3 bucket configured for a static site;
- Airflow will orchestrate the EMR and control the lifecycle of the jobs.
1. Creation of Spark script with Great Expectations
To create the Spark script that contains the test cases, we will divide it into some steps, as follows:
Configuration of the context
The GE context indicates the main configurations to be considered to run the tests.
The following code configures the context through a YAML created by a Python object itself.
datasource_yaml = f"""
    name: my_spark_datasource
    class_name: Datasource
    module_name: great_expectations.datasource
    execution_engine:
        module_name: great_expectations.execution_engine
        class_name: SparkDFExecutionEngine
    data_connectors:
        my_runtime_data_connector:
            class_name: RuntimeDataConnector
            batch_identifiers:
                - some_key_maybe_pipeline_stage
                - some_other_key_maybe_airflow_run_id
    """

def create_context_ge(output_path):
  context = ge.get_context()

  context.add_expectation_suite(
      expectation_suite_name=suite_name
  )

  context.add_datasource(**yaml.load(datasource_yaml))
  config_data_docs_site(context, output_path)

  return context
The configuration of this context is basically informing that Spark is used to perform the tests, as it could be another scenario, such as the use of Pandas.
Configuring Data Docs
An important point is setting where our data docs will be saved. By default, the HTML documentation is generated on the local disk, but for this article, the data docs will be stored and hosted by S3.
The destination bucket (output_path) is a parameter in the following code, so the script becomes more dynamic and customizable.
def config_data_docs_site(context, output_path):
    data_context_config = DataContextConfig()

    data_context_config["data_docs_sites"] = {
        "s3_site": {
            "class_name": "SiteBuilder",
            "store_backend": {
                "class_name": "TupleS3StoreBackend",
                "bucket": output_path.replace("s3://", "")
            },
            "site_index_builder": {
                "class_name": "DefaultSiteIndexBuilder"
            }
        }
    }

    context._project_config["data_docs_sites"] = data_context_config["data_docs_sites"]
Creation of a Validator
Before adding the test cases, we must configure a Validator to indicate the tests as a Batch Request.
The Validator already incorporates data validation functions in a built-in way, as we will see later, which makes the creation of test cases much easier and more intuitive.
The code below configures and creates the Validator using the context of our tests and the dataframe containing the data for validation.
def create_validator(context, suite, df):
    runtime_batch_request = RuntimeBatchRequest(
        datasource_name="my_spark_datasource",
        data_connector_name="my_runtime_data_connector",
        data_asset_name="insert_your_data_asset_name_here",
        runtime_parameters={"batch_data": df},
        batch_identifiers={
            "some_key_maybe_pipeline_stage": "ingestion step 1",
            "some_other_key_maybe_airflow_run_id": "run 18",
        },
    )

    df_validator: Validator = context.get_validator(
        batch_request=runtime_batch_request,
        expectation_suite=suite
    )

    return df_validator
Creating Test Cases
The most awaited moment has arrived, creating the test cases.
At this stage, the objective is to work with two scenarios of test cases: the first is to run a data profile and the other is to add custom test cases as the business needs.
- Data Profile
Data Profile is the process of examining, analyzing, reviewing, and summarizing datasets to obtain information about the quality of the data.
The GE allows you to create a data profile automatically and very simply.
In this profile, information will be generated for all data columns, including tests to check for null values, data types, and the most frequent pattern in each column.
To create a data profile and add it to the test context, you just need to have the following code:
def add_profile_suite(context, df_ge):
    profiler = BasicDatasetProfiler()
    expectation_suite, validation_result = profiler.profile(df_ge)
    context.save_expectation_suite(expectation_suite, suite_profile_name)
An important point is that the profile is executed through a Spark object created by GE (df_ge), which will be seen later, it differs from the other test cases that will be added next, as they are based on the Validator object (created in the previous step).
Another point to highlight is that a name was used for the test suite of the profile and another for the validator tests, so they will be separated in the data docs, which helps with documentation organization.
- Test cases
Now just add the test cases as needed for data validation.
The following code adds the following tests:
- Validate if all desired columns are in the dataset;
- Validate if the product_id field has unique and non-null values;
- Validate if the discount_percentage field contains only values between 0 and 100;
- Validate if the rating field contains only values between 0 and 5;
- Validate if the product_link field contains only data with a valid link format, using a regex to validate the pattern.
After adding all desired test cases, save the test suite's expectations:
def add_tests_suite(df_validator):
    columns_list = ["product_id", "product_name", "category", "discounted_price", "actual_price",
                    "discount_percentage", "rating", "rating_count", "about_product", "user_id",
                    "user_name", "review_id", "review_title", "review_content", "img_link", "product_link"]

    df_validator.expect_table_columns_to_match_ordered_list(columns_list)
    df_validator.expect_column_values_to_be_unique("product_id")
    df_validator.expect_column_values_to_not_be_null("product_id")
    df_validator.expect_column_values_to_be_between(
        column='discount_percentage', min_value=0, max_value=100)
    df_validator.expect_column_values_to_be_between(
        column='rating', min_value=0, max_value=5)
    df_validator.expect_column_values_to_match_regex(
        column="product_link",
        regex=r'^https:\/\/www\.[a-zA-Z0-9\-\.]+\.[a-zA-Z]{2,}$',
        mostly=0.9
    )
    df_validator.save_expectation_suite(discard_failed_expectations=False)

    return df_validator
Running the tests
Now it's time to connect all the dots.
The code below is the main function that will be called by Spark. It reads the data we want and invokes the other functions we discussed earlier to set up and execute the test suites:
def process_suite_ge(spark, input_path, output_path):
    path_data = join(input_path, 'sales', 'amazon.csv')
    df = spark.read.format("csv").option("header", "true").load(path_data)
    df_ge = SparkDFDataset(df)

    context = create_context_ge(output_path)

    suite: ExpectationSuite = context.get_expectation_suite(
        expectation_suite_name=suite_name)

    add_profile_suite(context, df_ge)

    df_validator = create_validator(context, suite, df)
    df_validator = add_tests_suite(df_validator)

    results = df_validator.validate(expectation_suite=suite)
    context.build_data_docs(site_names=["s3_site"])

    if results['success']:
        print("The test suite run successfully: " +
              str(results['success']))
        print("Validation action if necessary")
2. Creating the DAG in Airflow
In this step, it's time to create a DAG in Airflow to run the tests with GE inside the EMR with Spark.
We will have the following tasks in our DAG:
- create_emr: task responsible for creating the EMR for job execution. Remember to configure the connection with AWS (aws_default) or IAM if you're running Airflow on AWS. EMR configurations can be found in the project repository.
- add_step: responsible for adding a job to the EMR (step). We will see the configuration of this job (spark-submit) later on.
- watch_step: an Airflow sensor responsible for monitoring the status of the previous job until it is completed, either successfully or with failure.
- terminate_emr: after the job is finished, this task terminates the EMR instance allocated for running the tests.
Below is the code for the DAG:
create_emr = EmrCreateJobFlowOperator(
    task_id='create_emr',
    aws_conn_id='aws_default',
    job_flow_overrides=JOB_FLOW_OVERRIDES,
    dag=dag
)

add_step = EmrAddStepsOperator(
    task_id='add_step',
    job_flow_id="{{ task_instance.xcom_pull(task_ids='create_emr', key='return_value') }}",
    steps=STEPS_EMR,
    dag=dag
)


watch_step = EmrStepSensor(
    task_id='watch_step',
    job_flow_id="{{ task_instance.xcom_pull(task_ids='create_emr', key='return_value') }}",
    step_id="{{ task_instance.xcom_pull('add_step', key='return_value')[0] }}",
    aws_conn_id='aws_default',
    dag=dag,
)

terminate_emr = EmrTerminateJobFlowOperator(
    task_id='terminate_emr',
    job_flow_id="{{ task_instance.xcom_pull('create_emr', key='return_value') }}",
    aws_conn_id='aws_default',
    trigger_rule=TriggerRule.ALL_DONE,
    dag=dag,
)

create_emr >> add_step >> watch_step >> terminate_emr
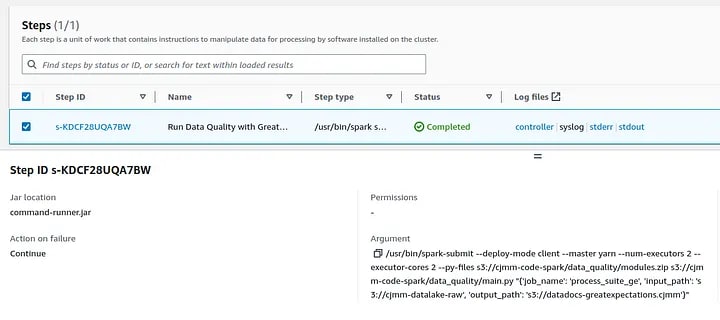
Now I'll detailthe configuration of the job that will be added to EMR to process the tests, which is basically a spark-submit.
We can check all the settings in the code below, including the script parameters.
args = str({'job_name': 'process_suite_ge', 'input_path': 's3://cjmm-datalake-raw',
           'output_path': 's3://datadocs-greatexpectations.cjmm'})

STEPS_EMR = [{
    'Name': 'Run Data Quality with Great Expectations',
    'ActionOnFailure': 'CONTINUE',
    'HadoopJarStep': {
            'Jar': 'command-runner.jar',
            'Args': [
                '/usr/bin/spark-submit',
                '--deploy-mode', 'client',
                '--master', 'yarn',
                '--num-executors', '2',
                '--executor-cores', '2',
                '--py-files', 's3://cjmm-code-spark/data_quality/modules.zip',
                's3://cjmm-code-spark/data_quality/main.py', args
            ]
    }
}]
It's important to highlight that the code that will be executed in Spark is stored in S3, both the main.py file that calls the other functions and the modules.zip file that contains all the logic for the tests to run.
This coding model was adopted to be scalable and easier to maintain, besides allowing us to easily run Spark in client or cluster mode.
3. Executing the Script on EMR
With the script developed, and the Airflow DAG created, we can now run the tests.
Below is an example of the Airflow DAG that ran successfully:

The following images shows more details about the job successfully executed on EMR:
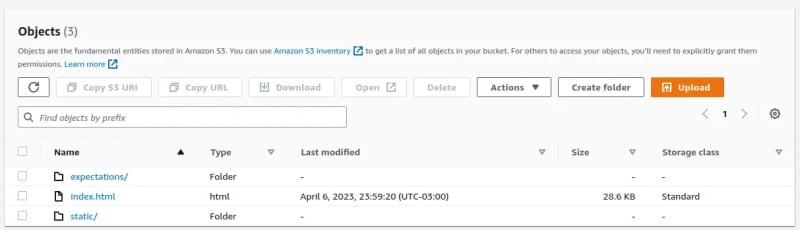
4. Results
Now it's time to analyze the two results of the executed tests.
The first one is the data docs files saved in the S3 bucket, as shown in the following image:
The second result is accessing the data docs, as shown below:
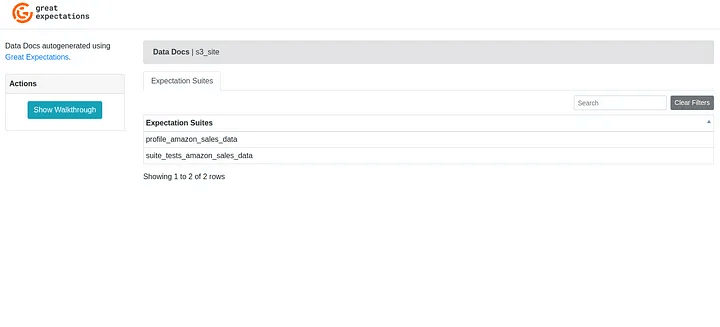
Remember that the data docs created in this article can be accessed at this link.
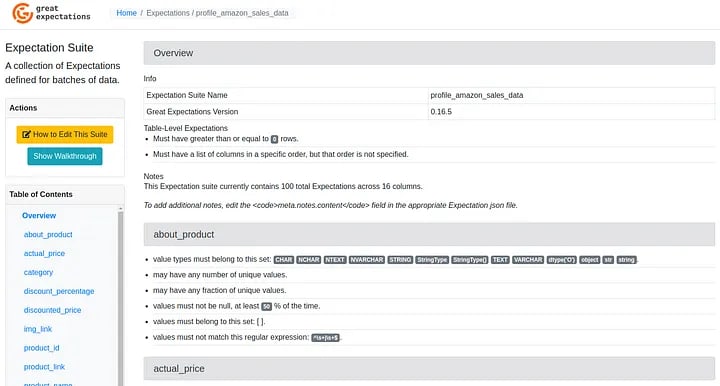
When accessing the suite with the data profile, we have the following result:
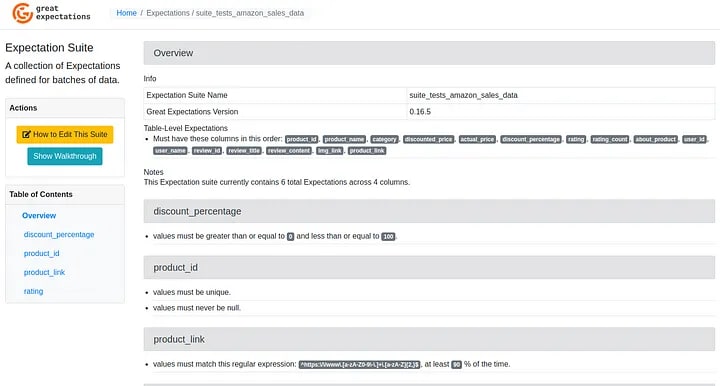
And when accessing the suite with the created test cases, we have the result below:
Conclusion
Great Expectation is the fastest-growing open-source data quality tool with a highly active community, constantly updated, and several large companies worldwide using it.
With GE, we can easily create test cases for various scenarios that accommodate different datasets and customize tests for our use cases.
In addition to bringing statistical results of tests that we can save and use as desired, it also brings ready-to-use data docs in HTML with a lot of helpful information about data quality.
Great Expectation is an excellent tool with easy integration and management. It uses concepts we already know in the world of Big Data, so it is worth testing and using it daily to mature your Data Governance and Data Quality Monitoring.
Remember:
More than having data available for analysis, it is essential to ensure its quality.


Top comments (2)
very detailed blog on using these tools together.
but i think when u talk about performing data monitoring/quality checks via great expectation, we can not expect it be done at scale :) as all such tools/platform are SQL based and would not scale unless heavily provided with compute capacity, neverthless it will do job for basic cases though.
Thanks for the feedback, Jay Sen!
However, scalability depends on execution in distributed computing, which in this case is Spark, with it we will be able to scale our environment for data quality