AWS Open Source Blog
Continuous deployment of Cloud Custodian to AWS Control Tower
Cloud Custodian is an open source, cloud security, governance, and management tool that enables users to keep their Amazon Web Services (AWS) environment secure and well managed by defining policies in a YAML domain specific language (DSL). Cloud Custodian works by defining policies in a YAML file and running the defined policies against AWS accounts. The policy definition contains the type of resource the policy will be run against and filters to narrow down within a specific resource type as well as actions to take on the resources captured by the filter.
Cloud Custodian policies can run within an AWS account in various serverless modes using AWS Lambda and Amazon CloudWatch Events; however, to initially deploy these policies, customers often have to maintain a separate compute environment that will be used deploy them. Also, in a multi-account AWS environment (for example, AWS Control Tower where AWS accounts are provisioned programmatically using AWS Organizations as needed), deploying Cloud Custodian to new AWS accounts will require manual work.
The AWS Control Tower service is intended for organizations with multiple accounts and teams who are looking for the easiest way to set up their new multi-account AWS environment and govern at scale. With AWS Control Tower, cloud administrators get peace of mind knowing accounts in their organization are compliant with established policies while builders provision new AWS accounts quickly in a few clicks.
In this post, we will demonstrate how AWS DevOps tools can be used to achieve continuous, at-scale deployment of Cloud Custodian policies to AWS Control Tower without provisioning a separate compute environment. We will also show how these policies will be deployed automatically to all new AWS accounts provisioned by AWS Control Tower without any manual intervention.
Architecture and workflow
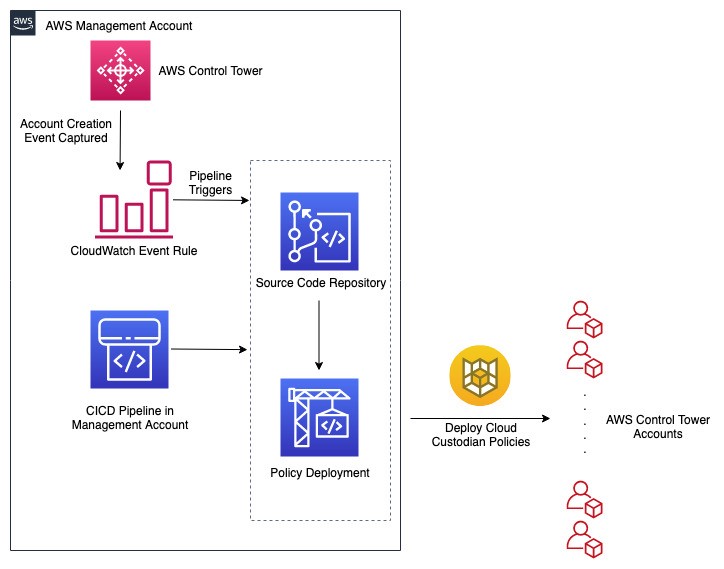
- AWS CodePipeline is used for continuous integration/continuous deployment (CI/CD). It consists of two stages.
- The first stage is a source stage powered by an AWS CodeCommit repository. All source code for this solution is stored in this repository including some sample Cloud Custodian policies we will be deploying.
- The second stage is powered by AWS CodeBuild. In this stage, the list of destination AWS accounts are compiled dynamically and c7n-org (Cloud Custodian Multi Account Tool) is used to deploy policies to destination AWS accounts.
- When new policies can be added to the source repository, the pipeline is triggered to deploy these policies.
- An AWS CloudWatch Event rule watches for New Account creation using AWS Control Tower Lifecycle Events. Creation of a new account triggers the pipeline, and all the current policies found in the source repository are deployed to the new account.
Source code
The source code for this article, including CloudFormation templates and sample cloud custodian policies, can be downloaded from this repository.
- CloudFormation templates are in the cloudformation directory.
- Sample Cloud Custodian policies are in the policies directory. See below for more information on the sample policies:
- no-internet-facing-alb.yaml: This policy monitors CloudTrail events for the creation of any public-facing Application Load Balancer and deletes it as a remediation.
- r53-querylogging-enabled.yaml: This policy periodically checks if there are any Route 53 public hosted zones that do not have query logging enabled and enables it as a remediation.
- AWS CodeBuild configuration file can be found in the root directory as buildspec.yaml.
Assumptions
- The Organization Management Account is used as the Admin account, hence the pipeline exists in this Account.
- The AWS region used in this post is us-east-1. Any other Cloud Custodian supported regions can be used. To use other regions, modify all the region configuration in the buildspec.yaml file with your region of choice.
- This post assumes Cloud Custodian policy deployment to all accounts within the Organization.
- The steps in this post will be carried out in a test environment because two sample policies are deployed with auto-remediation actions configured.
Deployment
Step 1: Deploy pipeline prerequisites.
In this step, we will be deploying the pipeline prerequisite resources, such as Amazon Simple Storage Service (Amazon S3) bucket, AWS Identity and Access Management (IAM) role, AWS CodeBuild project, and AWS CodeCommit repository.
- Navigate to AWS CloudFormation Console in the AWS region in which you want to deploy the pipeline.
- Create a stack with CloudFormation template cloudcustodian-admin-account-prereq.yaml. The parameters required are below:
- pCloudCustodianAdminRoleName – This is the IAM role name that will be given to the AWS CodeBuild Role that deploys the Cloud Custodian policies. Default value can be changed.
- pCloudCustodianDeploymentRoleName – This is the IAM role name that will be given to policy deployment roles in all child accounts. This is a cross-account role in all child accounts that allows access to the Management account. Default value can be changed.
- pCloudCustodianPipelineServiceRoleName – This is the IAM role name that will be given to the CodePipeline Service Role. Default value can be changed.
- pCodeCommitRepoName – This is the name given to the source AWS CodeCommit repository. Default value can be changed.
- Create the stack and, once stack creation completes, note all of the stack outputs values as seen below:
- oCloudCustodianAdminRoleArn
- oCloudCustodianCodeBuildProject
- oCloudCustodianCodeCommitCloneUrlHttp
- oCloudCustodianCodeCommitName
- oCloudCustodianDeploymentRoleName
- oCloudCustodianPipelineArtifactStore
- oCloudCustodianPipelineRoleArn
Step 2: Deploy child account resources.
In this step, we will be deploying all cross-account IAM roles and required Cloud Custodian Lambda roles to all child accounts using AWS CloudFormation StackSets. We will be using CloudFormation StackSets with AWS Organization so that, when new accounts are created, stack instances are automatically deployed into these accounts to allow deployment of Cloud Custodian policies. To read more about this CloudFormation StackSets feature, see the blog post Use AWS CloudFormation StackSets for multiple accounts in an AWS organization on the AWS News Blog.
- Navigate to AWS CloudFormation StackSets Console in the AWS region being used.
- Create a StackSet with CloudFormation template cloudcustodian-member-accounts-role.yaml. The required parameters are below:
- pCloudCustodianAdminRoleArn – Pass the value of the output oCloudCustodianAdminRoleArn from Step 1.
- pCloudCustodianDeploymentRoleName – Pass the value of the output oCloudCustodianDeploymentRoleName from Step 1.
- Proceed with StackSets creation. In the Configure StackSets options page, select service-managed permissions for Permissions.
- In the Set deployment options page, set deployment options as shown in the following screenshot:

- Proceed with StackSet deployment. Wait for StackSet deployment to complete.
Note: The Cloud Custodian Lambda IAM role deployed in this StackSet to all accounts is configured with minimum permissions required to allow the sample Cloud Custodian policies used in this article to work. When deploying your own policies, the Lambda IAM role permissions must be extended to allow your policy to work as expected.
Step 3: Store source code in AWS CodeCommit.
In this step, we will store all of the code used in this article in the AWS CodeCommit repository created in Step 1.
- Clone the blog source code repository locally.
- Retrieve the repository clone URL from the output oCloudCustodianCodeCommitCloneUrlHttp in Step 1.
- Connect to the newly created repository by cloning it.
- Copy the code from the blog source code repository directory to the AWS CodeCommit repository local directory.
- Commit the changes into the AWS CodeCommit repository local directory and push the changes to the remote CodeCommit repository:
Step 4: Deploy pipeline.
In this step, we will set up the CI/CD pipeline that will use all the resources that have been deployed in previous steps to orchestrate the deployment of CloudCustodian Policies.
- Navigate to AWS CloudFormation Console in the AWS region being used.
- Create a stack with CloudFormation template pipeline-resources.yaml. The parameters required are:
- pCloudCustodianCodeBuildProject – Pass the value of the output oCloudCustodianCodeBuildProject from Step 1.
- pCloudCustodianPipelineArtifactS3Bucket – Pass the value of the output oCloudCustodianPipelineArtifactStore from Step 1.
- pCloudCustodianPipelineRoleArn – Pass the value of the output oCloudCustodianPipelineRoleArn from Step 1.
- pCodeCommitRepositoryName – Pass the value of the output oCloudCustodianCodeCommitName from Step 1.
- Proceed with stack creation and wait for stack creation to complete.
- Go to Stack Outputs and click the value of output oCodePipelineConsoleURL. This will take you to the AWS CodePipeline console and here you can monitor the progress of your pipeline. A completed pipeline will look like this:

- Once the pipeline is complete, the Cloud Custodian policies have been deployed to all accounts. To validate the policy deployment, log into one of the Organization child accounts and navigate to the AWS Lambda console. Filter for AWS Lambda functions starting with custodian- and you should see results as shown below:

Repeat the same step for CloudWatch Event Rules. You should see event rules starting with custodian-.
Additional resources
After the pipeline is created, more Cloud Custodian policies can be created and deployed through the pipeline by adding them to the AWS CodeCommit repository. See the following resources for further guidance on writing Cloud Custodian policies:
- Cloud Custodian Documentation
- Cloud Custodian AWS Reference
- Cloud Custodian Example AWS Policies
- c7n-org: Multi Account Cloud Custodian Execution
Cleanup
In this section, we will show how to clean up the resources deployed from this post.
- Clean up resources deployed by Cloud Custodian using mugc. To use the cleanup functionality that is part of the pipeline, edit the buildspec.yaml file locally as follows. (Changes can also be made directly on the AWS CodeCommit Console.)
- Comment the policy deployment sections (for example, lines 18 and 19).
- Uncomment the policy cleanup sections (for example, lines 20 and 21).
- Save buildspec.yaml file.
- Commit and push the latest code change to the CodeCommit repository to start a new pipeline run.
- Wait for the pipeline run to complete.
- Log into any of the child accounts to verify that all Cloud Custodian resources have been cleaned up.
- Delete the pipeline stack created in Step 4.
- Remove all stack instances from the AWS StackSet created in Step 2 and delete the StackSet.
- Delete the pipeline prerequisite stack created in Step 1.
Conclusion
In this article, we have shown how the open source cloud security and management tool Cloud Custodian can be integrated into an AWS Control Tower environment for an easier and scalable deployment of compliance policies across accounts within an AWS Organization. Using this approach in addition to the out-of-the-box capabilities of AWS Control Tower, cloud administrators can further ensure that accounts in their organization are compliant with established policies.