AWS Open Source Blog
Integrating identity providers, such as OneLogin, Ping Identity, Okta, and Azure AD, to SSO into Amazon Managed Grafana
November 8, 2022: This blog post was written prior to AWS renaming AWS Single Sign-On. The new name is AWS IAM Identity Center (successor to AWS Single Sign-On). Please consider all references, in this blog, to AWS Single Sign-On or AWS SSO as being AWS IAM Identity Center.
September 8, 2021: Amazon Elasticsearch Service has been renamed to Amazon OpenSearch Service. Visit the website to learn more.
In December 2020, AWS announced Amazon Managed Grafana, a fully managed service that is developed together with Grafana Labs and based on open source Grafana. Enhanced with enterprise capabilities, Amazon Managed Grafana makes it easier to visualize and analyze operational data at scale. In the blog post Amazon Managed Grafana – Getting Started, we also explained how Amazon Managed Grafana can be used with various data sources, such as Amazon CloudWatch, Amazon Elasticsearch Service (Amazon ES), Amazon Timestream, AWS IoT SiteWise, AWS X-Ray, and Amazon Managed Service for Prometheus (AMP).
Amazon Managed Grafana supports a single sign-on experience with AWS Single Sign-On (AWS SSO) authentication. External identity providers (IDP), such as OneLogin, Ping Identity, Okta, and Azure Active Directory (Azure AD), can be integrated with AWS SSO to verify login identity for Amazon Managed Grafana. Users are given access to Amazon Managed Grafana via a unique login URL that directly navigates into the environment, and they can sign in with their existing corporate credentials. Administrators can continue to manage users and groups in their existing identity systems, which can be seamlessly synchronized with AWS SSO by using System for Cross Domain Identity Management (SCIM).
In this blog post, we explain how to integrate external identity providers, such as OneLogin, Ping Identity, Okta and Azure AD, with Amazon Managed Grafana, which enables a single sign-on into an Amazon Managed Grafana environment via AWS SSO. We also demonstrate the AWS SSO experience for system administrators and Amazon Managed Grafana users.
Solution overview
By integrating existing identity providers with Amazon Managed Grafana, users within an organization who don’t have access to the AWS Management Console can access Amazon Managed Grafana dashboards that query metrics and logs from a variety of data sources, including Amazon CloudWatch, Amazon Managed Service for Prometheus, AWS IoT SiteWise, Amazon Elasticsearch Service, Amazon Timestream, AWS X-Ray, and others. This allows organizations to enforce existing login security requirements, such as two-factor authentication and password complexity, without having to make drastic changes.

Prerequisites
To follow this walkthrough, you must have the following:
- Access to Amazon Managed Grafana from the AWS Management Console.
- AWS SSO enabled on the AWS Management Console. If you are using a child account via your AWS organization, ensure that the main account for that organization has AWS SSO enabled.
- An external identity provider account, such as OneLogin, Ping Identity, Okta, or Azure AD:
- OneLogin trial accounts are available at https://www.onelogin.com/developer-signup.
- Ping Identity trial accounts are available at https://www.pingidentity.com/en/trials.html.
- Okta trial accounts are available at https://www.okta.com/free-trial/.
- Azure AD trial accounts are available at https://azure.microsoft.com/en-us/.
- (Optional) For seamless identity synchronization between IDP and AWS SSO, enable System for Cross Domain Identity Management (SCIM) API connection if supported by your IDP.
Setup
For demonstrating this scenario, we will be referencing Okta, but we have successfully tested the similar integration with OneLogin and Azure AD to achieve the desired end goal.
Step 1: Set up the AWS Application in Okta.
Via the Okta console, log into the account as an admin and add the AWS SSO app.

Navigate to Sign On and download and save the Identity Provider Metadata as okta-aws.xml.

Step 2: Enable AWS SSO and set up SCIM (optional).
On the AWS console, navigate to the AWS SSO service. Enable AWS SSO if it is not already enabled. AWS SSO provides support for the System for Cross-domain Identity Management (SCIM) v2.0 standard. SCIM keeps AWS SSO identities in sync with identities from IDP, which includes any provisioning, updates, and deprovisioning of users between IDP and AWS SSO. Using SCIM integration saves IT and admin teams the time and effort of implementing custom solutions to cross-replicate user names and email addresses between AWS SSO and IDPs.
Navigate to Settings and change the Identity source from the default AWS SSO by clicking Change and choose External identity provider.

Using the Okta Metadata XML downloaded previously, browse and upload IdP SAML metadata in the Identity provider SAML metadata section.

Change the provisioning from Manual to SCIM by clicking the Enable automatic provisioning.

Copy the SCIM endpoint (also known as the SCIM Base URL) and the Access token (also known as a SCIM Bearer token).

Select View details in the Authentication SAML 2.0 part and copy the AWS SSO ACS URL and AWS SSO issuer URL. Having gathered these four pieces of information, now it’s time to go to Okta (or your IDP) to finalize the integration.

Step 3: Establish SAML authentication between Okta (IDP) and AWS SSO.
Log back into the Okta portal (as admin) and into the previously configured AWS SSO app. Select Sign On and enter the AWS SSO issuer URL and AWS SSO ACS URL details gathered from AWS SSO in the previous section.

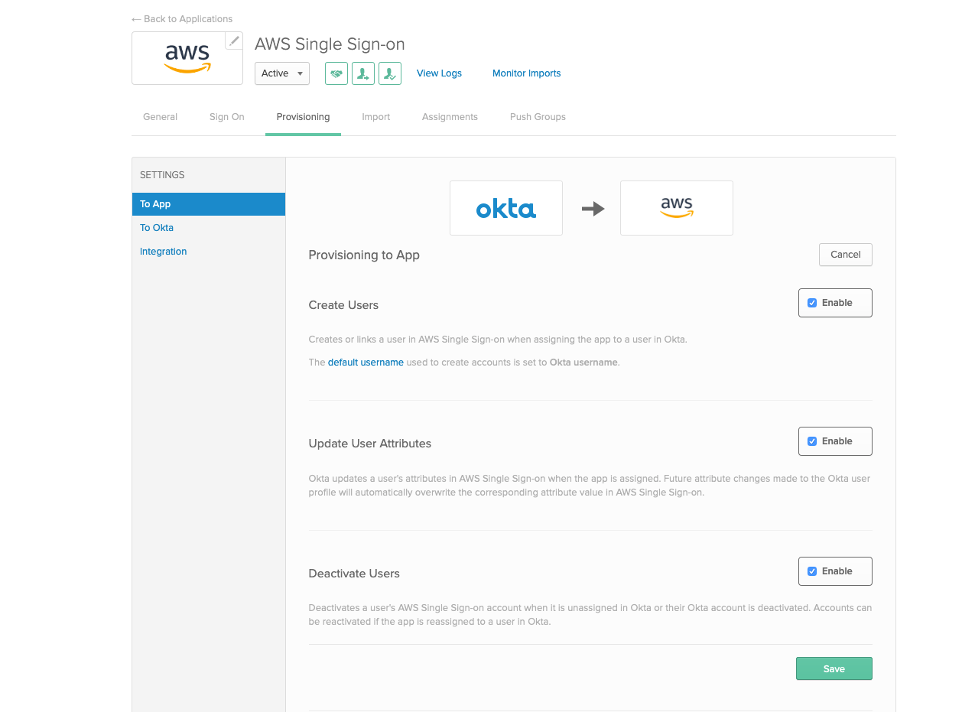
Next, select Provisioning under Settings, navigate to To App and check the boxes for enable Create Users, Update User Attributes, Deactivate users, and Save. This is important for SCIM integration to work.
Next, select Integration under Settings, Edit, Enable API Integration, and set up the SCIM Integration by :
- Pasting the previously gathered SCIM Endpoint for Base URL and Access Token for API Token, respectively.
- Select Test API Credentials and, if the integration is set up correctly, a message that says Provisioning Certification: Okta Verified is shown.

Step 4: Assign and sync users from Okta to AWS SSO to access Amazon Managed Grafana.
In the Okta portal, navigate to Assignments under the AWS Single Sign-On and assign the users in the organization who should have access to Amazon Managed Grafana.

Verify whether a user or group has synced into AWS SSO via SCIM by logging into AWS SSO service via the AWS Console.

Step 5: Create Amazon Managed Grafana Workspace and assign users created via the identity provider.
We can spin up on-demand, autoscaled Grafana workspaces (virtual Grafana servers) that enable us to create unified dashboards across multiple data sources. In the following instructions, we use the AWS console to walk through the required steps and comment on what to consider when performing each step.
Navigate to AWS Grafana on the AWS account. After selecting the Create new workspace option in the right upper corner of the Amazon Managed Grafana console landing page, name the new workspace and add a description (optional).

Next configure the settings to use AWS Single Sign-On and under service managed permission settings, choose service managed permission type (because we intend to use external IDP integration with Amazon Managed Grafana), and select the data sources as per your requirement.

Once the Amazon Managed Grafana workspace is created, select Assign user to assign the user you had provisioned via Okta into AWS SSO. Also take note of the Grafana workspace URL.

Here we are assigning the user to Amazon Managed Grafana, which we previously created through our Okta – AWS SSO SCIM integration.

To verify, we can navigate to AWS SSO service and Applications to view the Amazon Grafana application. Now the set up, including user and application provisioning, is complete. Let’s proceed to access the Amazon Managed Grafana workspace.

Step 6: Access the Amazon Managed Grafana workspace.
We can access Amazon Managed Grafana in one of three ways:
1. Start from the Okta user portal, select the AWS SSO application, and choose Amazon Grafana.

2. Start from the AWS SSO user portal (the URL is on the AWS SSO Settings page), redirect to Okta login page, and choose Amazon Grafana.

3. Bookmark the Grafana Workspace URL (the URL is on the Amazon Managed Grafana service).

The page redirects automatically to the Okta login page.

After entering credentials, we are then authenticated into Amazon Managed Grafana environment.

Conclusion
In this blog post, we walked through how to integrate your identity provider (IDP) with Amazon Managed Grafana. We also explained how to assign users via your IDP so that your users can seamlessly authenticate into the Amazon Managed Grafana environment to visualize and monitor your workloads and logs. Administrators can now use a single source of truth to manage their users, and users no longer need to manage an additional identity and password to sign in to their AWS accounts and applications.