April 21, 2021: This article has been updated to reflect changes introduced by Sigv4 support on Prometheus server.
The recently launched Amazon Managed Service for Prometheus (AMP) service provides a highly available and secure environment to ingest, query, and store Prometheus metrics. We can query the metrics from the AMP environment using Amazon Managed Grafana, a fully managed service that is developed together with Grafana Labs and based on open source Grafana. We can also query Prometheus metrics from AMP with a self-hosted Grafana server, or using the HTTP APIs.
In previous posts, we have demonstrated how to set up cross-region metrics collection using AMP. However, organizations may have their workloads running globally and spread across multiple AWS accounts. In this article, we show how to set up central monitoring visibility for cross-account applications with AMP.
Scenario
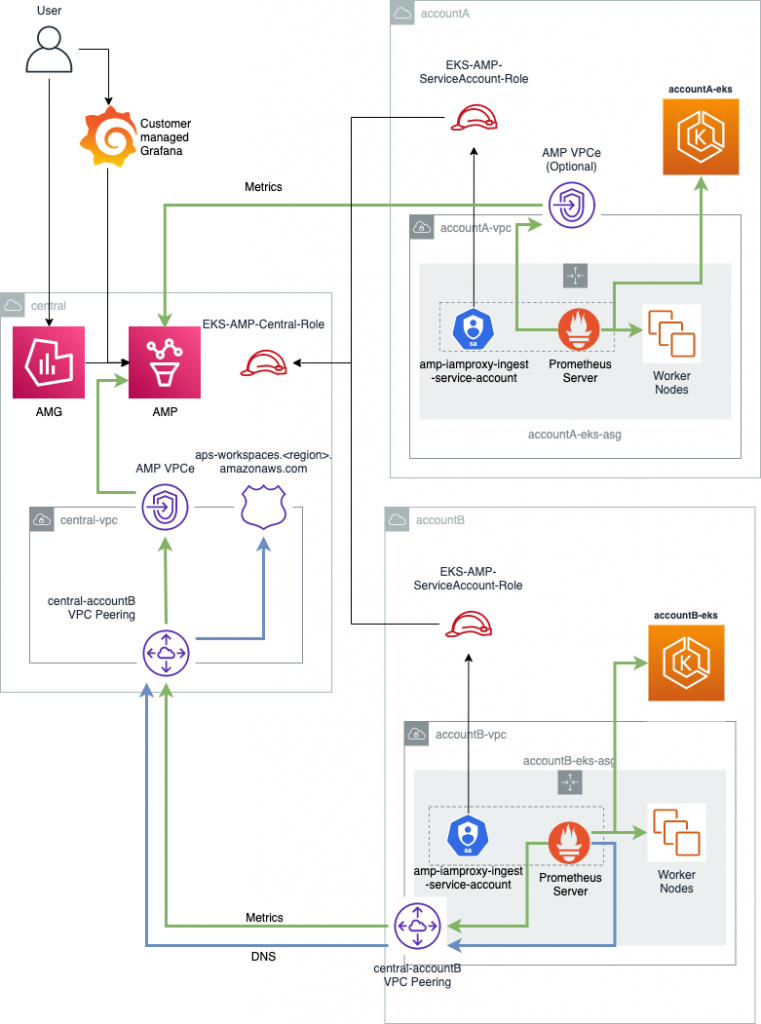
For purposes of this article, we’ll consider a scenario where we have two workloads running into separate accounts (workload account A and B), and we want to enable central visibility (central monitoring account) on Prometheus metrics. Proper AWS Identity and Access Management (IAM) policies will be configured to allow cross-account access from the workloads to the AMP workspace.
Setup
To achieve this, we will set up an AMP workspace in the central monitoring account. We will then create a role inside the monitoring account that trusts our workloads accounts with write permissions on our AMP workspace. On each workload account, we will deploy a Prometheus server into an Amazon Elastic Kubernetes Service (Amazon EKS) cluster to collect metrics.
Leveraging the IAM roles for service accounts feature of Amazon EKS, we will grant IAM permissions to allow assuming a cross-account role in the central account. For one of the workload accounts (account B), we will keep the traffic to AMP completely private by using Amazon Virtual Private Cloud (VPC) endpoint, VPC peering, and Amazon Route 53 private hosted zones.
For the central monitoring account, we’ll do the following:
- Create an AMP workspace in the monitoring account.
- Create an Amazon Managed Grafana workspace in the monitoring account to visualize metrics.
- Create an IAM role with AMP write only permissions and allows to be assumed by workloads accounts (
AmazonPrometheusRemoteWriteAccess).
For the Private Networking Section, we will:
- Set up Amazon VPC, Internet Gateway (IGW), and Subnets.
- Set up Amazon VPC endpoint.
- Set up DNS private hosted zone and DNS A Record (account B only).
- Create a VPC peering between workload accounts and the central monitoring account (account B only).
For workload accounts, we’ll:
- Create an Amazon VPC, Internet Gateway (IGW), and Subnets.
- Create an Amazon EKS cluster.
- Create an IAM role, which allows “assume role” in the central monitoring account.
- Deploy Prometheus server with
remoteWrite to AMP.
- Set up an Amazon VPC Endpoint for the AMP service (account A only).
- Create a VPC peering between the workload account and the central monitoring account (account B only).
The entire setup can be visualized as follows.
This example will use the Ireland (eu-west-1) region. Please visit the AWS Regional Service List to see AWS regions supported by the service.
Workload accounts (account A and account B)
In this section, on both workload accounts, we will:
- Create an Amazon VPC and create an Amazon EKS cluster.
- Create an IAM role and assume role policy in the central monitoring account.
Many of the scripts provided in this blog post rely on dependencies, such as jq, kubectl, eksctl, helm, and awscli. To get these tools installed on AWS CloudShell, we’ll use the following commands.
Note that CloudShell sessions are ephemeral and that deployment of the Amazon EKS cluster can take up to 20 minutes. If the sessions expires, you’ll need to install the tools again by simply running this script and sourcing the delete.env file to restore the environment variables.
sudo yum -y -q install jq openssl


# Install kubectl 1.16.8

curl -o kubectl \
  https://amazon-eks.s3.us-west-2.amazonaws.com/1.17.12/2020-11-02/bin/linux/amd64/kubectl

chmod +x kubectl && sudo mv kubectl /usr/local/bin/

# Install eksctl

curl --silent --location \
  "https://github.com/weaveworks/eksctl/releases/latest/download/eksctl_$(uname -s)_amd64.tar.gz" | \
  tar xz -C /tmp
sudo mv /tmp/eksctl /usr/local/bin


# Install helm

curl -sSL https://raw.githubusercontent.com/helm/helm/master/scripts/get-helm-3 | bash
This script creates an Amazon VPC, an Amazon EKS cluster, and service account role.
WORKLOAD_REGION='eu-west-1'
WORKLOAD_REGION_AZ1='eu-west-1a'
WORKLOAD_REGION_AZ2='eu-west-1b'
WORKLOAD_CIDR_BLOCK='192.168.32.0/19'
WORKLOAD_CIDR_BLOCK_SUBNET1='192.168.32.0/22'
WORKLOAD_CIDR_BLOCK_SUBNET2='192.168.37.0/22'
SERVICE_ACCOUNT_NAME=amp-iamproxy-ingest-service-account

WORKLOAD_ACCOUNT_ID=$(aws sts get-caller-identity | jq .Account -r)

aws configure set region $WORKLOAD_REGION

# Setup VPC
WORKLOAD_VPCID=$(aws ec2 create-vpc \
  --cidr-block ${WORKLOAD_CIDR_BLOCK} | jq .Vpc.VpcId -r)
aws ec2 create-tags --resources $WORKLOAD_VPCID \
  --tags Key=Name,Value=EKS-AMP-Workload
aws ec2 modify-vpc-attribute --vpc-id $WORKLOAD_VPCID \
  --enable-dns-hostnames
aws ec2 modify-vpc-attribute --vpc-id $WORKLOAD_VPCID \
  --enable-dns-support

# Create an internet gateway and attaches it to the VPC
WORKLOAD_IGW=$(aws ec2 create-internet-gateway | jq -r '.InternetGateway.InternetGatewayId')
aws ec2 attach-internet-gateway \
    --internet-gateway-id $WORKLOAD_IGW \
    --vpc-id $WORKLOAD_VPCID

# Create subnets and configure route table
WORKLOAD_RT=$(aws ec2 describe-route-tables \
    --query 'RouteTables[].RouteTableId' \
    --filters Name=vpc-id,Values=$WORKLOAD_VPCID \
    --output text)
aws ec2 create-route --route-table-id $WORKLOAD_RT \
    --gateway-id $WORKLOAD_IGW \
    --destination-cidr-block '0.0.0.0/0'

WORKLOAD_SUBNET1=$(aws ec2 create-subnet --vpc-id $WORKLOAD_VPCID \
    --cidr-block $WORKLOAD_CIDR_BLOCK_SUBNET1 \
    --availability-zone $WORKLOAD_REGION_AZ1 | jq -r '.Subnet.SubnetId')
WORKLOAD_SUBNET2=$(aws ec2 create-subnet --vpc-id $WORKLOAD_VPCID \
    --cidr-block $WORKLOAD_CIDR_BLOCK_SUBNET2 \
    --availability-zone $WORKLOAD_REGION_AZ2 | jq -r '.Subnet.SubnetId')
aws ec2 modify-subnet-attribute --map-public-ip-on-launch \
    --subnet-id $WORKLOAD_SUBNET1
aws ec2 modify-subnet-attribute --map-public-ip-on-launch \
    --subnet-id $WORKLOAD_SUBNET2
aws ec2 associate-route-table --route-table-id $WORKLOAD_RT \
    --subnet-id $WORKLOAD_SUBNET1
aws ec2 associate-route-table --route-table-id $WORKLOAD_RT \
    --subnet-id $WORKLOAD_SUBNET2

# Amazon EKS cluster creation
eksctl create cluster workload \
  --vpc-public-subnets $WORKLOAD_SUBNET1,$WORKLOAD_SUBNET2
eksctl utils associate-iam-oidc-provider --cluster=workload --approve


CLUSTER_OIDC_PROVIDER=$(aws eks describe-cluster --name workload \
  --query "cluster.identity.oidc.issuer" \
  --output text | sed -e "s/^https:\/\///")
cat > trustPolicy.json << EOF
{
  "Version": "2012-10-17",
  "Statement": [
    {
      "Effect": "Allow",
      "Principal": {
        "Federated": "arn:aws:iam::${WORKLOAD_ACCOUNT_ID}:oidc-provider/${CLUSTER_OIDC_PROVIDER}"
      },
      "Action": "sts:AssumeRoleWithWebIdentity",
      "Condition": {
        "StringEquals": {
        "${CLUSTER_OIDC_PROVIDER}:sub": "system:serviceaccount:prometheus:amp-iamproxy-ingest-service-account"
        }
      }
    }
  ]
}
EOF

# Create an IAM role for Kubernetes service account
aws iam create-role \
    --role-name EKS-AMP-ServiceAccount-Role \
    --assume-role-policy-document file://trustPolicy.json \
    --description "IAM role to be used by a K8s service account to assume cross account role"


echo "export WORKLOAD_ACCOUNT_ID=${WORKLOAD_ACCOUNT_ID}" >> delete.env
echo "export WORKLOAD_VPCID=${WORKLOAD_VPCID}" >> delete.env
echo "export WORKLOAD_IGW=${WORKLOAD_IGW}" >> delete.env
echo "export WORKLOAD_RT=${WORKLOAD_RT}" >> delete.env
echo "export WORKLOAD_SUBNET1=${WORKLOAD_SUBNET1}" >> delete.env
echo "export WORKLOAD_SUBNET2=${WORKLOAD_SUBNET2}" >> delete.env
echo "export WORKLOAD_RT=${WORKLOAD_RT}" >> delete.env
echo "export CLUSTER_NAME=workload" >> delete.env
echo "export ROLE_NAME=EKS-AMP-ServiceAccount-Role" >> delete.env

echo -e "# Copy this into your Central account terminal:\n\nexport WORKLOAD_ACCOUNT_ID=$WORKLOAD_ACCOUNT_ID\n"
Let’s create a minimum set of permissions to assume the role EKS-AMP-Central-Role. We will create the EKS-AMP-Central-Role in the central monitoring account later. You can eventually attach additional permissions according to your use case.
# Set the central account id
CENTRAL_ACCOUNT_ID=


cat > PermissionPolicy.json << EOF
{
   "Version":"2012-10-17",
   "Statement":[
      {
         "Effect":"Allow",
         "Action":[
            "sts:AssumeRole"
         ],
         "Resource":"arn:aws:iam::${CENTRAL_ACCOUNT_ID}:role/EKS-AMP-Central-Role"
      }
   ]
}
EOF

POLICY_ARN=$(aws iam create-policy --policy-name xaccount \
    --policy-document file://PermissionPolicy.json | jq -r '.Policy.Arn')
WORKLOAD_ROLE=$(aws iam attach-role-policy --role-name EKS-AMP-ServiceAccount-Role \
    --policy-arn $POLICY_ARN --query 'Role.RoleName' --output text)

echo "export POLICY_ARN=${POLICY_ARN}" >> delete.env
echo "export WORKLOAD_ROLE=${WORKLOAD_ROLE}" >> delete.env
Central monitoring account
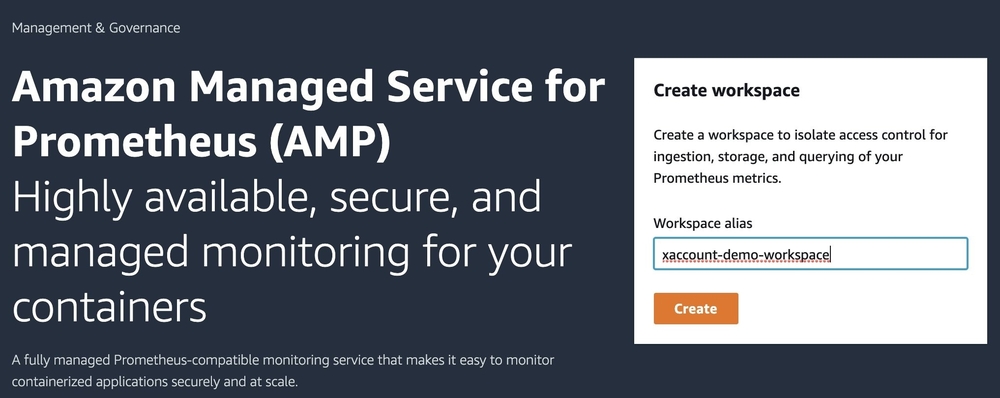
Logged into the central account, we will now create an AMP workspace with aws-cli. We’ll use following command:
WORKSPACE_ID=$(aws amp create-workspace --alias xaccount-demo-workspace \
  --region eu-west-1 \
  --query 'workspaceId')
echo "export WORKSPACE_ID=$WORKSPACE_ID" >> delete.env

echo -e "# Copy this into your workload account terminal:\n\nexport WORKSPACE_ID=$WORKSPACE_ID\n\n"
Alternatively, we can use the AWS console to create the workspace:
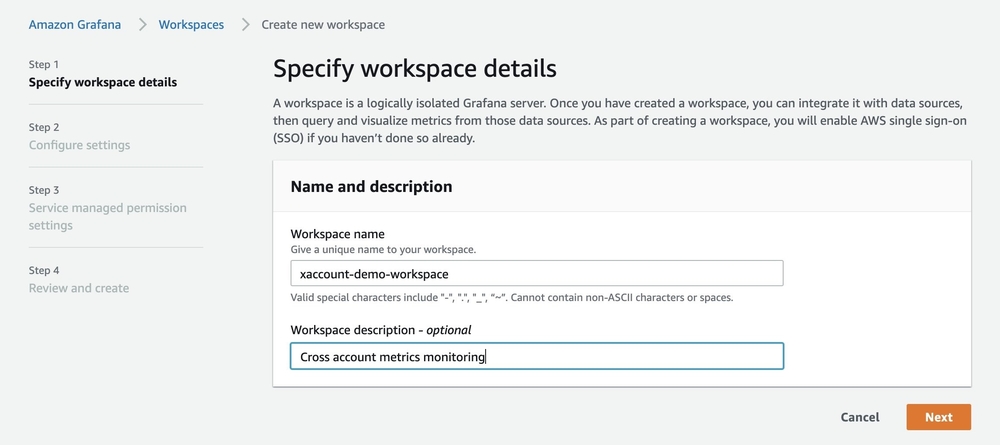
To set up an Amazon Managed Grafana workspace, follow the instructions found in the Amazon Managed Grafana – Getting Started article from the AWS Management & Governance blog.
IAM role (central account)
In this essential step, using IAM trust policies, we are going to define which IAM roles will be able to have write permissions on our central AMP workspace. Here, we specify the roles we created in the steps above.
In a file called policy.json, add the following content and edit the respective values for WORKLOAD_ACCOUNT_A, WORKLOAD_ACCOUNT_B, with the AWS account IDs of the workload accounts.
WORKLOAD_ACCOUNT_A=
WORKLOAD_ACCOUNT_B=

cat > policy.json << EOF
{
  "Version": "2012-10-17",
  "Statement": [
    {
      "Effect": "Allow",
      "Principal": {
        "AWS": [
          "arn:aws:iam::$WORKLOAD_ACCOUNT_A:role/EKS-AMP-ServiceAccount-Role",
          "arn:aws:iam::$WORKLOAD_ACCOUNT_B:role/EKS-AMP-ServiceAccount-Role"
        ]
      },
      "Action": "sts:AssumeRole",
      "Condition": {}
    }
  ]
}
EOF
We can now proceed to IAM role creation. We are also giving write access to AMP via a role policy.
# Note: You might encounter an error if the `EKS-AMP-ServiceAccount-Role`
# does not exists in the target accounts.

CENTRAL_ROLE_NAME=$(aws iam create-role \
  --role-name EKS-AMP-Central-Role \
  --assume-role-policy-document file://policy.json --query 'Role.RoleName' --output text)

aws iam attach-role-policy \
  --role-name $CENTRAL_ROLE_NAME \
  --policy-arn arn:aws:iam::aws:policy/AmazonPrometheusRemoteWriteAccess


echo "export CENTRAL_ROLE_NAME=$CENTRAL_ROLE_NAME" >> delete.env
Deploying Prometheus server — account A only
We will now run Prometheus server inside the Amazon EKS cluster.
Edit the file named amp_ingest_override_values.yaml and replace the ACCOUNT_ID_A , CENTRAL_ACCOUNT_ID and WORKSPACE_ID variables, respectively, with the AWS Account ID of the current account, the AWS account ID for the central monitoring account, and finally the AMP workspace ID.
cat > amp_ingest_override_values.yaml << EOF
serviceAccounts:
    server:
        name: "amp-iamproxy-ingest-service-account"
        annotations:
            eks.amazonaws.com/role-arn: arn:aws:iam::$WORKLOAD_ACCOUNT_ID:role/EKS-AMP-ServiceAccount-Role
server:
    remoteWrite:
      -
        url: https://aps-workspaces.eu-west-1.amazonaws.com/workspaces/$WORKSPACE_ID/api/v1/remote_write
        queue_config:
            max_samples_per_send: 1000
            max_shards: 200
            capacity: 2500
        sigv4:
            region: eu-west-1
            role_arn: arn:aws:iam::$CENTRAL_ACCOUNT_ID:role/EKS-AMP-Central-Role
    statefulSet:
        enabled: "true"
EOF
By running the following commands, we will deploy Prometheus server with the config above. The following script requires kubectl and helm to be installed.
helm repo add prometheus-community https://prometheus-community.github.io/helm-charts
kubectl create ns prometheus
helm install prometheus-for-amp prometheus-community/prometheus -n prometheus
helm upgrade --install prometheus-for-amp prometheus-community/prometheus -n prometheus -f ./amp_ingest_override_values.yaml
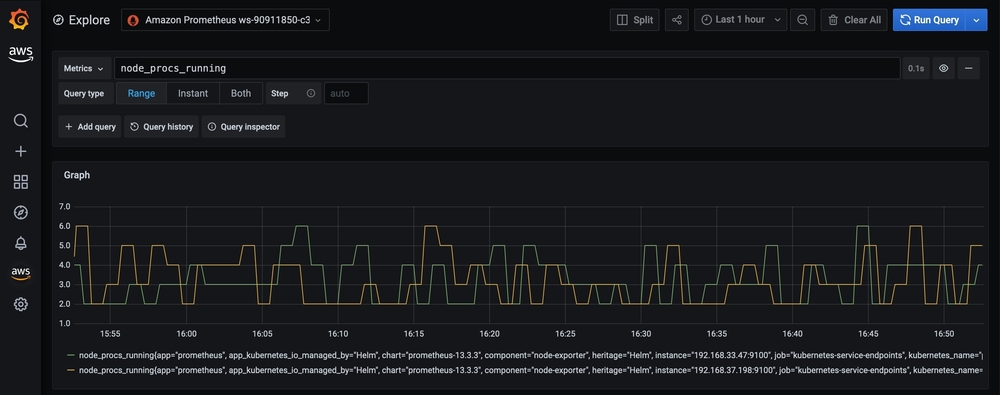
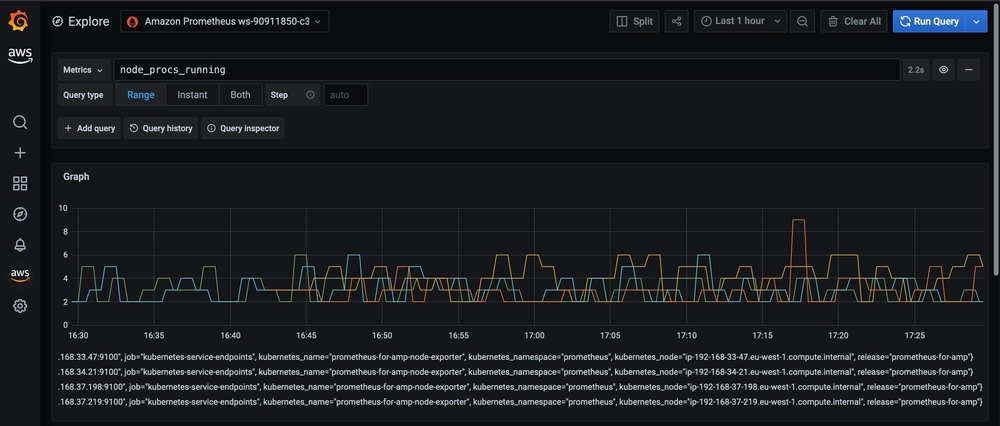
The Prometheus metrics should start to be visible from the central monitoring account. Here we can see the two Amazon EKS worker nodes reporting process metrics:
Up to this point, traffic to the AMP endpoint is routed over public internet (HTTPS+Sigv4). We can verify this by checking the IP address of the DNS name configured for the AMP host server (aps-workspaces.eu-west-1.amazonaws.com).
kubectl exec prometheus-for-amp-server-0 \
  -n prometheus -c prometheus-server -it \
  -- nslookup aps-workspaces.eu-west-1.amazonaws.com
This should return a set of the public IP addresses of the AMP service:
Server:         10.100.0.10
Address:        10.100.0.10:53

Non-authoritative answer:
Name:   aps-workspaces.eu-west-1.amazonaws.com
Address: 34.246.8.159
Name:   aps-workspaces.eu-west-1.amazonaws.com
Address: 18.203.90.208
Name:   aps-workspaces.eu-west-1.amazonaws.com
Address: 52.51.97.79
We can make this traffic private by adding a VPC endpoint (VPCe) with the following commands:
CLUSTER_SG=$(aws eks describe-cluster \
  --name workload \
  --query 'cluster.resourcesVpcConfig.clusterSecurityGroupId' \
  --output text)

VPC_ENDPOINT_ID=$(aws ec2 create-vpc-endpoint \
    --vpc-id $WORKLOAD_VPCID \
    --vpc-endpoint-type Interface \
    --service-name com.amazonaws.eu-west-1.aps-workspaces \
    --subnet-ids $WORKLOAD_SUBNET1 $WORKLOAD_SUBNET2 \
    --security-group-ids $CLUSTER_SG \
    --query 'VpcEndpoint.VpcEndpointId' \
    --output text)

echo "export VPC_ENDPOINT_ID=$VPC_ENDPOINT_ID" >> delete.env
After a few minutes, the VPCe will be ready to route traffic, and the VPC Private DNS will start to return the local IP for this endpoint. Note that traffic will be disrupted until the DNS resolution propagates and the VPCe gets created and starts receiving traffic.
Server:         10.100.0.10
Address:        10.100.0.10:53

Name:   aps-workspaces.eu-west-1.amazonaws.com
Address: 192.168.34.229
Name:   aps-workspaces.eu-west-1.amazonaws.com
Address: 192.168.36.91
Private networking setup
To keep things completely private and secure in the second account (account B), we will set up a VPC peering with the monitoring account before running Prometheus. Here’s a summary of the steps involved.
Central account:
- Create an Amazon VPC, Internet Gateway (IGW), and Subnets.
- Set up a VPC endpoint.
- Create an Amazon Route 53 private hosted zone.
Workload account B:
- Request a VPC peering with central account Amazon VPC.
Central account:
- Accept VPC peering.
- Attach hosted zone to account B’s VPC.
Workload account B:
- Attach Central account’s private hosted zone to account B’s Amazon VPC.
- Configure Amazon EKS security groups.
- Create VPC endpoints.
Central account
The following script will create, in the central monitoring account, an Amazon VPC with two Subnets and a VPC endpoint to enable private connectivity between the Amazon VPC and AMP. We will host a DNS private zone with Amazon Route 53 to resolve DNS queries to AMP inside the Amazon VPC and provide permissions for cross-account DNS resolution into this hosted zone for the workload account Amazon VPC.
# Warning: Run this script in the central account
REGION='eu-west-1'
REGION_AZ1='eu-west-1a'
REGION_AZ2='eu-west-1b'
CENTRAL_CIDR_BLOCK='192.168.254.0/24'
CENTRAL_CIDR_BLOCK_SUBNET1='192.168.254.0/25'
CENTRAL_CIDR_BLOCK_SUBNET2='192.168.254.128/25'
WORKLOAD_CIDR_BLOCK='192.168.32.0/19'

aws configure set region $REGION

# gets the current AWS account id
CENTRAL_ACCOUNT_ID=$(aws sts get-caller-identity | jq .Account -r)

# Setup VPC with DNS support
CENTRAL_VPCID=$(aws ec2 create-vpc --cidr-block ${CENTRAL_CIDR_BLOCK} | jq .Vpc.VpcId -r)
aws ec2 create-tags --resources $CENTRAL_VPCID --tags Key=Name,Value=EKS-AMP-Workload
aws ec2 modify-vpc-attribute --vpc-id $CENTRAL_VPCID --enable-dns-hostnames
aws ec2 modify-vpc-attribute --vpc-id $CENTRAL_VPCID --enable-dns-support

# Creates an internet gateway and attaches it to the VPC
CENTRAL_IGW=$(aws ec2 create-internet-gateway | jq -r '.InternetGateway.InternetGatewayId')
aws ec2 attach-internet-gateway --internet-gateway-id $CENTRAL_IGW --vpc-id $CENTRAL_VPCID

# Creates subnets in two availability zones (AZs)
# For a higly available infrastructure, you should consider 3 or more AZs
CENTRAL_SUBNET1=$(aws ec2 create-subnet --vpc-id $CENTRAL_VPCID --cidr-block $CENTRAL_CIDR_BLOCK_SUBNET1 --availability-zone $REGION_AZ1 | jq -r '.Subnet.SubnetId')
CENTRAL_SUBNET2=$(aws ec2 create-subnet --vpc-id $CENTRAL_VPCID --cidr-block $CENTRAL_CIDR_BLOCK_SUBNET2 --availability-zone $REGION_AZ2 | jq -r '.Subnet.SubnetId')

# Creates a route table for the subnets and a default destination to the IGW.
CENTRAL_RT=$(aws ec2 describe-route-tables --query 'RouteTables[].RouteTableId' --filters --filters Name=vpc-id,Values=$CENTRAL_VPCID --output text)
aws ec2 create-route --route-table-id $CENTRAL_RT --gateway-id $CENTRAL_IGW --destination-cidr-block '0.0.0.0/0'
aws ec2 associate-route-table --route-table-id $CENTRAL_RT --subnet-id $CENTRAL_SUBNET1
aws ec2 associate-route-table --route-table-id $CENTRAL_RT --subnet-id $CENTRAL_SUBNET2

CENTRAL_SG=$(aws ec2 describe-security-groups --filters Name=vpc-id,Values=$CENTRAL_VPCID --query 'SecurityGroups[0].GroupId' --output text)
aws ec2 authorize-security-group-ingress --group-id $CENTRAL_SG --cidr $WORKLOAD_CIDR_BLOCK --protocol all

# Creates a VPC endoint for AMP into the VPC.
VPC_ENDPOINT_ID=$(aws ec2 create-vpc-endpoint \
  --vpc-id $CENTRAL_VPCID \
  --vpc-endpoint-type Interface \
  --service-name com.amazonaws.${REGION}.aps-workspaces \
  --subnet-ids $CENTRAL_SUBNET1 $CENTRAL_SUBNET1 \
  --no-private-dns-enabled \
  --query 'VpcEndpoint.VpcEndpointId' \
  --output text)

# Creates a private hosted zone for AMP hostname
HOSTED_ZONE=$(aws route53 create-hosted-zone \
    --name aps-workspaces.${REGION}.amazonaws.com \
    --caller-reference $(date +%F%T) \
    --vpc VPCRegion=$REGION,VPCId=$CENTRAL_VPCID \
    --hosted-zone-config Comment="VPCE Hosted Zone",PrivateZone=true \
    | jq .HostedZone.Id -r)

# Creates a DNS entry for AMP into the region
DNS_NAME=$(aws ec2 describe-vpc-endpoints \
    --filter Name=service-name,Values="com.amazonaws.${REGION}.aps-workspaces" Name=vpc-id,Values=$CENTRAL_VPCID \
    --query 'VpcEndpoints[].DnsEntries[0].DnsName' --output text)
VPCE_HOSTED_ZONE=$(aws ec2 describe-vpc-endpoints \
    --filter Name=service-name,Values="com.amazonaws.${REGION}.aps-workspaces" Name=vpc-id,Values=$CENTRAL_VPCID \
    --query 'VpcEndpoints[].DnsEntries[0].HostedZoneId' --output text)

cat > dnsentry.json << EOF
{ "Comment": "VPCe record set",
  "Changes":
  [
      { "Action": "CREATE",
         "ResourceRecordSet":
         {
             "Name": "aps-workspaces.${REGION}.amazonaws.com",
             "Type": "A",
             "AliasTarget":
             {
                 "DNSName":"${DNS_NAME}",
                 "HostedZoneId":"${VPCE_HOSTED_ZONE}",
                 "EvaluateTargetHealth":true
             }
         }
     }
  ]
}
EOF

aws route53 change-resource-record-sets \
    --hosted-zone $HOSTED_ZONE \
    --change-batch file://dnsentry.json

echo "export CENTRAL_ACCOUNT_ID=${CENTRAL_ACCOUNT_ID}" >> delete.env
echo "export CENTRAL_VPCID=${CENTRAL_VPCID}" >> delete.env
echo "export CENTRAL_IGW=${CENTRAL_IGW}" >> delete.env
echo "export CENTRAL_RT=${CENTRAL_RT}" >> delete.env
echo "export CENTRAL_SUBNET1=${CENTRAL_SUBNET1}" >> delete.env
echo "export CENTRAL_SUBNET2=${CENTRAL_SUBNET2}" >> delete.env
echo "export CENTRAL_RT=${CENTRAL_RT}" >> delete.env
echo "export HOSTED_ZONE=$HOSTED_ZONE" >> delete.env
echo "export VPC_ENDPOINT_ID=$VPC_ENDPOINT_ID" >> delete.env


echo -e "# Copy this into your workload accounts:\n\nexport CENTRAL_ACCOUNT_ID=$CENTRAL_ACCOUNT_ID\nexport CENTRAL_VPCID=$CENTRAL_VPCID\n\n"
Workload account B
In account B, set the CENTRAL_ACCOUNT_ID, and CENTRAL_VPCID environment variables with the corresponding values and run the following script to request a VPC peering with the central monitoring account.
# Warning: Run this script in account B, run the export commands from the central account


VPC_ID=$(aws ec2 describe-vpcs --filter Name=cidr,Values=192.168.32.0/19 --query Vpcs[0].VpcId --output text)
VPC_PEERING_ID=$(aws ec2 create-vpc-peering-connection \
    --vpc-id $VPC_ID \
    --peer-owner-id $CENTRAL_ACCOUNT_ID \
    --peer-vpc-id $CENTRAL_VPCID \
    | jq '.VpcPeeringConnection.VpcPeeringConnectionId' -r)

echo "export VPC_PEERING_ID=${VPC_PEERING_ID}" >> delete.env
echo -e "# Copy this into your Central accounts:\n\nexport WORKLOAD_VPCID=$VPC_ID\n"
Central monitoring account
In the central account, we will accept the peering connection and set up a private DNS hosted zone to be associated with account B’s VPC. Set the appropriate value for WORKLOAD_VPCID and run the following script.
# Warning: Run this script in the central account, run the export commands from the worload account

REGION=eu-west-1

# Gets the peering connection created on account B
VPC_PEERING_ID=$(aws ec2 describe-vpc-peering-connections --filters \
    Name=requester-vpc-info.cidr-block,Values=192.168.32.0/19 \
    Name=status-code,Values=pending-acceptance \
    --query VpcPeeringConnections[].VpcPeeringConnectionId \
    --output text)

HOSTED_ZONE_ID=$(aws route53 list-hosted-zones-by-name \
    --dns-name com.amazonaws.${REGION}.aps-workspaces \
    --query HostedZones[0].Id \
    --output text)

# accepts VPC peering
aws ec2 accept-vpc-peering-connection \
  --vpc-peering-connection-id $VPC_PEERING_ID \
  --output text \
  --query 'VpcPeeringConnection[].AccepterVpcInfo.OwnerId'

sleep 60

aws ec2 modify-vpc-peering-connection-options \
    --vpc-peering-connection-id $VPC_PEERING_ID \
    --accepter-peering-connection-options AllowDnsResolutionFromRemoteVpc=true

# Authorizes Account B to issue a request to associate the VPC with a specified hosted zone
aws route53 create-vpc-association-authorization \
    --hosted-zone-id $HOSTED_ZONE_ID --vpc VPCRegion=$REGION,VPCId=$WORKLOAD_VPCID


echo -e "# Copy this into your Workload accounts:\n\nexport HOSTED_ZONE=$HOSTED_ZONE_ID\n"
Workload account B
On workload account B, the VPC peering should now appear as active. We will next associate the private hosted zone for AMP to the Amazon EKS VPC. From the last script output, set the corresponding value for HOSTED_ZONE and run the following script.
# Warning: Run this script in account B, run the export commands from the central account

REGION='eu-west-1'
CENTRAL_CIDR_BLOCK='192.168.254.0/24'


VPC_ID=$(aws ec2 describe-vpcs --filter Name=cidr,Values=192.168.32.0/19 --query Vpcs[0].VpcId --output text)

VPC_PEERING_ID=$(aws ec2 describe-vpc-peering-connections --filters \
    Name=accepter-vpc-info.cidr-block,Values=$CENTRAL_CIDR_BLOCK \
    Name=status-code,Values=active \
    --query VpcPeeringConnections[].VpcPeeringConnectionId \
    --output text)

RT=$(aws ec2 describe-route-tables \
    --query 'RouteTables[].RouteTableId' \
    --filters Name=vpc-id,Values=$VPC_ID \
    --output text)

aws ec2 create-route --route-table-id $RT \
    --vpc-peering-connection-id $VPC_PEERING_ID \
    --destination-cidr-block $CENTRAL_CIDR_BLOCK

aws ec2 modify-vpc-peering-connection-options \
    --vpc-peering-connection-id $VPC_PEERING_ID \
    --requester-peering-connection-options AllowDnsResolutionFromRemoteVpc=true

aws route53 associate-vpc-with-hosted-zone \
    --hosted-zone-id $HOSTED_ZONE \
    --vpc VPCRegion=$REGION,VPCId=$VPC_ID

CLUSTER_SG=$(aws eks describe-cluster --name workload --query 'cluster.resourcesVpcConfig.clusterSecurityGroupId' --output text)
DEFAULT_SG=$(aws ec2 describe-security-groups --filters Name=vpc-id,Values=$VPC_ID Name=group-name,Values='default' --query 'SecurityGroups[].GroupId'  --output text)
aws ec2 authorize-security-group-ingress --group-id $CLUSTER_SG --cidr $CENTRAL_CIDR_BLOCK --protocol all
aws ec2 authorize-security-group-ingress --group-id $DEFAULT_SG --cidr $CENTRAL_CIDR_BLOCK --protocol all
Deploying Prometheus server — account B only
With the full private connectivity between VPCs established, we can now run Prometheus server on Amazon EKS. This is similar to the deployment made with account A.
Edit the file named amp_ingest_override_values.yaml and replace the WORKLOAD_ACCOUNT_ID, CENTRAL_ACCOUNT_ID, and WORKSPACE_ID variables, respectively, with the AWS Account ID of the current account, the AWS account ID for the central monitoring account, and the AMP workspace ID.
cat > amp_ingest_override_values.yaml << EOF
serviceAccounts:
    server:
        name: "amp-iamproxy-ingest-service-account"
        annotations:
            eks.amazonaws.com/role-arn: arn:aws:iam::$WORKLOAD_ACCOUNT_ID:role/EKS-AMP-ServiceAccount-Role
server:
    remoteWrite:
      -
        url: https://aps-workspaces.eu-west-1.amazonaws.com/workspaces/$WORKSPACE_ID/api/v1/remote_write
        queue_config:
            max_samples_per_send: 1000
            max_shards: 200
            capacity: 2500
        sigv4:
            region: eu-west-1
            role_arn: arn:aws:iam::$CENTRAL_ACCOUNT_ID:role/EKS-AMP-Central-Role
    statefulSet:
        enabled: "true"
EOF
By running the following commands, we will deploy Prometheus server with the config above.
helm repo add prometheus-community https://prometheus-community.github.io/helm-charts
kubectl create ns prometheus
helm install prometheus-for-amp prometheus-community/prometheus -n prometheus
helm upgrade --install prometheus-for-amp prometheus-community/prometheus -n prometheus -f ./amp_ingest_override_values.yaml
At this stage, we’re able to visualize all metrics from the four worker nodes in both Amazon EKS clusters, with two per cluster in each workload account.
To test the route used by Prometheus server to publish its metrics, we can query the DNS record for the the AMP host with the following command:
$ kubectl exec prometheus-for-amp-server-0 \
  -n prometheus -c prometheus-server -it \
  -- nslookup aps-workspaces.eu-west-1.amazonaws.com
You should see a result like this:
Server:         10.100.0.10
Address:        10.100.0.10:53

Non-authoritative answer:
Name:   aps-workspaces.eu-west-1.amazonaws.com
Address: 192.168.254.56
Note that the address of the host is within the central monitoring account CIDR block.
Troubleshooting
To troubleshoot issues in the deployment, check the logs in the prometheus-for-amp-server pod with this command:
# Prometheus server
kubectl logs -f prometheus-for-amp-server-0 -n prometheus prometheus-server
# force prometheus to redeploy if changes are needed in the ingest_override_values.yaml after the first deployment
helm upgrade --install prometheus-for-amp prometheus-community/prometheus -n prometheus -f ./amp_ingest_override_values.yaml
Conclusion
In this article, we have shown how to centralize Prometheus metrics collection using AMP for a workload segmented into multiple accounts. To visualize metrics, we’ve set up Grafana workspace with Amazon Managed Grafana, which provides a native integration with AMP. You can also run your own Grafana server and query your metrics.
With the help of IAM roles and cross-account trust policies, you can be specific regarding who has access to the workspace. Our example makes use of Amazon Elastic Kubernetes Service (EKS); however, you can also use this setup for other workload types, such as Amazon Elastic Container Service (ECS) or Amazon Elastic Compute Cloud (Amazon EC2). Additionally, we provide options for complete private connectivity using VPC peering and VPC endpoints.
Cleanup
To remove all the resources used in this article, run the following commands on each account. All the relevant resources are saved in the “delete.env” file for referencing on these scripts.
Workloads:
# Workloads
source delete.env
helm uninstall prometheus-for-amp -n prometheus
rm -f amp_ingest_override_values.yaml
# Account A
if [ $VPC_ENDPOINT_ID ]; then aws ec2 delete-vpc-endpoints --vpc-endpoint-ids ${VPC_ENDPOINT_ID} ; fi
# Account B
if [ $VPC_PEERING_ID ]; then aws ec2 delete-vpc-peering-connection --vpc-peering-connection-id $VPC_PEERING_ID ; fi

aws iam detach-role-policy --role-name $WORKLOAD_ROLE --policy-arn $POLICY_ARN
aws iam delete-policy --policy-arn $POLICY_ARN
aws iam delete-role --role-name $WORKLOAD_ROLE
rm PermissionPolicy.json
rm -f trustPolicy.json
eksctl delete cluster workload
aws ec2 detach-internet-gateway --internet-gateway-id $WORKLOAD_IGW --vpc-id $WORKLOAD_VPCID
aws ec2 delete-internet-gateway --internet-gateway-id $WORKLOAD_IGW

# Wait for deletion
sleep 60

aws ec2 delete-subnet --subnet-id $WORKLOAD_SUBNET1
aws ec2 delete-subnet --subnet-id $WORKLOAD_SUBNET2
aws ec2 delete-vpc --vpc-id $WORKLOAD_VPCID
Central account:
#Central account
source delete.env
if [ -f dnsentry.json ]; then sed -i "s/CREATE/DELETE/g" dnsentry.json ; f
aws route53 change-resource-record-sets \
    --hosted-zone $HOSTED_ZONE \
    --change-batch file://dnsentry.json
# Wait for deletion
sleep 60
aws route53 delete-hosted-zone --id $HOSTED_ZONE
aws iam detach-role-policy --role-name $CENTRAL_ROLE_NAME --policy-arn arn:aws:iam::aws:policy/AmazonPrometheusRemoteWriteAccess
aws iam delete-role --role-name $CENTRAL_ROLE_NAME
rm PermissionPolicy.json
aws ec2 delete-vpc-endpoints --vpc-endpoint-ids ${VPC_ENDPOINT_ID}
aws ec2 detach-internet-gateway --internet-gateway-id $CENTRAL_IGW --vpc-id $CENTRAL_VPCID
aws ec2 delete-internet-gateway --internet-gateway-id $CENTRAL_IGW
aws ec2 delete-subnet --subnet-id $CENTRAL_SUBNET1
aws ec2 delete-subnet --subnet-id $CENTRAL_SUBNET2
aws ec2 delete-vpc --vpc-id $CENTRAL_VPCID
aws amp delete-workspace --workspace-id $WORKSPACE_ID