AWS Security Blog
How to automate SCAP testing with AWS Systems Manager and Security Hub
US federal government agencies use the National Institute of Standards and Technology (NIST) framework to provide security and compliance guidance for their IT systems. The US Department of Defense (DoD) also requires its IT systems to follow the Security Technical Implementation Guides (STIGs) produced by the Defense Information Systems Agency (DISA). To aid in managing compliance with these programs, IT managers can use OpenSCAP, an open-source NIST-certified security and compliance tool. OpenSCAP uses the Security Content Automation Protocol (SCAP) to automate continuous monitoring, vulnerability management, and reporting of security policy compliance data. Although OpenSCAP is geared towards DoD security standards, it can be applied to set security baselines for any industry.
This blog post will walk you through how to automate OpenSCAP’s STIG testing and integrate the findings with AWS Security Hub to improve your view of your IT systems’ compliance status. Security Hub is a centralized location that gives you a comprehensive view of your security posture across your Amazon Web Services (AWS) accounts. Security Hub natively integrates with Amazon GuardDuty, Amazon Inspector, Amazon Macie, AWS Identity and Access Management (IAM) Access Analyzer, and AWS Firewall Manager. Security Hub also integrates with several AWS Partner solutions. For accounts that don’t have Security Hub enabled, the results of the STIG tests are still available because the results are also stored in Amazon DynamoDB, and Amazon CloudWatch metrics are generated.
This post uses Red Hat Enterprise Linux (RHEL) for the example code, but the same techniques can also be used for Windows.
Solution overview
The solution we present in this blog uses a number of AWS services to automate the testing and reporting of OpenSCAP, as shown in Figure 1.
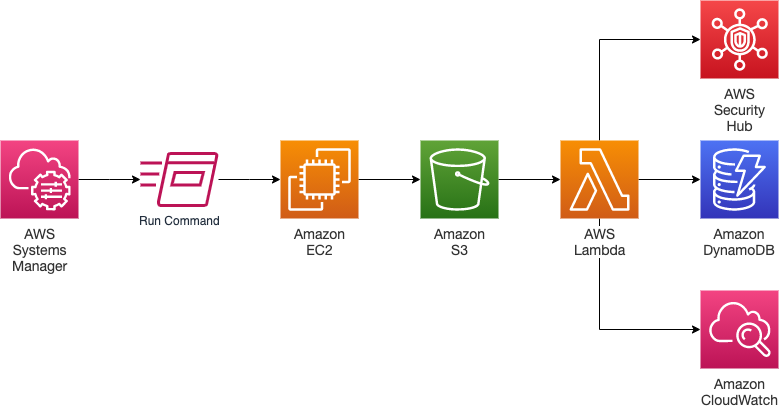
Figure 1: Solution architecture
The workflow of the solution is as follows:
- The process starts with AWS Systems Manager, where a Run Command association is used to run OpenSCAP on the RHEL instances that you’ve configured to use the solution.
- After the OpenSCAP scanning process is complete, the Amazon Elastic Compute Cloud (Amazon EC2) instance puts the output—an XML results file and an HTML report—into an Amazon Simple Storage Service (Amazon S3) bucket.
- The S3 bucket has an event notification on the s3:ObjectCreated:* methods that triggers an AWS Lambda function.
- The Lambda function parses the OpenSCAP results file to extract and count all the low, medium, and high severity findings.
- The function pushes the counts as custom metrics to CloudWatch.
- The function saves the detailed information for each finding in a DynamoDB table.
- If Security Hub is enabled on the account, the function also sends the detailed information for each finding to Security Hub, with a link to the HTML results file that provides remediation guidance.
Deploy the solution
This blog covers the process of setting up your AWS account to support automated SCAP testing and reporting. It also walks you through all the code that is used in this solution so that you can customize the code. The walkthrough is broken down into three steps:
- Step 1: Deploy the AWS CloudFormation template
- Step 2: Set up your Red Hat Enterprise Linux servers
- Step 3: Test the process
Prerequisites
You’ll need a Red Hat Enterprise Linux (RHEL) 7 or RHEL 8 Amazon EC2 instance. This solution can be used for other operating systems that are supported by OpenSCAP, but in this post, we only discuss an implementation for RHEL. The instance type also must have enough memory to run the OpenSCAP tool—for the complete STIG testing, a minimum of 8 GB of RAM is needed.
For the Security Hub integration to work, you must enable Security Hub. If you run the automated tests but aren’t integrated with Security Hub, then the solution publishes the results only to DynamoDB.
Step 1: Run the AWS CloudFormation template
You can access the CloudFormation template for this solution from here. The CloudFormation template has two parameters that you need to set. The first parameter indicates to the Lambda script whether you want to enable Security Hub integration, and this value is stored in the AWS Systems Manager Parameter Store under /SCAPTesting/EnableSecurityHub. The second parameter is the name of the S3 bucket you want to store the SCAP results in. This bucket will be created for you by the template; its name must be unique and must follow the S3 bucket naming guidelines. The template then creates resources for you, which we will describe in the next section.
Run the following command line interface (CLI) command to deploy the CloudFormation template.
Step 2: Set up the Red Hat Enterprise Linux instances
There are a few things that you’ll need to do to the RHEL instances that need to be scanned, in order for them to work with Systems Manager and S3.
First, associate the IAM role created by the CloudFormation template with each instance that you want the scanning performed on. If you already have an instance role associated with your instance, add the policies in the SCAPEC2InstanceRole role that was created by the CloudFormation template to the role that you’re currently using.
Next, add the RunSCAP tag to your instances so that the Run Command association will be alerted to run the command on the instances.
In order for the instance to interact with S3, it needs to have the AWS Command Line Interface (AWS CLI) installed. To do this, install the unzip tool, then connect to your RHEL server by using SSH and run the following commands.
Next, install and start the Systems Manager Agent for RHEL so that it can make use of Systems Manager. The install command must point to the AWS Region that the instances are running in. In the following command, you will need to replace <region> with the correct Region (for example, us-east-1).
Step 3: Test the process
To make sure that the template created all the resources successfully and the automation is running, view the automation in the AWS Management Console.
To validate the solution deployment
- Sign in to the AWS Management Console, and then navigate to AWS Systems Manager.
- In the left-hand menu, choose State Manager to bring up the State Manager page in the console. In the Associations table, you should see an entry with an association name of SCAPRunCommandAssociation. The first run should not have had any instances to scan, because the EC2 instance wasn’t configured yet.

Figure 2: The Associations table in the State Manager console
- Select the association ID to bring up the association details page.

Figure 3: Association details
- Choose Apply association now to run the association against the instances that you configured in Step 2: Set up the Red Hat Enterprise Linux instances. After the association shows a status of success again, you should see the Resource status count field show success:1 if you set up a single instance.
- Navigate to Security Hub in the Console and view the findings produced by the OpenSCAP tool. If you didn’t enable Security Hub, you’ll be able to see the results in the SCAPScanResults DynamoDB table.

Figure 4: The findings in the Security Hub console
Deep dive into the solution
Now we’ll walk you through all the resources created by the CloudFormation template. We explain how each resource is created, and why it is needed by the solution. We also explain some of the settings that you might want to modify for your environment. This includes walking through the parts of the Lambda function that handle the parsing of the OpenSCAP results and placing the findings into Security Hub.
The Parameter Store parameter
The CloudFormation template uses the AWS::SSM::Parameter resource to create the /SCAPTesting/EnableSecurityHub parameter in the Parameter Store and put the value that you selected into it. The Lambda function then uses this parameter to determine whether findings should be sent to Security Hub.
The scan results S3 bucket
The template creates an S3 bucket to hold all OpenSCAP testing results and the HTML report. Each EC2 instance will have its own folder in the bucket, keyed by its instance-id, and the output files are named <timestamp>-scap-results.xml and <timestamp>-scap-results.html. The S3 bucket is created with the NotificationConfiguration event s3:ObjectCreated:* and the suffix filter .xml. This tells Amazon S3 to notify the Lambda function of all files that are created in the S3 bucket where the file name ends in .xml, so that only the XML files are processed.
In order for Amazon S3 to be able to invoke the Lambda function, the S3 bucket needs permission. The CloudFormation template creates an AWS::Lambda:::Permission resource for this purpose. The permission allows only the S3 bucket that was created earlier to call the Lambda function. The permission also requires the call to come from the source account where the stack is created, to further enhance security.
DynamoDB tables
The template creates two DynamoDB tables. The first is a table to hold the names of OpenSCAP tests to ignore. This table is loaded by the Lambda function, and the function ignores any results from the test that match the SCAP_Rule_Name element from the XML results in the DynamoDB table. This allows you to customize your reports so that they don’t show any findings that you want ignored; this table is empty by default.
The second DynamoDB table holds information about each of the OpenSCAP findings. The Lambda function puts the InstanceId, SCAP Rule Name, time, severity of the finding, the result of the test, and a link to the HTML report in S3 for the test run. This table is useful if you don’t use Security Hub but still want the findings in a data store. Note that the ReadCapacityUnits and WriteCapacityUnits parameters are used for instructional purposes only—you must set these appropriately based on the number of servers you are scanning and frequency of scans.
EC2 instance permissions
The EC2 instance needs permissions to allow it to have access to Systems Manager and S3. To accomplish this, Systems Manager Run Command needs permission to run commands on your EC2 instances, and your instances need access to the S3 bucket. For all these purposes, the template creates an AWS::IAM::Role resource that will give the EC2 instance the permissions from the AWS managed policy AmazonEC2RoleforSSM. Systems Manager must have this policy in place so that it can use Run Command on the instances. The template also creates an inline policy that allows the EC2 instance the s3:PutObject action so that the instance can upload its scan results to the S3 bucket created earlier. To enable an EC2 instance to use the role that the template created, the instance needs an AWS::IAM::InstanceProfile resource. This allows the EC2 instance to assume the role that was created, so that the instance can perform the actions needed by Run Command and can put the results in the S3 bucket.
The Lambda function definition
The Process SCAP Results Lambda function will be loaded from the same S3 bucket that the CloudFormation script is in, and you can view it from that S3 bucket.
In the Lambda function definition in the CloudFormation template, a Timeout value of 360 seconds and a MemorySize value of 1024 megabytes is provided. The memory is needed to process the large XML files that contain the results, and also gives the Lambda function more central processing unit (CPU) capacity to utilize.
The Lambda execution role is also assigned to the Lambda function in this solution. The Lambda function needs to interact with CloudWatch (both logs and metrics), DynamoDB, S3, Security Hub and Systems Manager Parameter Store. This role provides least-privilege access to those services with inline policies.
The following table shows the API calls allowed by the role and what they’re being used for.
| IAM permission | Description |
| cloudwatch:PutMetricData | Set to allowed so that the function can push the count of low, medium, and high severity findings to CloudWatch. |
| logs:CreateLogGroup, logs:CreateLogStream, logs:PutLogEvents | Set to allowed so that the function can write log events to CloudWatch. |
| dynamodb:Scan | Set to allowed for the Ignore List table, because the function needs to scan the table to get all the rules to ignore. |
| dynamodb:BatchWriteItem | Set to allowed for the Results table so that the function can save the results to DynamoDB. |
| s3:Get* | Set to allowed so that the function can access the scan results. |
| securityhub:BatchImportFindings | Set to allowed so that the function can push findings to Security Hub. |
| ssm:GetParameters, ssm:DescribeParameters, ssm:GetParameter | Set to allowed so that the function can get the parameters that were created by the CloudFormation template. |
The Lambda function code
We’ll walk through some of the key elements of the Process SCAP Results Lambda function code here. You can view the full function by following the link provided earlier for the Lambda function.
The first thing the function does is to get the file from S3 and parse it as XML, as follows.
After the function has the XML, it checks the Parameter Store to see if it should push the results to Security Hub.
To get the findings of the test, the function navigates through the XML and finds the TestResults section.
The Lambda function then loops through each finding that was found in the TestResults section of the XML, and checks whether the finding is in the ignore list, whether the result is “fail,” and then whether the severity of the result is “high,” “medium,” or “low.” The function then adds the finding to a list of objects to persist to DynamoDB, adds the finding to another list of objects to send to Security Hub, and adds counts for the different severity types to send to CloudWatch.
After all the results are processed, the function submits the counts to CloudWatch.
Next, the function uses the batch_writer method of the DynamoDB table to insert all the records in a single batch.
Finally, the function submits the findings to Security Hub. The Security Hub API provides a batch_import_findings method that supports the import of 100 findings at a time. The following code breaks up the findings array into groups of 100 and then pushes them to Security Hub.
The Systems Manager Run Command association
The last section of the CloudFormation template creates the Systems Manager Run Command association (AWS::SSM::Association). This association creates an AWS-RunShellScript Run Command and passes it a script that will be explained in the next section. The association also uses the ScheduleExpression parameter with a cron definition to run the command once a day. Finally, it associates the command with all EC2 instances that have the tag RunSCAP set to True.
Systems Manager Run Command
With Systems Manager Run Command, you can run a command on an instance that is using the Systems Manager Agent. The Systems Manager Agent makes it possible for Systems Manager to run commands on your behalf. This solution uses a built-in Run Command called AWS-RunShellScript, which will run a script on a Linux operating system.
The first thing that the script does is a yum install to make sure that the OpenSCAP tool is installed and up to date prior to running the scanner.
Next, the script checks to see which version of RHEL the operating system is so that it can save the correct OpenSCAP testing file to the scriptFile variable.
Next, the script checks that it found the configuration script for the version of RHEL that the instance is using as its operation system.
OpenSCAP has the capability to run multiple checks for the same rule. For instance, when it checks to see if your system is patched, it will scan several packages. If you want OpenSCAP to list each package that failed, you need to have multi-check parameter set to true. For this solution, you will only want the rolled-up results, because when OpenSCAP formats the results for the multiple checks, it uses the same test ID for each check. This would result in only the last check being recorded, but by rolling the results up, you’ll know if the system update failed for any package. The remediation has you perform an update to all packages, so you set the multi-check parameter to false in the OpenSCAP testing file.
Now that the correct configuration script is in place and the multi-check values are set in it, the OpenSCAP tool can be run to perform the scan and check for STIG compliance.
After the scan is complete, the script gets the instance ID and a timestamp, and saves them to variables so that it can use these values when it pushes the results to S3.
Finally, the script pushes the results XML file and the report HTML file to a folder in the S3 bucket. The name of the folder is the ID of the EC2 instance. The script sets the two file names to be a timestamp followed by -scap-results.html and -scap-results.xml.
Conclusion
In this post, you’ve learned how to automate your OpenSCAP testing process for RHEL instances by using System Manager Run Command associations. You can apply this same technique to any operating system supported by OpenSCAP. You also learned how you can use Lambda to post any OpenSCAP findings to Security Hub so that you can centralize security findings across your infrastructure. I hope you can use these techniques to improve your security and compliance automation within your own organization.
For more AWS security automation information, see our blog posts at https://aws.amazon.com/blogs/security/tag/automation/
If you have feedback about this post, submit comments in the Comments section below. If you have questions about this post, start a new thread on the AWS Security Hub forum or contact AWS Support.
Want more AWS Security how-to content, news, and feature announcements? Follow us on Twitter.