Containers
Automated software delivery using Docker Compose and Amazon ECS
Note: Docker Compose’s integration with Amazon ECS has been deprecated and is retiring in November 2023
In November 2020, Docker Compose for Amazon ECS became generally available. It is now even easier for a developer to take a containerized microservices-based application from their workstation and deploy it straight to the AWS Cloud. Developers can now run docker compose up and deploy their existing Docker Compose files straight to Amazon ECS, as previously shown here. Leveraging Docker Compose for Amazon ECS, a developer can have a consistent framework when developing an application locally and when running it on Amazon ECS.
For many enterprises however, deploying straight from the developer’s workstation to the AWS Cloud isn’t something they would approve of, and instead, they have adopted a more automated centralized deployment model. So the question is now: can the same Docker Compose file that is used during development on a workstation be used to deploy to a production environment in a more controlled manner? And we believe the answer, by leveraging Docker Compose for Amazon ECS, is yes.
Depending on the size and governance inside of an organization, the number of steps to take an application from a developer’s workstation to production could vary greatly. So in this blog post, we will assume a few requirements that a solution needs to meet.
- The same Docker Compose file should be used throughout, from the developers workstation through to the test/staging and production environments.
- Our microservices-based application defined in Docker Compose should be deployed into an existing AWS infrastructure. Amazon VPC, ECS clusters, and custom AMIs are often already in place and shared between multiple application teams.
- The solution must be automated from the time a developer checks in their code into a source code repository, through to deploying on to the existing AWS production infrastructure. Manual deployments decrease the ability for standardization and provide room for human error.
CI/CD pipeline
In this blog post, we want to highlight how you could take a Docker Compose file and deploy it in an automated fashion through a pipeline, a more common approach to rolling out a microservices-based application. In this walk through, we will leverage AWS CodePipeline and AWS CodeBuild, however, these steps could be adapted to suit an existing CI/CD pipeline in your environment.

The steps involved in this sample pipeline are as follows:
- We will store our application code in S3, with any object changes in S3 resulting in a trigger of the pipeline. AWS CodePipeline supports a variety of sources to trigger a pipeline run, such as S3, CodeCommit, Github, and BitBucket. To utilize this sample pipeline with a GitHub repository as the source instead of S3, see this documentation.
- Following a change in an S3 object, AWS CodePipeline will start an AWS CodeBuild job to build a new container image and push the resulting image to Amazon Elastic Container Registry (Amazon ECR). At this stage in the pipeline, it is common to execute various unit and application integration tests, however these are not included in this walk through.
- After the container image has been built, we will focus on the Docker Compose file. First, converting the existing Docker Compose file to an AWS CloudFormation template through the Docker Compose for ECS plugin. This is done by running by the
docker compose convertcommand within an AWS CodeBuild instance. The output artifact from this command is a CloudFormation template that can be used to create an AWS CloudFormation change set. - AWS CodePipeline will now stop and wait for a user to review an AWS CloudFormation change set.
- Finally, once the CloudFormation change set is approved, AWS CodePipeline will now execute the Cloudformation change set, rolling out the new change to the ECS environment via an ECS service rolling update.
Converting to AWS CloudFormation
One of the important steps in the walk through Pipeline is that we convert the Docker Compose to CloudFormation for the production roll out. There is no hard requirement to do this, within our pipeline we could run docker compose up within CodeBuild and the latest Docker Compose file is deployed to the production environment, as is the case in Massimo’s blog.
If you are working in an agile environment or maybe you have a small change control process, then this is fine. However in many circumstances, especially in larger enterprises, a manual approval process in a pipeline is a good thing as it provides time for other members of the team to review the change before it rolls out to production. When this manual approval occurs, we believe a CloudFormation change set is an appropriate way to view the changes about to be made in the environment. Even though a code change may have been reviewed in a GitHub pull request, the underlying change on the infrastructure may be hard to spot. The Docker Compose for ECS plugin controls a lot more than just rolling out a new version of a microservice. The great abstraction provided by Docker Compose means that a lot more of the AWS infrastructure is defined in the Docker Compose framework. The security groups, the load balancers, and the IAM roles and policies can all be updated as a result of a change in Docker Compose; these items are often critical items in a production environment which would justify a manual gate to review.
Converting the Docker Compose file to CloudFormation using docker compose convert and then creating a CloudFormation change set allows us to deeply inspect what resources within the AWS Cloud are going to be created or updated. This is considered an AWS CloudFormation best practice. Note that other AWS developer focused tools like AWS Cloud Development Kit (CDK) and AWS Serverless Application Framework (SAM) also require manual approval of a CloudFormation change set before deploying their workloads.
Sample pipeline
In this walk through, we will leverage a two tiered sample application, the first tier is a Python Flask application, the 2nd is a stateful tier running Redis. Every time a user clicks the button in the Flask application, a timestamp entry is stored in the Redis key/value store. This sample application can be deployed locally using Docker Compose, on both a workstation running Docker Desktop or a Linux host with the Docker Engine and Compose CLI installed.
$ git clone https://github.com/aws-containers/demo-app-for-docker-compose.git
$ cd demo-app-for-docker-compose/application
$ docker compose up
If everything has worked correctly, you can now navigate to http://localhost in your web browser and you should see the sample application. Feel free to click the button to test that the 2 tiers of the application are communicating correctly over the local Docker network bridge.

Inspecting the Docker Compose file
The sample application Docker Compose file is quite straight forward, if deployed locally this compose file contains a frontend service, backend service, a Docker network to connect the two containers, and finally a Docker volume to store the Redis state.
x-aws-vpc: ${AWS_VPC}
x-aws-cluster: ${AWS_ECS_CLUSTER}
x-aws-loadbalancer: ${AWS_ELB}

services:
  frontend:
    image: ${IMAGE_URI:-frontend}:${IMAGE_TAG:-latest}
    build: ./frontend
    environment:
      REDIS_URL: "backend"
    networks:
      - demoapp
    ports:
      - 80:80

  backend:
    image: public.ecr.aws/bitnami/redis:6.2
    environment:
      ALLOW_EMPTY_PASSWORD: "yes"
    volumes:
      - redisdata:/data
    networks:
      - demoapp

volumes:
  redisdata:

networks:
  demoapp:
However, some interesting things happen if we then deploy this through the Docker Compose to ECS plugin.
- Two Amazon ECS services will be created that provide an orchestrated deployment for our workloads. The running containers will be deployed to AWS Fargate.
- An Amazon EC2 security group will be created, defining Ingress Rules into the “Frontend” and “Backend” services.
- An AWS Cloud Map namespace will be created transparently providing service discovery within our environment, allowing the “Frontend” to discover the “Backend.”
- The Application Load Balancer will be configured with a listener on port 80, and a Target Group connected to the “Frontend” service.
- An Amazon Elastic File Share (EFS) will be created and mounted to the “Backend” service, providing state to the Redis database.
- The
x-aws-*variables will be used to define where the application and its supporting AWS infrastructure will be deployed, for a complete list of the supportedx-awsvariables see the Docker Documentation.
One of the core intentions here is to keep the Docker Compose file generic, not hard coding variables, allowing it to be environment agnostic (i.e. development / testing / production). The Amazon VPC, ECS cluster, and load balancer values, alongside the Image URI and Tag are set with environment variables. These environment variables are set in the various CodeBuild stages in the CI/CD pipeline. When a developer is working on their application locally the x-aws-* variables defined in the compose file are ignored, so variables do not need to be set on their workstation.
Infrastructure requirements
For this walk through, we will deploy a Docker Compose file in to existing AWS infrastructure. The Docker Compose for ECS plugin could create all of the prerequisites for you, however, to simulate a production-like environment, our infrastructure will be deployed separately. If you do not have an existing VPC and ECS Cluster in place, a CloudFormation template within the sample application git repository can give you a head start.

This sample CloudFormation template will create a VPC, Public and Private Subnets, and an Amazon ECS cluster following AWS best practices. The sample template will also create an Application Load Balancer that will front the sample application. There is an assumption at this stage, that the awscli is already installed on your workstation, with the relevant IAM credentials to create the networking infrastructure in an AWS account.
# Navigate to the Infrastructure Directory
$ cd ../infrastructure

# Deploy the CloudFormation Template
$ aws cloudformation create-stack \
    --stack-name compose-infrastructure \
    --template-body file://cloudformation.yaml \
    --capabilities CAPABILITY_IAM
The VPC ID, ECS cluster, and Application Load Balancer ARN will be needed later in the pipeline. If you are leveraging the sample CloudFormation template, these can be set as local variables by running the following commands when the CloudFormation stack has been successfully deployed:
# Set the VPC Id
$ VPC_ID=$(aws cloudformation describe-stacks --stack-name compose-infrastructure --query "Stacks[0].Outputs[?OutputKey=='VpcId'].OutputValue" --output text)

# Set the ECS Cluster Name
$ ECS_CLUSTER=$(aws cloudformation describe-stacks --stack-name compose-infrastructure --query "Stacks[0].Outputs[?OutputKey=='ClusterName'].OutputValue" --output text)

# The Loadbalancer Arn
$ LOADBALANCER_ARN=$(aws cloudformation describe-stacks --stack-name compose-infrastructure --query "Stacks[0].Outputs[?OutputKey=='LoadbalancerId'].OutputValue" --output text)
Pipeline infrastructure
This walk through leverages AWS CodePipeline, AWS CodeBuild, and AWS CloudFormation to deploy the sample application to Amazon ECS. To deploy the components of the pipeline, a CloudFormation template is supplied within the sample app repository. This CloudFormation template deploys the following resources:
- An S3 bucket to store the source code of the application
- Amazon ECR repository for the sample application’s container image
- An AWS CodePipeline to orchestrate the pipeline
- An AWS CodeBuild job to build the container images
- An AWS CodeBuild job to convert the Docker Compose file to the CloudFormation template
# Navigate to the directory that stores the Pipeline Template
$ cd ../pipeline/

# Deploy the AWS CloudFormation Template, passing in the existing AWS Resource Paramaters
$ aws cloudformation create-stack \
     --stack-name compose-pipeline \
     --template-body file://cloudformation.yaml \
     --capabilities CAPABILITY_IAM \
     --parameters \
     ParameterKey=ExistingAwsVpc,ParameterValue=$VPC_ID \
     ParameterKey=ExistingEcsCluster,ParameterValue=$ECS_CLUSTER \
     ParameterKey=ExistingLoadbalancer,ParameterValue=$LOADBALANCER_ARN
If you browse to the AWS CodePipeline in the AWS Management Console, the recently deployed pipeline should be created. The pipeline will have failed its first run as there are currently no objects stored in the newly created S3 bucket.

Deploy the sample application to AWS
In the git repository, we store the application code alongside the infrastructure as code. To deploy the sample application to AWS, only the application source code and the docker-compose.yml need to be uploaded to Amazon S3. These artifacts are all included in the application directory within the repository.
# Ensure you are in the Application directory of the cloned repository
$ cd ../application

# Retrieve the S3 Bucket Name
$ BUCKET_NAME=$(aws cloudformation describe-stacks --stack-name compose-pipeline --query "Stacks[0].Outputs[?OutputKey=='S3BucketName'].OutputValue" --output text)

# Zip up the Code and Upload to S3
$ zip -r compose-bundle.zip .
$ aws s3 cp compose-bundle.zip s3://$BUCKET_NAME/compose-bundle.zip
Copying the ZIP file into the S3 bucket will trigger the CodePipeline; after a few seconds the pipeline will transition to the first stage, building the container image via CodeBuild. When the Docker Compose file is ran locally with docker compose up, Docker Compose is building the container image and starting the container. However when deploying via the pipeline we will break the build out into its own stage. It is common for Unit Tests and Container Scanning Tools to run at this stage of the pipeline before the image is tagged and pushed to Amazon ECR.
The commands to build the container image are defined in a BuildSpec file. The following BuildSpec file was embedded within the pipeline CloudFormation template. The CodeBuild Job first downloads and unzips the compose-bundle.zip before running any steps. CodeBuild will then work its way through the BuildSpec file, first authenticating with Amazon ECR, navigating to the source code directory, building the container image via docker build, and finally pushing the container image to Amazon ECR.
version: 0.2
phases:
  pre_build:
    commands:
      - echo Logging in to Amazon ECR...
      - aws ecr get-login-password --region $AWS_DEFAULT_REGION | docker login --username AWS --password-stdin $AWS_ACCOUNT_ID.dkr.ecr.$AWS_DEFAULT_REGION.amazonaws.com
  build:
    commands:
      - echo Building the Docker image...
      - cd frontend/
      - docker build -t $IMAGE_URI:$IMAGE_TAG .
  post_build:
    commands:
       - echo Pushing the Docker image...
      - docker push $IMAGE_URI:$IMAGE_TAG
Following the image build, the Docker Compose file will then be converted into CloudFormation. The following CodeBuild BuildSpec file is also embedded within the Pipeline CloudFormation Template for the “Convert2Cloudformation” stage.
This BuildSpec file will do the following:
- Install the Docker Compose CLI
- Create a Docker Compose Context by extracting the IAM role attached to the CodeBuild job
- Convert the Docker Compose File to Cloudformation with
docker compose convert.
version: 0.2
phases:
 install:
   commands:
     - mv /usr/local/bin/docker /usr/bin/docker
     - curl -L https://raw.githubusercontent.com/docker/compose-cli/main/scripts/install/install_linux.sh | sh
 pre_build:
   commands:
     - echo Logging in to Amazon ECR...
     - aws ecr get-login-password --region $AWS_DEFAULT_REGION | docker login --username AWS --password-stdin $AWS_ACCOUNT_ID.dkr.ecr.$AWS_DEFAULT_REGION.amazonaws.com
     - echo Creating Docker Compose Context
     - curl "http://169.254.170.2${AWS_CONTAINER_CREDENTIALS_RELATIVE_URI}" > creds.json
     - export AWS_ACCESS_KEY_ID=$(cat creds.json | jq -r .AccessKeyId)
     - export AWS_SECRET_ACCESS_KEY=$(cat creds.json | jq -r .SecretAccessKey)
     - export AWS_SESSION_TOKEN=$(cat creds.json | jq -r .Token)
     - docker context create ecs demoecs --from-env
     - docker context use demoecs
 build:
   commands:
     - echo Convert Compose File
     - docker --debug compose convert > cloudformation.yml
artifacts:
  files:
    - cloudformation.yml
You can track the progress of the deployment through via AWS CodePipeline in the console, and eventually the pipeline will pause at the manual approval stage.

Within the AWS CloudFormation page in the AWS Management Console, you can click on the CloudFormation stack compose-application, navigate to “Change Sets”, and review the CloudFormation change set that was created from the Docker Compose file. The number of changes in this change set, highlights the number of resources managed by the Docker Compose abstraction.

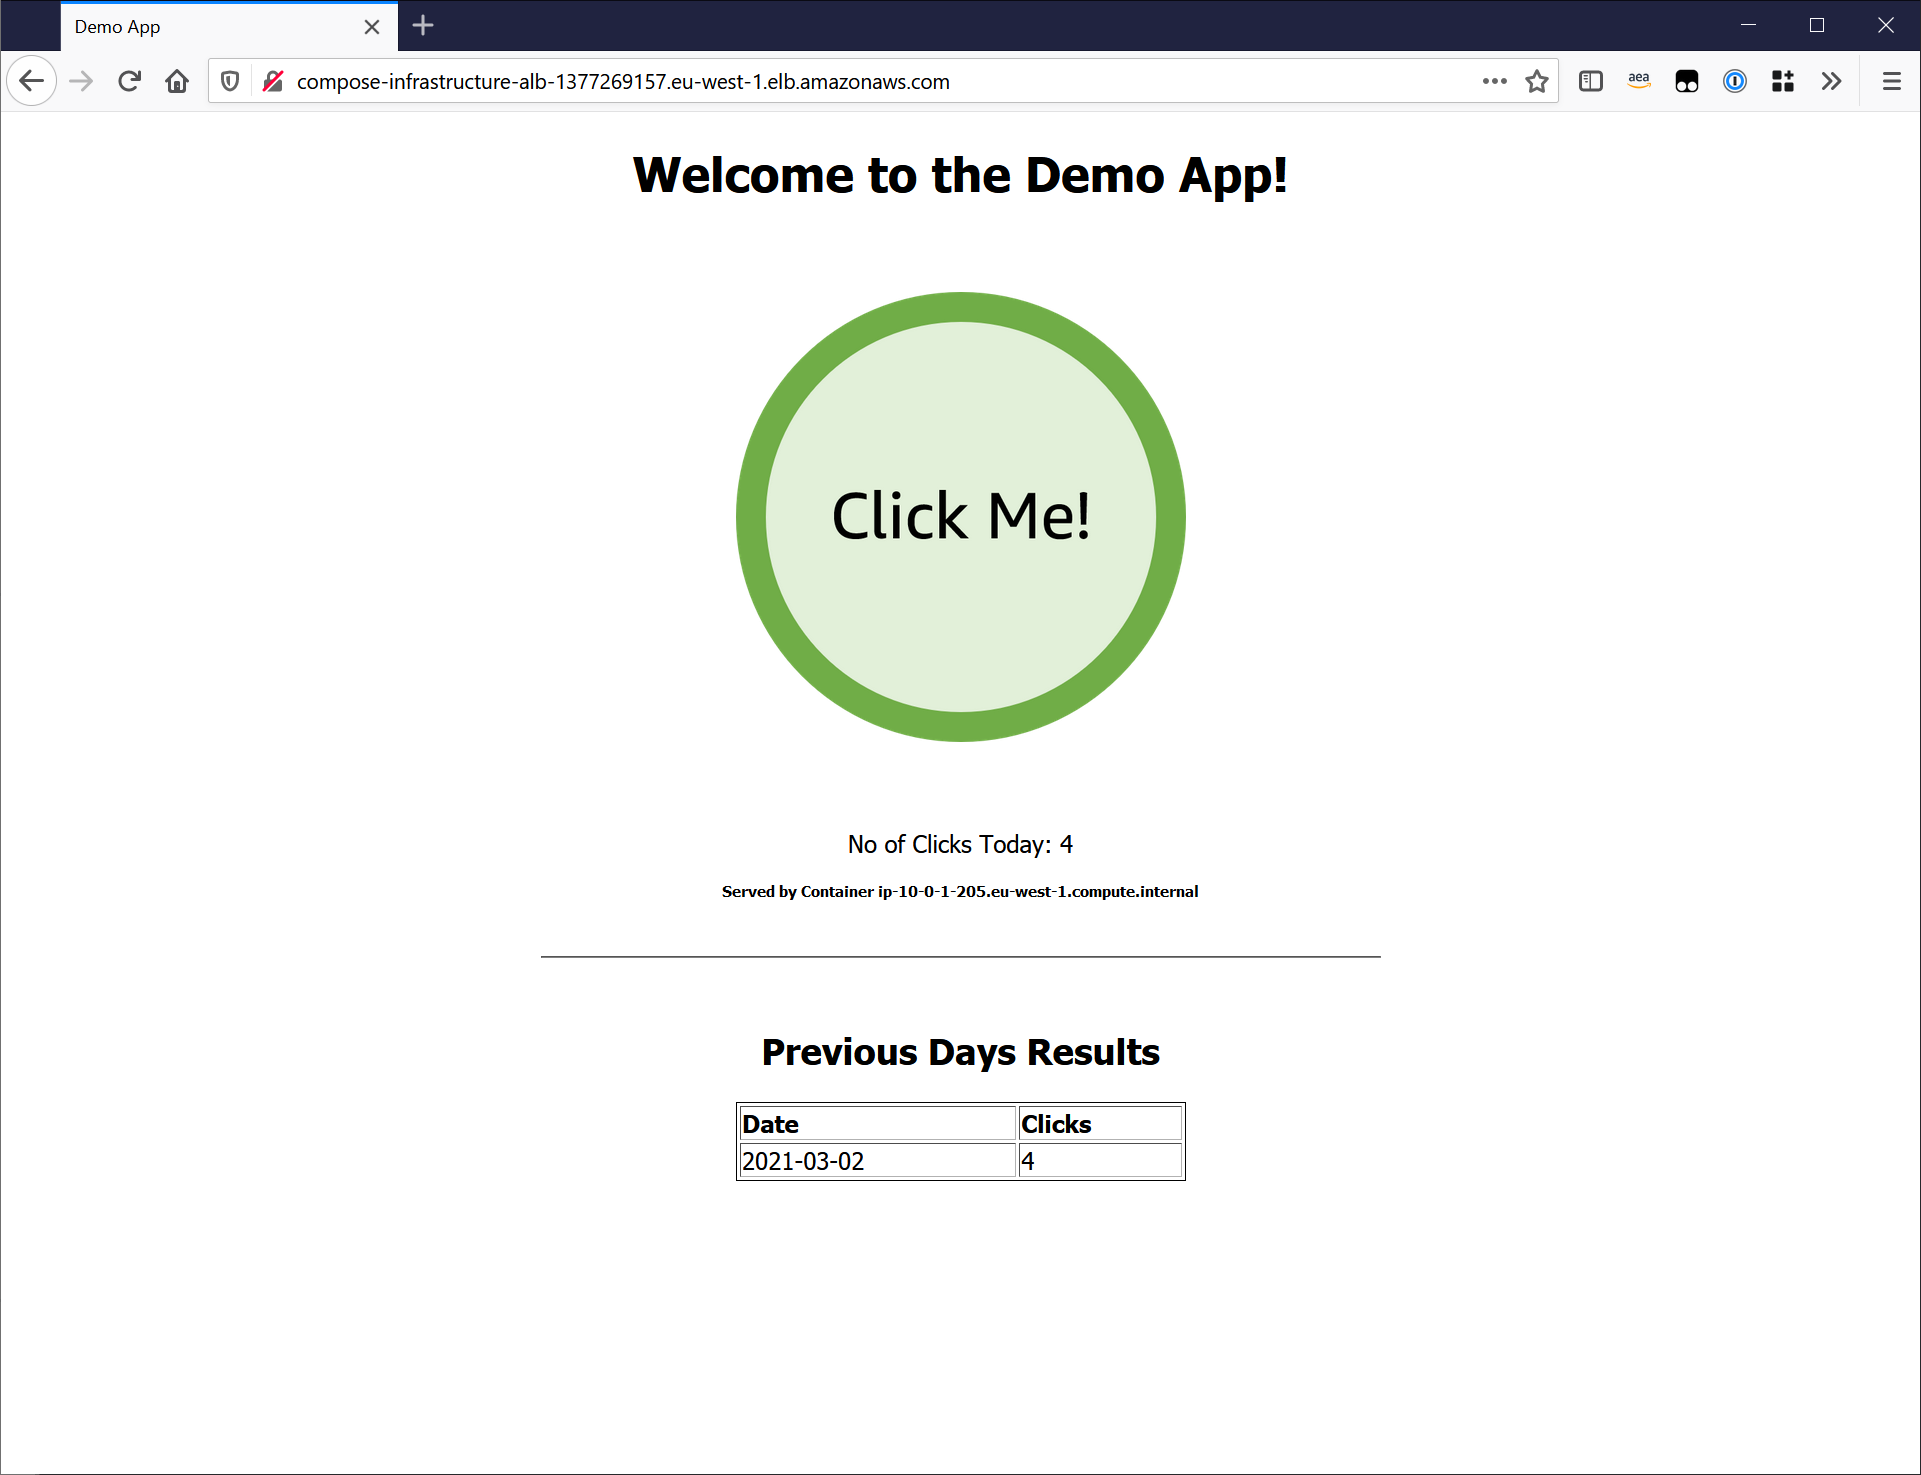
To approve the CloudFormation change set, navigate back to the AWS CodePipeline Console. In the DeployStage, Click “Review >> Approve”. This will now execute the CloudFormation change set, deploying the demonstration application to Amazon ECS. The roll out will take a few minutes as the ECS tasks roll out and pass the load balancer health checks. If you were using the Infrastructure CloudFormation template, the load balancer endpoint can be received from the CloudFormation output of the compose-infrastructure stack.
$ aws cloudformation describe-stacks --stack-name compose-infrastructure --query "Stacks[0].Outputs[?OutputKey=='LoadbalancerEndpoint'].OutputValue" --output text
http://compose-infrastructure-alb-1377269157.eu-west-1.elb.amazonaws.com
Update the sample application
To simulate the life cycle of the stack we created, we will make a small change to the sample application. Changing the color of the Frontend’s “Click Me” button provides a nice visual change in the application, allowing us to observe the change as the ECS rolling update deploys the new version of the application.
# Ensure you are in the application directory
$ cd ../application/

# Replace the word "Blue" with "Green" in the frontend application.
# For Linux Users:
$ sed -i 's/blue/green/g' frontend/myweb/app.py

# For Mac OS users:
$ sed -i "" 's/blue/green/g' frontend/myweb/app.py
Using a local Docker Engine running on your workstation machine, we can once again deploy the sample application through Docker Compose to make sure the change has had its required effect.
# Ensure the previous Docker Compose stack is not running
$ docker compose down

# Remove the previous container image and start the Docker Compose Stack
$ docker rmi frontend:latest
$ docker compose up --build
Success! Now we can re-zip up the sample application and upload it to the S3 bucket, and deploy the application to the AWS cloud.
$ zip -r compose-bundle.zip .
$ aws s3 cp compose-bundle.zip s3://$BUCKET_NAME/compose-bundle.zip
Once again, you can now follow along with the pipeline in AWS CodePipeline via the AWS Management Console. After the container has been built and a CloudFormation change set has been created, it will once again stop at the manual approval gate. This time, when reviewing the upcoming changes to the Cloud Formation, we can see there is less change to our infrastructure.

Once the DevOps / Operations team have checked that the resource changes in the change set are expected and have approved the change in the CodePipeline Console, ECS will perform a rolling update on the Frontend service. It will take a few minutes for the new version of our application to be deployed, as the Load Balancer will safely drain the previous ECS tasks before decommissioning them. After the CloudFormation roll out is complete, the new version of the application should be available on the same Load Balancer Endpoint.
Excellent! Feel free to make additional changes to the application, possibly changing the index.html , and rolling out new versions of our application through the pipeline.
Clean Up
# Delete the Sample Application deployed via the Pipeline
$ aws cloudformation delete-stack --stack-name compose-application

# Delete the S3 Objects
$ BUCKET_NAME=$(aws cloudformation describe-stacks --stack-name compose-pipeline --query "Stacks[0].Outputs[?OutputKey=='S3BucketName'].OutputValue" --output text)
$ aws s3api delete-objects \
  --bucket $BUCKET_NAME --delete \
  "$(aws s3api list-object-versions \
    --bucket "${BUCKET_NAME}" \
    --output=json \
    --query='{Objects: Versions[].{Key:Key,VersionId:VersionId}}')"

# Delete the S3 Bucket
$ aws s3 rb s3://$BUCKET_NAME

# Delete the ECR Repository
$ ECR_REPO=$(aws cloudformation describe-stacks --stack-name compose-pipeline --query "Stacks[0].Outputs[?OutputKey=='DemoAppEcrName'].OutputValue" --output text)
$ aws ecr delete-repository --repository-name $ECR_REPO --force

# Delete the Sample Pipeline
$ aws cloudformation delete-stack --stack-name compose-pipeline

# Delete the Networking and ECS Infrastructure
$ aws cloudformation delete-stack --stack-name compose-infrastructure
Conclusion
This article has shown how a Docker Compose file, defined and owned by the developer teams, can live along side application source code and be deployed through a centrally managed deployment pipeline to Amazon ECS.
In this article, we have:
- Built a sample application locally and demonstrated its functionality through Docker Compose.
- Built a AWS CodePipeline through AWS CloudFormation .
- Deployed the sample application via Docker Compose to Amazon ECS through the CI/CD pipeline
- Made a change to our application and rolled out the new version via Docker Compose through the CI/CD pipeline.
To learn more about the Docker Compose for Amazon ECS plugin, see the Docker Documentation and the Compose CLI Github Repository. To provide feedback, add feature requests and follow the progress of the Docker Compose for Amazon ECS Plugin, see the Docker Roadmap on Github.