AWS HPC Blog
Simplify HPC cluster usage with AWS Cloud9 and AWS ParallelCluster
This post was written by Benjamin Meyer, AWS Solutions Architect
When companies and labs start their high performance computing (HPC) journey in the AWS Cloud, it’s not only because they’re in search of elasticity and scale – they’re also in search of new tools and environments. Initially this can appear challenging as there are many novel services and interesting side-roads to explore. Today we’re starting a series of blog posts aimed at showing you simple, often foundational, solutions to common problems. We hope these posts will expand your repertoire of skills and the tools you use to start running your HPC workloads on AWS.
When working with an HPC cluster, it is common to write shell scripts to schedule jobs to a cluster on the cluster head node. It’s especially true in the development lifecycle of common HPC jobs. Commonly, companies or labs use their HPC cluster from the head node, using a terminal and tools like VIM. However, with this approach it can be difficult to remember where work was completed or to recover work which was lost, especially in a cloud environment with ephemeral virtual machines and multiple teams sharing resources. If there’s a memorable place to come back to each time, it’s easier to remember where files are stored, what formats they are, or to change the content of the files during debugging.
On local machines, developers and engineers use an editor or an IDE to work on scripts or code for their HPC workloads. These tools support writing and debugging code, and give insights into their work environment. To have the same experience when working on an HPC cluster, an AWS Cloud9 can be set up on the head node.
In this post, we will cover how to configure a canonical AWS ParallelCluster set up and explain how to set up an AWS Cloud9 IDE on the head node of the cluster. AWS Cloud9 automatically saves the state from the previous work done. This will help new users of AWS ParallelCluster’s environment get started quickly with the cluster and enable easy collaboration with their peers and colleagues.
What is AWS ParallelCluster?
AWS ParallelCluster is an AWS-supported open-source cluster management tool. It allows customers to easily get started, and update and scale an HPC cluster environment in the AWS Cloud within minutes.
Each cluster is based on a configuration file in which the resources of the cluster are defined. The minimal required resources are an Amazon VPC, a cluster definition, a queue with the according compute resources and a shared volume. A minimal configuration does look like this:
[aws]
aws_region_name = <Cluster Region>

[global]
cluster_template = default
update_check = false
sanity_check = true

[vpc public]
vpc_id = <target vpc>
master_subnet_id = <subnet for the head node>

[cluster default]
key_name = <ec2-keypair>
base_os = alinux2
scheduler = slurm
master_instance_type = c5.2xlarge
vpc_settings = public
ebs_settings = shared
queue_settings = compute

[queue compute]
compute_resource_settings = default
disable_hyperthreading = true
placement_group = DYNAMIC

[compute_resource default]
instance_type = c5.24xlarge
min_count = 0
max_count = 10

[ebs shared]
shared_dir = /shared
volume_type = gp2
volume_size = 20

[aliases]
ssh = ssh {CFN_USER}@{MASTER_IP} {ARGS}
This becomes a template for building clusters. In this case, they’ll all share the same operating system (Amazon Linux 2), with a head node running the Slurm job scheduler and a fleet of compute nodes that scale from 0 to 10 instances.
The AWS ParallelCluster CLI is used to create a cluster called minimal-demo-cluster with a single shell command.
pcluster create minimal-demo-cluster -c minimal-demo-cluster.iniAround 5-10 minutes after this command runs, you will have a cluster that is fully set up and ready to run jobs. To start using the cluster, you have to SSH to the head node and start using shell scripts to schedule jobs to the cluster. The follow command allows you to SSH to the head node from the local machine with the given SSH key.
pcluster ssh minimal-demo-cluster -i <ec2-keypair>What is AWS Cloud9?
AWS Cloud9 is a cloud-native IDE that allows developers to write, edit, and debug code in their browser. An AWS Cloud9 running on an Amazon Elastic Compute Cloud (EC2) instance offers a terminal on the host instance. Besides common IDE features like code hinting, code completion and step-through debugging, it also offers the ability to share the development environment with everyone who has access to AWS Cloud9 through the AWS Management Console.
This enables you to do pair programming or debugging remotely in real time on the same AWS Cloud9 and quickly share the same development environment with new peers. For further information, see Working with Shared Environments in AWS Cloud9.
Setup of AWS Cloud9 on the head node of an AWS ParallelCluster
AWS Cloud9 can be set up in the AWS Management Console within minutes. If the host fulfills the SSH host requirements, it can be started on a self-managed host. An AWS ParallelCluster head node doesn’t fulfill the requirements when created, but with the following steps, you are able to start an AWS Cloud9 on the head node.
AWS Cloud9 requires the instance to have Node 12 and the Development Tools installed before installing AWS Cloud9 itself. This can be done by SSH’ing to the head node and running the following commands:
curl -sL https://rpm.nodesource.com/setup_12.x | bash -
sudo yum install -y nodejs

echo "u=rwx,g=rx,o=rx ~"
chmod u=rwx,g=rx,o=rx ~

echo "Installing Development Tools"
yum -y groupinstall "Development Tools"

echo "Intalling Cloud9"
curl -sL https://raw.githubusercontent.com/c9/install/master/install.sh | bash
The last step is to add the SSH key of your own AWS Cloud9 to the instance so that AWS Cloud9 can connect the head node. First you must create an AWS Cloud9 and get your SSH key:
- Navigate to the AWS Cloud9 console
- Choose Create environment
- For Name, enter
Cluster-Head-Nodeand choose Next step - For Environment type, select Create and run in remote server (SSH connection)
- For User, enter
ec2-user - For Host, enter the public IP address given by the AWS ParallelCluster create command
- In the Advanced settings, enter
/sharedfor Environment path so that the AWS Cloud9 IDE uses the cluster shared Amazon EFS directory as the working environment directory - Choose Copy key to clipboard
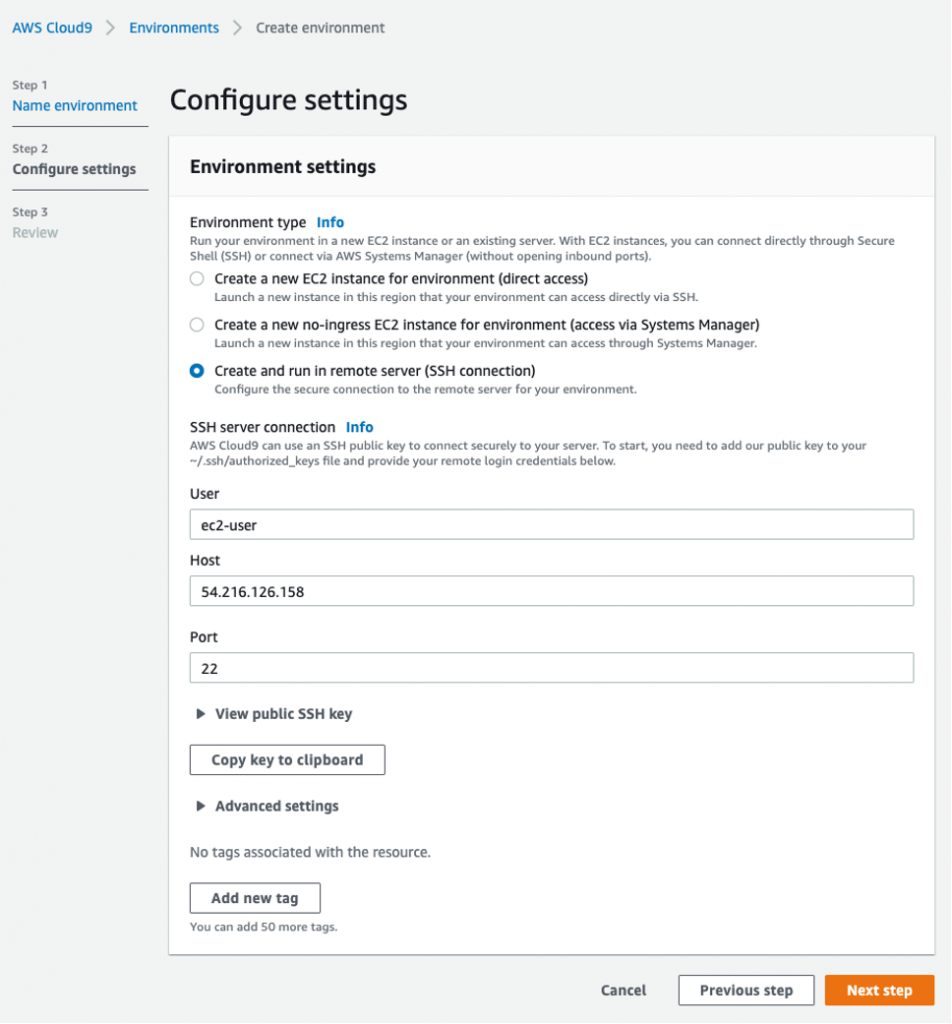
Creating a new environment in AWS Cloud9’s console, by selecting the option to create and run in a remote server via SSH.
Back at the SSH terminal on the head node, run the following command, paying careful attention to quotes and output redirects (’>’) to avoid any mistakes:
echo "<copied ssh key from the AWS Cloud9 configuration dialog>" >> ~/.ssh/authorized_keysWith that done, the AWS Cloud9 creation can be finished and the AWS Cloud9 will be set up on the head node.
To verify that the AWS Cloud9 that opens is installed on the head node, run the following command in the terminal of the AWS Cloud9:
sinfoYou should see that the job scheduler Slurm is available and has 10 compute nodes waiting to be started for job processing.
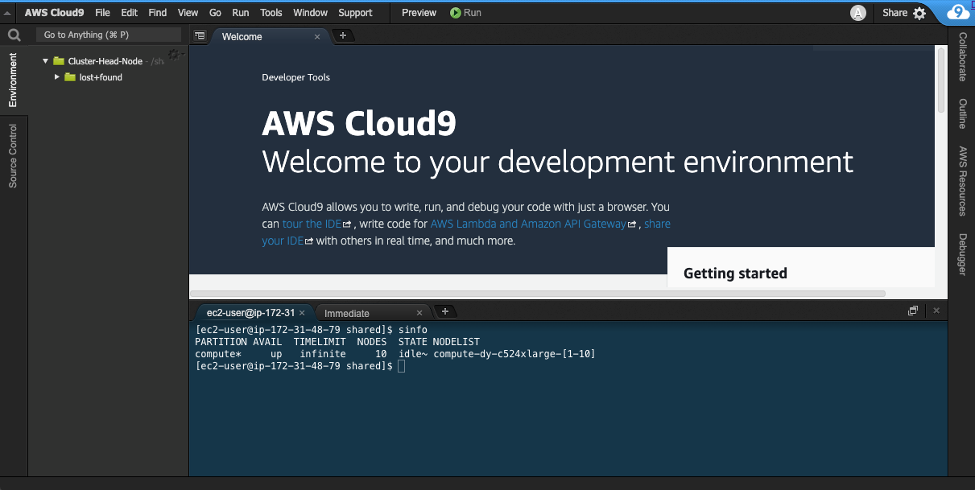
A successful AWS Cloud9 terminal session running on the head node of the cluster, showing the results from the ‘sinfo’ command, which lists the queues available in Slurm.
Cleanup
If you’re finished experimenting for today and want to stop using any resources you started, and clean up, follow these steps.
Run the following command to delete the cluster in the same terminal you used to create the cluster earlier:
pcluster delete minimal-demo-clusterIn the AWS Management Console:
- Navigate to the AWS Cloud9 Console
- Select the Cluster-Head-Node AWS Cloud9 and choose Delete
Conclusion
In this post, you saw an overview on how simple and fast it is to set up an HPC cluster using the AWS ParallelCluster CLI. After that, we explained how to add an AWS Cloud9 on a head node for collaboration on scripts, navigation on the cluster and for ease of use. Using AWS Cloud9 makes it easy for teams to work in parallel remotely and automatically saves state, so it’s easier to pick up where you left off. When combined with AWS ParallelCluster, which provides HPC clusters in minutes, it helps teams save time and focus on the work of the HPC cluster.
You can combine these steps with our online workshops like the one for CFD on AWS ParallelCluster. The CFD workshop will guide you through each detail for building an AWS ParallelCluster environment with a CFD application in mind. For details on how to customize that cluster for your own applications, see Configuring AWS ParallelCluster in our online documentation. You’ll find additional information for HPC on AWS at the Getting started with HPC on AWS website. Thanks for reading this far – we hope this has helped.