AWS Developer Tools Blog
Developing on Amazon Linux 2 using Windows
When a developer needs to target Amazon Linux 2 (AL2) to run their code but they only have access to a Windows development environment, they can use the Windows Subsystem for Linux (WSL) and Visual Studio Code (VS Code) to accomplish that. Targeting AL2 allows a developer to gain the benefits associated with AL2 – support for the latest EC2 features as well as better performing workloads due to the tuned Linux kernel. On the developer side of the solution, VS Code combines the simplicity of a source code editor with developer-friendly features such as IntelliSense or code completion and debugging.
This blog post will walk you through the steps required to set up VS Code to use the WSL 2 and AL2. We are going to use the WSL 2 because as opposed to the WSL 1, which could not run the Docker Engine directly inside of the WSL, the WSL 2 is able to run the Docker Engine, thanks to it’s implementation of a real Linux kernel inside a lightweight virtual machine (VM).
Overview of solution
The following diagram depicts the overall solution. Starting with the developer at the top, we then head down several layers – the developer’s machine that is running Windows, Visual Studio Code that is running on the Windows instance, followed by the Linux VM (WSL2) that is also running on the Windows instance. Finally, the Visual Studio Code Server running inside of the WSL2 and has the AWS Toolkit for Visual Studio Code Extension installed.

Figure 1 – Solution Overview
The graphic below shows the steps we will take during the Walkthrough section of this post:

Windows Subsystem for Linux 2
The Windows Subsystem for Linux (WSL) lets users run Linux environment directly on Windows without the need of a traditional virtual machine or dual-booting. WSL 2 provides full system call compatibility by running the Linux kernel inside a lightweight utility virtual machine (VM). Both the WSL Linux kernel and VM are managed for you, providing a similar user experience as WSL 1 with additional benefits. See the WSL 2 system requirements to determine if your system is compatible.
In this blog post, we will be using WSL 2 to run the Amazon Linux 2 distribution and leverage the Visual Studio Code Remote – WSL extension to use Amazon Linux 2 for your development environment. Using this extension, Visual Studio Code delivers the same development experience as running on Windows, including IntelliSense, code navigation, and live debugging. Additionally, your code executes on a Linux operating system just like it would in AWS Lambda.
We will further tailor your development environment on Amazon Linux 2 with the AWS Toolkit for Visual Studio Code and the SAM CLI to provide a seamless debugging experience as you develop Lambda functions. You can also add other Linux-specific tools all while using Windows as your base operating system.
Let’s take a look at how to get your .NET development environment setup using Amazon Linux 2 running on WSL2, and Visual Studio Code.
Amazon Linux 2
Amazon Linux 2 (AL2) is the next generation Amazon Linux operating system that provides a high performance, stable, and secure execution environment for cloud and enterprise applications. Benefits of using AL2 over other operating systems include pre-packaged features and tools, optimized for use with Amazon EC2, and due to a tuned Linux Kernel, many customer workloads perform better as well. AL2 is also available for use on EC2 Bare Metal Instances as both a bare metal OS and a virtualization host.
Core components of AL2 include:
- The tuned Linux kernel designed to perform better on Amazon EC2
- A set of core packages including systemd, GCC 7.3, Glibc 2.26, Binutils 2.29.1 that receive Long Term Support (LTS) from AWS.
- An extras channel for rapidly evolving technologies that are likely to be updated frequently and outside the Long Term Support (LTS) model
Key features that differentiate AL2 from the Amazon Linux AMI are:
- AL2 offers long-term support until June 30, 2023
- AL2 is available as virtual machine images for on-premises development and testing
- AL2 provides the system service and systems manager (as opposed to System V init system in Amazon Linux AMI)
- AL2 comes with an updated Linux kernel, C library, compiler, and tools
- AL2 provides the ability to install additional software packages through the extras mechanism
For more details about AL2, refer to the Amazon Linux documentation
Walkthrough
The following are the high-level steps to get started setting up the Amazon Linux 2 WSL distribution for local development.
- Download and register Amazon Linux 2 WSL distribution
- Install development tools and .NET core
- Create local project and begin debugging
Prerequisites
For this walkthrough, you should have completed the following prerequisite steps on your Windows machine:
- Install Visual Studio Code
- Install the Remote Development extension pack for VS Code
- Install Docker Desktop
- Ensure Hyper-V has been enabled
- Recommended: Install the Windows Terminal to make switching between different terminals easier
Download and Register Amazon Linux 2 WSL Distribution
Make sure to open a Windows Terminal window as we’ll be switching between the Windows instance and the Amazon Linux 2 WSL distribution. You can find it in your Windows Start Menu.

Figure 2 – Windows Start Menu
With the Windows Terminal open, we’re ready to begin. The below commands will download, install, and set Amazon2 as the default distribution. The path used was latest version as of the time of this writing. Visit the AmazonWSL Releases page to make sure you are using the latest. The last command starts WSL, launching us into the Amazon Linux 2 distribution.
Note that the AmazonWSL github project is not affiliated with or maintained by Amazon or AWS and is an open source project that is maintained by the community. Learn more about open source projects here.
Invoke-WebRequest -Uri https://github.com/yosukes-dev/AmazonWSL/releases/download/2.0.20200722.0-update.2/Amazon2.zip -OutFile $env:TMP\Amazon2.zip
Expand-Archive -Path $env:TMP\Amazon2.zip -DestinationPath C:\WSL\Amazon2
C:\WSL\Amazon2\Amazon2.exe
wsl -s Amazon2
wsl
After the Amazon2.exe completes execution, you will see a prompt to “Press any key to continue…”, pressing the Enter key, will allow execution to continue. The prompt can be seen in figure 3.

Figure 3 – Amazon2 Installation Prompt
Once you’ve allowed execution to continue, Amazon2 is set as the default distribution and we launch WSL. You should now see your bash prompt as depicted in figure 4.
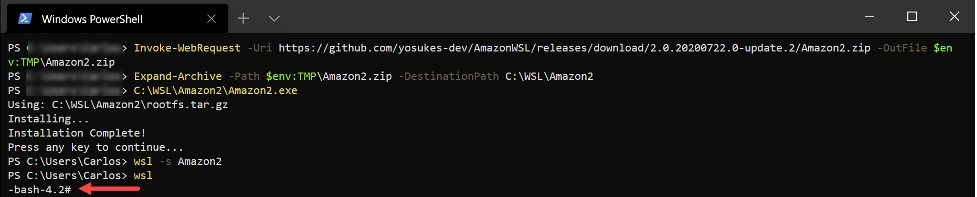
Figure 4 – Amazon2 Installation Completion
Update Linux Environment
Now that we’re in the Linux environment, we will begin by ensuring that the Linux distribution’s kernel and installed packages are updated to the latest versions. Execute the following commands in the Linux environment to complete this step.
yum upgrade -y && yum update -y
amazon-linux-extras install -y kernel-ng
With the updates complete, we can begin installing the necessary tools to develop .NET Core applications.
Install .NET Core
Next up is installing .NET Core 5 and the Lambda Global Tool. To install .NET Core 5 SDK, we will first need to add the Microsoft package repository. The Linux Software Repository for Microsoft Products built and supported by Microsoft. The Lambda Global Tool is a .NET Core CLI tool that is focused on building .NET Core and ASP.NET Core applications and deploying them to AWS services.
rpm -Uvh https://packages.microsoft.com/config/centos/7/packages-microsoft-prod.rpm
yum install -y wget zip unzip dotnet-sdk-5.0 git
dotnet tool install -g Amazon.Lambda.Tools
exit
The reason the last command is “exit” is because you are required to logout of the Linux environment prior to being able to use the newly installed Lambda tooling since the .NET SDK was just installed. You can see this noted by the command output in figure 5.

Figure 5 – .NET Core Setup
Install Visual Studio Code Extensions
Jump back into the Linux environment by executing the WSL command.
wslOnce back in the Linux environment, installing both the C# and AWS Toolkit for Visual Studio Code extensions is next. The C# extension for Visual Studio Code provides features such as debugging and navigation of .NET Core applications written in C#. The AWS Toolkit for Visual Studio Code extension enables you to interact with Amazon Web Services (AWS) services. For this blog post, we are most interested in its support for developing AWS serverless applications locally.
To install the necessary VS Code extensions, copy and paste the following lines into your terminal:
code --install-extension ms-dotnettools.csharp
code --install-extension amazonwebservices.aws-toolkit-vscode

Figure 6 – Visual Studio Code Extension Setup
Install SAM CLI
The AWS Toolkit for Visual Studio Code implements a SAM debugging experience based on VS Code launch configurations. The AWS Toolkit connects VS Code to the SAM CLI, invokes the build, and allows the user to step-through their Lambda code in VS Code. See the introductory blog post for this feature for additional details. The following commands will install the SAM CLI using the zip file. See the SAM CLI Release Notes for the latest version of this file. Steps to install the SAM CLI using Homebrew are also available. Alternatively, you can install the SAM CLI using pip.
wget https://github.com/aws/aws-sam-cli/releases/latest/download/aws-sam-cli-linux-x86_64.zip -o /tmp/aws-sam-cli-linux-x86_64.zip
unzip aws-sam-cli-linux-x86_64.zip -d /tmp/sam-installation
/tmp/sam-installation/install
If installation completed successfully, you should now see a message similar to “You can now run: /usr/local/bin/sam –version”, as depicted in figure 7.

Figure 7 – SAM CLI Setup
That completes all of the tooling setup, let’s look at how to get a project created and start debugging.
Create and Start .NET Core Lambda Project
The following command using the SAM CLI’s init command to create a new .NET Core Lambda project and opens the project’s folder with VS Code.
sam init --name sample --runtime dotnetcore3.1 --app-template hello-world --package-type Zip -o /src
code /src/sample
Once VS Code opens up the project folder, you will notice that on its status bar, it is connected to the Amazon2 WSL distribution.

Figure 8 – VS Code Connected to WSL
If you switch to the Terminal tab, you can see that it is a Bash console window. Any commands executed are run on the Linux environment.

Figure 9 – VS Code Bash Console
To start a debugging session for the Lambda function created by the SAM CLI, the first step is to open the Run panel and click the “create a launch.json file” option.

Figure 10 – VS Code Run Panel
This will display the “Select Environment” dropdown. Select the “AWS SAM: Debug Lambda Function Locally” option.

Figure 11 – VS Code Select Environment Dropdown
This will create a launch.json file that uses the aws-sam VS Code debugger extension. It is this extension that provides step-through debugging of your Lambda functions locally. Below is a snippet showing the configuration used to execute the HelloWorld Lambda function.
{
  "type": "aws-sam",
  "request": "direct-invoke",
  "name": "sample:HelloWorldFunction (dotnetcore3.1)",
  "invokeTarget": {
    "target": "template",
    "templatePath": "template.yaml",
    "logicalId": "HelloWorldFunction"
  },
  "lambda": {
    "payload": {},
    "environmentVariables": {}
  }
}
Let’s set a breakpoint on the Lambda function and see the debugging support in action.
- Open the Explorer panel on VS Code
- Select the Function.cs file
- Place a breakpoint on the first line of the Lambda function.
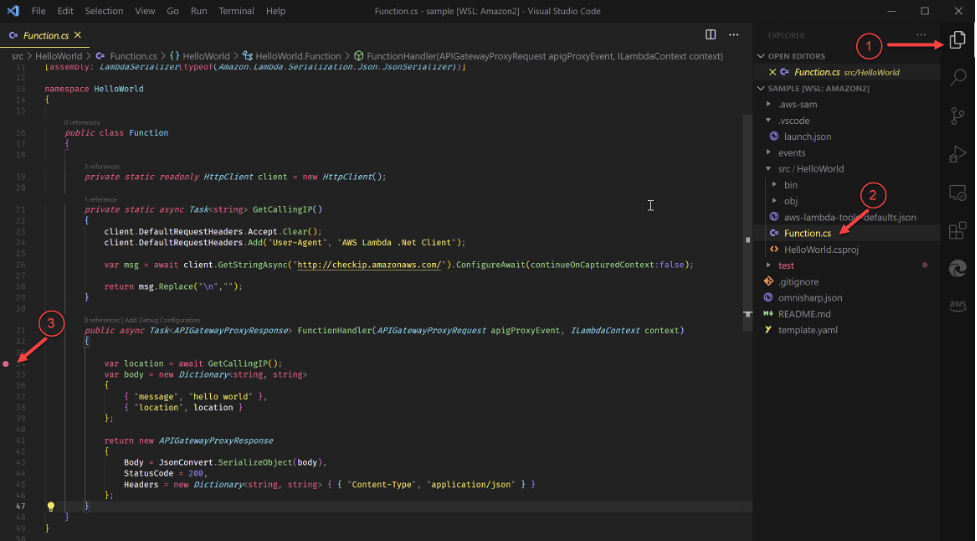
Figure 12 – Set Breakpoint in Lambda Function
Now you are ready to run the project. You can do this be pressing the F5 key. This will launch the debugger where we can see:
- Execution stopped at the breakpoint we created earlier
- The VARIABLES window shows local variables such as the apiProxyEvent and context fully populated.

Figure 13 – Lambda Execution Stops at Breakpoint
Conclusion
In this blog post we saw how to get the best of both Windows and Linux as your development environment all on the same machine. We achieved this by running the Amazon Linux 2 distribution via the Windows Subsystem for Linux 2 and leveraged the Visual Studio Code Remote – WSL extension, AWS Toolkit for Visual Studio Code, and the AWS SAM CLI to provide a frictionless development experience. The AWS Toolkit for Visual Studio Code is built in the open source and we welcome feedback, feature requests, and issues on GitHub. Learn more about working with AWS serverless applications, including more options on how to configure the aws-sam debugger extension.

Carlos Santos
Carlos Santos is a Microsoft Specialist Solutions Architect with Amazon Web Services (AWS). In his role, Carlos helps customers through their cloud journey, leveraging his experience with application architecture, and distributed system design.

Matthew Ostovarpour
Matthew Ostovarpour is a Cloud Application Architect with Amazon Web Services (AWS) Professional Services. Working with customers analyzing, designing, and building their applications allows Matthew to think outside of the box and apply solutions to a myriad of projects.