update I am grateful to Michael Grabenstein for spotting some mistakes in the original post/code. I hope these have now been rectified in this post.
Using AWS CDK to deploy your Amazon Managed Workflows for Apache Airflow environment
What better way to celebrate CDK Day than to return to a previous blog where I wrote about automating the installation and configuration of Amazon Managed Workflows for Apache Airflow (MWAA), and take a look at doing the same thing but this time using AWS CDK.
What this post will show you is how you can use AWS CDK to deploy a working MWAA environment, and I will provide enough details that you should be able to tailor this to your own needs. It should take (if everything works ok!) around 45-60 minutes to complete. Given that Apache Airflow uses Python, this CDK application is also going to be using Python.
Using KMS?
If you are planning on using KMS, then please make sure you read this additional post
.

Installing MWAA with CDK
What will you need
- An AWS account with the right level of privileges
- An environment with the AWS CDK configured and running - it is outside the scope of this post to cover what AWS CDK is, but check out my open source newsletter as I often feature great tutorial blog posts. Also, I would ensure you are running the latest version too.
- Access to an AWS region where Managed Workflows for Apache Airflow is supported
I have provided everything you need in a GitHub repository.
Some thing to watch out for:
- If you are deploying this in an environment that already has VPCs, you may generate an error if you exceed the number of VPCs within your AWS Account.
- If you deploy and are using an existing Amazon S3 bucket as your MWAA Dag bucket, the deployment will fail. Make sure that the Amazon S3 bucket you define for your MWAA environment does not existing before running the CDK app - I need to put some better logic in the code, so by the time you read this I might have done this. If not, keep note.
Getting Started
After checking out the repository you will have the following files on your local developer environment.
├── app.py
├── cdk.json
├── dags
│   ├── sample-cdk-dag-od.py
│   └── sample-cdk-dag.py
├── mwaa_cdk
│   ├── mwaa_cdk_backend.py
│   └── mwaa_cdk_env.py
└── requirements.txt
We will go through these files, but first we need to install the AWS CDK constructs we are using. If you are familiar with CDK, then you may already have these but in this specific CDK application, I will be using the aws_cdk.aws_mwaa construct, which you may not have installed.
To make this easier, I have put them in the requirements.txt so all you need to do is
$ pip install -r requirements.txt
If we take a look at the app.py file, we can see what our CDK application looks like. We are creating two stacks, one called mwaa_cdk_backend and the other called mwaa_cdk_env.
#!/usr/bin/env python3
import io
from aws_cdk import core

from mwaa_cdk.mwaa_cdk_backend import MwaaCdkStackBackend
from mwaa_cdk.mwaa_cdk_env import MwaaCdkStackEnv

env_EU=core.Environment(region="eu-central-1", account="XXXXXXXXX")
mwaa_props = {'dagss3location': 'airflow-ricsue-cdk-demo','mwaa_env' : 'cdk-ricsue-demo-delete'}

app = core.App()

mwaa_backend = MwaaCdkStackBackend(
    scope=app,
    id="MWAA-Backend",
    env=env_EU,
    mwaa_props=mwaa_props
)

mwaa_env = MwaaCdkStackEnv(
    scope=app,
    id="MWAA-Environment",
    vpc=mwaa_backend.vpc,
    env=env_EU,
    mwaa_props=mwaa_props
)

app.synth()
The mwaa_cdk_backend will be used to setup the VPC network that the MWAA environment is going to use. The mwaa_cdk_env is the stack that will configure your MWAA environment. In order to do both though, first we set up some parameters we want to use so that we do not need to hard code these. If you look at
env_EU=core.Environment(region="eu-central-1", account="XXXXXXXXX")
mwaa_props = {'dagss3location': 'airflow-ricsue-cdk-demo','mwaa_env' : 'cdk-ricsue-demo-delete'}
First we define the AWS region and the AWS Account we want to deploy this into. These are used when creating the IAM policies as well as ensuring the environment is setup in the AWS region you want to run this in. Following that we define dagss3location which is the name of the Amazon S3 bucket that will get created. You will need to change this before you run this to make sure it is something unique. The mwaa_env is the name we give to the MWAA environment.
After changing the values in the app.py file and saving, we are ready to deploy. Before we do that, lets take a look at the stacks.
mwaa_cdk_backend
There is nothing particular interesting about this other than it creates the underlying network infrastructure that MWAA needs. There is nothing you need to do, but if you do want to experiment, then what I would say is that a) ensure you read and follow the networking guidance on the MWAA documentation site, as they provide you with details on what needs to be setup, b) if you are trying to lock down the networking, try just deploying the backend stack, and then manually creating a MWAA environment to see if it works/fails.
from aws_cdk import core
import aws_cdk.aws_ec2 as ec2
import aws_cdk.aws_s3 as s3
import aws_cdk.aws_s3_deployment as s3deploy
import aws_cdk.aws_mwaa as mwaa

class MwaaCdkStackBackend(core.Stack):

    def __init__(self, scope: core.Construct, id: str, mwaa_props, **kwargs) -> None:
        super().__init__(scope, id, **kwargs)

        # Create VPC network

        self.vpc = ec2.Vpc(
            self,
            id="MWAA-ApacheAirflow-VPC",
            cidr="10.192.0.0/16",
            max_azs=2,
            nat_gateways=1,
            subnet_configuration=[
                ec2.SubnetConfiguration(
                    name="public", cidr_mask=24,
                    reserved=False, subnet_type=ec2.SubnetType.PUBLIC),
                ec2.SubnetConfiguration(
                    name="private", cidr_mask=24,
                    reserved=False, subnet_type=ec2.SubnetType.PRIVATE)
            ],
            enable_dns_hostnames=True,
            enable_dns_support=True
        )


        core.CfnOutput(
            self,
            id="VPCId",
            value=self.vpc.vpc_id,
            description="VPC ID",
            export_name=f"{self.region}:{self.account}:{self.stack_name}:vpc-id"
        )
mwaa_cdk_env
The MWAA environment stack is a little more interesting and I will break it down. The first part of the stack configures the Amazon S3 buckets that MWAA will use.
class MwaaCdkStackEnv(core.Stack):

    def __init__(self, scope: core.Construct, id: str, vpc, mwaa_props,  **kwargs) -> None:
        super().__init__(scope, id, **kwargs)

        # Create MWAA S3 Bucket and upload local dags

        dags_bucket = s3.Bucket(
            self,
            "mwaa-dags",
            bucket_name=f"{mwaa_props['dagss3location'].lower()}",
            versioned=True,
            block_public_access=s3.BlockPublicAccess.BLOCK_ALL
        )

        s3deploy.BucketDeployment(self, "DeployDAG",
        sources=[s3deploy.Source.asset("./dags")],
        destination_bucket=dags_bucket,
        destination_key_prefix="dags",
        prune=False,
        retain_on_delete=False
        )

        dags_bucket_arn = dags_bucket.bucket_arn
What this also does however, is it takes all the files it finds in the local dags folder (on your developer environment) and uploads those as part of the deployment process. You can tweak this to your own requirements if you want, and even comment it out/remove as needed if you do not need to do this.
Next up we have the code that creates the MWAA execution policy and associated role that will be used by the MWAA worker nodes. This is taken from the MWAA documentation, but you can adjust as needed for your own environment. You might need to do this if you are integrating with other AWS services - this has been setup with default none access, so anything you need to do will need to be added.
       # Create MWAA IAM Policies and Roles, copied from MWAA documentation site

        mwaa_policy_document = iam.PolicyDocument(
            statements=[
                iam.PolicyStatement(
                    actions=["airflow:PublishMetrics"],
                    effect=iam.Effect.ALLOW,
                    resources=[f"arn:aws:airflow:{self.region}:{self.account}:environment/{mwaa_props['mwaa_env']}"],
                ),
                iam.PolicyStatement(
                    actions=[
                        "s3:ListAllMyBuckets"
                    ],
                    effect=iam.Effect.DENY,
                    resources=[
                        f"{dags_bucket_arn}/*",
                        f"{dags_bucket_arn}"
                        ],
                ),
                iam.PolicyStatement(
                    actions=[
                        "s3:GetObject*",
                        "s3:Head*",
                                 "s3:GetBucket*",
                                 "s3:List*"
                    ],
                    effect=iam.Effect.ALLOW,
                    resources=[
                        f"{dags_bucket_arn}/*",
                        f"{dags_bucket_arn}"
                        ],
                ),
                iam.PolicyStatement(
                    actions=[
                        "logs:CreateLogStream",
                        "logs:CreateLogGroup",
                        "logs:PutLogEvents",
                        "logs:GetLogEvents",
                        "logs:GetLogRecord",
                        "logs:GetLogGroupFields",
                        "logs:GetQueryResults"
                    ],
                    effect=iam.Effect.ALLOW,
                    resources=[f"arn:aws:logs:{self.region}:{self.account}:log-group:airflow-{mwaa_props['mwaa_env']}-*"],
                ),
                iam.PolicyStatement(
                    actions=[
                        "logs:DescribeLogGroups"
                    ],
                    effect=iam.Effect.ALLOW,
                    resources=["*"],
                ),
                iam.PolicyStatement(
                    actions=[
                        "sqs:ChangeMessageVisibility",
                        "sqs:DeleteMessage",
                        "sqs:GetQueueAttributes",
                        "sqs:GetQueueUrl",
                        "sqs:ReceiveMessage",
                        "sqs:SendMessage"
                    ],
                    effect=iam.Effect.ALLOW,
                    resources=[f"arn:aws:sqs:{self.region}:*:airflow-celery-*"],
                ),
                iam.PolicyStatement(
                    actions=[
                        "kms:Decrypt",
                        "kms:DescribeKey",
                        "kms:GenerateDataKey*",
                        "kms:Encrypt",
                        "kms:PutKeyPolicy"
                    ],
                    effect=iam.Effect.ALLOW,
                    resources=["*"],
                    conditions={
                        "StringEquals": {
                            "kms:ViaService": [
                                f"sqs.{self.region}.amazonaws.com",
                                f"s3.{self.region}.amazonaws.com",
                            ]
                        }
                    },
                ),
            ]
        )

        mwaa_service_role = iam.Role(
            self,
            "mwaa-service-role",
            assumed_by=iam.CompositePrincipal(
                iam.ServicePrincipal("airflow.amazonaws.com"),
                iam.ServicePrincipal("airflow-env.amazonaws.com"),
            ),
            inline_policies={"CDKmwaaPolicyDocument": mwaa_policy_document},
            path="/service-role/"
        )
The next part configures the security group and subnets needed by MWAA.
   # Create MWAA Security Group and get networking info

        security_group = ec2.SecurityGroup(
            self,
            id = "mwaa-sg",
            vpc = vpc,
            security_group_name = "mwaa-sg"
        )

        security_group_id = security_group.security_group_id

        security_group.connections.allow_internally(ec2.Port.all_traffic(),"MWAA")

        subnets = [subnet.subnet_id for subnet in vpc.private_subnets]
        network_configuration = mwaa.CfnEnvironment.NetworkConfigurationProperty(
            security_group_ids=[security_group_id],
            subnet_ids=subnets,
        )
The final part is the most interesting from the MWAA perspective, which is setting up and then configuring the environment. I have commented some of the environment settings out, so feel free to adjust for your own needs.
The first thing we do is create a configuration for the MWAA logging. In this particular configuration, I have enabled everything with INFO level logging so feel free to enable/disable or change the logging level as you need.
# Configure specific MWAA settings - you can externalise these if you want

        logging_configuration = mwaa.CfnEnvironment.LoggingConfigurationProperty(
            task_logs=mwaa.CfnEnvironment.ModuleLoggingConfigurationProperty(enabled=True, log_level="INFO"),
            worker_logs=mwaa.CfnEnvironment.ModuleLoggingConfigurationProperty(enabled=True, log_level="INFO"),
            scheduler_logs=mwaa.CfnEnvironment.ModuleLoggingConfigurationProperty(enabled=True, log_level="INFO"),
            dag_processing_logs=mwaa.CfnEnvironment.ModuleLoggingConfigurationProperty(enabled=True, log_level="INFO"),
            webserver_logs=mwaa.CfnEnvironment.ModuleLoggingConfigurationProperty(enabled=True, log_level="INFO")
            )
Next up we define some MWAA Apache Airflow configuration parameters. If you use custom properties, then this is where you will add them. Also, if you want to use TAGs for your MWAA environment, you can adjust accordingly.
        options = {
            'core.load_default_connections': False,
            'core.load_examples': False,
            'webserver.dag_default_view': 'tree',
            'webserver.dag_orientation': 'TB'
        }

        tags = {
            'env': f"{mwaa_props['mwaa_env']}",
            'service': 'MWAA Apache AirFlow'
        }
Now we come to actually creating the environment, using the stuff we have created or setup above.
        # Create MWAA environment using all the info above

        managed_airflow = mwaa.CfnEnvironment(
            scope=self,
            id='airflow-test-environment',
            name=f"{mwaa_props['mwaa_env']}",
            airflow_configuration_options={'core.default_timezone': 'utc'},
            airflow_version='2.0.2',
            dag_s3_path="dags",
            environment_class='mw1.small',
            execution_role_arn=mwaa_service_role.role_arn,
            #kms_key=key.key_arn,
            logging_configuration=logging_configuration,
            max_workers=5,
            network_configuration=network_configuration,
            #plugins_s3_object_version=None,
            #plugins_s3_path=None,
            #requirements_s3_object_version=None,
            #requirements_s3_path=None,
            source_bucket_arn=dags_bucket_arn,
            webserver_access_mode='PUBLIC_ONLY',
            #weekly_maintenance_window_start=None
        )

        managed_airflow.add_override('Properties.AirflowConfigurationOptions', options)
        managed_airflow.add_override('Properties.Tags', tags)

        core.CfnOutput(
            self,
            id="MWAASecurityGroup",
            value=security_group_id,
            description="VPC ID for MWAA"
        )
Running the CDK application
Now you have reviewed the app, modified it so that it contains your details (your AWS account/unique S3 bucket/etc) you can now run the app and deploy the CDK stacks. To do this we use the "cdk deploy" command.
First of all, from the directory, make sure everything is working ok. To do this we can use the "cdk ls" command.
$ cdk ls
It should return the following (which are the ids assigned in the stacks that this CDK application uses) if it is working ok.
MWAA-Backend
MWAA-Environment
We can now deploy them, either all together or one at a time. This CDK application needs the MWAA-Backend app deployed first as it contains the VPC networking that will be used in the MWAA-Environment stack, so we can deploy that by:
$ cdk deploy MWAA-Backend
And if it is working ok, it should start of with..
MWAA-Backend: deploying...
MWAA-Backend: creating CloudFormation changeset...
and then start creating the CloudFormation which you can then track/view via the AWS Console. Once it has finished, you should see something like the following (your numbers/letters will be different):
 ✅  MWAA-Backend

Outputs:
MWAA-Backend.ExportsOutputRefMWAAApacheAirflowVPCB5BDED9D45FBF85F = vpc-0a46c87709f48799a
MWAA-Backend.ExportsOutputRefMWAAApacheAirflowVPCprivateSubnet1Subnet41EDA5200DFEC7E0 = subnet-0a5ea20a194b2e7e1
MWAA-Backend.ExportsOutputRefMWAAApacheAirflowVPCprivateSubnet2SubnetF8BEBBAC6108F015 = subnet-0e4bb92d83d79e8fa
MWAA-Backend.VPCId = vpc-0a46c87709f48799a

Stack ARN:
arn:aws:cloudformation:eu-central-1:XXXXXXXXX:stack/MWAA-Backend/4de53ff0-a84d-11eb-a753-020a8f92cbec
We can now deploy the MWAA environment, which we can do simply by typing:
$ cdk deploy MWAA-Environment
This time it will pop up details about some of the security related information, in this case the IAM policies and security groups which I mentioned earlier. Answer "y" to deploying these changes. This will kick off the deployment which you can track by going to the CloudFormation console.
This will take approx 20-25 minutes, so a good time to grab a cup of tea and read some of my other blog posts perhaps :-)
If it has been successful, you will see the following output (again, your details will change but it should look similar to this):
 ✅  MWAA-Environment

Outputs:
MWAA-Environment.MWAASecurityGroup = sg-0c2a02f721d2ce27b

Stack ARN:
arn:aws:cloudformation:eu-central-1:704533066374:stack/MWAA-Environment/16380e60-a84e-11eb-a109-0a082239d27a
Testing the environment
If we take a look at the Amazon S3 bucket we can see we have our MWAA bucket and dags folder created, as well as our local dags uploaded.

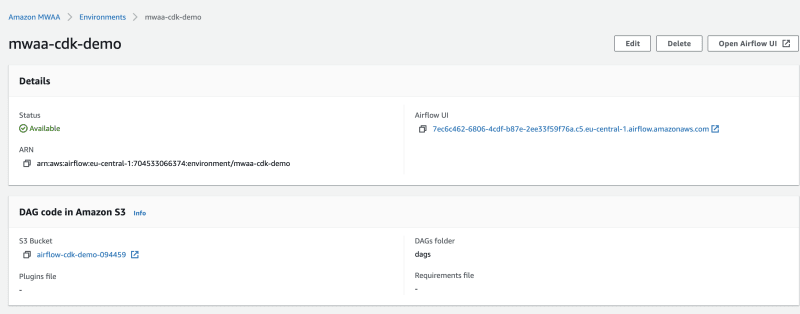
If we go to the MWAA console, we can see our environment
We can now grab the URL for this environment, either by getting it from the console or by using the AWS Cli.
Just substitute the name of the MWAA environment and AWS region, and it should then give you the URL you can use in your browser (although you will have to append /home to it)
Note I am using jq, if you do not have this in your environment, you can run the command without this but just need to find the entry in the output where it says "WebserverUrl"
$ aws mwaa get-environment --name {name of the environment created} --region={region} | jq -r '.Environment | .WebserverUrl'
And as we can see, we have the two sample DAGS that were in the local folder, and are now available for us in the MWAA environment.

Removing/Cleaning up
In order to remove everything we have deployed, all we need to do is:
$ cdk destroy MWAA-Environment
This will take 20-30 minutes to clean up the MWAA environment. One thing that it will not do however, is remove the Amazon S3 bucket we setup, so you will need to manually delete that via the console (or use the AWS Cli - that would be my approach). Once you have removed that S3 bucket, now clean up the backend stack
$ cdk destroy MWAA-Backend
This should be much quicker to clean up. Once finished, you should be done.
Conclusion
That's all folks, I hope this has been helpful. You can find out more about the MWAA CDK construct by checking out the documentation here
One of the things I will hopefully come back to in the weeks to come is taking some of the other ways I have setup MWAA and incorporate these into existing or new CDK stacks. For example;
- either extending the mwaa_cdk_backend stack to include a bastion host so we can configure a Private environment, or even creating a new stack that does that
- setting up and integrating a simple CI/CD stack that improves the developer experience
- setting up the KMS key and then configuring the MWAA environment to use it
If you have any other suggestions, feel free to use the comments or get in touch and let me know. Would be great to hear from you...
Thank you!


Top comments (0)