AWS Security Blog
How to use AWS Secrets & Configuration Provider with your Kubernetes Secrets Store CSI driver
January 2, 2024: We’ve updated this post to include the new failover Region feature.
April 29, 2021: We’ve updated the order of the commands in Step 1.
April 23, 2021: We’ve updated the commands in Steps 1 and 5 and in the “Additional Features” section.
Using AWS Secrets Manager, you can more securely retrieve secrets from Secrets Manager for use in your Amazon Elastic Kubernetes Service (Amazon EKS) Kubernetes pods. With the launch of AWS Secrets Manager and Configuration Provider (ASCP), you have a simple-to-use plugin for the industry-standard Kubernetes Secrets Store and Container Storage Interface (CSI) driver, used for providing secrets to applications that operate on Amazon EKS.
Since December 2022, Secrets Manager provides a failover AWS Region feature to use with your Kubernetes Secrets Store and CSI driver. This new feature helps you securely and seamlessly use secrets stored in another Region with your Kubernetes pods. Previously, the Secrets Store CSI driver supported mounting secrets from a single Region into a pod. This meant that if you faced connectivity issues with Secrets Manager in that Region and the secret couldn’t be mounted, you had to manually failover and mount a secret from a different Region. However, the new CSI driver failover Region removes the challenge of manually failing over to a different Region, helping to ensure a smooth transition between both Regions while still using the ability of Secrets Manager to securely store, rotate, and manage your secrets throughout their lifecycle.
With ASCP, you can securely store and manage your secrets in Secrets Manager, and retrieve them through your applications that are running on Kubernetes, without the need to write custom code. You also have the added benefit of using AWS Identity and Access Management (IAM) and resource policies to help limit and restrict access to your secrets. This tightly controls which secrets are accessible by the cluster. If you have enabled the rotation reconciler feature of the Secret Store CSI driver, ASCP will work with it to retrieve the latest secret from the secret provider. After you install and enable ASCP, it helps ensure that your applications receive the most current version of the secret when the pod starts, so that you can benefit from the lifecycle management capabilities of Secrets Manager. You not only gain the benefit of a natively-integrated secrets management solution, but also the ability to provide configurations in a single provider.
Note: The failover Region secret and API requests made to the secret are billed as a separate secret and API call.
Overview
In this post, we will walk you through how to set up ASCP to work with the Secrets Store CSI driver on your Kubernetes clusters. The Secrets Store CSI driver allows Kubernetes to mount secrets stored in Secret Manager into the pods as volumes. After the volumes are attached, the data is mounted into the container’s file system. We will also show you how to use the new failover Region feature with your CSI driver to support your disaster recovery plan.
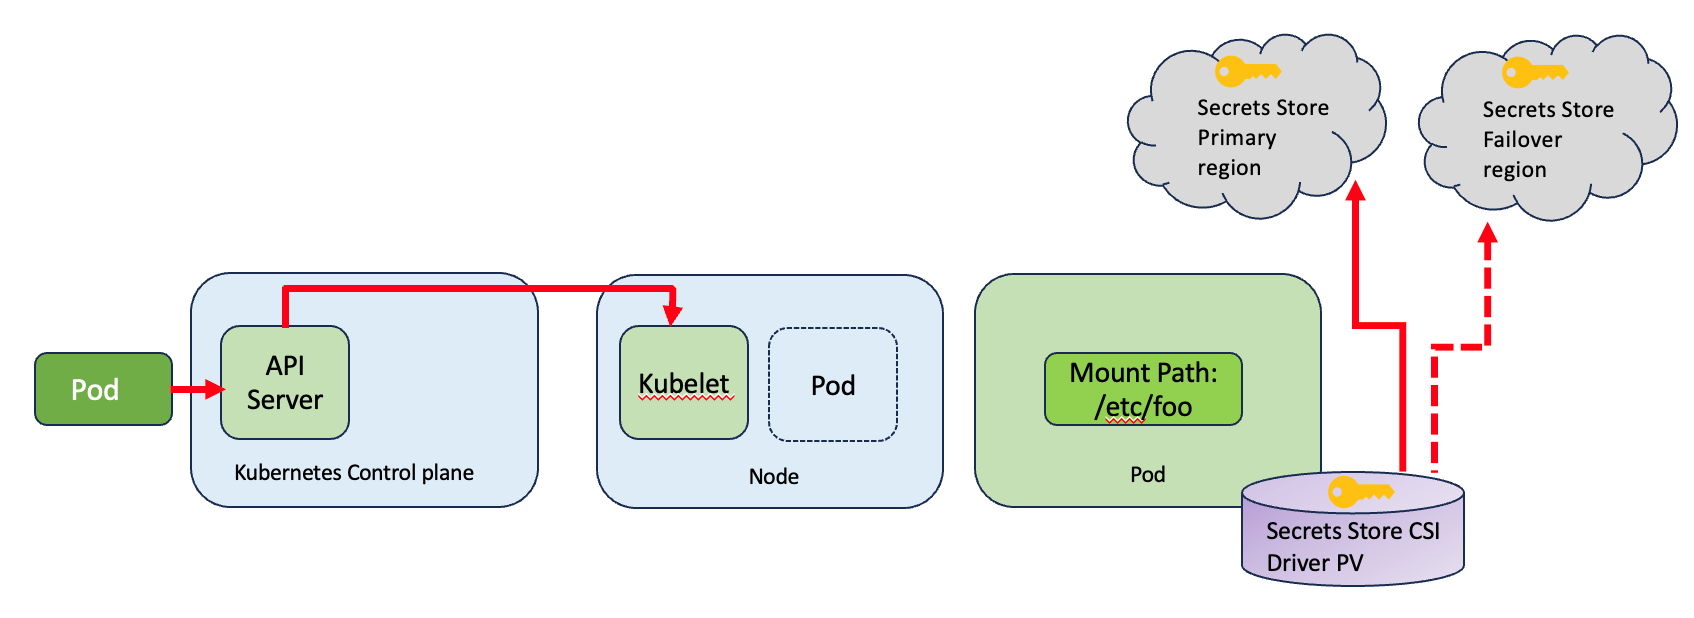
Figure 1: Overview
This solution includes the following steps, which we describe in more detail in the following sections:
- Restrict access to your pods using IAM roles for service accounts
- Install the Kubernetes secrets store CSI driver
- Install the AWS Secrets Manager and Configuration Provider (ASCP)
- Create and deploy the SecretProviderClass custom resource
- Configure and deploy the pods to mount the volumes based on the configured secrets
- Load secrets and configurations from the volumes mounted to the container
- Configure and enable the failover Region.
Prerequisites
This solution has the following prerequisites:
- An AWS account.
- An Amazon Virtual Private Cloud (Amazon VPC).
- An IAM policy with permissions to retrieve a secret from Secrets Manager.
- Your secrets stored in Secrets Manager in two Regions, or a secret created with replication enabled.
- AWS Command Line Interface (AWS CLI) and kubectl installed.
- Helm and eksctl installed.
- An EKS cluster – For this demonstration, I have used Managed node as the node type because the CSI Secret Store driver runs as a DaemonSet, and as described in the AWS documentation, DaemonSet is not supported on AWS Fargate. You can use the eksctl tool to create the cluster.
- A user that can modify your Kubernetes cluster.
Deploy the solution
Step 1: Restrict access to your pods using IAM roles for service accounts
You will use IAM roles for service accounts (IRSA) to limit secret access to your pods. By setting this up, the provider will retrieve the pod identity and exchange this identity for an IAM role. ASCP will then assume the IAM role of the pod and only retrieve secrets from Secrets Manager that the pod is authorized to access. This helps prevent the container from accessing secrets that are intended for another container that belongs to another pod.
Run the following command to turn on OpenID Connect (OIDC). Remember to replace<REGION> and <CLUSTERNAME> with your own values.
eksctl utils associate-iam-oidc-provider --region=<REGION> --cluster=<CLUSTERNAME> --approve #Only run this once
To create your service account role, run the following command to associate the policy (from the Prerequisites section) with your service account. Replace <NAMESPACE>, <CLUSTERNAME>, <IAM_policy_ARN>, <SERVICE_ACCOUNT_NAME> with your own values.
eksctl create iamserviceaccount --name <SERVICE_ACCOUNT_NAME> --namespace <NAMESPACE> --cluster <CLUSTERNAME> --attach-policy-arn <IAM_policy_ARN> --approve --override-existing-serviceaccounts
Step 2: Install the Kubernetes secrets store CSI driver
From your terminal where you have kubectl installed, run the following helm commands to install the CSI driver.
helm repo add secrets-store-csi-driver https://raw.githubusercontent.com/kubernetes-sigs/secrets-store-csi-driver/master/charts
Next, you need to determine whether you want to turn on automated rotation for the driver using the rotation reconciler feature, or whether you don’t need to periodically pull updated secrets.
If you don’t need to periodically pull updated secrets, initialize the driver with the following command:
helm -n kube-system install csi-secrets-store secrets-store-csi-driver/secrets-store-csi-driver
Note: If you are running an older version of the driver, you might need the flag –set grpcSupportedProviders=”aws”.
If you want to turn on automated rotation for the driver using the rotation reconciler feature which is currently in alpha, use the command as follows (you can adjust the rotation interval as you desire to find an appropriate balance between API call cost consideration and rotation frequency):
helm -n kube-system install csi-secrets-store secrets-store-csi-driver/secrets-store-csi-driver --set enableSecretRotation=true --set rotationPollInterval=3600s
To validate that the installer is running as expected, run the following command:
kubectl get pods --namespace=kube-system
The output should show the following Secrets Store CSI driver pods and custom resource definitions (CRDs) deployed:
Step 3: Install the AWS Secrets Manager and Configuration Provider (ASCP)
Using the CSI driver, you can mount your secrets in your EKS Kubernetes pods. To retrieve the secrets from Secrets Manager so that the CSI driver can mount them, you need to install the AWS Secrets Manager and Configuration Provider (ASCP). You do this by running the following command in your terminal, which will pull down the installer file without the need to clone the entire repo.
curl -s https://github.com/aws/secrets-store-csi-driver-provider-aws/blob/main/deployment/aws-provider-installer.yaml | kubectl apply -f -
Step 4: Create and deploy the SecretProviderClass custom resource
To use the Secrets Store CSI driver, you need to create a SecretProviderClass custom resource. This provides driver configurations and provider-specific parameters to the CSI driver itself. The SecretProviderClass resource should have at least the following components:
To use ASCP, you create the SecretProviderClass to provide a few more details of how you are going to retrieve secrets from Secrets Manager. The SecretProviderClass MUST be in the same namespace as the pod that references it. The following is an example SecretProviderClass configuration:
Step 5: Configure and deploy the pods to mount the volumes based on the configured secrets
Update your deployment yaml to use the secrets-store.csi.k8s.io driver, and reference the SecretProviderClass resource created previously. You should save this on your local desktop.
The following is an example of how to configure a pod to mount a volume based on the SecretProviderClass to retrieve secrets from Secrets Manager. In this example, I used NGINX. For your secret, the mount point and SecretProviderClass configuration will be in the pod deployment specification file. For another example, see ExampleDeployment.yaml. Make sure to replace <SERVICE_ACCOUNT_NAME> with your own information.
On pod start and restart, the CSI driver will call the provider binary to retrieve the secret and configurations from Secrets Manager and Parameter Store, respectively. After successfully retrieving this information, the CSI driver will mount them to the container’s file system. You can validate that the volume is mounted properly after a restart by running the following command:
kubectl exec -it nginx-secrets-store-inline -- ls /mnt/secrets-store/
You should get the following response:
MySecret2
Step 6: Load secrets and configurations from the volumes mounted to the container
Both secrets and configurations will be fetched at pod initialization during the mount operation. This can add a small amount of latency when using the native Kubernetes secrets, but it is similar to the experience of retrieving secrets through a custom or third-party tool. After initialization, your pod will not be impacted. ASCP, along with the rotation reconciler component, will update the values in the mount path and in the Kubernetes secret. The workload pods will watch the file system to track changes and automatically pick up new credentials. In the case of environmental variables, you will need to restart your pods.
Step 7: Configure and enable the failover Region
The updated CSI driver supports an automated failover feature to fetch secrets from a secondary Region. This helps with availability during connectivity outages and disaster recovery configurations. You can define the automated failover Region using the failoverRegion parameter in the SecretProviderClass.yaml file.
Additionally, you can include the failoverObject parameter. This is an optional field that specifies the secret in the failover Region. If you don’t include this, the CSI driver searches for the secret with the same secret ID in the failover Region that is specified in the objectName field.
To test the failover feature, update the SecretProviderClass.yaml file with the following content:
The preceding SecretProviderClass configuration looks for the secret named “mysecret2” in the primary Region “eu-west-2”. If that fails, it fails over to the “eu-west-1” Region and looks for the secret with the same name: “mysecret2”. The objectAlias is an optional field that specifies the name of the file under which the secret will be mounted. In the absence of the objectAlias field, the file name is the same as the value specified for objectName.
Before you apply the changes, you need to simulate the 500 internal server error using the DNS firewall rule group through the following steps:
- Make sure that you’re in the same Region as the EKS cluster, and navigate to the Amazon VPC console.
- In the left navigation pane, under DNS firewall, select Rule groups.
- Choose Add rule group, provide a name and (optional) description, and choose Next.
- On the Add rules – optional screen, choose Add rule.
- In the Rule details section, enter a name and optional description.
- In the Domain list section, select Add my own domain list and enter secretsmanager.eu-west-2.amazonaws.com in the box.
- In the Action section, select BLOCK as the action and NODATA as the response.
- Select Add rule.
- On the Set rule priority screen, choose Next.
- On the Add tags screen, choose Next.
- On the Review and create screen, choose Create rule group.
- From the console, select the rule group, and then navigate to the Associated VPCs tab.
- Choose Associate VPC and then choose the VPC that the EKS cluster uses.
- Choose Associate.
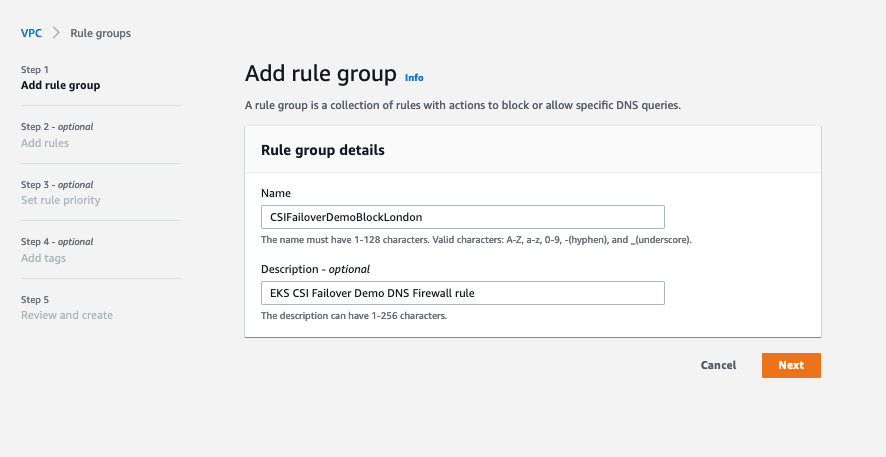
Figure 2: Add rule group
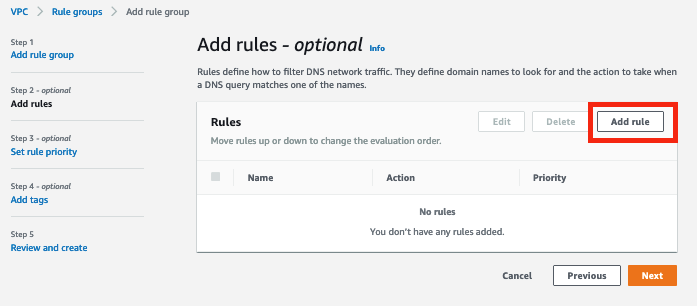
Figure 3: Add a rule
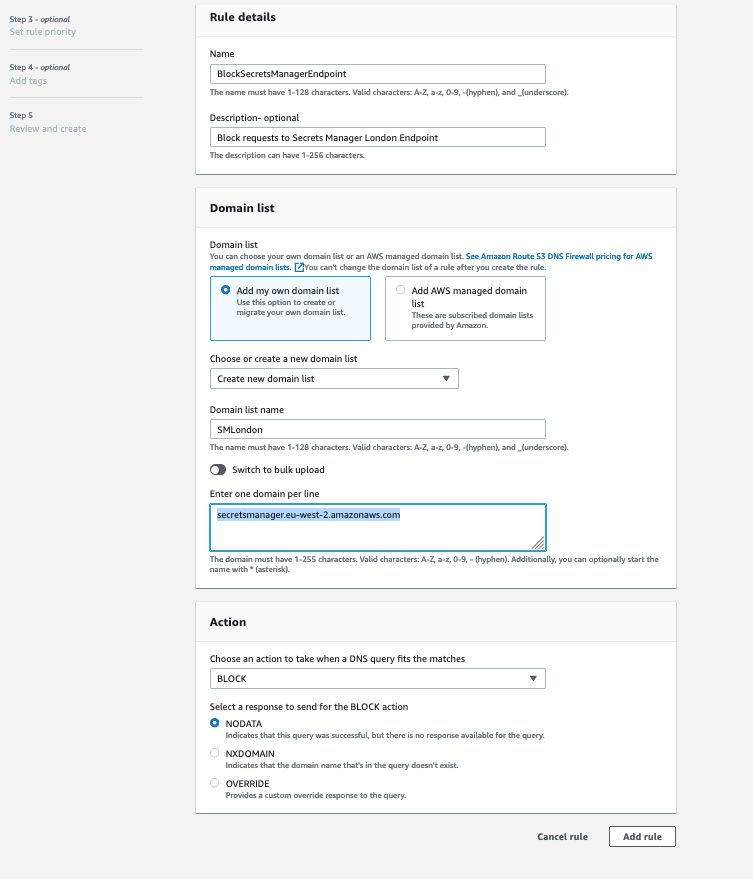
Figure 4: Set up rule details, domain list, and action

Figure 5: Associate VPC
When the association status changes to Complete, apply the change by running the following command:
kubectl apply -f SecretProviderClass.yaml -n kube-system
Create a new deployment yaml file using the following specification and configure a pod to mount volumes based on the secretProviderClass. For another example of a deployment file, see ExampleDeployment.yaml.
Create the resources and verify that the pods were created.
Verify that the secret has been mounted. Be sure to update the <Pod-ID> with your own information.
kubectl exec -it nginx-deployment-<Pod-ID> -n kube-system -- cat /mnt/secrets-store/eksblogdemo;echo
You should see the content of your secret, confirming that the failover was successful.
After testing the failover feature, complete the following steps to remove forced failover:
- In the DNS Firewall section, choose Rule groups.
- Select the rule group that you created previously and choose the Associated VPCs tab.
- Select the associated VPC and choose Disassociate.
- Enter disassociate and then choose Disassociate to confirm disassociation of the rule group from the VPC.
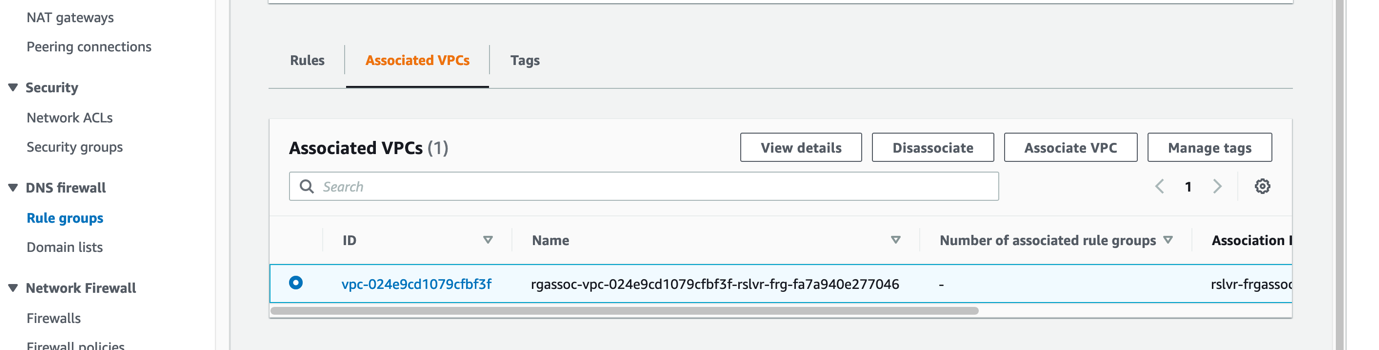
Figure 6: Select the associated VPC
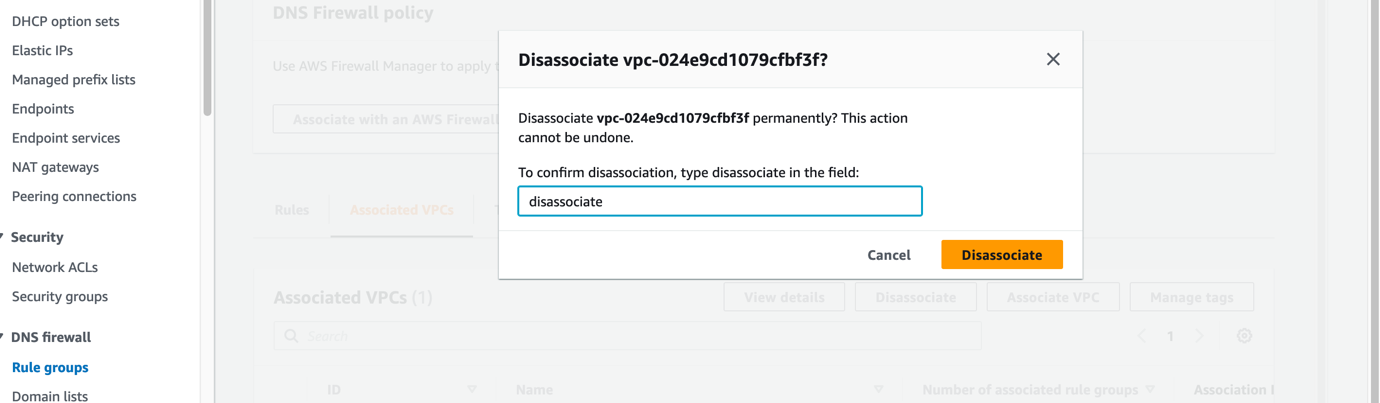
Figure 7: Confirm disassociation of the VPC from the rule group
After you make these changes, the primary Region secret should be accessible.
Additional features
The CSI driver can also sync your secrets with Kubernetes secrets. To do this, use the optional secretObjects field to define the desired state of your synced Kubernetes secret objects. The volume mount is required for the sync. The following is an example SecretProviderClass custom resource that will sync a secret from Secrets Manager to a Kubernetes secret:
Supported Kubernetes secret types include the following:
- Opaque
- Kubernetes.io/basic-auth
- bootstrap.kubernetes.io/token
- Kubernetes.io/dockerconfigjson
- Kubernetes.io/dockercfg
- Kubernetes.io/ssh-auth
- Kubernetes.io/service-account-token
- Kubernetes.io/tls
You also have the option of using a pod deployment yaml to set environment variables in your deployment to reference new Kubernetes secrets. The following is an example deployment yaml that creates an environment variable from a synced Kubernetes secret:
Conclusion
In this post, we walked you through how to set up and configure the new AWS Secrets Manager and Configuration Provider (ASCP) to work with Amazon EKS and other Kubernetes clusters that you are running and how to configure and simulate the CSI driver failover feature. By using ASCP and the new failover feature, you can provide more protection of your secrets with encryption and auto-rotation features while still meeting your disaster recover needs. This allows you to focus more on developing your applications rather than on fine-tuning their security configurations.
If you have feedback about this post, submit comments in the Comments section below. If you have questions about this post, start a new thread on the AWS Secrets Manager forum or contact AWS Support.
Want more AWS Security news? Follow us on Twitter.