AWS DevOps & Developer Productivity Blog
Building an ARM64 Rust development environment using AWS Graviton2 and AWS CDK
2020 was the year that ARM chips made the headlines by moving from largely mobile form factors into the cloud thanks to AWS Graviton2, allowing you to have up to 40% better price performance over comparable current generation x86 Amazon Elastic Compute Cloud (Amazon EC2) and Amazon Relational Database Service (Amazon RDS) instances.
We speak to customers daily about Graviton2. One recurring question we hear is “Graviton2 is great, but how can my team develop for ARM natively without the complexity of cross-compilation or having to buy custom hardware on premises?” This post seeks to answer that question by setting up the Visual Studio Code-based Code Server IDE, running on a Graviton2 EC2 instance that enables native development in a cost-effective and secure manner accessed via your browser.
The Rust programming language has gained a huge amount of popularity recently. This post aims to show that you can use this environment for Rust development as well as hundreds of other supported languages. AWS has committed to supporting the Rust community and using the language to deliver fast and robust services to customers at scale, and we want to enable our customers to do the same.
We also include instructions for building and installing the rust-analyzer and CodeLLDB debugger plugins to add additional language features.
Solution overview
The following diagram illustrates our solution architecture.
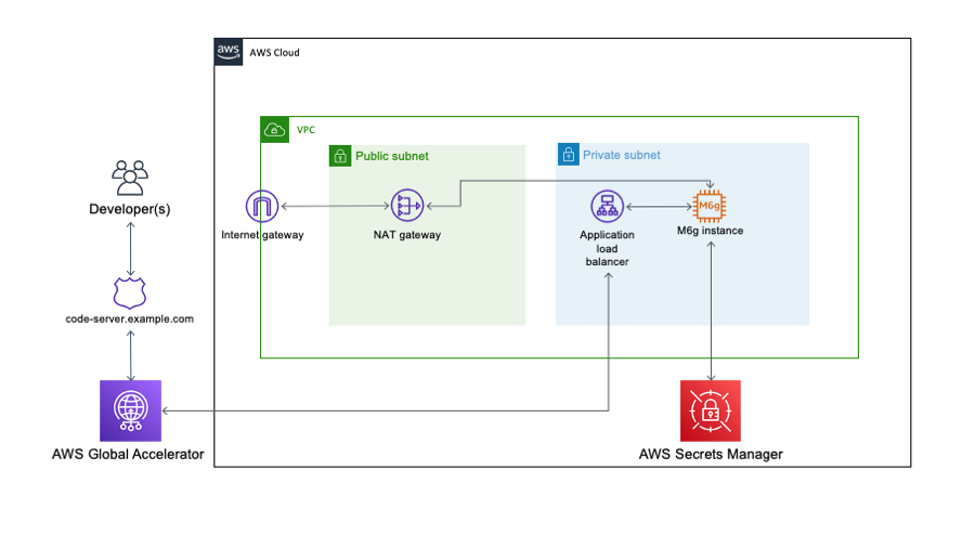
The solution consists of an EC2 Graviton2 instance located in a private VPC subnet routed through an AWS Global Accelerator accelerator to provide routing optimization and keep packet loss, jitter, and latency lower by up to 60%. An internal facing Application Load Balancer containing the AWS Certificate Manager certificate decrypts and forwards traffic to this instance.
Code Server queries AWS Secrets Manager to initially set the login password on startup and allow for continued password-based authentication and easy password rotation. The EC2 instance has access to the internet through a NAT gateway and has no public IP address or key pair associated, and is accessible only through AWS Systems Manager Session Manager.
Prerequisites
For this walkthrough, the following are prerequisites:
- An AWS account
- Familiarity with the AWS Command Line Interface (AWS CLI)
- Account capacity for two Elastic IPs for the NAT gateways
- Access to an AWS account with administrator or PowerUser (or equivalent) AWS Identity and Access Management (IAM) role policies attached
- Access to AWS CloudShell
- Basic knowledge of the Linux operating system
- A public hosted zone in Amazon Route 53—for instructions on setting one up, see Getting started with Amazon Route 53
- A private CIDR range for the new VPC that is created as part of the AWS Cloud Development Kit (AWS CDK) stack
AWS CDK stack
In order to deploy our architecture, I use the AWS CDK. As a developer, it’s more intuitive to me to define my infrastructure using a language and tooling with which I am familiar. I can also do things like environment variable injection and scripting as part of the stack creation to add stack parameters and customization points.
The AWS CDK application is comprised of five stacks. Each stack defines a separate part of the architecture:
- Networking – Defines a VPC across two Availability Zones with the CIDR range of your choice. The routing and public/private subnet creation is done for us as part of the default configuration.
- Certificate – This is the reason for the domain prerequisite. It’s a best practice to encrypt web applications using TLS, and for that we need a certificate and therefore a domain. This stack creates a certificate for the subdomain you specify as part of the stack creation and DNS validation in Route 53.
- Amazon EC2 configuration – This defines both our AMI and the instance type and configuration. In this case, we’re using Amazon Linux 2 ARM64 edition. Here we also set the instance-managed roles that allow Session Manager connectivity and Secrets Manager access.
- ALB configuration – Here we define the internal load balancer and specify the listener, certificate, and target configuration. I have injected the Amazon EC2 configuration as part of the class constructor so that I can reference it directly as a target.
- Global accelerator configuration – Finally, the accelerator is defined here with two ports open, the ALB we defined in the ALB stack as a target, and most importantly adds in a CNAME DNS entry pointing to the DNS name of the accelerator.
Walkthrough overview
This walkthrough uses the AWS CDK command line tools to deploy the stack. Session Manager is enabled to allow access to the EC2 instance and configure the Code Server application and associated plugins.
The walkthrough specifically covers the following steps:
- Deploy the AWS CDK stacks via CloudShell to build out the application infrastructure and associated IAM roles.
- Launch Code Server via the official Docker container with the commands to get and set the password stored in Secrets Manager.
- Log in and build the rust-analyzer and CodeLLDB plugins from a terminal to allow for debugging within a “Hello World” application.
Start CloudShell and install the appropriate tooling
In this section, I use dummy values for the domain, the VPC CIDR, AWS Region, and the secret password. You need to submit real values as appropriate.
Sign in to CloudShell and enter the following commands:
The deploy step takes around 10-15 mins to run and prompts a couple of times to add resources like security groups and IAM roles.
Log in to the new instance using Session Manager
Install the latest version of the Session Manager plugin for the AWS CLI:
Now start a session, logging into the newly created EC2 instance and log in as ec2-user:
Add the password as a secret and start the container
Enter the following code to add the password as a secret in Secrets Manager and start the container:
Access and configure the web application for Rust development
So far, we have accomplished the following:
- Created the infrastructure in the diagram via AWS CDK deployment
- Configured the EC2 instance to run Docker and added this to the systemctl startup scripts
- Created a secret in Secrets Manager to use as the application login password
- Instantiated a Docker container running Code Server
Next, we access the running container via the web interface and install the required development tools.
Log in to the Code Server web application
To log in to the Code Server web application, complete the following steps:
- Browse to https://code-server.example.com, where example.com is the name of the domain you supplied in the AWS CDK step.
- Log in using the password you created in Secrets Manager.
- Create a new terminal by choosing the hamburger icon and, under Terminal, choosing New Terminal.
- Issue the following commands into the terminal to install the Rust programming language:
Install the rust-analyzer plugin
Open the extensions panel and enter Rust Analyzer in the search bar. Then install the plugin.
Install the debugger
Go back to the extensions panel in the Code Server application and enter CodeLLDB into the search bar. Then install this extension.
Create a sample application and open it in the Code Server window
To create and use our sample application, complete the following steps:
- In the existing Code Server terminal, enter the following:
- Open the newly created folder in Code Server verifying that the helloworld directory was successfully created.

- Rust-analyzer runs when you open up src/main.rs and index the file.
- You can run the program by choosing Run in the editor.
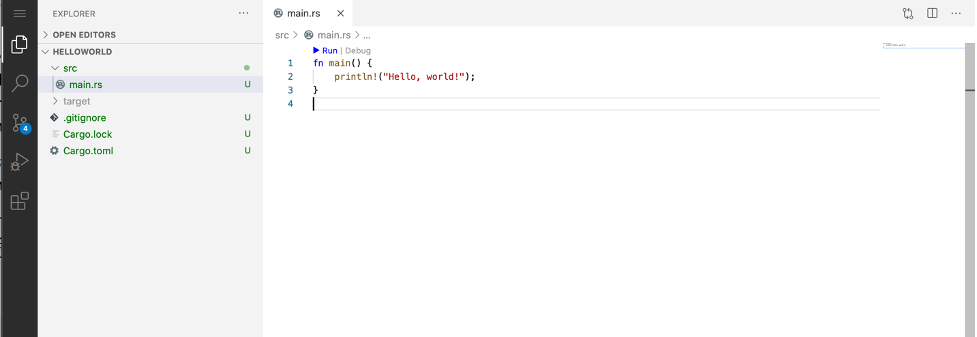
- Similarly, to launch the debugger, choose Debug in the editor.

Troubleshooting
If the CloudShell session times out, you need to reset your environment variables in order to re-deploy, modify, and delete the stack deployment.
Clean up
This stack incurs an estimated monthly cost of $143.00.
To delete the stack, log in to CloudShell and enter the following commands:
This destroys all the resources created in the first step. You can verify this by browsing to the AWS CloudFormation console and noting the deletion of all the stacks.
Conclusion
AWS is a place where builders can reinvent the future. The future of development means supporting different chipsets depending on different business requirements. This post is designed to enable development targeting the ARM64 microarchitecture by utilizing AWS Graviton2. Happy building!
Author bio

Alistair is a Principal Solutions Architect at AWS focused on EdTech customers. Originally from the west coast of Scotland, Alistair now lives in Fairfield, Connecticut, with his wife and two daughters and enjoys spending time with his family, skiing, golfing, cycling, and using his pellet smoker.