AWS Database Blog
How to set up command-line access to Amazon Keyspaces (for Apache Cassandra) by using the new developer toolkit Docker image
Amazon Keyspaces (for Apache Cassandra) is a scalable, highly available, and fully managed Cassandra-compatible database service. Amazon Keyspaces helps you run your Cassandra workloads more easily by using a serverless database that can scale up and down automatically in response to your actual application traffic. Because Amazon Keyspaces is serverless, there are no clusters or nodes to provision and manage. You can get started with Amazon Keyspaces with a few clicks in the console or a few changes to your existing Cassandra driver configuration.
In this post, I show you how to set up command-line access to Amazon Keyspaces by using the keyspaces-toolkit Docker image. The keyspaces-toolkit Docker image contains commonly used Cassandra developer tooling. The toolkit comes with the Cassandra Query Language Shell (cqlsh) and is configured with best practices for Amazon Keyspaces. The container image is open source and also compatible with Apache Cassandra 3.x clusters.
A command line interface (CLI) such as cqlsh can be useful when automating database activities. You can use cqlsh to run one-time queries and perform administrative tasks, such as modifying schemas or bulk-loading flat files. You also can use cqlsh to enable Amazon Keyspaces features, such as point-in-time recovery (PITR) backups and assign resource tags to keyspaces and tables.
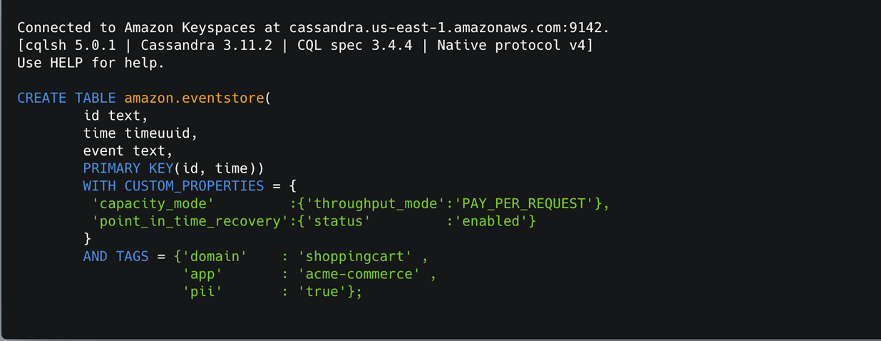
The following screenshot shows a cqlsh session connected to Amazon Keyspaces and the code to run a CQL create table statement.
Build a Docker image
To get started, download and build the Docker image so that you can run the keyspaces-toolkit in a container. A Docker image is the template for the complete and executable version of an application. It’s a way to package applications and preconfigured tools with all their dependencies. To build and run the image for this post, install the latest Docker engine and Git on the host or local environment. The following command builds the image from the source.
The preceding command includes the following parameters:
- –tag – The name of the image in the
name:tagLeaving out the tag results inlatest. - –build-arg CLI_VERSION – This allows you to specify the version of the base container. Docker images are composed of layers. If you’re using the AWS CLI Docker image, aligning versions significantly reduces the size and build times of the
keyspaces-toolkitimage.
Connect to Amazon Keyspaces
Now that you have a container image built and available in your local repository, you can use it to connect to Amazon Keyspaces.
To use cqlsh with Amazon Keyspaces, create service-specific credentials for an existing AWS Identity and Access Management (IAM) user. The service-specific credentials enable IAM users to access Amazon Keyspaces, but not access other AWS services.
The following command starts a new container running the cqlsh process.
The preceding command includes the following parameters:
- run – The Docker command to start the container from an image. It’s the equivalent to running
createandstart. - –rm –Automatically removes the container when it exits and creates a container per session or run.
- -ti – Allocates a pseudo TTY (
t) and keeps STDIN open (i)even if not attached (removeiwhen user input is not required). - amazon/keyspaces-toolkit – The image name of the
keyspaces-toolkit. - us-east-1.amazonaws.com – The Amazon Keyspaces endpoint.
- 9142 – The default SSL port for Amazon Keyspaces.
After connecting to Amazon Keyspaces, exit the cqlsh session and terminate the process by using the QUIT or EXIT command.
Drop-in replacement
Now, simplify the setup by assigning an alias (or DOSKEY for Windows) to the Docker command. The alias acts as a shortcut, enabling you to use the alias keyword instead of typing the entire command. You will use cqlsh as the alias keyword so that you can use the alias as a drop-in replacement for your existing Cassandra scripts.
The alias contains the parameter –v "$(pwd)":/source, which mounts the current directory of the host. This is useful for importing and exporting data with COPY or using the cqlsh --file command to load external cqlsh scripts.
For security reasons, don’t store the user name and password in the alias.
After setting up the alias, you can create a new cqlsh session with Amazon Keyspaces by calling the alias and passing in the service-specific credentials.
Later in this post, I show how to use AWS Secrets Manager to avoid using plaintext credentials with cqlsh. You can use Secrets Manager to store, manage, and retrieve secrets.
Create a keyspace
Now that you have the container and alias set up, you can use the keyspaces-toolkit to create a keyspace by using cqlsh to run CQL statements. In Cassandra, a keyspace is the highest-order structure in the CQL schema, which represents a grouping of tables. A keyspace is commonly used to define the domain of a microservice or isolate clients in a multi-tenant strategy.
Amazon Keyspaces is serverless, so you don’t have to configure clusters, hosts, or Java virtual machines to create a keyspace or table. When you create a new keyspace or table, it is associated with an AWS Account and Region. Though a traditional Cassandra cluster is limited to 200 to 500 tables, with Amazon Keyspaces the number of keyspaces and tables for an account and Region is virtually unlimited.
The following command creates a new keyspace by using SingleRegionStrategy, which replicates data three times across multiple Availability Zones in a single AWS Region. Storage is billed by the raw size of a single replica, and there is no network transfer cost when replicating data across Availability Zones.
Using keyspaces-toolkit, connect to Amazon Keyspaces and run the following command from within the cqlsh session.
The preceding command includes the following parameters:
- REPLICATION –
SingleRegionStrategyreplicates data three times across multiple Availability Zones. - TAGS – A label that you assign to an AWS resource. For more information about using tags for access control, microservices, cost allocation, and risk management, see Tagging Best Practices.
Create a table
Previously, you created a keyspace without needing to define clusters or infrastructure. Now, you will add a table to your keyspace in a similar way. A Cassandra table definition looks like a traditional SQL create table statement with an additional requirement for a partition key and clustering keys. These keys determine how data in CQL rows are distributed, sorted, and uniquely accessed. Tables in Amazon Keyspaces have the following unique characteristics:
- Virtually no limit to table size or throughput – In Amazon Keyspaces, a table’s capacity scales up and down automatically in response to traffic. You don’t have to manage nodes or consider node density. Performance stays consistent as your tables scale up or down.
- Support for “wide” partitions – CQL partitions can contain a virtually unbounded number of rows without the need for additional bucketing and sharding partition keys for size. This allows you to scale partitions “wider” than the traditional Cassandra best practice of 100 MB.
- No compaction strategies to consider – Amazon Keyspaces doesn’t require defined compaction strategies. Because you don’t have to manage compaction strategies, you can build powerful data models without having to consider the internals of the compaction process. Performance stays consistent even as write, read, update, and delete requirements change.
- No repair process to manage – Amazon Keyspaces doesn’t require you to manage a background repair process for data consistency and quality.
- No tombstones to manage – With Amazon Keyspaces, you can delete data without the challenge of managing tombstone removal, table-level grace periods, or zombie data problems.
- 1 MB row quota – Amazon Keyspaces supports the Cassandra blob type, but storing large blob data greater than 1 MB results in an exception. It’s a best practice to store larger blobs across multiple rows or in Amazon Simple Storage Service (Amazon S3) object storage.
- Fully managed backups – PITR helps protect your Amazon Keyspaces tables from accidental write or delete operations by providing continuous backups of your table data.
The following command creates a table in Amazon Keyspaces by using a cqlsh statement with customer properties specifying on-demand capacity mode, PITR enabled, and AWS resource tags. Using keyspaces-toolkit to connect to Amazon Keyspaces, run this command from within the cqlsh session.
The preceding command includes the following parameters:
- capacity_mode – Amazon Keyspaces has two read/write capacity modes for processing reads and writes on your tables. The default for new tables is on-demand capacity mode (the
PAY_PER_REQUESTflag). - point_in_time_recovery – When you enable this parameter, you can restore an Amazon Keyspaces table to a point in time within the preceding 35 days. There is no overhead or performance impact by enabling PITR.
- TAGS – Allows you to organize resources, define domains, specify environments, allocate cost centers, and label security requirements.
Insert rows
Before inserting data, check if your table was created successfully. Amazon Keyspaces performs data definition language (DDL) operations asynchronously, such as creating and deleting tables. You also can monitor the creation status of a new resource programmatically by querying the system schema table. Also, you can use a toolkit helper for exponential backoff.
Check for table creation status
Cassandra provides information about the running cluster in its system tables. With Amazon Keyspaces, there are no clusters to manage, but it still provides system tables for the Amazon Keyspaces resources in an account and Region. You can use the system tables to understand the creation status of a table. The system_schema_mcs keyspace is a new system keyspace with additional content related to serverless functionality. Using keyspaces-toolkit, run the following SELECT statement from within the cqlsh session to retrieve the status of the newly created table.
The following screenshot shows an example of output for the preceding CQL SELECT statement.

Insert sample data
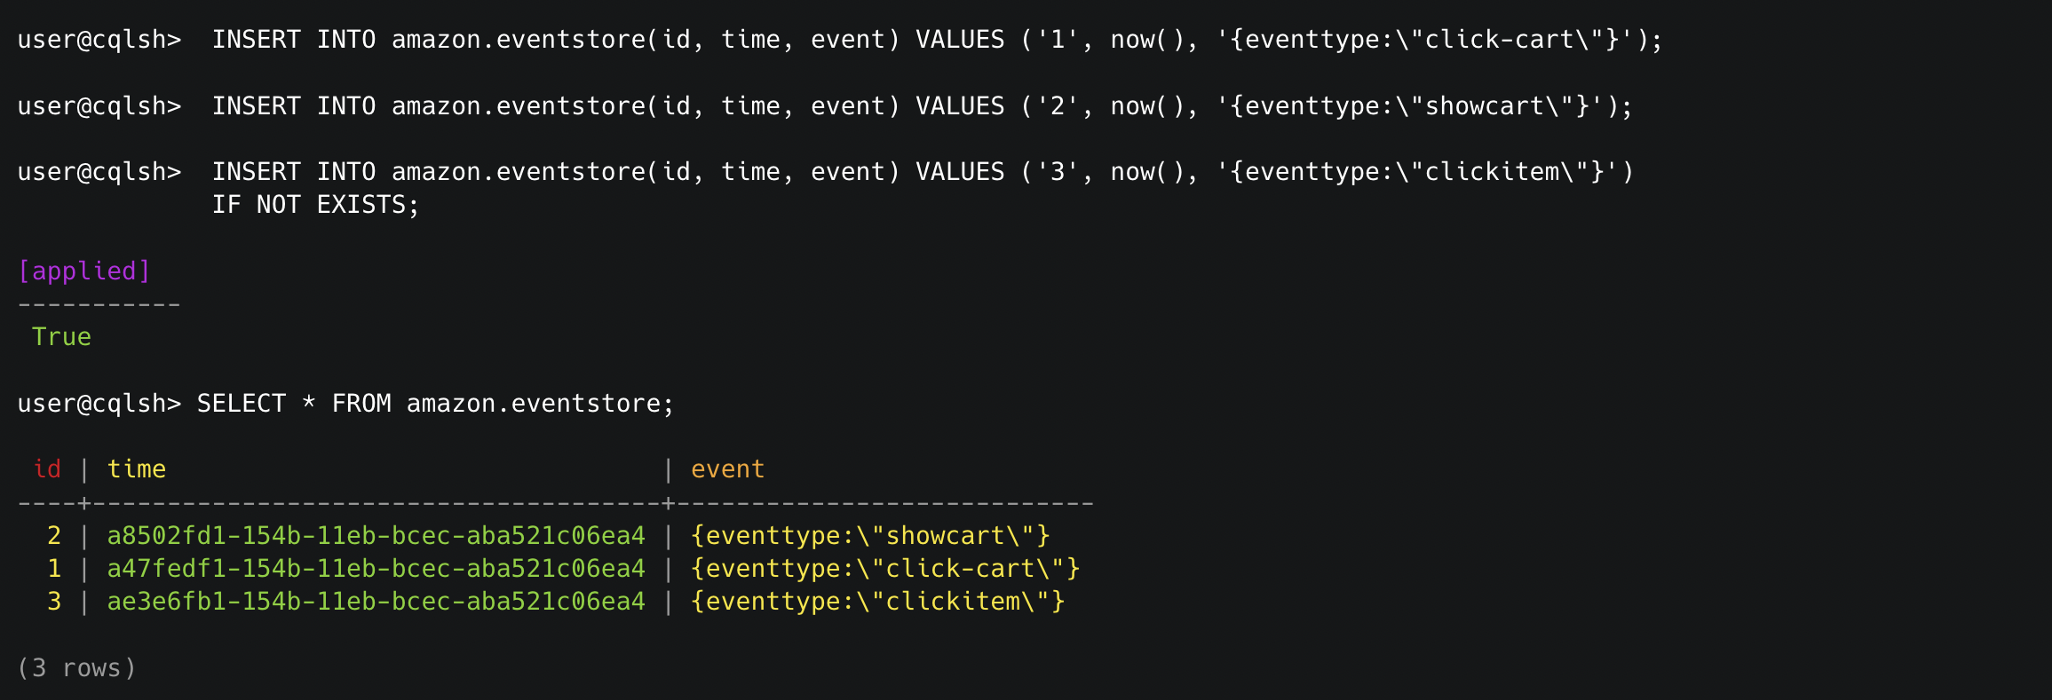
Now that you have created your table, you can use CQL statements to insert and read sample data. Amazon Keyspaces requires all write operations (insert, update, and delete) to use the LOCAL_QUORUM consistency level for durability. With reads, an application can choose between eventual consistency and strong consistency by using LOCAL_ONE or LOCAL_QUORUM consistency levels. The benefits of eventual consistency in Amazon Keyspaces are higher availability and reduced cost. See the following code.
The preceding code uses IF NOT EXISTS or lightweight transactions to perform a conditional write. With Amazon Keyspaces, there is no heavy performance penalty for using lightweight transactions. You get similar performance characteristics of standard insert, update, and delete operations.
The following screenshot shows the output from running the preceding statements in a cqlsh session. The three INSERT statements added three unique rows to the table, and the SELECT statement returned all the data within the table.
Export table data to your local host
You now can export the data you just inserted by using the cqlsh COPY TO command. This command exports the data to the source directory, which you mounted earlier to the working directory of the Docker run when creating the alias.
The following cqlsh statement exports your table data to the export.csv file located on the host machine.
The following screenshot shows the output of the preceding command from the cqlsh session.

After the COPY TO command finishes, you should be able to view the export.csv from the current working directory of the host machine. For more information about tuning export and import processes when using cqlsh COPY TO, see Loading data into Amazon Keyspaces with cqlsh.
Use credentials stored in Secrets Manager
Previously, you used service-specific credentials to connect to Amazon Keyspaces. In the following example, I show how to use the keyspaces-toolkit helpers to store and access service-specific credentials in Secrets Manager. The helpers are a collection of scripts bundled with keyspaces-toolkit to assist with common tasks.
By overriding the default entry point cqlsh, you can call the aws-sm-cqlsh.sh script, a wrapper around the cqlsh process that retrieves the Amazon Keyspaces service-specific credentials from Secrets Manager and passes them to the cqlsh process. This script allows you to avoid hard-coding the credentials in your scripts. The following diagram illustrates this architecture.

Configure the container to use the host’s AWS CLI credentials
The keyspaces-toolkit extends the AWS CLI Docker image, making keyspaces-toolkit extremely lightweight. Because you may already have the AWS CLI Docker image in your local repository, keyspaces-toolkit adds only an additional 10 MB layer extension to the AWS CLI. This is approximately 15 times smaller than using cqlsh from the full Apache Cassandra 3.11 distribution.
The AWS CLI runs in a container and doesn’t have access to the AWS credentials stored on the container’s host. You can share credentials with the container by mounting the ~/.aws directory. Mount the host directory to the container by using the -v parameter. To validate a proper setup, the following command lists current AWS CLI named profiles.
The ~/.aws directory is a common location for the AWS CLI credentials file.
If you configured the container correctly, you should see a list of profiles from the host credentials. For instructions about setting up the AWS CLI, see Step 2: Set Up the AWS CLI and AWS SDKs.
Store credentials in Secrets Manager
Now that you have configured the container to access the host’s AWS CLI credentials, you can use the Secrets Manager API to store the Amazon Keyspaces service-specific credentials in Secrets Manager. The secret name keyspaces-credentials in the following command is also used in subsequent steps.
The preceding command includes the following parameters:
- –entrypoint – The default entry point is cqlsh, but this command uses this flag to access the AWS CLI.
- –name – The name used to identify the key to retrieve the secret in the future.
- –secret-string – Stores the service-specific credentials. Replace SERVICEUSERNAME and SERVICEPASSWORD with your credentials. Replace SERVICEENDPOINT with the service endpoint for the AWS Region.
Creating and storing secrets requires CreateSecret and GetSecretValue permissions in your IAM policy. As a best practice, rotate secrets periodically when storing database credentials.
Use the Secrets Manager helper script
Use the Secrets Manager helper script to sign in to Amazon Keyspaces by replacing the user and password fields with the secret key from the preceding keyspaces-credentials command.
The preceding command includes the following parameters:
- -v – Used to mount the directory containing the host’s AWS CLI credentials file.
- –entrypoint – Use the helper by overriding the default entry point of cqlsh to access the Secrets Manager helper script, aws-sm-cqlsh.sh.
- keyspaces-credentials – The key to access the credentials stored in Secrets Manager.
- –execute – Runs a CQL statement.
Update the alias
You now can update the alias so that your scripts don’t contain plaintext passwords. You also can manage users and roles through Secrets Manager. The following code sets up a new alias by using the keyspaces-toolkit Secrets Manager helper for passing the service-specific credentials to Secrets Manager.
To have the alias available in every new terminal session, add the alias definition to your .bashrc file, which is executed on every new terminal window. You can usually find this file in $HOME/.bashrc or $HOME/bash_aliases (loaded by $HOME/.bashrc).
Validate the alias
Now that you have updated the alias with the Secrets Manager helper, you can use cqlsh without the Docker details or credentials, as shown in the following code.
The following screenshot shows the running of the cqlsh DESCRIBE TABLE statement by using the alias created in the previous section. In the output, you should see the table definition of the amazon.eventstore table you created in the previous step.

Conclusion
In this post, I showed how to get started with Amazon Keyspaces and the keyspaces-toolkit Docker image. I used Docker to build an image and run a container for a consistent and reproducible experience. I also used an alias to create a drop-in replacement for existing scripts, and used built-in helpers to integrate cqlsh with Secrets Manager to store service-specific credentials. Now you can use the keyspaces-toolkit with your Cassandra workloads.
As a next step, you can store the image in Amazon Elastic Container Registry, which allows you to access the keyspaces-toolkit from CI/CD pipelines and other AWS services such as AWS Batch. Additionally, you can control the image lifecycle of the container across your organization. You can even attach policies to expiring images based on age or download count. For more information, see Pushing an image.
Cheat sheet of useful commands
I did not cover the following commands in this blog post, but they will be helpful when you work with cqlsh, AWS CLI, and Docker.
About the Author
 Michael Raney is a Solutions Architect with Amazon Web Services.