Integration & Automation
Deploy an SPA with personalized subdomains using AWS CDK
Customer-specific subdomains can improve your experience with a single-page application (SPA). Imagine an application at www.example.com. With customer subdomains, customer A can use the application at customerA.example.com, and, similarly, customer B can use the application at customerB.example.com. Despite these benefits, there are drawbacks, such as managing a Domain Name System (DNS) record for each subdomain, having multiple front-end deployments, and diverging code bases.
In this post, I provide a serverless operation of hosting an SPA with personalized subdomains on the Amazon Web Services (AWS) Cloud. I also use the AWS Cloud Development Kit (AWS CDK) to show you how to deploy all of the required resources.
| About this blog post | |
| Time to read | ~10 min. |
| Time to complete | ~10 min. to complete walkthrough The deployment includes a DNS record and certificate. It typically takes 30 minutes to propagate the record, and it might take several hours for Amazon to validate it and issue the certificate. |
| Cost | ~$0.50 per month for the hosted DNS zone Data transfer and storage depend on usage. For more information, see CloudFront pricing and Amazon S3 pricing. |
| Learning level | Advanced (300) |
| AWS Services | Amazon Simple Storage Service (Amazon S3) Amazon CloudFront Amazon Route 53 AWS Certificate Manager (ACM) AWS Cloud Development Kit (AWS CDK) AWS CloudFormation |
Process overview
The design I propose uses a single Amazon CloudFront distribution as the content delivery service. To minimize latency, CloudFront delivers your application through a global network of edge locations by routing customer requests through the nearest location. CloudFront uses a single Transport Layer Security (TLS) certificate configured in ACM. With CloudFront, the entire front-end application is stored in a single Amazon S3 bucket. A wildcard DNS record in Amazon Route 53 maps subdomains to your application.
Figure 1 shows the collection of AWS resources deployed in this walkthrough.
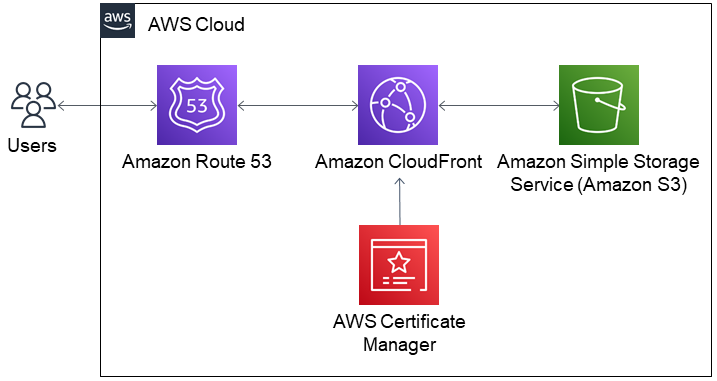
Figure 1. Architecture diagram for an SPA supporting customer-specific subdomains on the AWS Cloud
The following points summarize the workflow:
- Customers access your application through a browser by entering their personal subdomain.
- Amazon Route 53 receives the request for the customer-specific subdomain and routes it to the Amazon CloudFront distribution.
- CloudFront caches your web application from the Amazon S3 bucket where it is stored. Note that the CloudFront distribution is configured with read-only permissions to access files in Amazon S3.
- CloudFront uses a TLS certificate provisioned in ACM to deliver the content from the nearest edge location.
Prerequisites
For the deployment, you must have the following:
- An AWS account. If you don’t have an AWS account, sign up at https://aws.amazon.com.
- A hosted zone for Amazon Route 53. For more information, see Working with hosted zones.
- AWS CDK and version 2 of the AWS Command Line Interface (AWS CLI). Both of these are used in the section that follows. If you configure manually, you don’t need AWS CDK or AWS CLI and can skip ahead to “Alternative procedure: Manual deployment using the AWS Management Console.”
Automate the deployment with AWS CDK
The architecture depicted in figure 1 can be deployed automatically using AWS CDK which defines the cloud infrastructure. AWS CDK is a software development framework that uses programming languages for deployments in AWS CloudFormation. When an application runs, it compiles fully formed CloudFormation JSON and YAML templates that are provisioned by the CloudFormation service.
I prepared a GitHub repository for you that contains an AWS CDK application, written in TypeScript. To deploy it, complete the following steps:
- Use your command-line shell to clone the GitHub repository.
git clone https://github.com/aws-samples/multidomain-spa-with-cdk-and-cloudfront
- Navigate to the repository’s root directory.
cd multidomain-spa-with-cdk-and-cloudfront
- Run the following cdk command to bootstrap your AWS environment. The cdk command is the primary tool for interacting with an AWS CDK application.
cdk bootstrap
Note: Bootstrapping launches resources into your AWS environment that are required by AWS CDK. These include an S3 bucket for storing files and AWS Identity and Access Management (IAM) roles that grant permissions needed to run our deployment.
- Deploy the AWS CDK application.
cdk deploy -c domainName=<your-domain.name>
It typically takes the DNS 30 minutes to propagate records, but it can take several hours for Amazon to validate it and issue a certificate. When complete, you have an HTML application that listens to incoming requests from your specified subdomains. To see the resources deployed into your AWS account, navigate to the CloudFormation console.
Alternative procedure: Manual deployment using the AWS Management Console
If you don’t want to install AWS CDK and AWS CLI, you can configure each component manually using the AWS Management Console.
1. Create an Amazon S3 bucket
- Open the S3 console.
- Choose Create bucket.
- Enter a bucket name. For more information, see Bucket naming rules.
- Choose Create bucket.
2. Request a certificate using ACM
- Open the ACM console.
- Choose the US East (N. Virginia) us-east-1 AWS Region from the top toolbar.
- In the Provision certificates section, choose Get started.
- Choose Request a public certificate, and then Request a certificate.
- Under Domain name, enter your domain with an asterisk (*) at the beginning (for example,
*.example.com), and then choose Next. - On the Select validation method page, choose DNS validation, and then and then choose Next.
- On the Add tags page, choose Review.
- On the Review page, choose Confirm and request.
- On the Validation screen, choose the down arrow to expand your domain, and then choose Create record in Route 53.
- On the Create record in Route 53 dialog box, choose Create. A message displays that the DNS record was written to your Route 53 hosted zone. It can take up to 30 minutes for the changes to propagate and for AWS to validate the domain.
- Choose Continue.
3. Create an Amazon CloudFront distribution
- Open the CloudFront console.
- Choose Create distribution.
- Choose Get started.
- For Origin Domain Name, choose your Amazon S3 bucket.
- For Restrict Bucket Access, choose Yes.
- For Grant Read Permissions on Bucket, choose Yes, Update Bucket Policy. This setting is important because it restricts access to the the Amazon CloudFront distribution only.
- Under Distribution Settings, for Alternate Domain Names (CNAMEs), enter your previously configured domain name with an asterisk (*) at the beginning (for example,
*.example.com). - Under SSL Certificate, choose Custom SSL Certificate, and then choose the certificate that you created (for example,
*.example.com). - Keep the default settings for the remaining parameters, and choose Create distribution.
4. Create a wildcard DNS entry in your Amazon Route 53-hosted zone
- Open the Route 53 console.
- In the navigation pane, choose Hosted zones.
- In the list of hosted zones, choose the name of your domain.
- Choose Create record.
- Enter an asterisk (*) in the Record name field as shown in figure 2.
- For Record Type choose A – Routes traffic to and IPv4 address and some AWS resources
- Toggle the Alias to the On position. This will change the value input to a list AWS resources.
- From Route traffic to options, choose Alias to CloudFront distribution.
- For the destination, enter the CloudFront distribution that you created previously.
- Choose Create records.

Cleanup
When you’re ready to delete the sample application, follow these steps to avoid incurring future costs:
- In the S3 bucket, delete the index.html file. For more information, see Deleting a single object.
- If you used AWS CDK for this deployment, delete the resources stack.
cdk destroy
- If you used the AWS Management Console for a manual deployment, delete resources using the AWS Management Console.
Note: Keeping AWS CLI installed does not incur future costs. For more information, see Installing, updating, and uninstalling the AWS CLI version 2.
Conclusion
In this post, I proposed an operation that uses AWS services to host a static webpage on the AWS Cloud using personalized subdomains. The infrastructure used CloudFront as the content delivery service, which transfers your site contents to an Amazon S3 bucket. For more about the benefits of content caching with Amazon CloudFront, see Improve your website availability with Amazon CloudFront.
Taking advantage of a wildcard DNS entry in Route 53, I showed you how to accommodate subdomain requests using only a single DNS record. Finally, I presented a way of deploying the entire infrastructure either automatically using AWS CDK or manually using the AWS Management Console. For a deeper dive into AWS CDK, see Best practices for developing cloud applications with AWS CDK.
I invite you to deploy my sample application, explore the GitHub repository, and incorporate these steps into your own application pipeline. Let me know your thoughts in the comments.

Paul Kukiel
Paul Kukiel is a senior solution architect at AWS. He works with customers to bridge the gap between technology and business to help them make pragmatic, cost-effective, secure, and well-architected decisions. Paul has worked in and supported the banking, insurance, medical and biotech, retail, and wagering industries. He has significant experience in the startup space. Feel free to connect with Paul at https://www.linkedin.com/in/paulkukiel.