
In this post, you will learn how to create an AWS Application Load Balancer (ALB) for your EC2 instances running a Spring Boot application. You will also create an Autoscaling Group (ASG) which will simplify the setup and will automatically scale-in and scale-out.
1. Introduction
A load balancer will make it possible to distribute the workload across multiple EC2 instances. A client application will connect to the load balancer without knowing which EC2 instance will handle the request. Because of this, EC2 instances can come and go without impacting your client requests. It is transparent because of the load balancer. It is easy to scale-out and thus to add more EC2 instances when traffic increases, or to scale-in and reduce the number of EC2 instances in order to reduce costs when traffic gets low.
In this post, you will learn how to setup an Application Load Balancer (note that there are other types as well, dependent on your need) which distributes traffic between several EC2 instances running a basic Spring Boot application. Next, you will learn how to use an Autoscaling Group, which will simplify things quite a bit.
In case that you do not have any knowledge how to create EC2 instances, read a previous blog. The sources used in this post are available at GitHub. The resources being used in this post will not cost you a thing, only Free Tier is used.
2. Sample Application
The basic application contains of a simple Hello endpoint which returns a message containing the host name of the machine which handled the request.
@RestController
public class HelloController {

    @GetMapping("/hello")
    public String hello() {
        String message = "Hello AWS!";
        try {
            InetAddress ip = InetAddress.getLocalHost();
            message += " From host: " + ip;
        } catch (UnknownHostException e) {
            e.printStackTrace();
        }
        return message;
    }

}
Also the health endpoint of Spring Actuator is added which you can use in order to enable the health check of the EC2 instance.
In case you want to run the application locally, just run the following command:
$ mvn spring-boot:run
Verify whether the endpoints are available:
$ curl http://localhost:8080/hello
Hello AWS! From host: <name of your machine>/127.0.1.1
$ curl http://localhost:8080/actuator/health
{"status":"UP"}
Create the jar file:
$ mvn clean verify
The jar file is uploaded to GitHub as a release in order to be able to download it to the EC2 instance.
3. Create the EC2 Instances
Create 2 EC2 instances in two different availability zones with the following User Data:
#!/bin/bash
yum -y install java-11-amazon-corretto-headless
wget https://github.com/mydeveloperplanet/MyAWSPlanet/releases/download/v0.0.1-alpha/MyAWSPlanet-0.0.1-SNAPSHOT.jar
java -jar MyAWSPlanet-0.0.1-SNAPSHOT.jar
During startup of the EC2 instance, Java 11 is downloaded and installed, the jar file is downloaded and the jar file is started.
Create a new Security Group and leave the default SSH access inbound rule for now. Name the Security Group ec2-sg. Now launch the EC2 instances.
4. Create the ALB
In the left menu, navigate to Load Balancers in the Load Balancing section and click the Create Load Balancer button. Here you can choose the type of load balancer you want to use. Choose Application Load Balancer by clicking the Create button.

In Step 1, you give the load balancer the name MyFirstLoadBalancer.

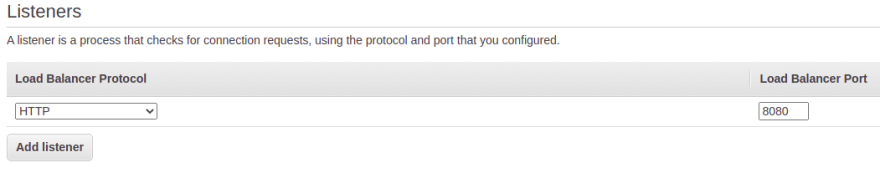
Set the listener to port 8080.
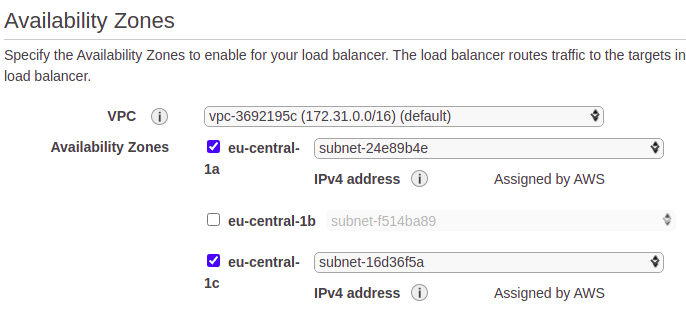
You also enable the availability zones for the load balancer. Check in which availability zones your EC2 instances are running and enable the same availability zones. Click the Next: Configure Security Settings button.
In Step 2, just click the Next: Configure Security Groups button.
In Step 3, create a new Security Group alb-sg for your ALB allowing HTTP traffic to port 8080. Click the Next: Configure Routing button.

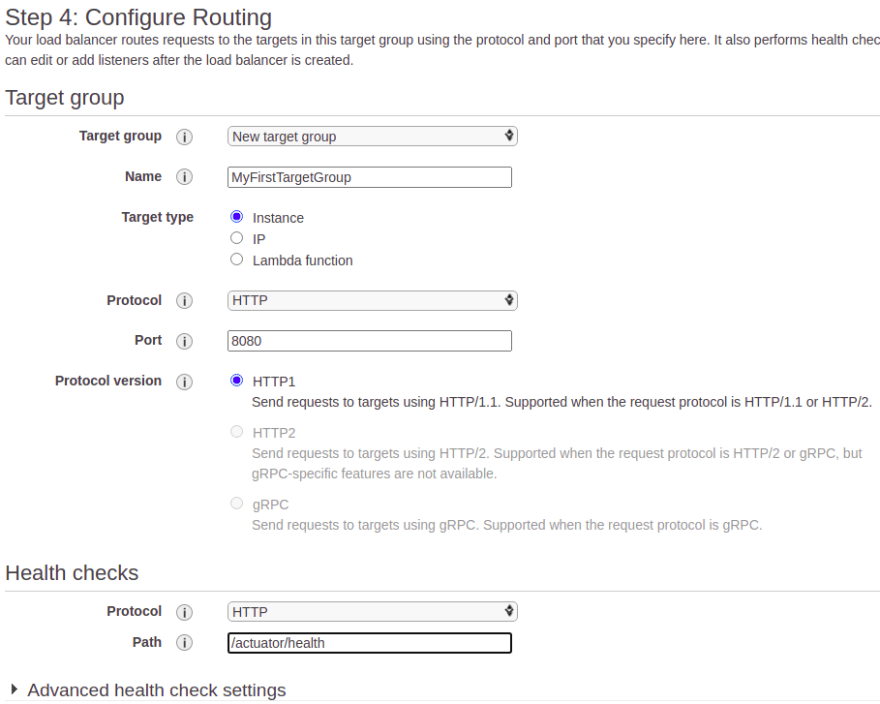
In Step 4, you need to create a Target Group. A target group can be a number of EC2 instances the ALB will send traffic to. Name the target group MyFirstTargetGroup, set the port to 8080 and set the health check path to /actuator/health. Click the Next: Register Targets button.
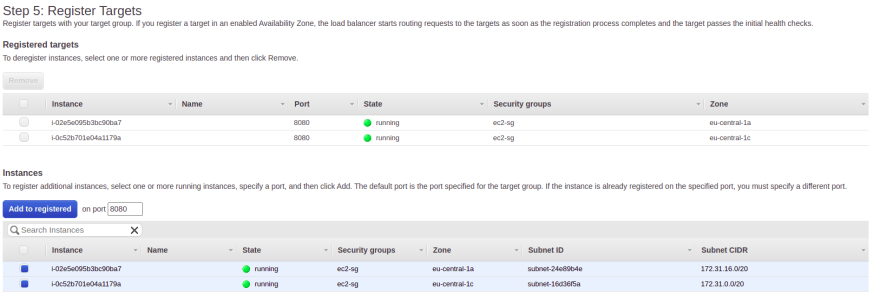
In Step 5, you need to add the EC2 instances you want to include in the target group. Select both EC2 instances and click the Add to registered button. Click the Next: Review button.
At the end, you are able to review all the settings and click the Create button. You need to wait some time before the ALB is active.

Try to invoke the URL with the DNS Name of the load balancer.
$ curl http://MyFirstLoadBalancer-1212513449.eu-central-1.elb.amazonaws.com:8080/hello
<html>
<head><title>504 Gateway Time-out</title></head>
<body>
<center><h1>504 Gateway Time-out</h1></center>
</body>
</html>
The time-out is expected. The EC2 instances only allow SSH traffic and no HTTP traffic. In the left menu, navigate to Security Groups in the Network & Security section. Select the ec2-sg security group and click the Edit inbound rules button of the Inbound rules tab.

Add a rule which allows HTTP traffic over port 8080. As a source, you choose the security group alb-sg of your ALB. This means that your EC2 instances cannot be reached directly over HTTP but only via the load balancer. Click the Save rules button.

Try to invoke the URL again and now the Hello message is returned. It will be more or less equally divided between the two machines when you invoke it several times.
$ curl http://MyFirstLoadBalancer-1212513449.eu-central-1.elb.amazonaws.com:8080/hello
Hello AWS! From host: ip-172-31-2-55.eu-central-1.compute.internal/172.31.2.55
$ curl http://MyFirstLoadBalancer-1212513449.eu-central-1.elb.amazonaws.com:8080/hello
Hello AWS! From host: ip-172-31-2-55.eu-central-1.compute.internal/172.31.2.55
$ curl http://MyFirstLoadBalancer-1212513449.eu-central-1.elb.amazonaws.com:8080/hello
Hello AWS! From host: ip-172-31-2-55.eu-central-1.compute.internal/172.31.2.55
$ curl http://MyFirstLoadBalancer-1212513449.eu-central-1.elb.amazonaws.com:8080/hello
Hello AWS! From host: ip-172-31-2-55.eu-central-1.compute.internal/172.31.2.55
$ curl http://MyFirstLoadBalancer-1212513449.eu-central-1.elb.amazonaws.com:8080/hello
Hello AWS! From host: ip-172-31-21-171.eu-central-1.compute.internal/172.31.21.171
$ curl http://MyFirstLoadBalancer-1212513449.eu-central-1.elb.amazonaws.com:8080/hello
Hello AWS! From host: ip-172-31-21-171.eu-central-1.compute.internal/172.31.21.171
...
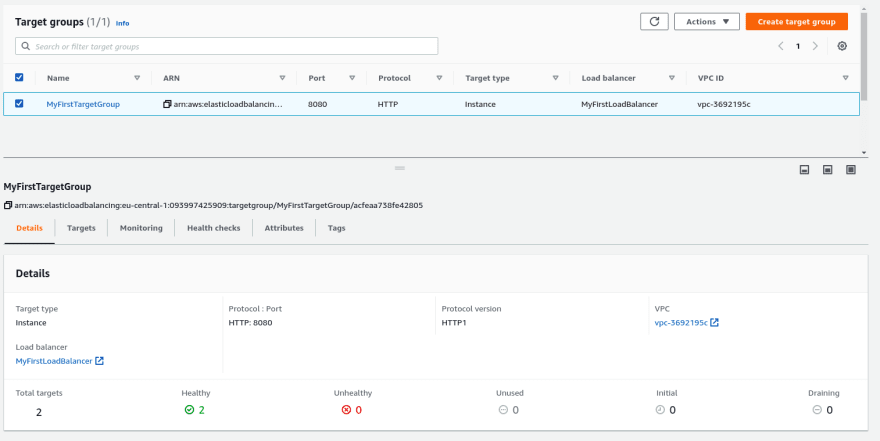
Navigate to the Target Groups in the Load Balancing section and take a look at the health of the instances. Here you can see that both EC2 instances are healthy based on the configured health check.
In order to cleanup everything, you need to delete the load balancer, the target group, terminate the EC2 instances, delete the EC2 security group and finally delete the ALB security group. If you want to continue to follow this blog, only terminate the EC2 instances, you will need the other items in the next section.
5. Create the ASG
Creating an ALB is easy and has its advantages, but you still need to manually add and remove instances. This problem is solved with an Auto Scaling Group (ASG). Based on a template, scale-out and scale-in will be done automatically based on triggers you define.
In the left menu, navigate to Auto Scaling Groups in the Auto Scaling section and click the Create Auto Scaling Group button.
Give the ASG the name MyFirstASG. Next thing to do, is to create a Launch Template. The Launch Template will provide information about how to create EC2 instances. Click the Create a launch template link.
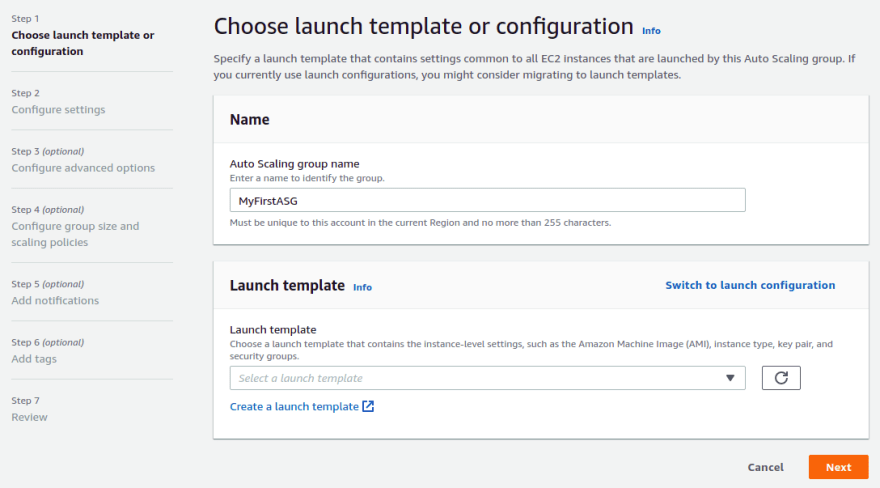
A new browser tab is opened where you first give the template the name MyFirstLaunchTemplate.

Fill in the AMI, the instance type and the key pair to be used just like you did while creating the EC2 instance.

In the Network settings, choose the ec2-sg security group.

Leave the Network settings, Storage, Resource tags and Network interfaces as default. Unfold the Advanced details section and scroll all the way down. Copy the User Data which you used for creating the EC2 instances before into the User data field. Finally, click the Create launch template button.

Return to the create ASG wizard, click the refresh button next to the Launch template field and select the just created launch template. Click the Next button.

In Step 2, select the three subnets and click the Next button.

In Step 3, choose to attach an existing load balancer target groups and select MyFirstTargetGroup.
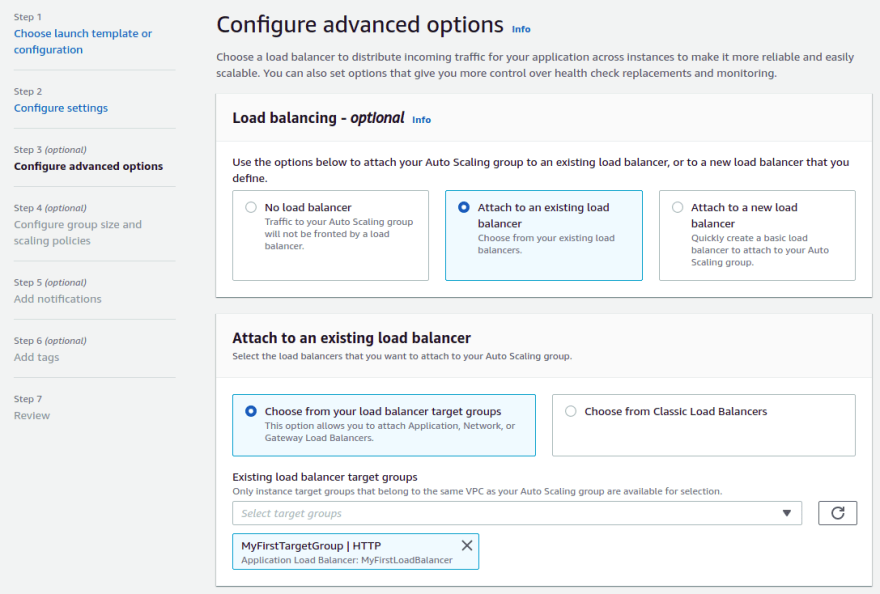
In the Health Checks section, you enable ELB. This way, the ELB will automatically restart when it is unhealthy. Click the Next button.

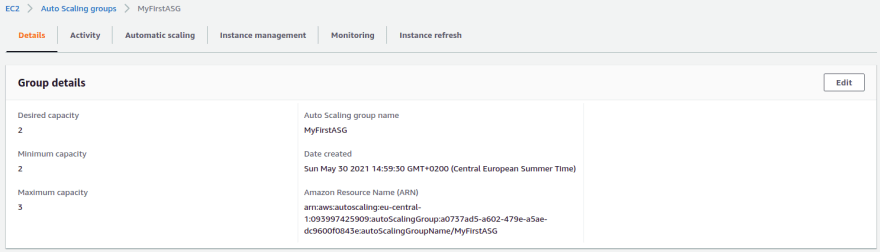
In Step 4, you define the Group size with a Desired capacity of 2, a Minimum capacity of 2 and a Maximum capacity of 3.

With the Scaling policies, you can define how the autoscaling should take place when you choose Target tracking scaling policy. For now, just choose None, but it is good to take a look at the different options to automatically scale. Click the Next button.

In Step 5 and Step 6, just click the Next button. It is possible to add notifications and tags, but you will not use it in this tutorial. In Step 7, you can review everything and at the bottom of the page you click the Create auto scaling group button. It may take a few minutes before everything is up-and-running. You will see the following:
- In the Auto Scaling section:
- The Auto Scaling Group
- In the Instances section:
- Two EC2 instances which have been created because the minimum and desired capacity was set to 2
- The created Launch Template
Verify again by means of curl whether the Hello URL can be accessed.
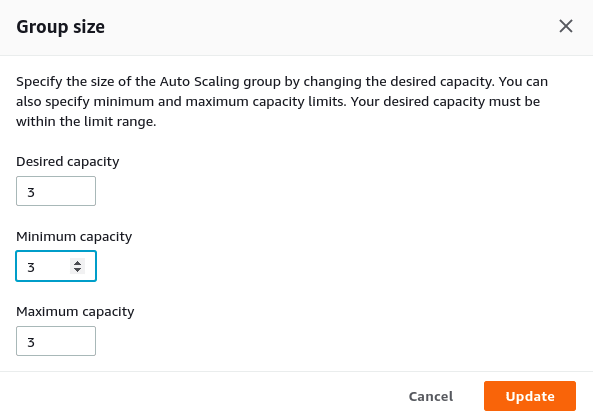
Navigate to the Auto Scaling Group and the Details tab and click the Edit button.
Increase the desired and minimum capacity and click the Update button.
Automatically, a new instance is provisioned. Wait a few minutes until the instance is marked as being healthy in the Target Group and after this, the traffic is distributed over three EC2 instances.
In order to cleanup everything, you need to delete the Auto Scaling Group (this can take a while), the load balancer, the target group, the EC2 security group and finally delete the ALB security group.
6. Conclusion
In this post, you learned how to create an ALB as a single point of access for your EC2 instances. Problem with this setup was that you needed to manually add or remove instances when traffic got high or low. The ASG will solve this problem. It will launch or terminate EC2 instances based on several scaling policies (which you did not configure in this post, but just took a look at).


Top comments (0)