AWS Security Blog
TLS-enabled Kubernetes clusters with ACM Private CA and Amazon EKS
October 21, 2021: We updated this post to a new version of the helm chart awspca/aws-privateca-issuer. The old version of the chart awspca/aws-pca-issuer will no longer receive updates.
In this blog post, we show you how to set up end-to-end encryption on Amazon Elastic Kubernetes Service (Amazon EKS) with AWS Certificate Manager Private Certificate Authority. For this example of end-to-end encryption, traffic originates from your client and terminates at an Ingress controller server running inside a sample app. By following the instructions in this post, you can set up an NGINX ingress controller on Amazon EKS. As part of the example, we show you how to configure an AWS Network Load Balancer (NLB) with HTTPS using certificates issued via ACM Private CA in front of the ingress controller.
AWS Private CA supports an open source plugin for cert-manager that offers a more secure certificate authority solution for Kubernetes containers. cert-manager is a widely-adopted solution for TLS certificate management in Kubernetes. Customers who use cert-manager for application certificate lifecycle management can now use this solution to improve security over the default cert-manager CA, which stores keys in plaintext in server memory. Customers with regulatory requirements for controlling access to and auditing their CA operations can use this solution to improve auditability and support compliance.
Solution components
- Kubernetes is an open-source system for automating the deployment, scaling, and management of containerized applications.
- Amazon EKS is a managed service that you can use to run Kubernetes on Amazon Web Services (AWS) without needing to install, operate, and maintain your own Kubernetes control plane or nodes.
- cert-manager is an add on to Kubernetes to provide TLS certificate management. cert-manager requests certificates, distributes them to Kubernetes containers, and automates certificate renewal. cert-manager ensures certificates are valid and up-to-date, and attempts to renew certificates at an appropriate time before expiry.
- ACM Private CA enables the creation of private CA hierarchies, including root and subordinate CAs, without the investment and maintenance costs of operating an on-premises CA. With ACM Private CA, you can issue certificates for authenticating internal users, computers, applications, services, servers, and other devices, and for signing computer code. The private keys for private CAs are stored in AWS managed hardware security modules (HSMs), which are FIPS 140-2 certified, providing a better security profile compared to the default CAs in Kubernetes. Private certificates help identify and secure communication between connected resources on private networks such as servers, mobile and IoT devices, and applications.
- AWS Private CA Issuer plugin. Kubernetes containers and applications use digital certificates to provide secure authentication and encryption over TLS. With this plugin, cert-manager requests TLS certificates from Private CA. The integration supports certificate automation for TLS in a range of configurations, including at the ingress, on the pod, and mutual TLS between pods. You can use the AWS Private CA Issuer plugin with Amazon Elastic Kubernetes Service, self managed Kubernetes on AWS, and Kubernetes on-premises.
- The AWS Load Balancer controller manages AWS Elastic Load Balancers for a Kubernetes cluster. The controller provisions the following resources.
- An AWS Application Load Balancer (ALB) when you create a Kubernetes Ingress.
- An AWS Network Load Balancer (NLB) when you create a Kubernetes Service of type LoadBalancer.
Different points for terminating TLS in Kubernetes
How and where you terminate your TLS connection depends on your use case, security policies, and need to comply with regulatory requirements. This section talks about four different use cases that are regularly used for terminating TLS. The use cases are illustrated in Figure 1 and described in the text that follows.
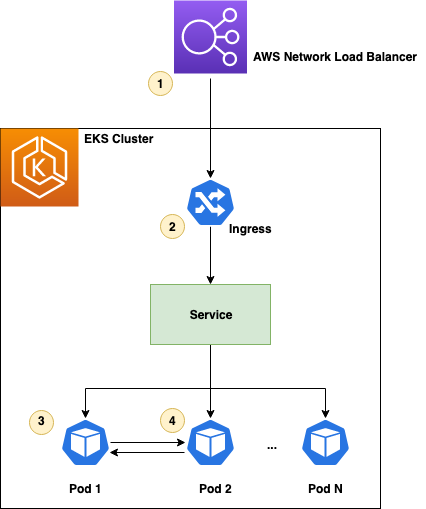
Figure 1: Terminating TLS at different points
- At the load balancer: The most common use case for terminating TLS at the load balancer level is to use publicly trusted certificates. This use case is simple to deploy and the certificate is bound to the load balancer itself. For example, you can use ACM to issue a public certificate and bind it with AWS NLB. You can learn more from How do I terminate HTTPS traffic on Amazon EKS workloads with ACM?
- At the ingress: If there is no strict requirement for end-to-end encryption, you can offload this processing to the ingress controller or the NLB. This helps you to optimize the performance of your workloads and make them easier to configure and manage. We examine this use case in this blog post.
- On the pod: In Kubernetes, a pod is the smallest deployable unit of computing and it encapsulates one or more applications. End-to-end encryption of the traffic from the client all the way to a Kubernetes pod provides a secure communication model where the TLS is terminated at the pod inside the Kubernetes cluster. This could be useful for meeting certain security requirements. You can learn more from the blog post Setting up end-to-end TLS encryption on Amazon EKS with the new AWS Load Balancer Controller.
- Mutual TLS between pods: This use case focuses on encryption in transit for data flowing inside Kubernetes cluster. For more details on how this can be achieved with Cert-manager using an Istio service mesh, please see the Securing Istio workloads with mTLS using cert-manager blog post. You can use the AWS Private CA Issuer plugin in conjunction with cert-manager to use ACM Private CA to issue certificates for securing communication between the pods.
In this blog post, we use a scenario where there is a requirement to terminate TLS at the ingress controller level, demonstrating the second example above.
Figure 2 provides an overall picture of the solution described in this blog post. The components and steps illustrated in Figure 2 are described fully in the sections that follow.
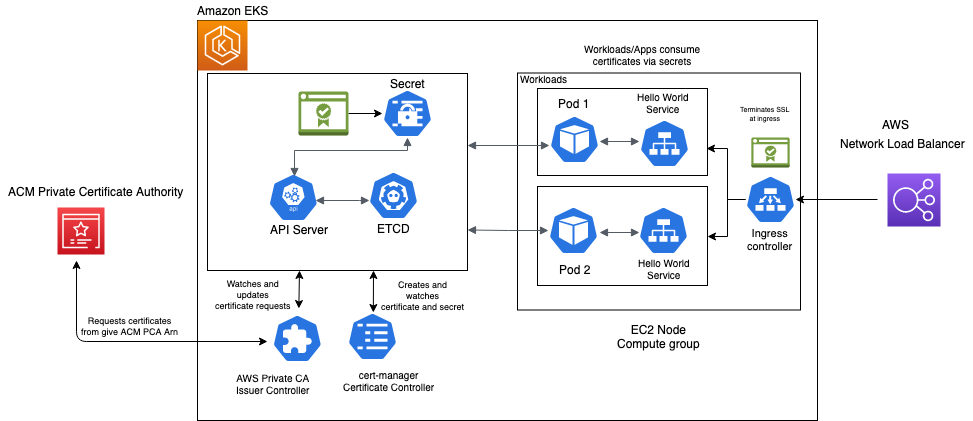
Figure 2: Overall solution diagram
Prerequisites
Before you start, you need the following:
- An AWS account
- The IAM security principal that you’re using must have permissions to work with Amazon EKS IAM roles and service-linked roles, AWS CloudFormation, Amazon Virtual Private Cloud (Amazon VPC), and related resources. For more information, see Actions, resources, and condition keys for Amazon Elastic Container Service for Kubernetes and Using service-linked roles in the IAM User Guide. In addition, this IAM security principal should have an AWSCertificateManagerPrivateCAFullAccess IAM managed policy attached to it.
- The AWS Command Line Interface (AWS CLI), with the kubectl and eksctl tools installed and configured. Follow the instructions in Getting started with Amazon EKS – eksctl in the Amazon EKS User Guide.
- Helm CLI.
Verify that you have the latest versions of these tools installed before you begin.
Provision an Amazon EKS cluster
If you already have a running Amazon EKS cluster, you can skip this step and move on to install NGINX Ingress.
You can use the AWS Management Console or AWS CLI, but this example uses eksctl to provision the cluster. eksctl is a tool that makes it easier to deploy and manage an Amazon EKS cluster.
This example uses the US-EAST-2 Region and the T2 node type. Select the node type and Region that are appropriate for your environment. Cluster provisioning takes approximately 15 minutes.
To provision an Amazon EKS cluster
- Run the following eksctl command to create an Amazon EKS cluster in the us-east-2 Region with Kubernetes version 1.19 and two nodes. You can change the Region to the one that best fits your use case.
- Once your cluster has been created, verify that your cluster is running correctly by running the following command:
You should see output similar to the above, with all pods in a running state.
Install NGINX Ingress
NGINX Ingress is built around the Kubernetes Ingress resource, using a ConfigMap to store the NGINX configuration.
To install NGINX Ingress
- Use the following command to install NGINX Ingress:
- Run the following command to determine the address that AWS has assigned to your NLB:
- It can take up to 5 minutes for the load balancer to be ready. Once the external IP is created, run the following command to verify that traffic is being correctly routed to ingress-nginx:
Note: Even though, it’s returning an HTTP 404 error code, in this case curl is still reaching the ingress controller and getting the expected HTTP response back.
Configure your DNS records
Once your load balancer is provisioned, the next step is to point the application’s DNS record to the URL of the NLB.
You can use your DNS provider’s console, for example Route53, and set a CNAME record pointing to your NLB. See CNAME record type for more details on how to setup a CNAME record using Route53.
This scenario uses the sample domain rsa-2048.example.com.
As you go through the scenario, replace rsa-2048.example.com with your registered domain.
Install cert-manager
cert-manager is a Kubernetes add-on that you can use to automate the management and issuance of TLS certificates from various issuing sources. It runs within your Kubernetes cluster and will ensure that certificates are valid and attempt to renew certificates at an appropriate time before they expire.
You can use the regular installation on Kubernetes guide to install cert-manager on Amazon EKS.
After you’ve deployed cert-manager, you can verify the installation by following these instructions. If all the above steps have completed without error, you’re good to go!
Note: If you’re planning to use Amazon EKS with Kubernetes pods running on AWS Fargate, please follow the cert-manager Fargate instructions to make sure cert-manager installation works as expected. AWS Fargate is a technology that provides on-demand, right-sized compute capacity for containers.
Install aws-privateca-issuer
The AWS PrivateCA Issuer plugin acts as an addon (see external cert configuration) to cert-manager that signs certificate requests using ACM Private CA.
To install aws-privateca-issuer
- For installation, use the following helm commands:
- Verify that the AWS Private CA Issuer is configured correctly by running the following command and ensure that it is in READY state with status as Running:
- You can check the chart configuration in the default values file.
Create an ACM Private CA
In this scenario, you create a private certificate authority in ACM Private CA with RSA 2048 selected as the key algorithm. You can create a CA using the AWS console, AWS CLI, or AWS CloudFormation.
To create an ACM Private CA
Download the CA certificate using the following command. Replace the <CA_ARN> and <Region> values with the values from the CA you created earlier and save it to a file named cacert.pem:
Once your private CA is active, you can proceed to the next step. You private CA will look similar to the CA in Figure 3.
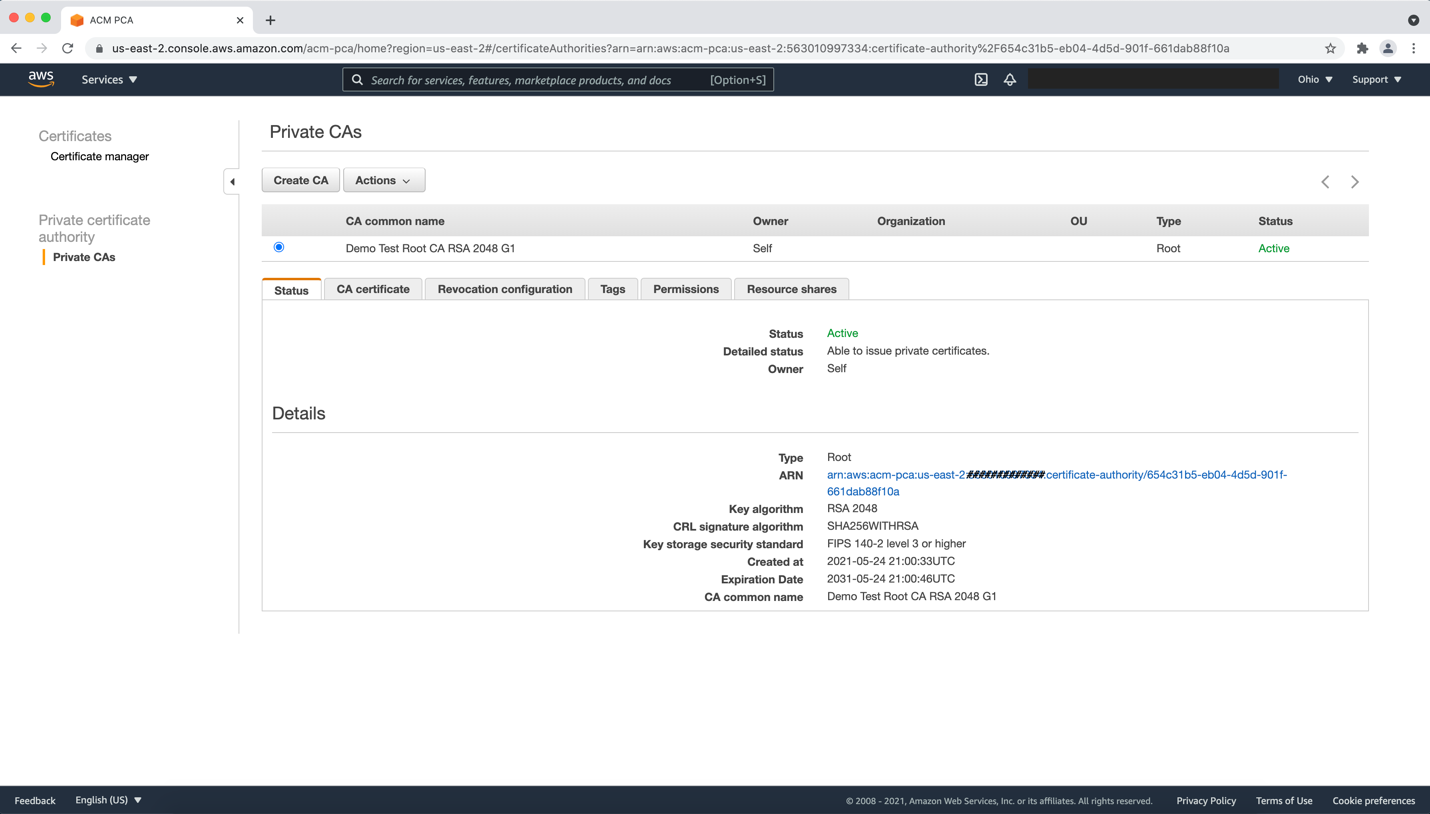
Figure 3: Sample ACM Private CA
Set EKS node permission for ACM Private CA
In order to issue a certificate from ACM Private CA, add the IAM policy from the prerequisites to your EKS NodeInstanceRole. Replace the <region>, <account_id>, and <resource_id> with the values from the CA you created earlier:
Note: For the latest policy, see the GitHub repository for cert-manager/aws-privateca-issuer.
Create an Issuer in Amazon EKS
Now that the ACM Private CA is active, you can begin requesting private certificates which can be used by Kubernetes applications. Use aws-privateca-issuer plugin to create the ClusterIssuer, which will be used with the ACM PCA to issue certificates.
Issuers (and ClusterIssuers) represent a certificate authority from which signed x509 certificates can be obtained, such as ACM Private CA. You need at least one Issuer or ClusterIssuer before you can start requesting certificates in your cluster. There are two custom resources that can be used to create an Issuer inside Kubernetes using the aws-privateca-issuer add-on:
- AWSPCAIssuer is a regular namespaced issuer that can be used as a reference in your Certificate custom resources.
- AWSPCAClusterIssuer is specified in exactly the same way, but it doesn’t belong to a single namespace and can be referenced by certificate resources from multiple different namespaces.
To create an Issuer in Amazon EKS
- For this scenario, you create an AWSPCAClusterIssuer. Start by creating a file named cluster-issuer.yaml and save the following text in it, replacing <CA_ARN> and <Region> information with your own.
- Deploy the AWSPCAClusterIssuer:
- Verify the installation and make sure that the following command returns a Kubernetes service of kind AWSPCAClusterIssuer:
Request the certificate
Now, you can begin requesting certificates which can be used by Kubernetes applications from the provisioned issuer. For more details on how to specify and request Certificate resources, please check Certificate Resources guide.
To request the certificate
- As a first step, create a new namespace that contains your application and secret:
- Next, create a basic X509 private certificate for your domain.
Create a file named rsa-2048.yaml and save the following text in it. Replace rsa-2048.example.com with your domain.
- For a certificate with a key algorithm of RSA 2048, create the resource:
- Verify that the certificate is issued and in READY state by running the following command:
- Run the command kubectl describe certificate rsa-cert-2048 -n acm-pca—lab-demo to check the progress of your certificate.
- Once the certificate status shows as issued, you can use the following command to check the issued certificate details:
Deploy a demo application
For the purpose of this scenario, you can create a new service—a simple “hello world” website that uses echoheaders that respond with the HTTP request headers along with some cluster details.
To deploy a demo application
- Create a new file named hello-world.yaml with below content:
- Create the service using the following command:
Expose and secure your application
Now that you’ve issued a certificate, you can expose your application using a Kubernetes Ingress resource.
To expose and secure your application
- Create a new file called example-ingress.yaml and add the following content:
- Create a new Ingress resource by running the following command:
Access your application using TLS
After completing the previous step, you can to access this service from any computer connected to the internet.
To access your application using TLS
- Log in to a terminal window on a machine that has access to the internet, and run the following:
- You should see an output similar to the following:
This response is returned from the service running behind the Kubernetes Ingress controller and demonstrates that a successful TLS handshake happened at port 443 with https protocol.
- You can use the following command to verify that the certificate issued earlier is being used for the SSL handshake:
Cleanup
To avoid incurring future charges on your AWS account, perform the following steps to remove the scenario.
Delete the ACM Private CA
You can delete the ACM Private CA by following the instructions in Deleting your private CA.
As an alternative, you can use the following commands to delete the ACM Private CA, replacing the <CA_ARN> and <Region> with your own:
- Disable the CA.
- Call the Delete Certificate Authority API
Continue the cleanup
Once the ACM Private CA has been deleted, continue the cleanup by running the following commands.
- Delete the services:
- Delete the Ingress controller:
- Delete the IAM NodeInstanceRole, replace role name with your EKS Node instance role created for the demo:
- Delete the Amazon EKS cluster using ekctl command:
You can also clean up from your Cloudformation console by deleting the stacks named eksctl-acm-pca-lab-nodegroup-acm-pca-nlb-lab-workers and eksctl-acm-pca-lab-cluster.
Conclusion
In this blog post, we showed you how to set up a Kubernetes Ingress controller with a service running in Amazon EKS cluster using AWS Load Balancer Controller with Network Load Balancer and set up HTTPS using private certificates issued by ACM Private CA. If you have questions or want to contribute, join the aws-privateca-issuer add-on project on GitHub.
If you have feedback about this post, submit comments in the Comments section below. If you have questions about this post, start a new thread on the AWS Certificate Manager forum or contact AWS Support.
Want more AWS Security how-to content, news, and feature announcements? Follow us on Twitter.