August 30, 2023: Amazon Kinesis Data Analytics has been renamed to Amazon Managed Service for Apache Flink. Read the announcement in the AWS News Blog and learn more.
When designing multi-tenant streaming ingestion pipelines, there are myriad ways to design and build your streaming solution, each with its own set of trade-offs. The first decision you have to make is the strategy that determines how you choose to physically or logically separate one tenant’s data from another.
Sharing compute and storage resources helps reduce costs; however, it requires strong security measures to prevent cross-tenant data access. This strategy is known as a pool model. In contrast, a silo model helps reduce security complexity by having each tenant have its own set of isolated resources. However, this increases cost and operational overhead. A more detailed review of tenant isolation models is covered in the SaaS Storage Strategies whitepaper. In this post, we focus on the pool model to optimize for cost when supporting a multi-tenant streaming ingestion architecture.
Consider a retail industry data as a service (DaaS) company that ingests point of sale (POS) data from multiple customers and curates reports that blend sale transactions with third-party data in near-real time. The DaaS company can benefit from sharing compute and storage resources to reduce costs and stay competitive. For security, the DaaS company needs to authenticate each customer request and, to support a pool model, also needs to guarantee that data issues from one tenant don’t affect reports consumed by other customers. Similar scenarios apply to other industries that need to ingest data from semi-trusted servers. For example, in supply chain, a company could be streaming data from multiple suppliers to maintain a near-real-time status of SKUs and purchase orders. In the education industry, a third-party company could ingest data from servers at multiple schools and provide aggregated data to government agencies.
To build a multi-tenant streaming ingestion pipeline with shared resources, we walk you through an architecture that allows semi-trusted servers to use Amazon Kinesis Data Streams using the AWS IoT credentials provider feature for authentication, Amazon API Gateway as a proxy for authorization, and an Amazon Kinesis Data Analytics for Apache Flink application to aggregate and write data partitioned by the tenant in near-real time into an Amazon Simple Storage Service (Amazon S3) data lake. With this architecture, you remove the operational overhead of maintaining multiple Kinesis data streams (one per customer) and allow for cost optimization opportunities by performing better utilization of your provisioned Kinesis data stream shards.
The following architecture diagram illustrates the data ingestion pipeline.
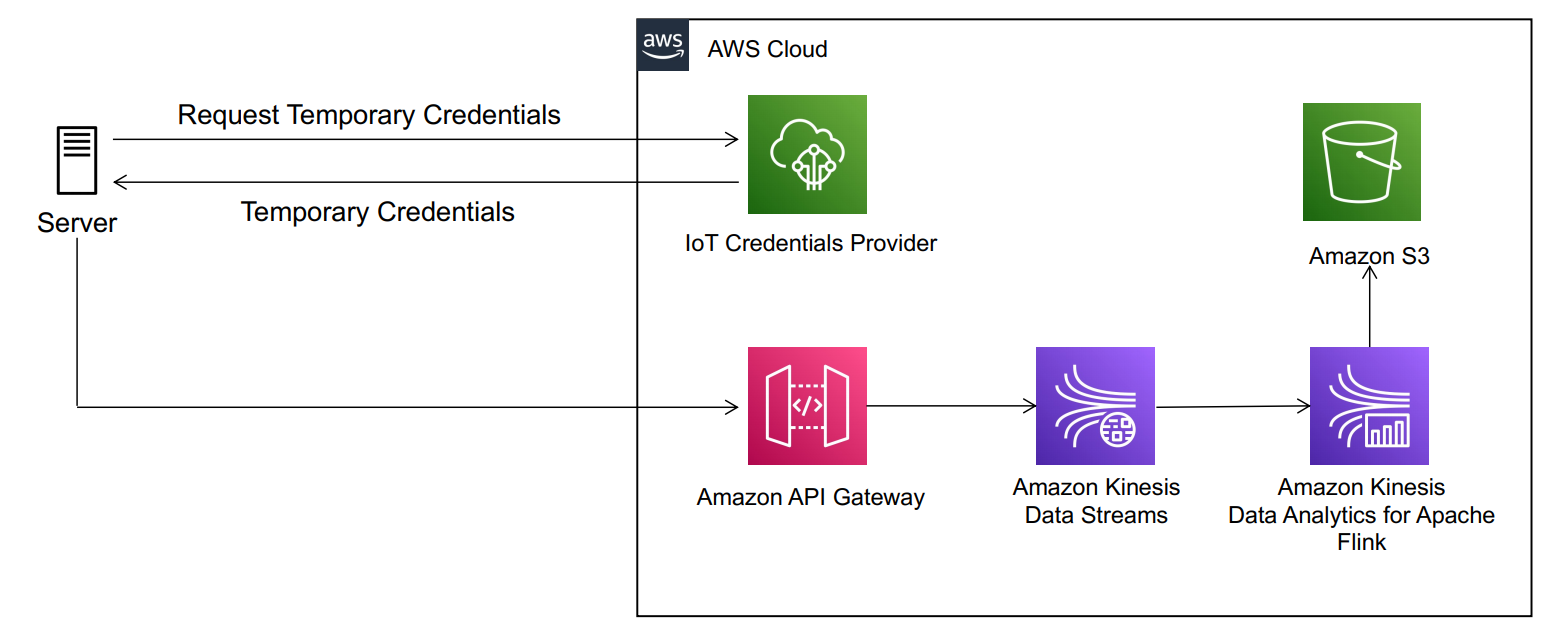
In this architecture, authorized servers from one or multiple third-party companies send messages to an API Gateway endpoint. The endpoint puts messages into the proper partition of a shared Kinesis data stream. Finally, a Kinesis Data Analytics consumer application aggregates, compresses, and writes data into the proper partition of an S3 data lake.
The following sections describe in more detail the multi-tenant architecture considerations and implementation details for this architecture.
Authentication
First, you need to decide on the desired authentication mechanisms. To simplify onboarding new customers and eliminate the need for hardcoded credentials on customers servers, we recommend looking into the credentials provider feature of AWS IoT. Each tenant can use a provisioned x.509 certificate to securely retrieve temporary credentials and authenticate against AWS services using an AWS Identity and Access Management (IAM) role. For more information on how this works, see How to Eliminate the Need for Hardcoded AWS Credentials in Devices by Using the AWS IoT Credentials Provider.
For additional authentication mechanisms directly with API Gateway, see Controlling and managing access to a REST API in API Gateway.
Authorization
After you’re authenticated with IAM, the next step is authorization. Simply put, make sure each tenant can only write to their respective data lake partition. One of the key risks to mitigate in a multi-tenant steaming ingestion workflow is the scenario where a tenant server is compromised and it attempts to impersonate other tenants sending bogus data. To guarantee isolation of data ingest and reduce the blast radius of bad data, you could consider the following options:
- Use a silo model and provision one Kinesis data stream per tenant – Kinesis Data Streams provides access control at the stream level. This approach provides you with complete isolation and the ability to scale your stream capacity up or down on a per-tenant basis. However, there is operational overhead in maintaining multiple streams, and optimizing for cost has limitations. Each data stream is provisioned by increments of one shard or 1 MB/sec of ingestion capacity with up to 1,000 PUT records per second. Pricing is based on shards per hour. One shard could be well beyond your tenant requirements and tenant onboarding costs could scale rapidly.
- Use AWS IoT Core with one topic per tenant using topic filters and an AWS IoT rule to push data into a shared data stream – AWS IoT Core gives access control at the topic level. Each tenant can send data to only their respective topic (for example, tenantID topic) based on their IAM credentials. We can then use an AWS IoT rule to extract the tenantID from the topic and push data into a shared data stream using tenantID as the partition key.
- Use API Gateway as a proxy with mapping templates and a shared data stream – Kinesis Data Streams doesn’t provide access control at the data partition level. However, API Gateway provides access control at the method and path level. With API Gateway as a proxy, you can use mapping templates to programmatically fetch the tenant UUID from the path and set it as the partition key before pushing the data to Kinesis Data Streams.
Optimize for costs
The last two preceding options use a pool model and share a single Kinesis data stream to reduce operational overhead and costs. To optimize costs even further, you need to consider the pricing model of each of these services (API Gateway vs. AWS IoT Core) and three factors in your use case: the average size for each message, the rate at which the data is being ingested, and the data latency requirements.
Consider an example where you have 1,000 tenants (devices) and each produces data at the rate of one request per second with an average payload of 8 KB. AWS IoT Core is priced per million messages and per million rules. Each message is metered at 5 KB increments, so you’re charged for two messages per payload. If you have small payloads and very low latency requirements, AWS IoT Core is likely your best choice. If you can introduce some latency and buffer your messages at each tenant, then API Gateway is your best option because the pricing model for REST APIs requests is on a per-API call basis and not metered by KB. You can use the AWS Pricing Calculator to quickly decide which option offers the best price for your use case.
For example, with API Gateway, you can optimize your cost even further by reducing the number of API requests. Instead of each tenant sending 8 KB of data per second, you can send 240 KB every 30 seconds and reduce costs considerably. We can explore a sample cost calculation for API Gateway considering this scenario: average size of message: 240 KB, REST API request units per month: 2 request per minute x 60 min x 24 hrs. x 30 days = 86,400 requests x 1,000 tenants = 86,400,000.
The following sections walk you through the configuration of API Gateway and Kinesis to prevent cross-data access when you support a multi-tenant streaming ingestion pipeline architecture.
Enable API Gateway as a Kinesis Data Streams proxy
API Gateway is a fully managed service that makes it easy for developers to publish, maintain, monitor, and secure APIs at any scale. You can create an API Gateway endpoint to expose other AWS services, such as Amazon Simple Notification Service (Amazon SNS), Amazon S3, Kinesis, and even AWS Lambda. All AWS services support dedicated APIs to expose their features. However, the application protocols or programming interfaces are likely to differ from service to service. An API Gateway API with the AWS integration has the advantage of providing a consistent application protocol for your client to access different AWS services. In our use case, we use API Gateway as a proxy to Kinesis in order to handle IAM authentication and authorize clients to invoke URL paths with their unique tenant ID. API Gateway has additional features that are beneficial for multi-tenant applications, like rate limiting API calls per tenant, requests and response transformations, logging and monitoring, and more.
When you configure API Gateway with IAM resource-level permissions, you can make sure each tenant can only make requests to a unique URL path. For example, if the tenant invokes the API Gateway URL with their tenant ID in the path (for example, https://api-id.execute-api.us-east-2.amazonaws.com/{tenantId}), IAM validates that the tenant is authorized to invoke this URL only. For more details on how to set up an IAM policy to a specific API Gateway URL path, see Control access for invoking an API.
Then, to ensure no authorized customer can impersonate other tenant by sending bogus data, API Gateway extracts the tenant ID from the URL path programmatically using the API Gateway mapping template feature. API Gateway allows developers to transform payloads before passing it to backend resources using mapping templates written with JSONPath expressions. With this feature, we can extract the tenant ID from the URL and pass it as the partition key of the shared data stream. The following is a sample mapping template:
{
    "StreamName": "$input.params('stream-name')",
    "Data": "$util.base64Encode($input.json('$.Data'))",
    "PartitionKey": "$input.params('partition')"
}
In the preceding code, partition is the parameter name you specify in your API Gateway resource path. The following screenshot shows what the configuration looks like on the API Gateway console.
 After messages in the data stream use the proper partition, the next step is to transform, enrich, and aggregate messages before writing them into an S3 data lake. For this workflow, we use Kinesis Data Analytics for Apache Flink to have full control of the data lake partition configuration. The following section describes the approach to ensure data is written in the proper partition.
Use Kinesis Data Analytics for Apache Flink to process and write data into an S3 data lake
After we guarantee that messages within the data stream have the right tenant ID as the partition key, we can use Kinesis Data Analytics for Apache Flink to continuously process messages in near-real time and store them in Amazon S3. Kinesis Data Analytics for Apache Flink is an easy way to transform and analyze streaming data in real time. Apache Flink is an open-source framework and engine for processing data streams. Kinesis Data Analytics reduces the complexity of building, managing, and integrating Apache Flink applications with other AWS services. Because this solution is also serverless, there are no servers to manage, it scales automatically to match the volume and throughput of your incoming data, and you only pay for the resources your streaming applications consume.
In this scenario, we want to extract the partition key (tenantId) from each Kinesis data stream message, then process all messages within a time window and use the tenant ID as the file prefix of the files we write into the destination S3 bucket. In other words, we write the data into the proper tenant partition. The result writes data in files that look like the following:
s3://mybucket/year=2020/month=1/day=1/tenant=A01/part-0-0
s3://mybucket/year=2020/month=1/day=1/tenant=A02/part-0-1
s3://mybucket/year=2020/month=1/day=1/tenant=A03/part-0-3
To achieve this, we need to implement two custom classes within the Apache Flink application code.
First, we use a custom deserializer class to extract the partition key from the data stream and append it to the body of the message. We can achieve this by overriding the deserialize method of the KinesisDeserializationSchema class:
class CustomKinesisDeserializer implements  KinesisDeserializationSchema<String> {
    private static final Logger log = LogManager.getLogger(CustomKinesisDeserializer.class);
   @Override
    public String deserialize(byte[] bytes, String partitionKey, String seqNum,
                              long approxArrivalTimeStamp, String stream, String shardId) throws IOException {
        log.debug("deserialize - enter");
        String s = new String(bytes);
        JSONObject json = new JSONObject(s);
        json.put("tenantid", partitionKey);
        return json.toString();
    }
    @Override
    public TypeInformation<String> getProducedType() {
        return BasicTypeInfo.STRING_TYPE_INFO;
    }
}
Next, we use a customBucketAssignerclass to use the partition key in the body of the message (in our case, the tenant ID) as the bucket prefix:
private static final BucketAssigner<String, String> assigner = new BucketAssigner<String, String> () {

        @Override
        public String getBucketId(String element, BucketAssigner.Context context) {
            log.debug("getBucketId - enter");
            JSONObject json = new JSONObject(element);
            if (json.has("tenantid")) {
                String tenantId = json.getString("tenantid");
                return "tenantid=" + tenantId;
            }
            return "tenantid=unknown";
        }

        @Override
        public SimpleVersionedSerializer<String> getSerializer() {
            return SimpleVersionedStringSerializer.INSTANCE;
        }
};
The following code is the full sample class for the Kinesis Data Analytics with Apache Flink application. The purpose of the sample code is to illustrate how you can obtain the partition key from the data stream and use it as your bucket prefix via the BucketAssigner class. Your implementation might require additional windowing logic to enrich, aggregate, and transform your data before writing it into an S3 bucket. In this post, we write data into a tenantId partition, but your code might require additional partition fields (such as by date). For additional code examples, see Kinesis Data Analytics for Apache Flink: Examples.
package com.amazonaws.services.kinesisanalytics;

import com.amazonaws.services.kinesisanalytics.runtime.KinesisAnalyticsRuntime;
import org.apache.flink.api.common.serialization.SimpleStringEncoder;
import org.apache.flink.api.common.typeinfo.TypeInformation;
import org.apache.flink.core.fs.Path;
import org.apache.flink.core.io.SimpleVersionedSerializer;
import org.apache.flink.streaming.api.datastream.DataStream;
import org.apache.flink.streaming.api.environment.StreamExecutionEnvironment;
import org.apache.flink.streaming.api.functions.sink.filesystem.BucketAssigner;
import org.apache.flink.streaming.api.functions.sink.filesystem.StreamingFileSink;
import org.apache.flink.streaming.api.functions.sink.filesystem.bucketassigners.SimpleVersionedStringSerializer;
import org.apache.flink.streaming.connectors.kinesis.FlinkKinesisConsumer;
import org.apache.flink.streaming.connectors.kinesis.config.ConsumerConfigConstants;
import org.apache.flink.streaming.connectors.kinesis.serialization.KinesisDeserializationSchema;
import org.apache.logging.log4j.LogManager;
import org.apache.logging.log4j.Logger;
import org.json.JSONObject;

import java.io.IOException;
import java.util.Map;
import java.util.Properties;

public class S3StreamingSinkWithPartitionsJob {

    private static final Logger log = LogManager.getLogger(S3StreamingSinkWithPartitionsJob.class);
    private static String s3SinkPath;
    private static String inputStreamName;
    private static String region;

    /**
     * Custom BucketAssigner to specify the bucket path/prefix with the Kinesis Stream partitionKey.
     *
     * Sample code. Running application with debug mode with this implementation will expose data into log files
     */
    private static final BucketAssigner<String, String> assigner = new BucketAssigner<String, String> () {

        @Override
        public String getBucketId(String element, BucketAssigner.Context context) {
            log.debug("getBucketId - enter");
            JSONObject json = new JSONObject(element);
            if (json.has("tenantid")) {
                String tenantId = json.getString("tenantid");
                return "tenantid=" + tenantId;
            }
            return "tenantid=unknown";
        }

        @Override
        public SimpleVersionedSerializer<String> getSerializer() {
            return SimpleVersionedStringSerializer.INSTANCE;
        }
    };


    private static DataStream<String> createSourceFromStaticConfig(StreamExecutionEnvironment env) throws IOException {
        log.debug("createSourceFromStaticConfig - enter - variables: {region:" + region +
                ", inputStreamName:" + inputStreamName + "}");
        Properties inputProperties = new Properties();
        inputProperties.setProperty(ConsumerConfigConstants.AWS_REGION, region);
        inputProperties.setProperty(ConsumerConfigConstants.STREAM_INITIAL_POSITION, "LATEST");

        /*
         * Implementinga custom serializer class that extends KinesisDeserializationSchema interface
         * to get additional values from partition keys.
         */
        return env.addSource(new FlinkKinesisConsumer<>(inputStreamName,
                new CustomKinesisDeserializer(),
                inputProperties
        ));
    }

    private static StreamingFileSink<String> createS3SinkFromStaticConfig() {
        log.debug("createS3SinkFromStaticConfig - enter - variables: { s3SinkPath:" + s3SinkPath + "}");
        final StreamingFileSink<String> sink = StreamingFileSink
                .forRowFormat(new Path(s3SinkPath), new SimpleStringEncoder<String>("UTF-8"))
                .withBucketAssigner(assigner)
                .build();
        return sink;
    }

    public static void main(String[] args) throws Exception {

        Map<String, Properties> applicationProperties = KinesisAnalyticsRuntime.getApplicationProperties();
        Properties consumerProperties = applicationProperties.get("ConsumerConfigProperties");
        region = consumerProperties.getProperty("Region","us-west-2");
        inputStreamName = consumerProperties.getProperty("InputStreamName");
        s3SinkPath = "s3a://" + consumerProperties.getProperty("S3SinkPath") + "/data";

        final StreamExecutionEnvironment env = StreamExecutionEnvironment.getExecutionEnvironment();
        DataStream<String> input = createSourceFromStaticConfig(env);
        input.addSink(createS3SinkFromStaticConfig());
        env.execute("Flink S3 Streaming with Partitions Sink Job");
    }

}

/**
 * Custom deserializer to pass partitionKey from KDS into the record value. The partition key can be used
 * by the bucket assigner to leverage it as the s3 path/prefix/partition.
 *
 * Sample code. Running application with debug mode with this implementation will expose data into log files
 */

class CustomKinesisDeserializer implements  KinesisDeserializationSchema<String> {

    private static final Logger log = LogManager.getLogger(CustomKinesisDeserializer.class);

    @Override
    public String deserialize(byte[] bytes, String partitionKey, String seqNum,
                              long approxArrivalTimeStamp, String stream, String shardId) throws IOException {
        log.debug("deserialize - enter");
        String s = new String(bytes);
        JSONObject json = new JSONObject(s);
        json.put("tenantid", partitionKey);
        return json.toString();
    }

    @Override
    public TypeInformation<String> getProducedType() {
        return TypeInformation.of(String.class);
    }

}
To test and build this multi-tenant stream ingestion pipeline, you can deploy an AWS CloudFormation template in your AWS environment. The following section provides step-by-step instructions on how to deploy and test the sample template.
Deploy a sample multi-tenant streaming ingestion pipeline
AWS CloudFormation simplifies provisioning and managing infrastructure and services on AWS via JSON or .yaml templates. Follow these instructions to deploy and test the sample workflow described in this post. The instructions assume a basic understanding of AWS Cloud concepts, the AWS Management Console, and working with REST APIs.
- Create a destination S3 bucket.
- Deploy the CloudFormation template.
The template has only been tested in the us-west-2 Region, and creates IAM roles and users with limited access scope. This template doesn’t register CA certificates or implement the AWS IoT credentials provider feature for authentication. To test the pipeline, the template creates an IAM user for authentication with API Gateway. If you want to test the AWS IoT credentials provider feature with this implementation, follow the instructions in How to Eliminate the Need for Hardcoded AWS Credentials in Devices by Using the AWS IoT Credentials Provider.
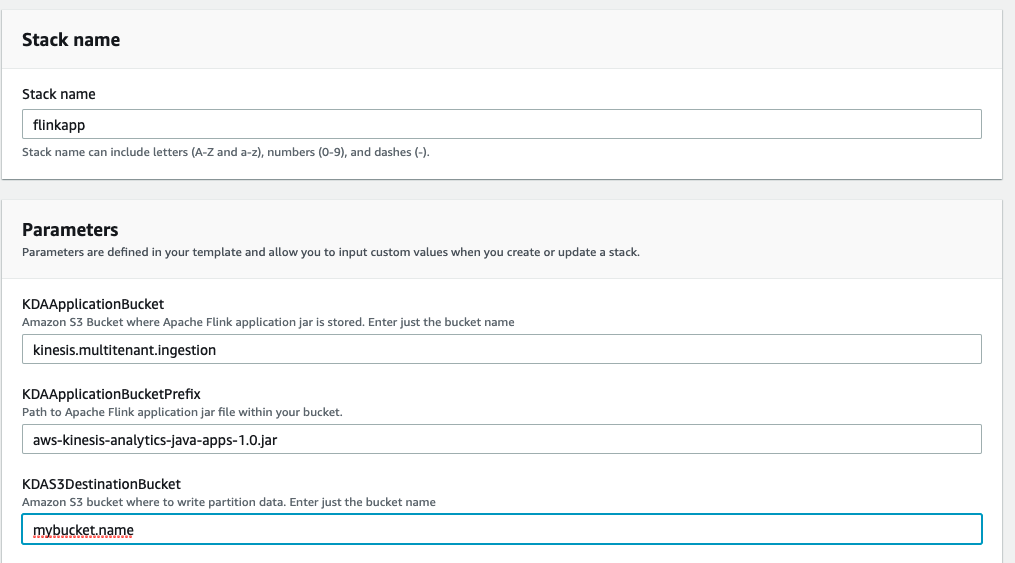
- For Stack name¸ enter a name (for example, flinkapp).
- For KDAS3DestinationBucket, enter the name of the S3 bucket you created.
- Leave the other parameters as default.
- Accept all other options, including acknowledging the template will create IAM principals on your behalf.
- Wait until the stack shows the status CREATE_COMPLETE.

Now you can start your Kinesis Data Analytics for Apache Flink application.
- On the Kinesis Data Analytics console, choose Analytics applications.
- Select the application that starts with
KinesisAnalyticsFI_*.
- Choose Run.

- Choose Run without snapshot.
- Wait for the application to show the status
Running.
Now you can test sending messages to your API Gateway endpoint. Remember requests should be authenticated. The CloudFormation template created an IAM test user for this purpose. We recommend using a development API tool for this step. For this post, we use Postman.
- On the AWS CloudFormation console, navigate to the Outputs tab of your stack.
- Note the API Gateway endpoint (
InvokeURL) and the name of the IAM test user.

- Create and retrieve the access key and secret key of your test user. For instructions, see Programmatic access.
AWS recommends using temporary keys when authenticating requests to AWS services. For testing purposes, we use a long-lived access key from this limited scope test user.
- Use your API development tool to build a POST request to your API Gateway endpoint using your IAM test user secrets.
The following screenshot shows the Authorization tab of the request using Postman.

The following screenshot shows the Body tab of the request using Postman.

- For the body of the request, you can use the following payload:
{
    Data: {
        "key1": "value1",
        "key2": "value2",
        "key3": "value3"
    }
}
You should get a response from the data stream that looks as follows:
{
 "EncryptionType": "KMS",
 "SequenceNumber": "49619151594519161991565402527623825830782609999622307842",
 "ShardId": "shardId-000000000000"
}
- Try to make a request to a different tenant by changing the path from
/prod/T001 to /prod/T002.
Because the user isn’t authorized to send data to this endpoint, you get the following error message:
{
    "Message": "User: arn:aws:iam::*******4205:user/flinkapp-MultiTenantStreamTestUser-EWUSMWR0T5I5 is not authorized to perform: execute-api:Invoke on resource: arn:aws:execute-api:us-west-2:********4205:fktw02penb/prod/POST/T002"
}
- Browse to your destination S3 bucket.
You should be able to see a new file within your T001 tenant’s folder or partition.

- Download and open your file (
part-*-*).
The content should look like the following data (in this scenario, we made six requests to the tenant’s API Gateway endpoint):
{"key1":"value1","key2":"value2","key3":"value3","tenantid":"T001"}
{"key1":"value1","key2":"value2","key3":"value3","tenantid":"T001"}
{"key1":"value1","key2":"value2","key3":"value3","tenantid":"T001"}
{"key1":"value1","key2":"value2","key3":"value3","tenantid":"T001"}
{"key1":"value1","key2":"value2","key3":"value3","tenantid":"T001"}
{"key1":"value1","key2":"value2","key3":"value3","tenantid":"T001"}
Clean up
After you finalize your testing, delete the CloudFormation stack and any data written into your destination S3 bucket to prevent incurring unnecessary charges.
Conclusion
Sharing resources in multi-tenant architectures allows organizations to optimize for costs while providing controls for proper tenant isolation and security. In this post, we showed you how to use API Gateway as a proxy to authorize tenants to a specific partition in your shared Kinesis data stream and prevent cross-tenant data access when performing data ingestion from semi-trusted servers. We also showed you how buffering data and sharing a single data stream with multiple tenants reduces operational overhead and optimizes for costs by taking advantage of better resource utilization. Check out the Kinesis Data Streams and Kinesis Data Analytics quick starts to evaluate them for your multi-tenant ingestion use case.
About the Authors
 Abhinav Krishna Vadlapatla is a Solutions Architect with Amazon Web Services. He supports startups and small businesses with their cloud adoption to build scalable and secure solutions using AWS. In his free time, he likes to cook and travel.
 Pablo Redondo Sanchez is a Senior Solutions Architect at Amazon Web Services. He is a data enthusiast and works with customers to help them achieve better insights and faster outcomes from their data analytics workflows. In his spare time, Pablo enjoys woodworking and spending time outdoor with his family in Northern California.