
Introduction
Last year I began really looking into Flutter development as AWS released the beta version of the AWS Amplify Flutter client libraries. These Amplify Flutter libraries are now GA
and I have started building out applications that show the offline sync functionality of AWS Amplify's DataStore category.
So as I built out various UI's that used DataStore, I quickly ran into the old problem of how to handle state and emit/consume events as states changed. This is where I came across the BLoC pattern and its simplified sibling the Cubit. So I thought I would write a quick post about it as I loved its simplicity and elegance in wrapping the AWS Amplify DataStore calls.
In this post I will walk you through an example of the BLoC pattern, how you can use it to improve your use of AWS Amplify Datastore API calls, to be a lot cleaner and so easier to maintain.
Abstract Data Access
For those who do not know about Amplify DataStore, it provides a programming model for leveraging shared and distributed data without writing additional code for offline and online scenarios, which makes working with distributed, cross-user data just as simple as working with local-only data. If we boil this down, it simply means that working with a single set of DataStore API calls means that data will not only be persisted locally, but also synced with a connected cloud back end.
The Datastore API calls, like any traditional data persistence mechanism are best wrapped in a repository pattern - I have been wrapping these calls in a repository so that I can abstract them away from the application logic and make them testable.
Understanding BloC
First lets have a quick overview of state and in particular the use of the BLoC pattern in Flutter. The pattern itself is very much in the reactive style, and stands for Business Logic Components. The gist of BLoC is that everything in the app should be represented as stream of events: widgets submit events; other widgets will respond. BLoC sits in the middle, managing the conversation. An added benefit is that Dart comes with syntax for working with streams that is baked into the language. Lets see how a typical program would flow using the Bloc and Repository patterns with the UI Layer

As you can seem, data flows from the UI layer, via the BLoC layer into the repository. The example shows the repository wrapping a Amplify.DataStore.save() call.
Understanding the Cubit
As explained the BLoC uses a stream of events and in its natural form isn't that easy to then wire into UI widgets. To listen and take action on events generated by widgets in Flutter we can use the Cubit, a simplified way of implementing BLoC in your application. The main difference between BloC and Cubit is that Cubit is suitable for simple state management where you just have one kind of event to bind to the state. While Bloc is for complex state management where you can have many events to map to states. This is what I have been using when interacting with the my repository that wraps Amplify DataStore calls. I often find keeping things simple is the way forward.
Putting together a simple example
So to demonstrate this I will walk you through the steps required to implement a simple 'update' action using Cubit. The first thing we need to do is install the dependencies we need in pubspec.yml
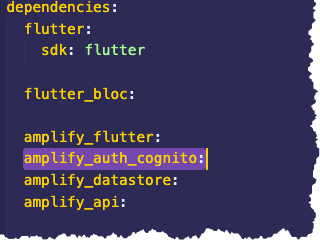
Here we can see the dependencies I need to run AWS Amplify along with the Flutter BLoC libraries. Once they are pulled down, next we create our repository class to wrap our DataStore API calls.
import 'package:amplify_flutter/amplify.dart';
import 'package:flutter_droidcon/models/ShoppingListItem.dart';

class ShoppingListItemRepository {
  Future<List<ShoppingListItem>> getListItems() async {
    List<ShoppingListItem> items = new List.empty();
    try {
      items = await Amplify.DataStore.query(ShoppingListItem.classType);
    } catch (e) {
      print("Could not query DataStore: ");
    }
    return items;
  }

  Future<void> createListItems(String itemName) async {
    final item = ShoppingListItem(itemName: itemName, isComplete: false);
    try {
      await Amplify.DataStore.save(item);
    } catch (e) {
      throw e;
    }
  }

  Future<void> updateListItem(ShoppingListItem item, bool isComplete) async {
    final updatedItem = item.copyWith(isComplete: isComplete);
    try {
      await Amplify.DataStore.save(updatedItem);
    } catch (e) {
      throw e;
    }
  }

  Stream observeTodos() {
    return Amplify.DataStore.observe(ShoppingListItem.classType);
  }
}
This code has a number of data operations get/create/update that take the passed in args that are then used to construct the Amplify DataStore API calls.
The next stage is to create the Cubit that wraps these calls. The Cubit for the above repository class looks like this:
class ShoppingListItemCubit extends Cubit<ShoppingListState> {
  final _shoppingListRepo = ShoppingListItemRepository();

  ShoppingListItemCubit() : super(LoadingShoppingList());

  void getListItems() async {
    if (state is ShoppingListSuccess == false) {
      emit(LoadingShoppingList());
    }

    try {
      final items = await _shoppingListRepo.getListItems();
      emit(ShoppingListSuccess(listItems: items));
    } catch (e) {}
  }

  void createListItems(String itemName) async {
    await _shoppingListRepo.createListItems(itemName);
  }

  void updateListItem(ShoppingListItem item, bool isComplete) async {
    await _shoppingListRepo.updateListItem(item, isComplete);
  }

  void observeItems() {
    final itemStream = _shoppingListRepo.observeTodos();
    itemStream.listen((_) => getListItems());
  }
}
Notice that inside some of the methods in this class we can also emit() state changes. Finally, lets see how to use the Cubit defined above. Using the updateListItem action as an example, what does that look like inside a UI widget.
Widget _shoppingItemListView(List<ShoppingListItem> items) {
    return ListView.builder(
      itemCount: items.length,
      itemBuilder: (context, index) {
        final item = items[index];
        return Card(
          child: CheckboxListTile(
              title: Text(item.itemName),
              value: item.isComplete,
              onChanged: (newValue) {
                BlocProvider.of<ShoppingListItemCubit>(context)
                    .updateListItem(item, newValue!);
              }),
        );
      },
    );
  }
As you can see implementation of the pattern inside the widgets onChanged property is trivial and we simply look up the Type of object we want the BlocProvider for, the send the value down to the BloC class's method - which in turn delegates to the repository. Very simple but extremely effective.
Summing up
As you can see, building with Flutter and Amplify lends itself really well to baking in best practice application architecture into your solution. In this article I showed you how to use Repository and BLoC patterns and how well they can facade the Amplify DataStore API calls. This then makes it very easy to build out a data persistence mechanism for your application that will function in online and offline modes with little code.
This was a very short example, if you want to see a more involved examples using multiple repositories and cubits - see My Github Repo. I have also written a Series of Amplify and Flutter posts detailing how to build out an application.
As always, please help me with future articles by providing feedback.
Until next time...


Top comments (0)