
My team at AWS has been releasing a ton of new features that make AWS Amplify better than ever. Here are ten things released in the past year that I'm personally excited about, and that will speed up your development workflows!
1. Next.js Support
Next.js is the latest and greatest in JavaScript frameworks. It allows for both static site generation and server-side rendering, which makes your sites more performant leading to a better experience for your customers. Amplify has added support for Next.js -- you can deploy server-side rendered and incremental static regenerated apps to Amplify Hosting, add in Amplify backend resources, and then you can use the Amplify JavaScript libraries to server-side render your data.
Within a getServerSideProps, for example, you can use the withSSRContext function to allow your Amplify JavaScript code to run on the server instead of the browser.
export async function getServerSideProps () {
  const SSR = withSSRContext()
  const { data } = await SSR.API.graphql({ query: listParks })
  return {
    props: {
      parks: data.listParks.items
    }
  }
}
Then, all you need to do to deploy is:
Create an AWS account if you don't already have one.
Navigate to the Amplify Console
Click on the orange
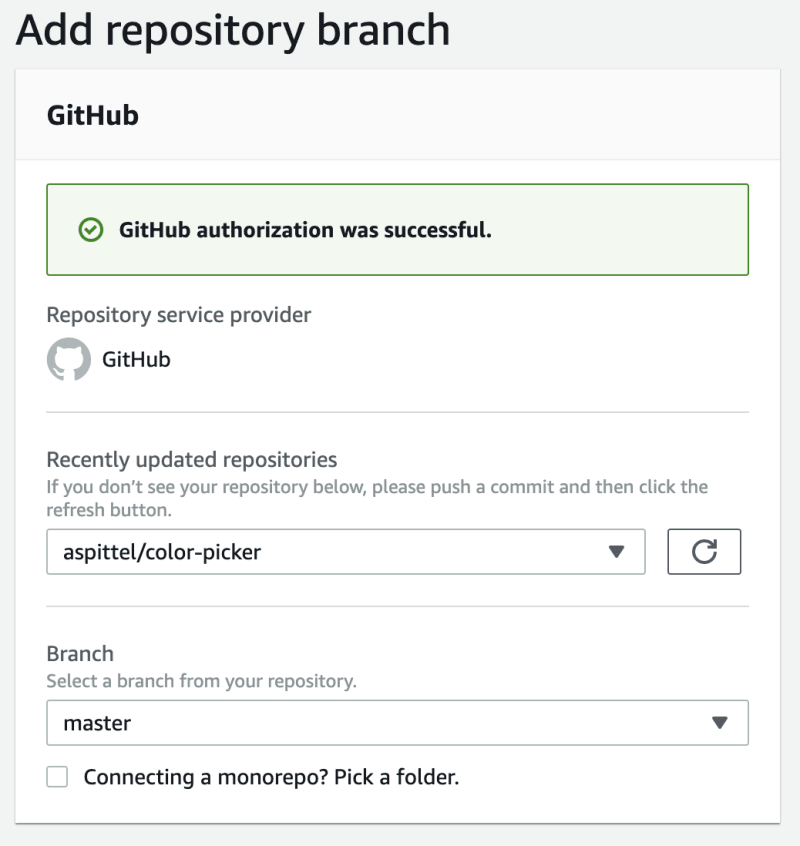
connect appbutton.Choose
GitHubin theFrom your existing codemenu, and click continue
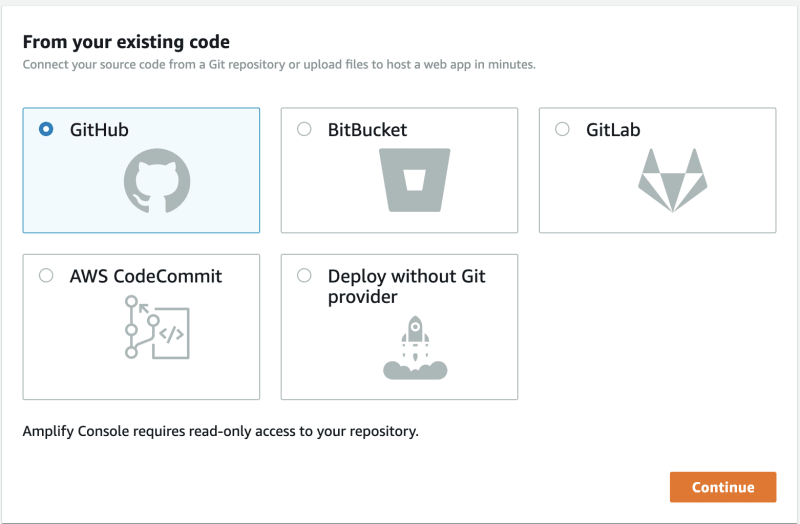
- Type in the name of your GitHub repo you just created (it should autofill!) and then click
next
The build settings will auto-populate, and so you can just click
nexton theConfigure build settingsClick
Save and deploy.
No custom settings are needed -- it will create a AWS Lambda@Edge function behind the scenes for you to do the server-side rendering.
If you want to read a full tutorial on how to implement this in your app, check this out!
2. Sign in with Apple
A lot of developers need to integrate "Sign in with Apple" to their apps so that users can use their pre-created Apple accounts instead of creating one from scratch. You can use the Amplify Admin UI or command line interface to enable Sign in With Apple and tie it to your Apple Developer Account, and then you can use Amplify's libraries to implement the frontend authentication flow!

Check out this tutorial to learn more.
3. Amplify Geo developer preview
Did you know that you can create maps with Amplify? Right now Amplify Geo is in developer preview mode -- you can create a map, then add markers and location based search to it.
To create a map, first create an HTML element to attach it to.
<div id="map"></div>
Then, you can use the helper functions to create a map with a few lines of code!
import { createMap } from "maplibre-gl-js-amplify"
import "maplibre-gl/dist/maplibre-gl.css"

async function initializeMap() {
    const map = await createMap({
        container: "map",
        center: [-200, 50],
        zoom: 11,
    })
}

initializeMap()
You can read more about how to implement Amplify Geo in the docs.
4. DataStore Multi-auth
AWS Amplify DataStore allows you to create online and offline available data with no extra code on your end. This is super helpful for many offline data patterns and mobile apps.
It also has support for adding different authorization rules so that different users can be allowed or restricted from performing certain actions. For example, you may want admins to be able to delete data, a regular user to be able to create data, and then unauthenticated users to read data. As of a few months ago, DataStore supports multiple types of authorization like that example!
Using the Admin UI, you can add different authorization rules for different types of users:

If you're interested in a full tutorial on how to integrate this into your app, check out this tutorial.
5. Environmental Variables and Secrets
You can create AWS Lambda Functions using Amplify, either within a REST API or outside of it. Now, you can add environmental variables and secrets to your functions -- I used this to create a function that would create a user account every time they bought an item from my site with Stripe.
To do this, first create a function:
➜  next10-blog git:(main) ✗ amplify add function
? Select which capability you want to add: Lambda function (serverless function)
? Provide an AWS Lambda function name: next10bloge53fc67d
? Choose the runtime that you want to use: NodeJS
? Choose the function template that you want to use: Hello World
Then, under advanced configuration, you can add environmental variables and secrets!
? Do you want to configure environment variables for this function? Yes
? Enter the environment variable name: github_user
? Enter the environment variable value: aspittel
? Select what you want to do with environment variables: Im done
? Do you want to configure secret values this function can access? Yes
? Enter a secret name (this is the key used to look up the secret value): github_key
? Enter the value for github_key: [hidden]
? What do you want to do? Im done
Then you can use them in your function! For example:
  const { Parameters } = await (new aws.SSM())
    .getParameters({
      Names: ['github_key'].map(secretName => process.env[secretName]),
      WithDecryption: true
    })
    .promise()
  return Parameters[0].Value
6. Admin UI Data Explorer
As a software engineer, I can't tell you how many times I've had to create a secondary admin app for the company use to manage data. The Amplify Admin UI solves this problem by auto-generating one for you! You can manage application data using its data explorer. You can perform all the CRUD operations on the data, and even manage your app's users!

Here's a full tutorial on using the Admin UI.
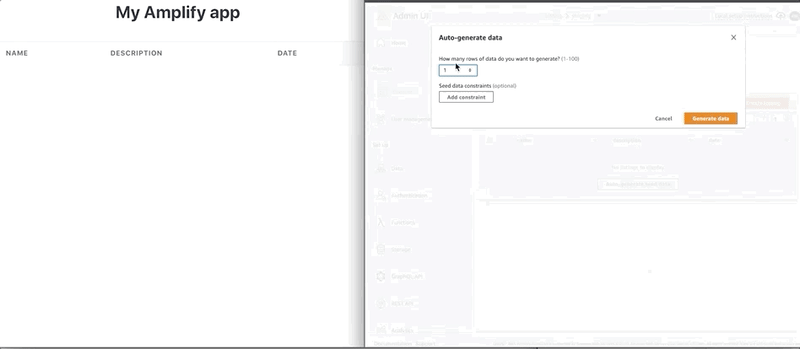
7. Data Seeding
To keep going with the awesome Admin UI features, you can also automatically generate seed data for your apps. Often, you'll need test data when you're developing your app to make sure it's working as promised. You can autogenerate this data with the Admin UI! You can choose how many rows to generate, and then it will use your fields data types to generate the data!
8. DataStore selective sync and sort
DataStore allows your data to be available online and offline. In the browser it stores your data in IndexedDB by default. That being said, sometimes each user doesn't need access to all data, or only some of the application's data needs to be available offline. You can set up selective sync to only sync some of the data locally.
If you wanted to only store data that is associated with a certain user ID, you could configure DataStore like so:
DataStore.configure({
  syncExpressions: [syncExpression(Song, u => u.userID('eq', '123'))]
})
In addition, there's support for sorting data! So, if you wanted to list all of your users alphabetically, you could write a query like so:
const posts = await DataStore.query(User, Predicates.ALL, {
  sort: s => s.username(SortDirection.ASCENDING)
})
Here's DataStore's full documentation.
9. Amplify Flutter
I'll be the first to admit that I'm a true web developer and really have no mobile knowledge. That being said, I'm really excited about Amplify releasing support for Flutter. Flutter allows for cross-platform development, and it seems to be picking up steam in the community.
Here's a tutorial on how to get started with Amplify and Flutter!
10. Amplify containers
So Amplify already has great support for serverless functions and GraphQL APIs, but sometimes you need to migrate an existing app over to Amplify. Also, sometimes you need to have long-running tasks, which don't integrate well into Lambda Functions. Or you want to write a full Django or Rails app which uses a bunch of other libraries which may not integrate well into a Lambda Function. Well, good news! Amplify supports AWS Fargate Containers! You can deploy anything that runs in a Docker Container within Amplify.
First, you'll need to allow Amplify to create container-based APIs by running amplify configure project and then:
? Which setting do you want to configure? Advanced:
> Container-based deployments
? Do you want to enable container-based deployments?
> Yes
Then you can create an API!
amplify add api

? Please select from one of the below mentioned services:
> REST
? Which service would you like to use
> API Gateway + AWS Fargate (Container-based)
? Provide a friendly name for your resource to be used as a label for this category in the project:
> containerb5734e35
? What image would you like to use
> ExpressJS - REST template
? When do you want to build & deploy the Fargate task
> On every "amplify push" (Fully managed container source)
? Do you want to restrict API access
> No
Then, you can go into your amplify/backend/api/<your-api-name>/src/index.js file, and add in your app code! For example with a Express app, you could write something like this:
const express = require("express");
const bodyParser = require('body-parser');
const port = process.env.PORT || 3001;

const app = express();
app.use(bodyParser.json());
app.use(bodyParser.urlencoded({ extended: true }));

// Enable CORS for all methods
app.use(function (req, res, next) {
  res.header("Access-Control-Allow-Origin", "*")
  res.header("Access-Control-Allow-Headers", "Origin, X-Requested-With,Content-Type, Accept")
  next()
})

app.get("/", async (req, res, next) => {
  try {
    res.contentType("application/json").send({
      "hello": "world"
    })
  } catch (err) {
    next(err)
  }
})

app.listen(port, () => {
  console.log('Example app listening at http://localhost:' + port)
})
Then, you can run amplify push to deploy! You can configure your own Dockerfile and bring your own backend!
Conclusion
Thanks for checking out these features! If you have any feedback on them, I'd love to hear. Stay tuned for more coming soon 😃.


Top comments (9)
Hey @aspittel ! Seriously, thanks for this. Popped up in my twitter feed and I've been using Amplify for a personal project. I've been trying to run a WS Client in the cloud to ingest some data from a third-party API and the reminder about the containers is a godsend!
Hope you're doing well! See you in Tweets.
What about fixing the mighty broken CI? there's a lot to fix before adding new features IMO.
Hey Adi, sorry to hear your running into issues! Can you give any details into the problems you're facing?
Preview builds on Amplify simply don't work as a whole. When it fails to initialise a new environment, it doesn't rollback successfully and ultimately stays a in broken state where you actually have to manually delete the partially created stack from CloudFormation. I started numerous issues in various Amplify repositories, but no solutions yet. While we like this service, it's currently broken in some areas, creating a lot of maintenance overhead. See: github.com/issues?q=is%3Aopen+is%3....
This strikes me as one of your best, informative posts.
Hey Ali, Thanks for writing a wonderful article. I'm experimenting with AWS amplify. I hope the team will like it.
Thanks for sharing Ali.
Could we also expect Container Support for Lambda?
Some comments may only be visible to logged-in visitors. Sign in to view all comments.